fuse PORSCHE 911 GT3 2010 5.G User Guide
[x] Cancel search | Manufacturer: PORSCHE, Model Year: 2010, Model line: 911 GT3, Model: PORSCHE 911 GT3 2010 5.GPages: 251, PDF Size: 14.33 MB
Page 163 of 251
162
Maintenance, Car Care
Brake Fluid LevelfPlease see the chapter “EXERCISE EXTREME
CAUTION WHEN WORKING ON YOUR VEHICLE”
on Page 157.
fUse only new (unused) Original Porsche
brake fluid.
Warning!
Brake fluid is hazardous to your health, and
may cause death if swallowed.
Brake fluid also attacks paintwork.
fKeep brake fluid out of children’s reach.
fTake care while topping off brake fluid not to
soil the luggage compartment or items of luggage.
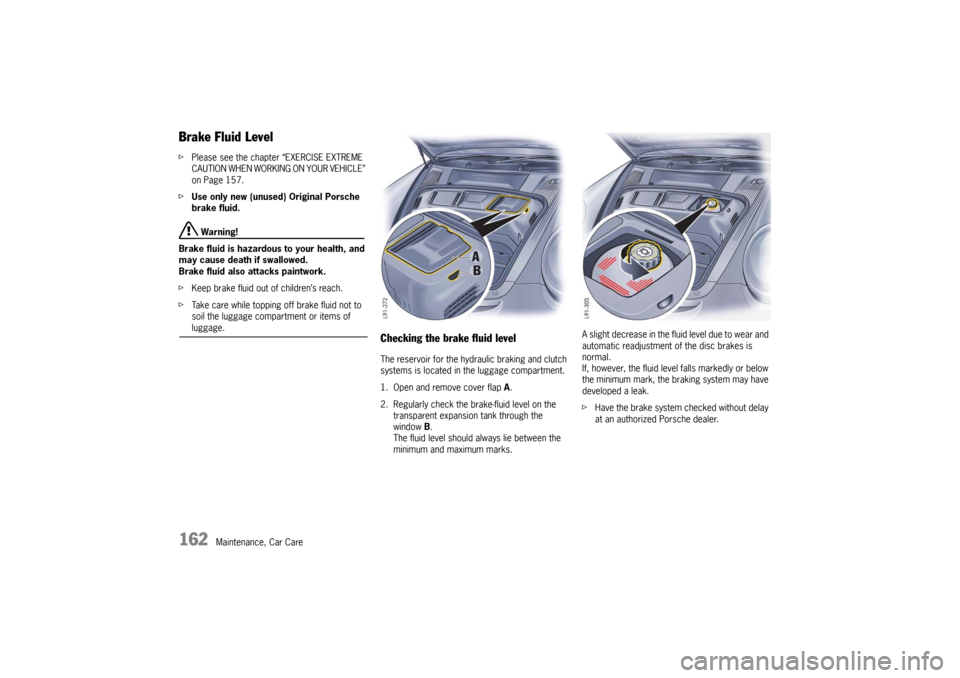
Checking the brake fluid levelThe reservoir for the hydraulic braking and clutch
systems is located in the luggage compartment.
1. Open and remove cover flap A.
2. Regularly check the brake-fluid level on the
transparent expansion tank through the
window B.
The fluid level should always lie between the
minimum and maximum marks.A slight decrease in the fluid level due to wear and
automatic readjustment of the disc brakes is
normal.
If, however, the fluid level falls markedly or below
the minimum mark, the braking system may have
developed a leak.
fHave the brake system checked without delay
at an authorized Porsche dealer.
10_GT3_21.book Seite 162 Donnerstag, 4. Juni 2009 12:48 12
Page 180 of 251

Maintenance, Car Care
179
The Porsche Light Alloy Wheel Cleaner
(ph-value 9.5) can be used for this
purpose.
If the ph-value of the detergent is incor-
rect, the protective coating on the wheels
will be destroyed.
Polishes which dissolve oxides, such as those
frequently used for other metals, or abrasive
tools or agents are unsuitable because they
break down the oxide film of the protective
coating and will cause discoloration of the
wheel.
fEvery three months, after cleaning, coat the
wheels with a car wax or non-corrosive grease
(vaseline).
Using a clean cloth thoroughly rub the grease
into the surface.
Door, roof, lid and window seals fWash dirt (e.g. abrasion, dust, road salts) from
all seals regularly using warm soapy water. Do
not use any chemical cleaning agents or
solvents.
When there is a frost hazard, the outer door seals
and the front and rear lid seals can be protected
against freezing into place by a suitable care
product.
In order to prevent damage to the anti-
friction coating, the inner door seals must
not be treated with care products.
Headlights, lights, interior and exterior
plastic parts, adhesive filmsfUse only clean water and a little dishwashing
detergent to clean light lenses, plastic
headlight lenses, plastic parts and surfaces.
Do not clean when dry.
Use a soft sponge or a soft, lint-free cloth.
Gently wipe the surface without applying too
much pressure.
The Porsche inside window cleaner is also
suitable for cleaning plastic surfaces.
Follow the cleaning instructions on the
container.
Never use other chemical cleaners or
solvents.
fRinse cleaned surfaces with clear water.Leather Characteristics and special features
The natural surface markings of leather, e.g.
creases, healed scars, insect sting marks, struc-
tural differences and slight variations in shade and
grain add to the attractiveness of the natural
leather product.
A special mention must be made here of natural
leather.
For natural leather, carefully selected hides of the
highest quality are used. It is not covered comple-
tely with dye on production.
“Nature’s signature” is therefore easily recogniz-
able.This fine material is distinguished by an outstan-
ding seating comfort, special suppleness and a
typical patina.
Leather care and treatment
fClean all types of leather regularly to remove
fine dust using a soft, damp, white woollen
cloth or a commercially available microfiber
cloth.
fRemove heavy contamination with Porsche
leather cleaner.
Please always follow the instructions for use
given on the containers.
Caustic cleaners and hard cleaning objects
must not be used.
Perforated leather must under no circum-
stances get wet on its reverse side.
Once cleaned, leather (particularly the heavily
stressed leather seats) must be treated only with
Porsche leather care liquid.
10_GT3_21.book Seite 179 Donnerstag, 4. Juni 2009 12:48 12
Page 181 of 251

180
Maintenance, Car Care
Cleaning airbags covers
Danger!
Risk of danger of serious personal injury or
death if the airbag system is impaired by
improper cleaning work.
fDo not make any modifications whatsoever on
individual components such as the padded
covers of the steering wheel, passenger side
instrument panel, the front seats and the door
linings.
fLet your authorized Porsche dealer clean these components.
Fabric, upholstery, carpets and
floor-mats fUse only a vacuum cleaner or a medium stiff
brush.
fRemove stains and spots with Porsche stain
remover.
The Porsche range of accessories includes
nonskid floor-mats to protect the carpets in
summer and winter.
Warning!
Risk of an accident resulting in serious
personal injury or death.
fAlways check the movement of the pedals
before driving and make sure that they are not
obstructed by a floor-mat or any other object.
fSecure the floor-mat to prevent it from sliding
into positions that could interfere with the safe
operation of your vehicle - do not install them
loosely in the vehicle.
Your Porsche dealer will be glad to offer you nonskid floor-mats of the correct size.
Alcantara fDo not use a leather care product to clean
Alcantara.
For regular care it is sufficient to clean the cover
with a soft brush.
Heavy abrasion or rubbing when cleaning causes
a lasting change in the surface.
Cleaning when lightly soiled
fWet a soft cloth with water or a neutral soap
solution and wipe off the dirt.
Cleaning when heavily soiled
fWet a soft cloth with lukewarm water or
thinned white spirit and dab the dirt from the
outside in. Safety belts If it becomes necessary to clean the belts, you
can use any mild washing agent.
Allow the belts to dry prior to retracting, but avoid
direct sunlight.
fOnly use suitable cleaners.
If unsuitable cleaners are used or any attempt
is made to dye or bleach the belts, the
webbing may be weakened and thus constitute
a safety risk.
10_GT3_21.book Seite 180 Donnerstag, 4. Juni 2009 12:48 12
Page 186 of 251

Practical Tips, Emergency Service
185
Treadwear
The treadwear grade is a comparative rating
based on the wear rate of the tire when tested
under controlled conditions on a specific govern-
ment test course.
For example, a tire graded 150 would wear one
and a half (1-1/2) times as well on the government
course as a tire graded 100.
The relative performance of tires depends upon
the actual conditions of their use, however, and
may depart significantly from the norm due to var-
iations in driving habits, service practices and dif-
ferences in road characteristics and climate.
Traction AA, A, B, C
The traction grades, from highest to lowest, are
AA, A, B, and C and they represent the tire’s ability
to stop on wet pavement as measured under
controlled conditions on specified government
test surfaces of asphalt and concrete.
A tire marked C may have poor traction perfor-
mance.
Warning!
The traction grade assigned to this is based on
braking (straight-ahead) traction tests and does
not include cornering (turned) traction, accelera-
tion, hydroplaning or peak traction characteris-
tics. Temperature A, B, C
The temperature grades are A (the highest), B and
C, representing the tire’s resistance to the genera-
tion of heat and its ability to dissipate heat when
tested under controlled conditions on a specified
indoor laboratory test wheel.
Sustained high temperatures can cause the
material of the tire to degenerate and reduce tire
life, and excessive temperature can lead to
sudden tire failure.
The grade C corresponds to a level of perfor-
mance which all passenger car tires must meet
under the Federal Motor Vehicle Safety Standard
No. 109.
Grades B and A represent higher levels of perfor-
mance on the laboratory test wheel than the
minimum required by law.
Warning!
The temperature grade for this tire is established
for a tire that is properly inflated and not
overloaded.
Excessive speed, underinflation, or excessive
loading, either separately or in combination, can
cause heat buildup and possible tire failure, resul-
ting in serious personal injury or death.
Tire pressures
Warning!
Incorrect tire pressure causes increased tire
wear and adversely affects road handling.
This could lead to tire failure, resulting in loss
of control, leading to serious personal injury
or death.
fAlways use an accurate tire pressure gauge
when checking inflation pressures.
fDo not exceed the maximum tire pressure
listed on the tire sidewall.
Please see the chapter “TIRE PRESSURE
PLATE” on Page 235.
fCold tire inflation pressure means: all tires
must be cold, ambient temperature maximum
(68 °F/20 °C)
, when adjusting the inflation
pressure.
Avoid sunlight striking the tires before measu-
ring cold pressures, since the pressures would
rise from temperature influence.
fValve caps protect the valve from dust and dirt,
and thus from leakage.
Always screw caps tightly down.
Replace missing caps immediately.
fUse only plastic valve caps.
fDo not use commercially available sealant or
tire inflating bottles. Only use Porsche approved tire sealant.
10_GT3_21.book Seite 185 Donnerstag, 4. Juni 2009 12:48 12
Page 190 of 251

Practical Tips, Emergency Service
189
Danger!
Risk of serious personal injury or death.
Driving the vehicle with low tire pressure
increases risk of a tire failure and resulting
loss of control. Furthermore, low tire
pressure increases rate of wear of the
affected tires.
fCheck tires – including sidewalls – regularly for
foreign bodies, nicks, cuts, cracks and bulges.
fAfter driving off road, examine tires for signs
of damage such as cuts, tears, bulges or
foreign objects stuck in the tread. Replace a
damaged tire if necessary.
fCross curb edges slowly and at right angles if
possible.
Avoid driving over steep or sharp curbs.
fIn cases of doubt, have the wheel (particularly
the inner side) checked by an authorized Porsche dealer.
Tire replacements If in doubt, contact your authorized Porsche
dealer.
Use only tire makes and types approved by
Porsche.
If you do not use a Porsche recommended
replacement tire, make sure that you
purchase your new tires from a reputable tire
dealer and that the dealer complies with all
manufacturers warnings for those tires.
Only tires with the same make and with the
same specification code (e.g. “N0”, “N1”...)
can be mounted.
Before mounting new tires, check with your
Porsche dealer about the current release
status.
Use tires with “ZR” quality standards. There
are currently no standards concerning tire
strength at speeds above 150 mph (240 km/h).
Tires should be replaced no less than on one axle
at the time.
Only tires of the same make and type must be
used. Mixed tires are not permissible.
Initially, new tires do not have their full traction.
You should therefore drive at moderate speeds
during the first 60 - 120 miles (100 - 200 km). If new tires are installed only on one axle, a notice-
able change in handling occurs due to the different
tread depth of the other tires.
This happens especially if only rear tires are
replaced. However, this condition disappears as
the new tires are broken in.
fPlease adjust your driving style accordingly.
Installation of new tires should only be done by a
qualified tire technician.
Valves
Please observe the installation and replacement
instructions for valves.
fUse only genuine Porsche metal valves.
fProtect the valve inserts against soiling with
valve caps.
Soiled valve inserts can cause a gradual loss
of air.
fUse only plastic valve caps.
10_GT3_21.book Seite 189 Donnerstag, 4. Juni 2009 12:48 12
Page 205 of 251
204
Practical Tips, Emergency Service
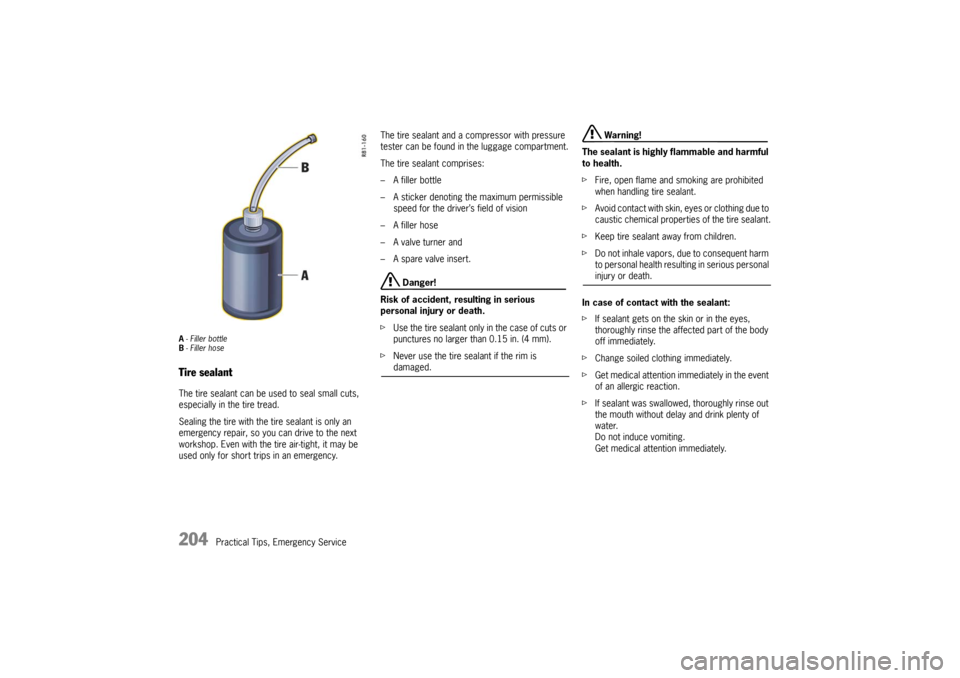
A- Filler bottle
B- Filler hoseTire sealantThe tire sealant can be used to seal small cuts,
especially in the tire tread.
Sealing the tire with the tire sealant is only an
emergency repair, so you can drive to the next
workshop. Even with the tire air-tight, it may be
used only for short trips in an emergency.The tire sealant and a compressor with pressure
tester can be found in the luggage compartment.
The tire sealant comprises:
– A filler bottle
– A sticker denoting the maximum permissible
speed for the driver’s field of vision
– A filler hose
– A valve turner and
– A spare valve insert.
Danger!
Risk of accident, resulting in serious
personal injury or death.
fUse the tire sealant only in the case of cuts or
punctures no larger than 0.15 in. (4 mm).
fNever use the tire sealant if the rim is damaged.
Warning!
The sealant is highly flammable and harmful
to health.
fFire, open flame and smoking are prohibited
when handling tire sealant.
fAvoid contact with skin, eyes or clothing due to
caustic chemical properties of the tire sealant.
fKeep tire sealant away from children.
fDo not inhale vapors, due to consequent harm
to personal health resulting in serious personal injury or death.
In case of contact with the sealant:
fIf sealant gets on the skin or in the eyes,
thoroughly rinse the affected part of the body
off immediately.
fChange soiled clothing immediately.
fGet medical attention immediately in the event
of an allergic reaction.
fIf sealant was swallowed, thoroughly rinse out
the mouth without delay and drink plenty of
water.
Do not induce vomiting.
Get medical attention immediately.
10_GT3_21.book Seite 204 Donnerstag, 4. Juni 2009 12:48 12
Page 208 of 251
Practical Tips, Emergency Service
207
Electrical System In order to avoid damage and faults in electrical or
electronic systems, electrical accessories should
be installed at your authorized Porsche dealer.
fOnly use accessories authorized by Porsche.
Warning!
Risk of short circuit and fire, resulting in
serious personal injury or death.
Replacing fuses or relays with the engine
running or the ignition on could cause
electrical shock.
fDisconnect the negative terminal on the
battery during all work on the electrical
system.
Please see the chapter “BATTERY” on Page 211.
RelaysDefective relays should be changed only by an
authorized workshop.
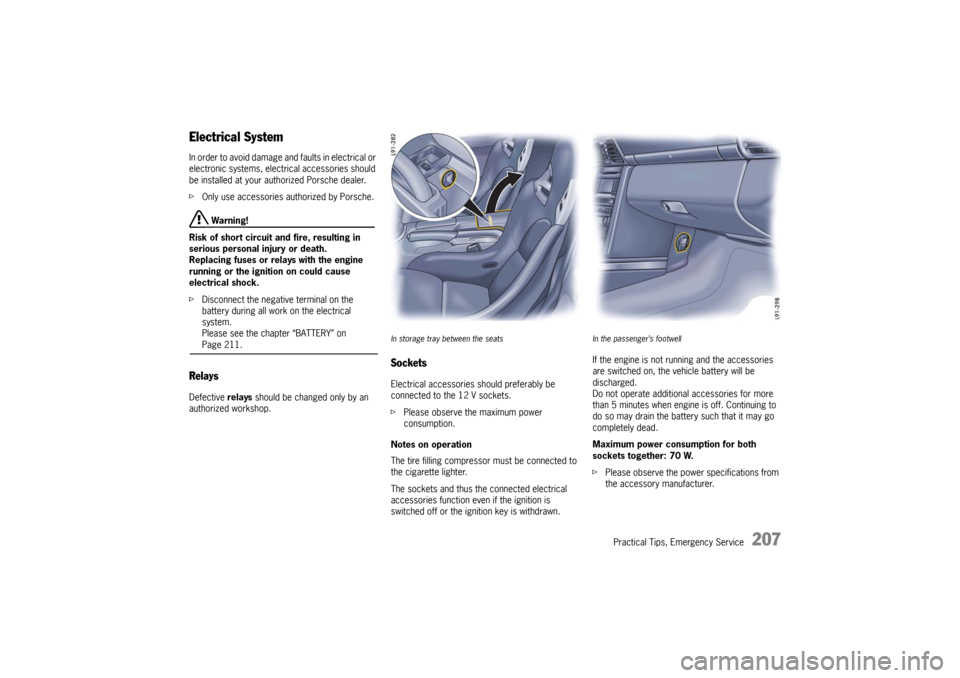
In storage tray between the seatsSocketsElectrical accessories should preferably be
connected to the 12 V sockets.
fPlease observe the maximum power
consumption.
Notes on operation
The tire filling compressor must be connected to
the cigarette lighter.
The sockets and thus the connected electrical
accessories function even if the ignition is
switched off or the ignition key is withdrawn.
In the passenger’s footwellIf the engine is not running and the accessories
are switched on, the vehicle battery will be
discharged.
Do not operate additional accessories for more
than 5 minutes when engine is off. Continuing to
do so may drain the battery such that it may go
completely dead.
Maximum power consumption for both
sockets together: 70 W.
fPlease observe the power specifications from
the accessory manufacturer.
10_GT3_21.book Seite 207 Donnerstag, 4. Juni 2009 12:48 12
Page 210 of 251
Practical Tips, Emergency Service
209
Replacing fuses In order to prevent damage to the electrical
system due to short circuits and overloads, the
individual circuits are protected by fuses.
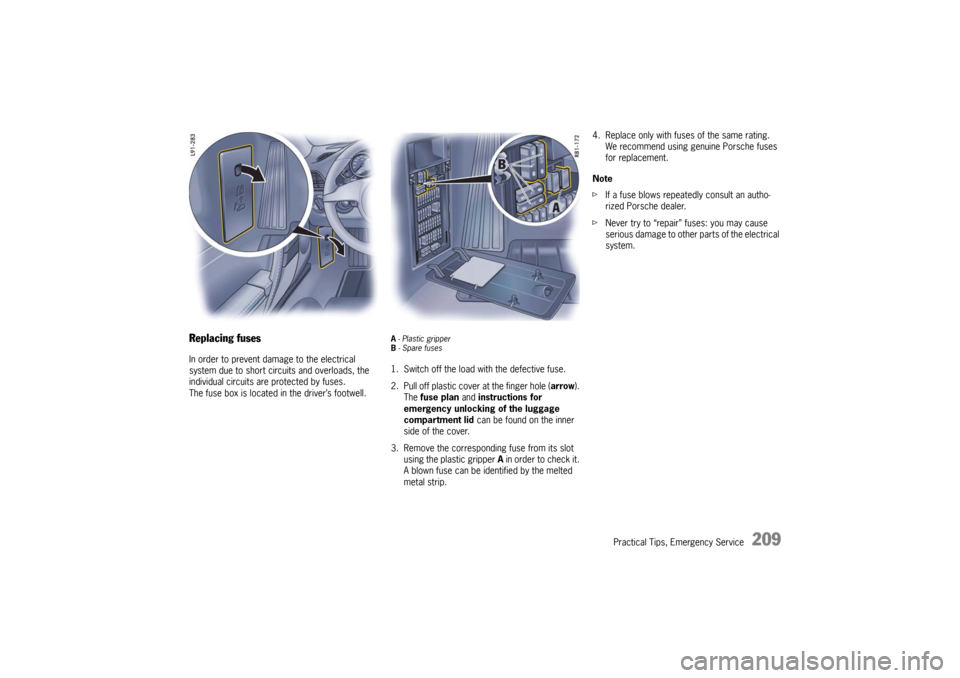
The fuse box is located in the driver’s footwell.
A - Plastic gripper
B - Spare fuses 1. Switch off the load with the defective fuse.
2. Pull off plastic cover at the finger hole (arrow).
The fuse plan and instructions for
emergency unlocking of the luggage
compartment lid can be found on the inner
side of the cover.
3. Remove the corresponding fuse from its slot
using the plastic gripper A in order to check it.
A blown fuse can be identified by the melted
metal strip.4. Replace only with fuses of the same rating.
We recommend using genuine Porsche fuses
for replacement.
Note
fIf a fuse blows repeatedly consult an autho-
rized Porsche dealer.
fNever try to “repair” fuses: you may cause
serious damage to other parts of the electrical
system.
10_GT3_21.book Seite 209 Donnerstag, 4. Juni 2009 12:48 12
Page 211 of 251
210
Practical Tips, Emergency Service
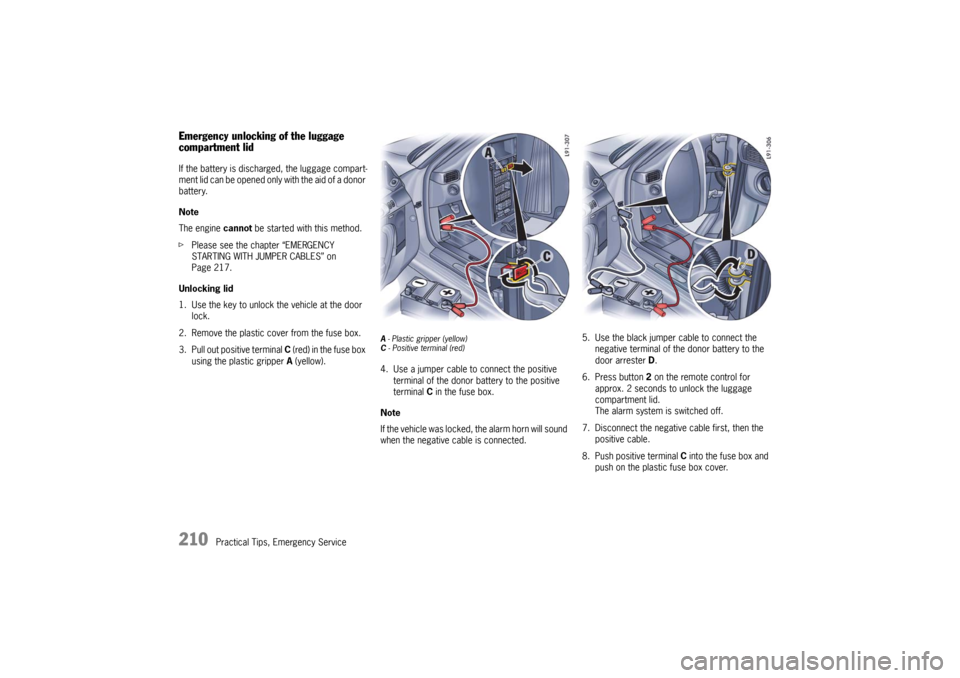
Emergency unlocking of the luggage
compartment lidIf the battery is discharged, the luggage compart-
ment lid can be opened only with the aid of a donor
battery.
Note
The engine cannot be started with this method.
fPlease see the chapter “EMERGENCY
STARTING WITH JUMPER CABLES” on
Page 217.
Unlocking lid
1. Use the key to unlock the vehicle at the door
lock.
2. Remove the plastic cover from the fuse box.
3. Pull out positive terminal C (red) in the fuse box
using the plastic gripper A (yellow).
A - Plastic gripper (yellow)
C - Positive terminal (red)4. Use a jumper cable to connect the positive
terminal of the donor battery to the positive
terminal C in the fuse box.
Note
If the vehicle was locked, the alarm horn will sound
when the negative cable is connected.5. Use the black jumper cable to connect the
negative terminal of the donor battery to the
door arrester D.
6. Press button 2 on the remote control for
approx. 2 seconds to unlock the luggage
compartment lid.
The alarm system is switched off.
7. Disconnect the negative cable first, then the
positive cable.
8. Push positive terminal C into the fuse box and
push on the plastic fuse box cover.
10_GT3_21.book Seite 210 Donnerstag, 4. Juni 2009 12:48 12
Page 218 of 251

Practical Tips, Emergency Service
217
Emergency Starting with Jumper
Cables If the battery is discharged, e.g. in winter or after
the car has been parked for a long time, the
battery of another car can be used for starting
with the help of jumper cables.
Make sure the voltage of both batteries is the
same. Both batteries must be 12 volt types.
The capacity (Ampere hours, Ah) of the booster
battery must not be substantially less than that of
the discharged battery.
The discharged battery must be correctly
connected to the vehicle’s electrical system.
fPlease see the chapter “BATTERY” on
Page 211.
fPlease see the chapter “EMERGENCY
UNLOCKING OF THE LUGGAGE COMPART-
MENT LID” on Page 210.
Note
fDo not try to start the car by pushing or
towing. Damage to the catalytic converters
and other components of the car may result.
Warning!
Risk of short circuit, damage and explosion,
resulting in serious personal injury or death.
fUse only jumper cables of adequate diameter
cross-section and fitted with completely
insulated alligator clips.
fFollow all warnings and instructions of the
jumper cable manufacturer.
fWhen connecting jumper cables, make sure
that they cannot get caught in any moving
parts in the engine compartment.
The jumper cables must be long enough so
that neither vehicles nor cables touch another.
fThe vehicles must not be in contact, otherwise
current might flow as soon as the positive
terminals are connected.
fThe cable clamps must not be allowed to
contact each other when one end of the
jumper cables are connected to a battery.
fEnsure that tools or conductive jewelery (rings,
chains, watch straps) do not come into contact
with the positive jumper cable or the positive
battery post.
fImproper hook-up of jumper cables can ruin
the alternator. Danger of caustic burns.
fDo not lean over the battery.
Danger of gas explosion.
fImproper use of booster battery to start a
vehicle may cause an explosion, resulting in
serious personal injury or death.
fKeep sources of ignition away from the
battery, e.g. open flame, burning cigarettes or
sparking due to cable contact or welding work.
fA discharged battery can freeze even at 23 °F/
–5 °C.
Before connecting jumper cables, a frozen
battery must be thawed out.
10_GT3_21.book Seite 217 Donnerstag, 4. Juni 2009 12:48 12