ECU PORSCHE 911 TURBO 2014 6.G User Guide
[x] Cancel search | Manufacturer: PORSCHE, Model Year: 2014, Model line: 911 TURBO, Model: PORSCHE 911 TURBO 2014 6.GPages: 300, PDF Size: 10.61 MB
Page 68 of 300
66 Windows, Sunroof and Cabriolet
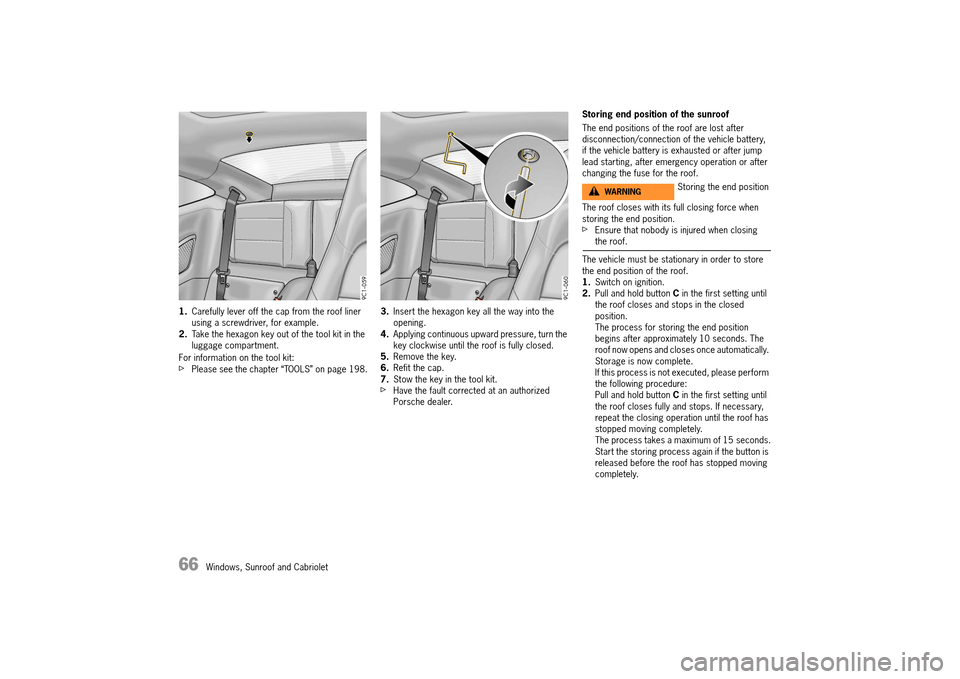
1.Carefully lever off the cap from the roof liner using a screwdriver, for example.2. Take the hexagon key out of the tool kit in the luggage compartment.
For information on the tool kit:fPlease see the chapter “TOOLS” on page 198.
3. Insert the hexagon key all the way into the opening.4. Applying continuous upward pressure, turn the key clockwise until the roof is fully closed.5. Remove the key. 6. Refit the cap. 7. Stow the key in the tool kit.fHave the fault corrected at an authorized Porsche dealer.
Storing end position of the sunroof
The end positions of the roof are lost after disconnection/connection of the vehicle battery, if the vehicle battery is exhausted or after jump lead starting, after emergency operation or after changing the fuse for the roof.
The roof closes with its full closing force when storing the end position.fEnsure that nobody is injured when closing the roof.
The vehicle must be stationary in order to store the end position of the roof.1. Switch on ignition. 2. Pull and hold button C in the first setting until the roof closes and stops in the closed position.The process for storing the end position begins after approximately 10 seconds. The roof now opens and closes once automatically. Storage is now complete.If this process is not executed, please perform the following procedure:Pull and hold button C in the first setting until the roof closes fully and stops. If necessary, repeat the closing operation until the roof has stopped moving completely.The process takes a maximum of 15 seconds.Start the storing process again if the button is released before the roof has stopped moving completely.
Storing the end positionWARNINGh
14_991_Turbo_21.book Seite 66 Mittwoch, 9. April 2014 2:19 14
Page 69 of 300
Windows, Sunroof and Cabriolet 67
Storing end position of the roll-up sunblind
The end positions of the sunblind are lost after disconnecting/connecting the vehicle battery,
if the vehicle battery is exhausted or after jump lead starting, after emergency operation or after changing the fuse for the sunblind.
The sunblind closes with its full closing force when storing the end position.fEnsure that nobody is injured when closing the sunblind.
To store the end position for the sunblind, the vehicle must be stationary and the end position for the roof must already be stored.1. Switch on ignition. 2. Press and hold button A in the first setting until the sunblind closes and stops in the closed position.The process for storing the end position begins after approximately 10 seconds. The sunblind now opens and closes once automatically. Storage is now complete.If this process is not executed, please perform the following procedure:Press and hold button A in the first setting until the sunblind closes fully and stops. If necessary, repeat the closing operation until the sunblind has stopped moving completely.The process takes a maximum of 15 seconds.Start the storing process again if the button is released before the sunblind has stopped moving completely.
Cleaning the air deflector
Cleaning the air deflector with the roof open.
1. Switch on the ignition and open the roof fully with button B. If the air deflector is not fully extended, drive the vehicle for a short distance with the roof open until it is fully extended.2. Clean the air deflector and net using a damp sponge.
Convertible Top
Brief operating instructions can be found on the back of the driver’s sun visor.fPlease see the chapter “CAR CARE INSTRUCTIONS” on page 231.
Risk of damage to convertible top and convertible- top mechanism.fDo not operate convertible top:– At temperatures below 20 °F (0 °C).– When one side of the vehicle is on a curb, a lifting platform or a jack.– When items of luggage or other objects hinder the movement of the convertible top.– With the roll-over bars extended.fAvoid frequent operation of the convertible top with the engine off; the vehicle battery will rapidly discharge.fOnly drive with the convertible top fully open or closed (end positions).fBefore opening the convertible top, ensure that there are no objects in the area behind the rear seats.fWhen opening or closing the convertible top, ensure that there is sufficient clearance above it (e.g. in the garage).fTo prevent damp stains and abrasion damage, open the convertible top only when it is in a dry, clean state.fPark the vehicle in the shade if possible, since continuous exposure to the sun attacks textiles, rubber and colors.fThe convertible top may only be operated when driving on a level surface.fThe convertible top must not be operated in a strong head wind (above approx. 50 mph (80 km/h)).
Storing the end positionWARNINGh
NOTICE
14_991_Turbo_21.book Seite 67 Mittwoch, 9. April 2014 2:19 14
Page 88 of 300
86 Lights, Turn Signals and Windshield Wipers
Windshield Wiper/Washer Stalk
In rain sensor operation, the windshield wipers wipe automatically if moisture is detected on the windshield.fAlways switch off windshield wipers before cleaning the windshield to avoid unintentional operation (rain sensor operation).
Risk of damage to the luggage compartment lid, windshield, rear window and wiper system.fOnly wipe the windshield when sufficiently wet, otherwise it could become scratched.fLoosen frozen wiper blades before starting to drive.fDo not operate a frozen headlight washer system. fAlways switch off windshield wipers in car washes to prevent them wiping unintentionally (rain sensor operation).fDo not operate headlight washer system in car washes.fAlways switch off windshield wipers before cleaning the windshield to avoid unintentional operation (rain sensor operation).fAlways hold the wiper arm securely when replacing the wiper blade.fAlways switch off windshield wipers before opening the luggage compartment lid (wiper switch in position 0).fWhen replacing wiper blades, observe different lengths of the wiper blades.
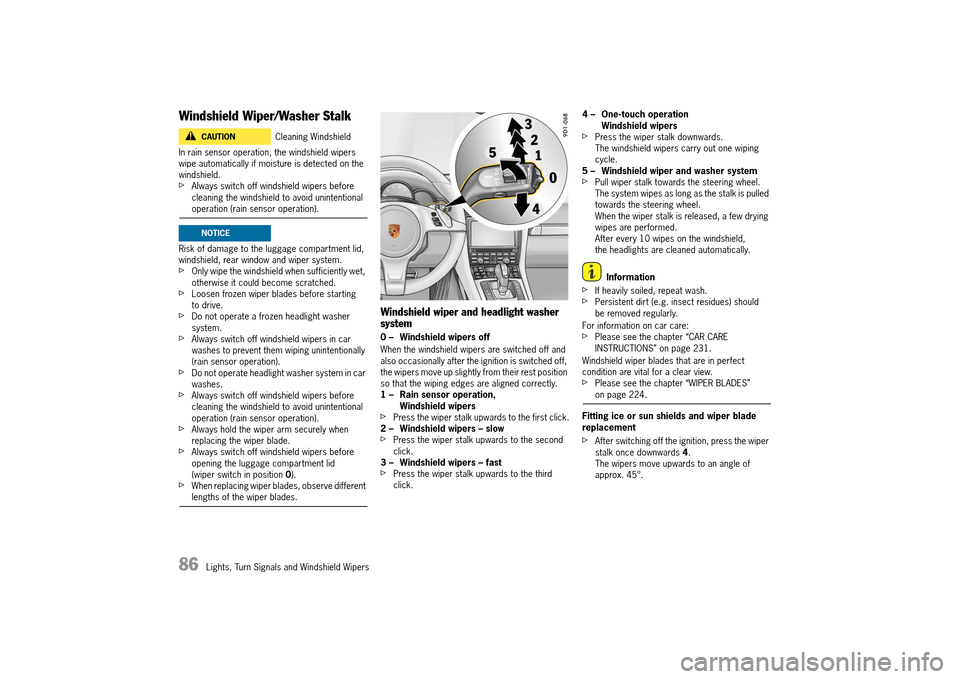
Windshield wiper and headlight washer system
0 – Windshield wipers off
When the windshield wipers are switched off and also occasionally after the ignition is switched off, the wipers move up slightly from their rest position so that the wiping edges are aligned correctly.1 – Rain sensor operation, Windshield wipersfPress the wiper stalk upwards to the first click.2 – Windshield wipers – slowfPress the wiper stalk upwards to the second click.3 – Windshield wipers – fastfPress the wiper stalk upwards to the third click.
4 – One-touch operation Windshield wipersfPress the wiper stalk downwards.The windshield wipers carry out one wiping cycle.5 – Windshield wiper and washer systemfPull wiper stalk towards the steering wheel.The system wipes as long as the stalk is pulled towards the steering wheel.When the wiper stalk is released, a few drying wipes are performed.After every 10 wipes on the windshield, the headlights are cleaned automatically.
Information
fIf heavily soiled, repeat wash. fPersistent dirt (e.g. insect residues) should be removed regularly.
For information on car care:fPlease see the chapter “CAR CARE INSTRUCTIONS” on page 231.
Windshield wiper blades that are in perfect condition are vital for a clear view.fPlease see the chapter “WIPER BLADES” on page 224.
Fitting ice or sun shields and wiper blade replacement
fAfter switching off the ignition, press the wiper stalk once downwards 4. The wipers move upwards to an angle of approx. 45°.
Cleaning WindshieldCAUTIONh
NOTICE
14_991_Turbo_21.book Seite 86 Mittwoch, 9. April 2014 2:19 14
Page 107 of 300
Instrument Panel and Multi-Function Display 105
Trip Menu
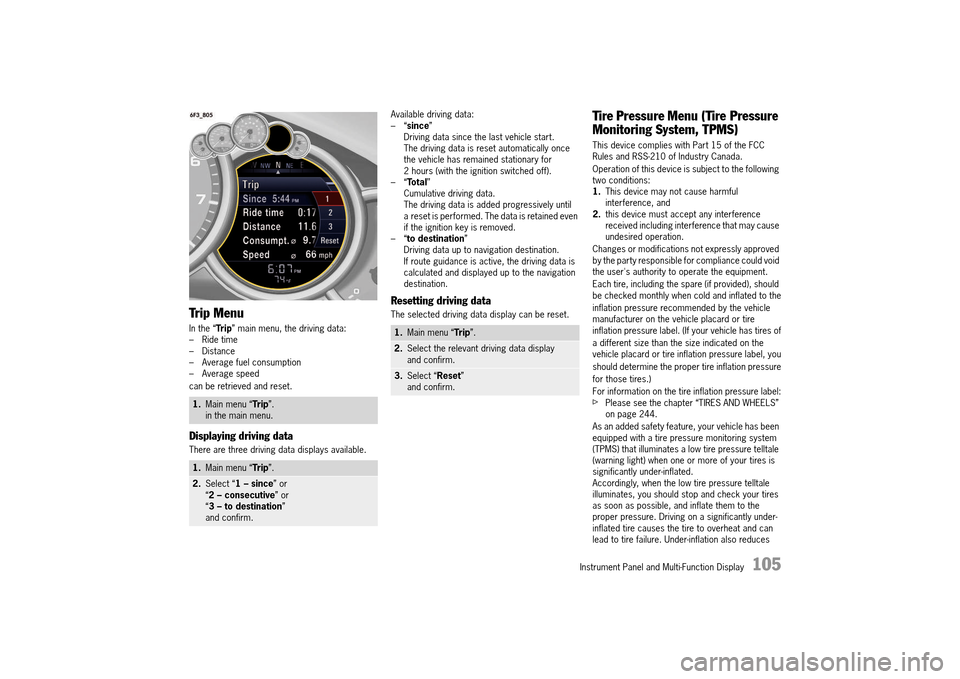
In the “Trip” main menu, the driving data: – Ride time– Distance– Average fuel consumption– Average speed
can be retrieved and reset.
Displaying driving data
There are three driving data displays available.
Available driving data: –“ since” Driving data since the last vehicle start.The driving data is reset automatically once the vehicle has remained stationary for 2 hours (with the ignition switched off).–“ Total” Cumulative driving data.The driving data is added progressively until a reset is performed. The data is retained even if the ignition key is removed.–“ to destination” Driving data up to navigation destination.If route guidance is active, the driving data is calculated and displayed up to the navigation destination.
Resetting driving data
The selected driving data display can be reset.
Tire Pressure Menu (Tire Pressure
Monitoring System, TPMS)
This device complies with Part 15 of the FCC Rules and RSS-210 of Industry Canada.
Operation of this device is subject to the following two conditions:1. This device may not cause harmful interference, and2. this device must accept any interference received including interference that may cause undesired operation.
Changes or modifications not expressly approved by the party responsible for compliance could void the user's authority to operate the equipment.
Each tire, including the spare (if provided), should be checked monthly when cold and inflated to the
inflation pressure recommended by the vehicle manufacturer on the vehicle placard or tire inflation pressure label. (If your vehicle has tires of
a different size than the size indicated on the vehicle placard or tire inflation pressure label, you
should determine the proper tire inflation pressure
for those tires.)
For information on the tire inflation pressure label:fPlease see the chapter “TIRES AND WHEELS” on page 244.
As an added safety feature, your vehicle has been equipped with a tire pressure monitoring system (TPMS) that illuminates a low tire pressure telltale (warning light) when one or more of your tires is significantly under-inflated.Accordingly, when the low tire pressure telltale illuminates, you should stop and check your tires as soon as possible, and inflate them to the proper pressure. Driving on a significantly under-inflated tire causes the tire to overheat and can lead to tire failure. Under-inflation also reduces
1. Main menu “Trip”. in the main menu.
1. Main menu “Trip”.
2.Select “1 – since” or “ 2 – consecutive” or “ 3 – to destination” and confirm.
1. Main menu “Trip”.
2.Select the relevant driving data display and confirm.
3. Select “Reset” and confirm.
14_991_Turbo_21.book Seite 105 Mittwoch, 9. April 2014 2:19 14
Page 133 of 300
Instrument Panel and Multi-Function Display 131
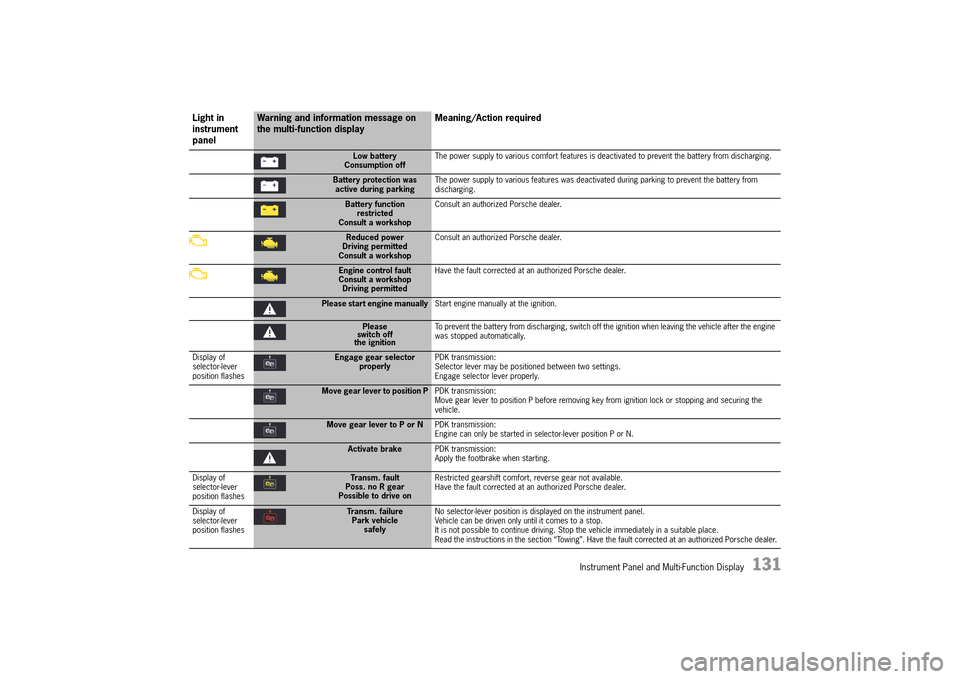
Low battery Consumption off The power supply to various comfort features is deactivated to prevent the battery from discharging.
Battery protection was active during parking The power supply to various features was deactivated during parking to prevent the battery from discharging.
Battery function restrictedConsult a workshop
Consult an authorized Porsche dealer.
Reduced power Driving permittedConsult a workshop
Consult an authorized Porsche dealer.
Engine control fault Consult a workshopDriving permitted
Have the fault corrected at an authorized Porsche dealer.
Please start engine manually Start engine manually at the ignition.
Please switch offthe ignition
To prevent the battery from discharging, switch off the ignition when leaving the vehicle after the engine was stopped automatically.
Display of selector-lever position flashes
Engage gear selector properly PDK transmission: Selector lever may be positioned between two settings. Engage selector lever properly.
Move gear lever to position P PDK transmission: Move gear lever to position P before removing key from ignition lock or stopping and securing the vehicle.
Move gear lever to P or N PDK transmission: Engine can only be started in selector-lever position P or N.
Activate brake PDK transmission: Apply the footbrake when starting.
Display of selector-lever position flashes
Transm. fault Poss. no R gearPossible to drive on
Restricted gearshift comfort, reverse gear not available. Have the fault corrected at an authorized Porsche dealer.
Display of selector-lever position flashes
Transm. failure Park vehiclesafely
No selector-lever position is displayed on the instrument panel. Vehicle can be driven only until it comes to a stop.It is not possible to continue driving. Stop the vehicle immediately in a suitable place. Read the instructions in the section “Towing”. Have the fault corrected at an authorized Porsche dealer.
Light in instrument panel
Warning and information message on the multi-function display Meaning/Action required
14_991_Turbo_21.book Seite 131 Mittwoch, 9. April 2014 2:19 14
Page 136 of 300
134 Instrument Panel and Multi-Function Display
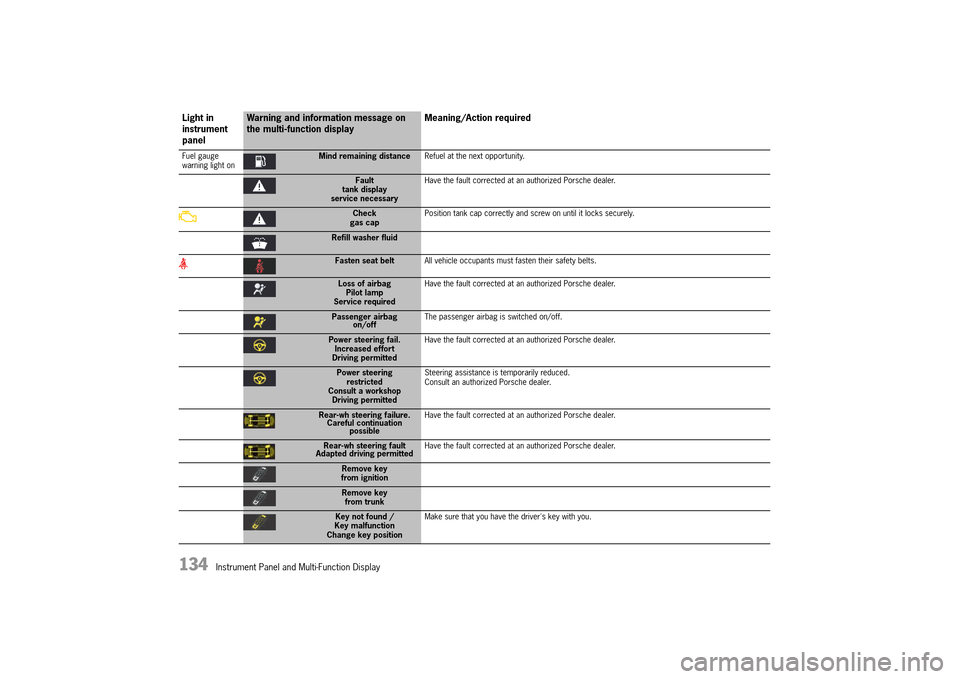
Fuel gauge warning light onMind remaining distance Refuel at the next opportunity.
Fault tank displayservice necessary
Have the fault corrected at an authorized Porsche dealer.
Check gas cap Position tank cap correctly and screw on until it locks securely.
Refill washer fluid
Fasten seat belt All vehicle occupants must fasten their safety belts.
Loss of airbag Pilot lampService required
Have the fault corrected at an authorized Porsche dealer.
Passenger airbag on/off The passenger airbag is switched on/off.
Power steering fail. Increased effortDriving permitted
Have the fault corrected at an authorized Porsche dealer.
Power steering restrictedConsult a workshopDriving permitted
Steering assistance is temporarily reduced. Consult an authorized Porsche dealer.
Rear-wh steering failure. Careful continuation possible
Have the fault corrected at an authorized Porsche dealer.
Rear-wh steering fault Adapted driving permitted Have the fault corrected at an authorized Porsche dealer.
Remove key from ignition
Remove keyfrom trunk
Key not found / Key malfunction Change key position
Make sure that you have the driver's key with you.
Light in instrument panel
Warning and information message on the multi-function display Meaning/Action required
14_991_Turbo_21.book Seite 134 Mittwoch, 9. April 2014 2:19 14
Page 152 of 300
150 Driving and Driving Safety
Information
The engine will start automatically in certain situations, e.g. if the vehicle starts rolling, if air conditioning causes reduced comfort, or if the brake vacuum is reduced.The engine is stopped again automatically if the preconditions for stopping the engine automatically are then met again.
Exceptions for the Auto Start Stop function
The Auto Start Stop function is deactivated e.g.: – When Sport mode is activated.– When PSM is off.– In maneuvering mode.– When A/C MAX mode is activated.– When the “Windshield defrost” function is active. – At altitudes above approx. 9,843 ft. (3,000 meters)
For information on switching on and off the Auto Start Stop function:fPlease see the chapter “SWITCHING AUTO START STOP FUNCTION AND COASTING MODE ON AND OFF” on page 150.
The Auto Start Stop function is available with limited functionality in the following situations, e.g.:– If the air conditioning or passenger compartment heating is operated at a high setting or if the defrost function is run for long time periods.– If the battery charging condition is low.– On upward or downward slopes.– During internal vehicle test procedures, e.g. automatic engine checks.
Information
If one of these situations arises after the engine has stopped automatically, the engine can be restarted automatically.
Reaction after leaving the vehicle (selector-lever position D or N selected)
If the vehicle is left after an automatic stop when PDK selector-lever position D or N is engaged, an automatic engine start is executed to remind the driver that the Auto Start Stop function is still active.
In selector-lever position D, the electric parking brake is additionally engaged.
The brake warning light on the instrument panel and the indicator light on the switch light up.fPlease see the chapter “OVERVIEW OF WARNING AND INFORMATION MESSAGES” on page 129.
Reaction after leaving the vehicle (selector-lever position P selected)
If the vehicle is left after an automatic stop when PDK selector-lever position P is engaged, in order to open the garage door, for example, no automatic engine start is executed. Auto Start Stop mode is resumed if the driver closes the driver’s door and presses the brake within 30 seconds of leaving the vehicle.
If one of these requirements is not met, the engine has to be started manually. The
message “ Please start engine manually” will appear on the multi-function display in the instrument panel.fPlease see the chapter “OVERVIEW OF WARNING AND INFORMATION MESSAGES” on page 129.
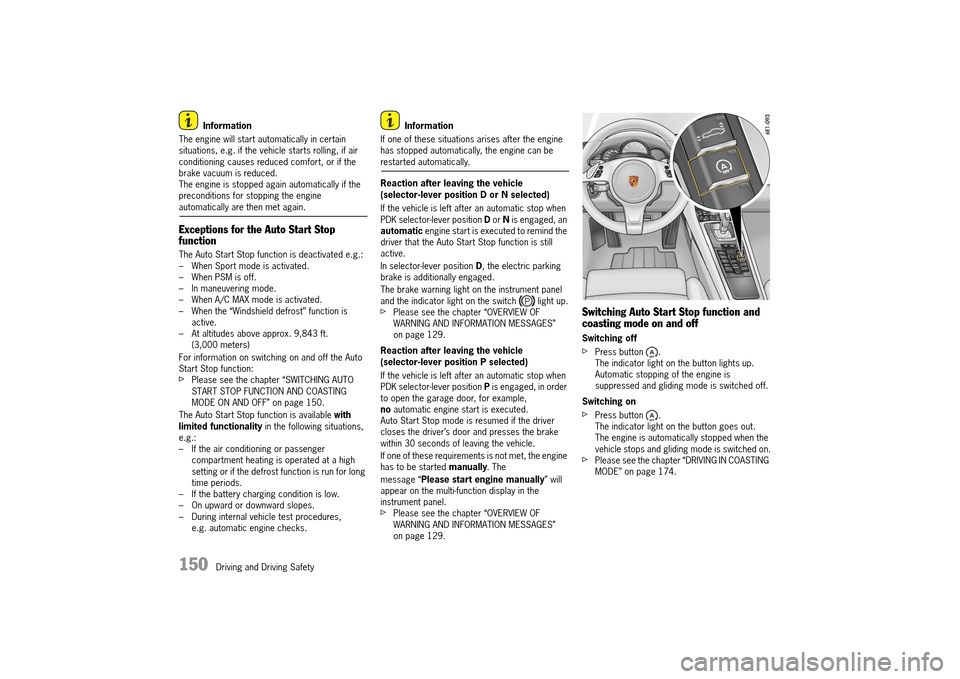
Switching Auto Start Stop function and coasting mode on and off
Switching off
fPress button . The indicator light on the button lights up.Automatic stopping of the engine is suppressed and gliding mode is switched off.
Switching on
fPress button . The indicator light on the button goes out.The engine is automatically stopped when the vehicle stops and gliding mode is switched on.fPlease see the chapter “DRIVING IN COASTING MODE” on page 174.
14_991_Turbo_21.book Seite 150 Mittwoch, 9. April 2014 2:19 14
Page 153 of 300
Driving and Driving Safety 151
Auto Start Stop function display
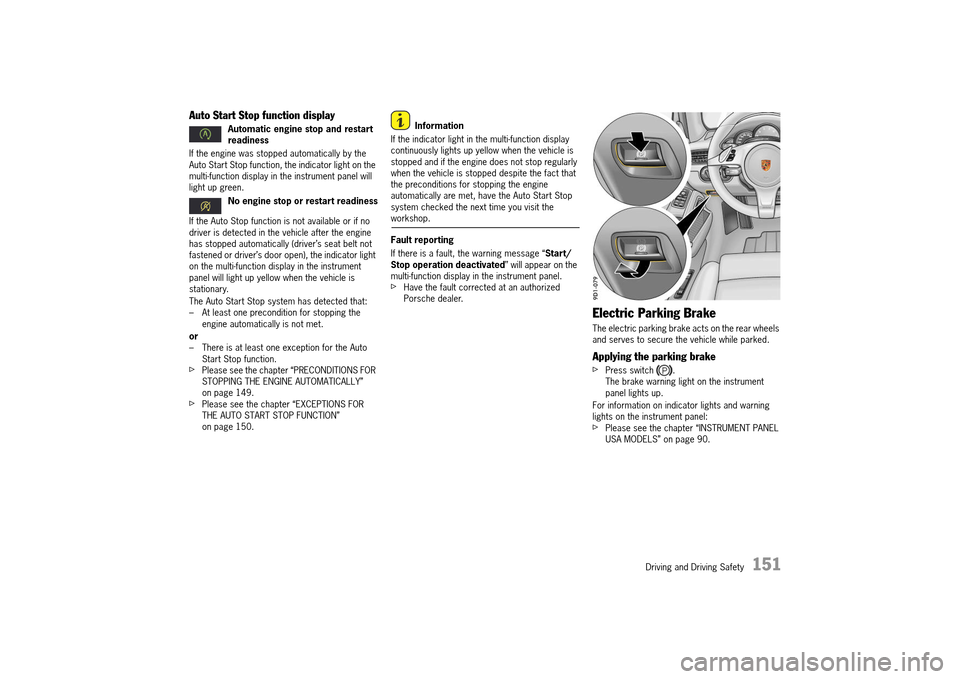
If the engine was stopped automatically by the Auto Start Stop function, the indicator light on the multi-function display in the instrument panel will light up green.
If the Auto Stop function is not available or if no driver is detected in the vehicle after the engine has stopped automatically (driver’s seat belt not fastened or driver’s door open), the indicator light on the multi-function display in the instrument panel will light up yellow when the vehicle is stationary.
The Auto Start Stop system has detected that: – At least one precondition for stopping the engine automatically is not met.
or – There is at least one exception for the Auto Start Stop function.fPlease see the chapter “PRECONDITIONS FOR STOPPING THE ENGINE AUTOMATICALLY” on page 149.fPlease see the chapter “EXCEPTIONS FOR THE AUTO START STOP FUNCTION” on page 150.
Information
If the indicator light in the multi-function display continuously lights up yellow when the vehicle is stopped and if the engine does not stop regularly when the vehicle is stopped despite the fact that the preconditions for stopping the engine automatically are met, have the Auto Start Stop system checked the next time you visit the workshop.
Fault reporting
If there is a fault, the warning message “ Start/ Stop operation deactivated ” will appear on the multi-function display in the instrument panel.fHave the fault corrected at an authorized Porsche dealer.
Electric Parking Brake
The electric parking brake acts on the rear wheels and serves to secure the vehicle while parked.
Applying the parking brake
fPress switch .The brake warning light on the instrument panel lights up.
For information on indicator lights and warning lights on the instrument panel: fPlease see the chapter “INSTRUMENT PANEL USA MODELS” on page 90.
Automatic engine stop and restart readiness
No engine stop or restart readiness
14_991_Turbo_21.book Seite 151 Mittwoch, 9. April 2014 2:19 14
Page 155 of 300
Driving and Driving Safety 153
Vehicles without Porsche Ceramic Composite Brake (PCCB)
Even though the brake disks consist of alloyed gray cast iron, they will unavoidably start to corrode if your car is parked for an extended period. The brakes will tend to “rub” as a result.The nature, extent and effects of corrosion depend on the amount of time the vehicle was parked, whether road salt or grit was spread and whether grease-dissolving agents were used in car washes.
If the braking comfort is noticeably impaired, we recommend having the brake system checked by experts at an authorized Porsche dealer.
Brake system function
Your Porsche is equipped with a power assisted hydraulic dual circuit brake system with disk brakes at the front and rear. Both circuits function independently. One brake circuit operates the front left and rear right wheel and the other operates the front right and rear left wheel.
If one brake circuit has failed, the other will still operate. However, you will notice an increased pedal travel when you apply the brakes. Failure of one brake circuit will cause the stopping distance to increase.
Your vehicle is equipped with an emergency function in the extreme event of a complete hydraulic failure of the brake system. If your brake pedal goes all the way to the floor, do not pump the brakes. fPush the brake pedal down firmly and hold it in that position. A mechanical linkage activates the second circuit, and you will be able to bring the vehicle to a stop.fAfter bringing your vehicle to a complete stop, avoid driving the vehicle and instead have it towed to the nearest authorized Porsche dealer for repair.
Brake system warning light
You can check the functionality of the brake system warning light by switching the ignition to the “On” position (position 1) and verifying that the warning light illuminates.
Brake warning light USA
Brake warning light Canada
The warning light in the instrument panel lights up. A message will be displayed on the multi-purpose display of the instrument panel if the brake fluid level is too low, or (if the brake pedal travel has increased) one of the two brake circuits has failed.
A greater braking pressure will be required, stopping distances will be longer and the braking behavior will change, particularly in curves.
With correctly adjusted brakes and a correctly working brake system, the pedal travel to the point of brake application should be 1-3/16 in. to 1-9/16 in. (30 to 40 mm). Whenever the brake pedal travel exceeds this value, have the brake system checked.
Brake pedal
Unsuitable or incorrectly fixed floor mats or objects can reduce the travel of the brake pedal or prevent you applying the brake pedal.fAlways check the movement of the brake pedal before driving and make sure that it is not obstructed by a floor mat or any other object.fSecure the floor mat to prevent it from sliding into positions that could interfere with the safe operation of your vehicle.Your authorized Porsche dealer will be glad to offer you floor mats of the correct size including a securing possibility.
Information
In case one of the two brake circuits fails, increased pedal travel is required to bring your vehicle to a full stop.
Brake Hydraulic Failure Recovery
WARNINGh
Obstruction of Brake Pedal
WARNINGh
14_991_Turbo_21.book Seite 153 Mittwoch, 9. April 2014 2:19 14
Page 179 of 300
Driving and Driving Safety 177
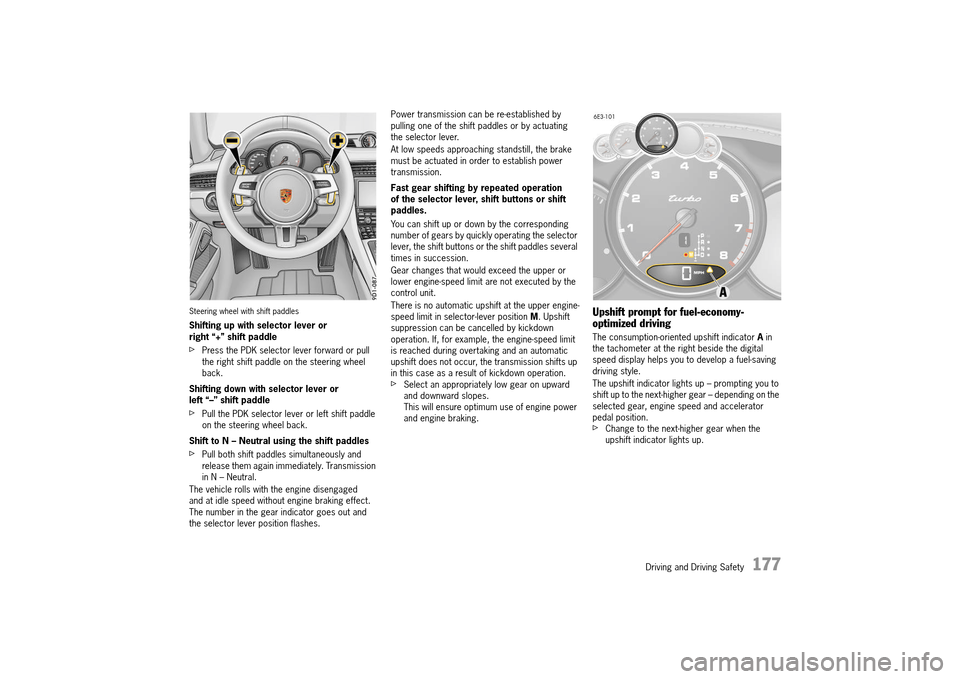
Steering wheel with shift paddles
Shifting up with selector lever or right “+” shift paddle
fPress the PDK selector lever forward or pull the right shift paddle on the steering wheel back.
Shifting down with selector lever or left “–” shift paddle
fPull the PDK selector lever or left shift paddle on the steering wheel back.
Shift to N – Neutral using the shift paddles
fPull both shift paddles simultaneously and release them again immediately. Transmission in N – Neutral.
The vehicle rolls with the engine disengaged and at idle speed without engine braking effect. The number in the gear indicator goes out and the selector lever position flashes.
Power transmission can be re-established by pulling one of the shift paddles or by actuating the selector lever.
At low speeds approaching standstill, the brake must be actuated in order to establish power transmission.
Fast gear shifting by repeated operation of the selector lever, shift buttons or shift paddles.
You can shift up or down by the corresponding number of gears by quickly operating the selector lever, the shift buttons or the shift paddles several times in succession.
Gear changes that would exceed the upper or lower engine-speed limit are not executed by the control unit.
There is no automatic upshift at the upper engine- speed limit in selector-lever position M. Upshift suppression can be cancelled by kickdown operation. If, for example, the engine-speed limit is reached during overtaking and an automatic upshift does not occur, the transmission shifts up in this case as a result of kickdown operation.fSelect an appropriately low gear on upward and downward slopes.This will ensure optimum use of engine power and engine braking.
Upshift prompt for fuel-economy- optimized driving
The consumption-oriented upshift indicator A in the tachometer at the right beside the digital speed display helps you to develop a fuel-saving driving style.
The upshift indicator lights up – prompting you to shift up to the next-higher gear – depending on the selected gear, engine speed and accelerator pedal position.fChange to the next-higher gear when the upshift indicator lights up.
14_991_Turbo_21.book Seite 177 Mittwoch, 9. April 2014 2:19 14