ECU PORSCHE 911 TURBO 2014 6.G Owner's Guide
[x] Cancel search | Manufacturer: PORSCHE, Model Year: 2014, Model line: 911 TURBO, Model: PORSCHE 911 TURBO 2014 6.GPages: 300, PDF Size: 10.61 MB
Page 244 of 300
242 Minor Repairs
Checking the Coolant Level and
Adding Coolant
The coolant provides year-round protection from corrosion and freezing down to –31 °F (–35 °C)(–40 °F (–40 °C) in Nordic countries). Regular checking of the coolant level is part of servicing. The coolant level only needs to be checked when a warning message appears on the multi-function display in the instrument panel.fPlease see the chapter “OVERVIEW OF WARNING AND INFORMATION MESSAGES” on page 129.fUse only antifreeze authorized by Porsche.
Coolant is hazardous to health. Coolant can be deadly to children or pets if consumed.fKeep coolant out of children's reach.fAlso, keep coolant away from your pets. They can be attracted to it should there be a spill, or to used coolant left in an open container.
The coolant becomes very hot when the engine is running and can burn you.
The coolant reservoir is pressurized. Careless opening of the coolant reservoir can lead to hot coolant suddenly spraying out.fDo not open the cap on the reservoir when the engine is hot.fAllow the engine to cool down before opening the cap and protect your hands, arms and face from any possible escape of hot coolant.
Coupé
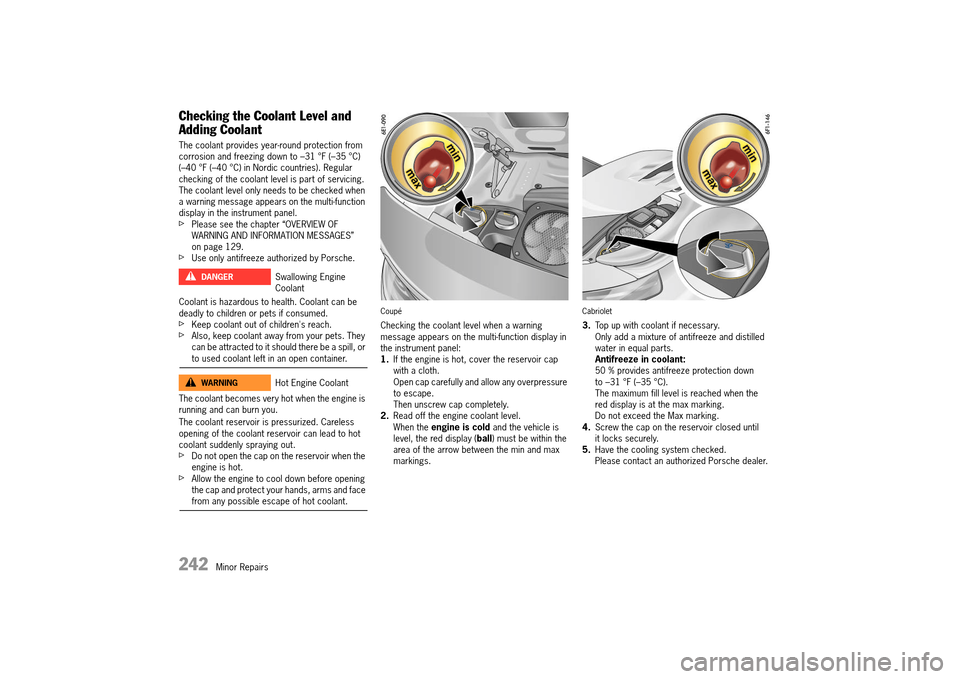
Checking the coolant level when a warning message appears on the multi-function display in the instrument panel:1. If the engine is hot, cover the reservoir cap with a cloth.Open cap carefully and allow any overpressure to escape.Then unscrew cap completely.2. Read off the engine coolant level. When the engine is cold and the vehicle is level, the red display ( ball) must be within the area of the arrow between the min and max markings.
Cabriolet
3. Top up with coolant if necessary. Only add a mixture of antifreeze and distilled water in equal parts.Antifreeze in coolant:50 % provides antifreeze protection down to –31 °F (–35 °C).The maximum fill level is reached when the red display is at the max marking.Do not exceed the Max marking.4. Screw the cap on the reservoir closed until it locks securely.5. Have the cooling system checked. Please contact an authorized Porsche dealer.
Swallowing Engine Coolant
Hot Engine Coolant
DANGERh
WARNINGh
14_991_Turbo_21.book Seite 242 Mittwoch, 9. April 2014 2:19 14
Page 256 of 300
254 Minor Repairs
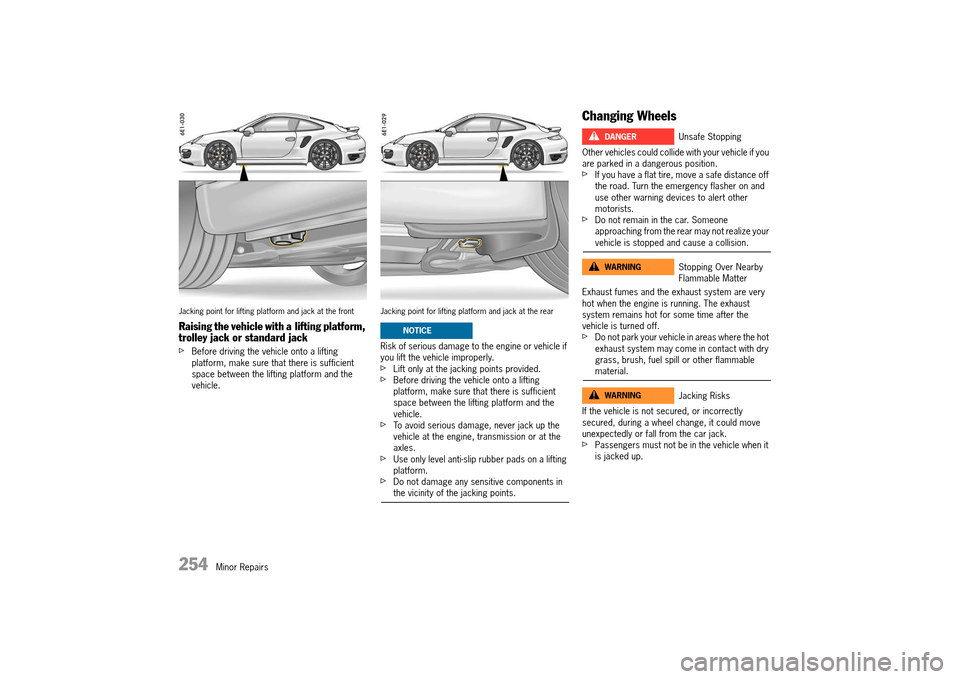
Jacking point for lifting platform and jack at the front
Raising the vehicle with a lifting platform, trolley jack or standard jack
fBefore driving the vehicle onto a lifting platform, make sure that there is sufficient space between the lifting platform and the vehicle.
Jacking point for lifting platform and jack at the rear
Risk of serious damage to the engine or vehicle if you lift the vehicle improperly.fLift only at the jacking points provided.fBefore driving the vehicle onto a lifting platform, make sure that there is sufficient space between the lifting platform and the vehicle.fTo avoid serious damage, never jack up the vehicle at the engine, transmission or at the axles.fUse only level anti-slip rubber pads on a lifting platform.fDo not damage any sensitive components in the vicinity of the jacking points.
Changing Wheels
Other vehicles could collide with your vehicle if you are parked in a dangerous position.fIf you have a flat tire, move a safe distance off the road. Turn the emergency flasher on and use other warning devices to alert other motorists.fDo not remain in the car. Someone approaching from the rear may not realize your vehicle is stopped and cause a collision.
Exhaust fumes and the exhaust system are very hot when the engine is running. The exhaust system remains hot for some time after the vehicle is turned off.fDo not park your vehicle in areas where the hot exhaust system may come in contact with dry grass, brush, fuel spill or other flammable material.
If the vehicle is not secured, or incorrectly secured, during a wheel change, it could move unexpectedly or fall from the car jack.fPassengers must not be in the vehicle when it is jacked up.
NOTICE
Unsafe Stopping
Stopping Over Nearby Flammable Matter
Jacking Risks
DANGERh
WARNINGh
WARNINGh
14_991_Turbo_21.book Seite 254 Mittwoch, 9. April 2014 2:19 14
Page 257 of 300
Minor Repairs 255
fBefore you change a wheel, be sure the ground is level and firm. If necessary, use a board under the jack to ensure that the jack does not sink into the ground.fSet the electric parking brake and block the wheels opposite the flat tire on the other side of the vehicle.fThe jack is only to be used for changing a wheel. Do not use it as a support to work under the car.fThe car must be jacked up only at the illustrated jacking points. Lifting at any other place may result in personal injury.
Risk of damage to the engine or vehicle if you lift the vehicle improperly.fThe car must be jacked up only at the illustrated jacking points. Lifting at any other place may result in damage to the vehicle.fNever jack up the car by the body, bumpers, engine, transmission or at the axles.fDo not damage any sensitive components in the vicinity of the jacking points.fFor safety reasons do not use tire inflating bot-tles. Do not use commercially available sealant bottles. Use only the tire inflating bottle located in the luggage compartment.
Information
The tools required for changing a wheel (e.g. jack, wheel bolt wrench, assembly aids) are not supplied as standard with the vehicle. Your authorized Porsche dealer will be pleased to advise you.
Information
The tire and wheel sizes on both axles are different.fDo not fit the wrong wheels on the wrong axle.fOnly use wheels/tires with approved dimensions for the relevant axle.
Sequence of operation
The jack must be used only to raise the car for wheel changing. The jack must never be used as a support to work underneath the vehicle. If the jack is accidentally dislodged, you or bystanders could suffer severe personal injury.fNever jack up other vehicles or other loads with the jack.fAlways place the car on stable supports if you have to work under it. When working under the vehicle, always use safety stands specifically designed for this purpose.
fPlease use a suitable knee rest to protect your clothing against soiling.1. Activate the electric parking brake and move the PDK selector lever to position P. Remove the ignition key or control unit on vehicles with Porsche Entry & Drive.2. Switch on the emergency flasher if necessary.
3. Secure the vehicle to prevent it from rolling away, e.g. by means of wedges under the wheels on the opposite side.This is particularly important on slopes.4. Slightly loosen the wheel bolts on the wheel to be changed.5. Lift the vehicle only at the specified jacking points.6. Raise the vehicle until the wheel lifts off the ground. fPlease see the chapter “RAISING THE VEHICLE WITH A LIFTING PLATFORM, TROLLEY JACK OR STANDARD JACK” on page 254.7. Remove 1 or 2 wheel bolts (see corresponding figure).NOTICE
Working Under VehicleWARNINGh
14_991_Turbo_21.book Seite 255 Mittwoch, 9. April 2014 2:19 14
Page 259 of 300
Minor Repairs 257
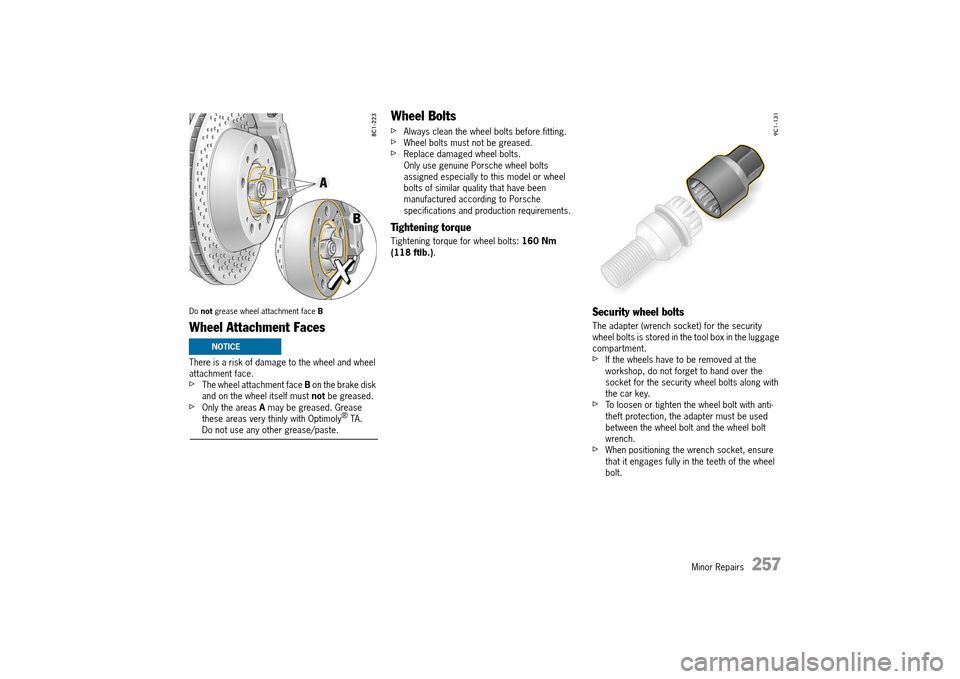
Do not grease wheel attachment face B
Wheel Attachment Faces
There is a risk of damage to the wheel and wheel attachment face.fThe wheel attachment face B on the brake disk and on the wheel itself must not be greased.fOnly the areas A may be greased. Grease these areas very thinly with Optimoly® TA. Do not use any other grease/paste.
Wheel Bolts
fAlways clean the wheel bolts before fitting.fWheel bolts must not be greased.fReplace damaged wheel bolts.Only use genuine Porsche wheel bolts assigned especially to this model or wheel bolts of similar quality that have been manufactured according to Porsche specifications and production requirements.
Tightening torque
Tightening torque for wheel bolts: 160 Nm (118 ftlb.) .
Security wheel bolts
The adapter (wrench socket) for the security wheel bolts is stored in the tool box in the luggage compartment.fIf the wheels have to be removed at the workshop, do not forget to hand over the socket for the security wheel bolts along with the car key.fTo loosen or tighten the wheel bolt with anti-theft protection, the adapter must be used between the wheel bolt and the wheel bolt wrench.fWhen positioning the wrench socket, ensure that it engages fully in the teeth of the wheel bolt.
NOTICE
14_991_Turbo_21.book Seite 257 Mittwoch, 9. April 2014 2:19 14
Page 261 of 300
Minor Repairs 259
If a wheel needs to be changed, the procedure described below must be adhered to exactly, as otherwise the wheel may loosen, resulting in damage. Porsche cannot be held liable if this happens.To achieve the high tightening torque required for the central bolt, a suitable, commercially available 443 ftlb. (600 Nm) torque wrench must be used. Alternatively, a corresponding tool with torque multiplier (part no. 997.450.323.90) is available from Porsche Motorsport. When a torque multiplier is used, the torque must be reduced in accordance with the tool’s operating instructions.
When loosening and fastening the wheel, a second person is needed to prevent the wheel from turning by firmly braking it.
The high mounting forces involved can cause the vehicle to roll away and slip off the jack.fAlways use a lifting platform if there is one available.
Risk of damage due to vehicle tipping over or falling off lifting equipment or using the wrong tool.
The high mounting forces involved can cause the vehicle to roll away and slip off the jack. An impact wrench can damage the central lock.fAlways use a lifting platform if there is one available.fDo not use an impact wrench .
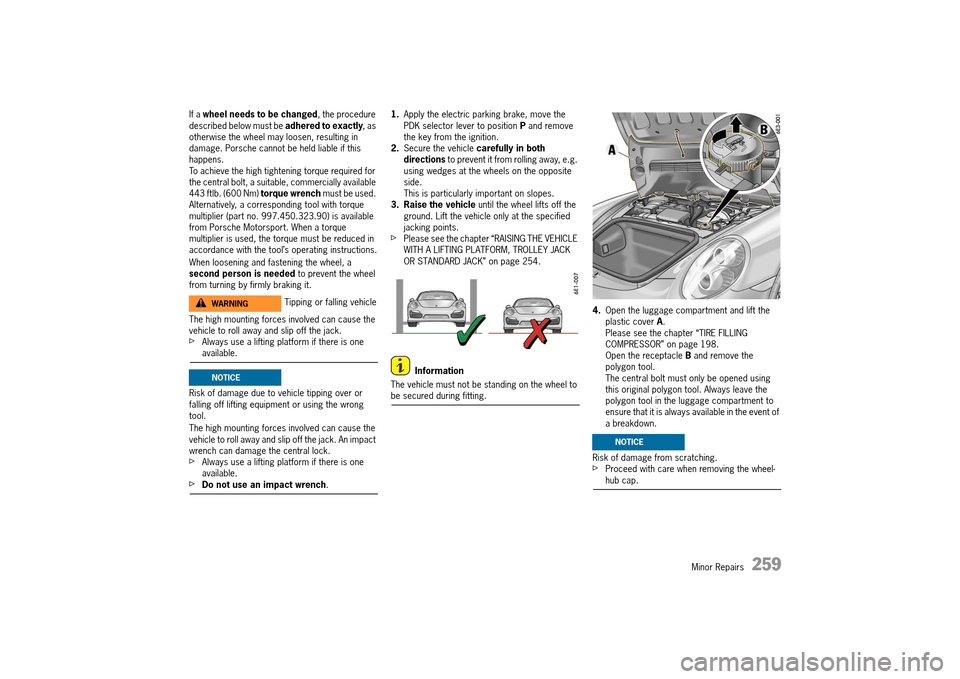
1. Apply the electric parking brake, move the PDK selector lever to position P and remove the key from the ignition.2. Secure the vehicle carefully in both directions to prevent it from rolling away, e.g. using wedges at the wheels on the opposite side.This is particularly important on slopes.3. Raise the vehicle until the wheel lifts off the ground. Lift the vehicle only at the specified jacking points.fPlease see the chapter “RAISING THE VEHICLE WITH A LIFTING PLATFORM, TROLLEY JACK OR STANDARD JACK” on page 254.
Information
The vehicle must not be standing on the wheel to be secured during fitting.
4. Open the luggage compartment and lift the plastic cover A. Please see the chapter “TIRE FILLING COMPRESSOR” on page 198.Open the receptacle B and remove the polygon tool.The central bolt must only be opened using this original polygon tool. Always leave the polygon tool in the luggage compartment to ensure that it is always available in the event of a breakdown.
Risk of damage from scratching.fProceed with care when removing the wheel-hub cap.
Tipping or falling vehicleWARNINGh
NOTICE
NOTICE
14_991_Turbo_21.book Seite 259 Mittwoch, 9. April 2014 2:19 14
Page 262 of 300
260 Minor Repairs
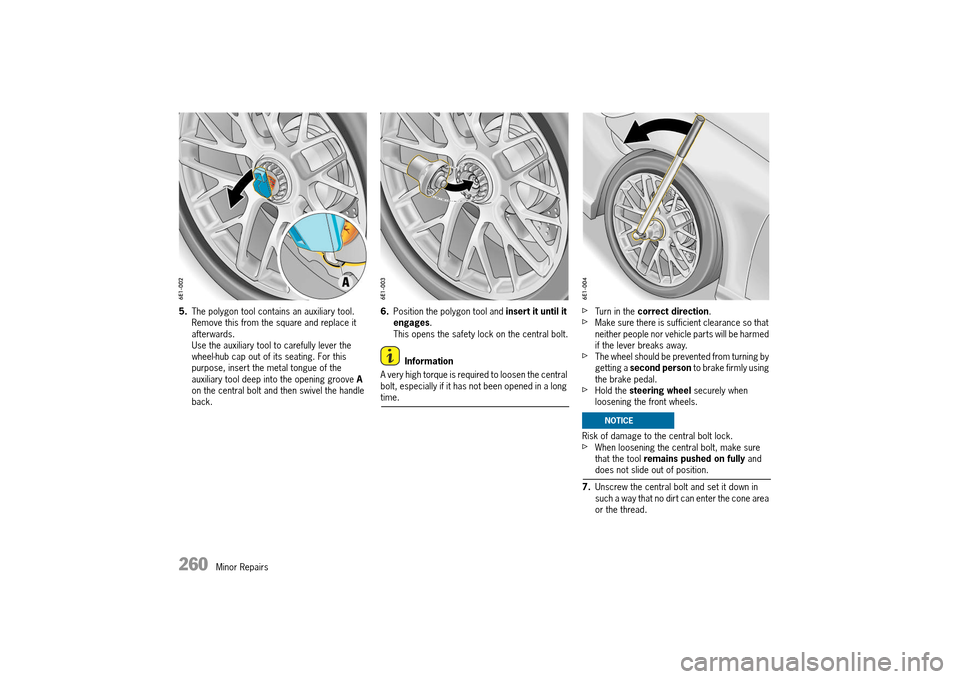
5.The polygon tool contains an auxiliary tool. Remove this from the square and replace it afterwards.Use the auxiliary tool to carefully lever the wheel-hub cap out of its seating. For this purpose, insert the metal tongue of the auxiliary tool deep into the opening groove A on the central bolt and then swivel the handle back.
6. Position the polygon tool and insert it until it engages . This opens the safety lock on the central bolt.
Information
A very high torque is required to loosen the central bolt, especially if it has not been opened in a long time.
fTurn in the correct direction.fMake sure there is sufficient clearance so that neither people nor vehicle parts will be harmed if the lever breaks away.fThe wheel should be prevented from turning by getting a second person to brake firmly using the brake pedal.fHold the steering wheel securely when loosening the front wheels.
Risk of damage to the central bolt lock.fWhen loosening the central bolt, make sure that the tool remains pushed on fully and does not slide out of position.
7. Unscrew the central bolt and set it down in such a way that no dirt can enter the cone area or the thread.
NOTICE
14_991_Turbo_21.book Seite 260 Mittwoch, 9. April 2014 2:19 14
Page 264 of 300
262 Minor Repairs
Information
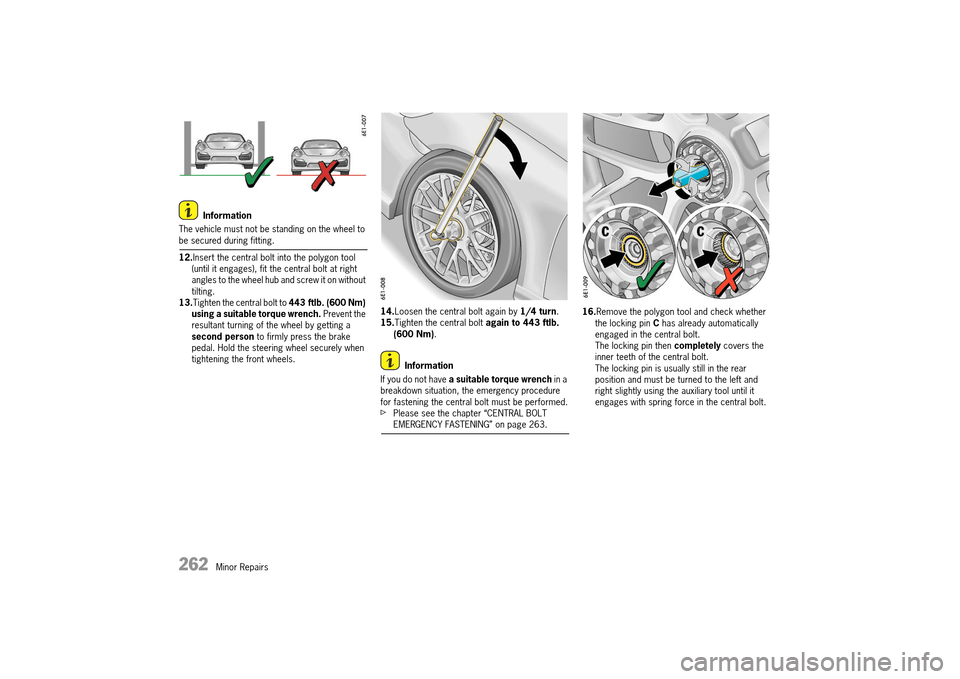
The vehicle must not be standing on the wheel to be secured during fitting.
12. Insert the central bolt into the polygon tool (until it engages), fit the central bolt at right angles to the wheel hub and screw it on without tilting.13.Tighten the central bolt to 443 ftlb. (600 Nm) using a suitable torque wrench. Prevent the resultant turning of the wheel by getting a second person to firmly press the brake pedal. Hold the steering wheel securely when tightening the front wheels.
14. Loosen the central bolt again by 1/4 turn. 15. Tighten the central bolt again to 443 ftlb. (600 Nm) .
Information
If you do not have a suitable torque wrench in a breakdown situation, the emergency procedure for fastening the central bolt must be performed.fPlease see the chapter “CENTRAL BOLT EMERGENCY FASTENING” on page 263.
16. Remove the polygon tool and check whether the locking pin C has already automatically engaged in the central bolt. The locking pin then completely covers the inner teeth of the central bolt. The locking pin is usually still in the rear position and must be turned to the left and right slightly using the auxiliary tool until it engages with spring force in the central bolt.
14_991_Turbo_21.book Seite 262 Mittwoch, 9. April 2014 2:19 14
Page 265 of 300
Minor Repairs 263
Deferring inspection measures can result in accidents.fNever drive when the locking pin is not engaged.
Risk of damage due to central bolt lock not engaging.fNever drive when the locking pin is not engaged.
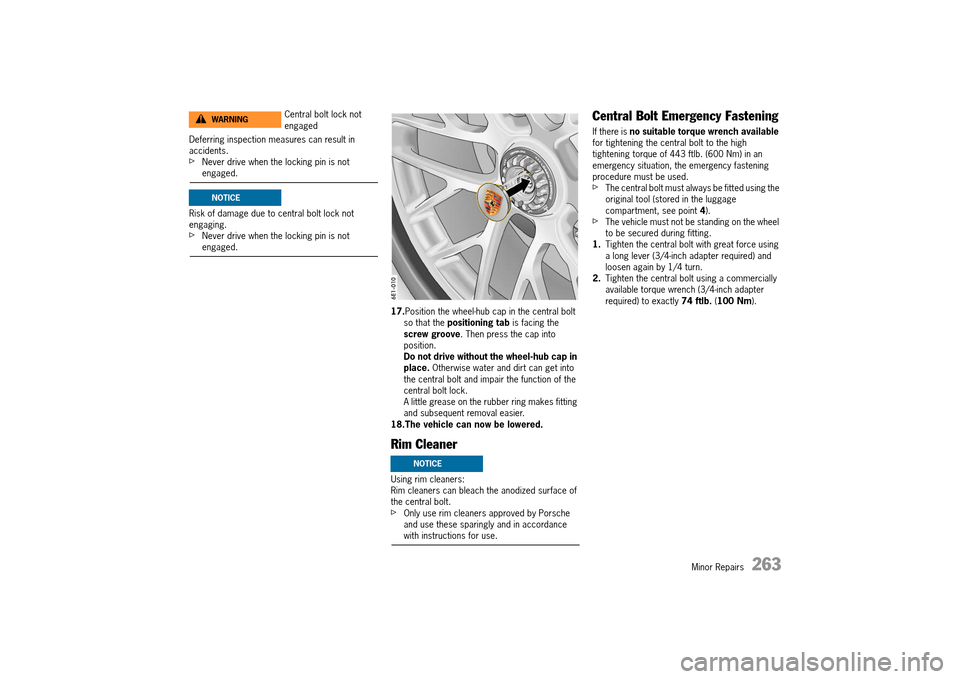
17. Position the wheel-hub cap in the central bolt so that the positioning tab is facing the screw groove . Then press the cap into position.Do not drive without the wheel-hub cap in place. Otherwise water and dirt can get into the central bolt and impair the function of the central bolt lock.A little grease on the rubber ring makes fitting and subsequent removal easier.18.The vehicle can now be lowered.
Rim Cleaner
Using rim cleaners: Rim cleaners can bleach the anodized surface of the central bolt.fOnly use rim cleaners approved by Porsche and use these sparingly and in accordance with instructions for use.
Central Bolt Emergency Fastening
If there is no suitable torque wrench available for tightening the central bolt to the high tightening torque of 443 ftlb. (600 Nm) in an emergency situation, the emergency fastening procedure must be used.fThe central bolt must always be fitted using the original tool (stored in the luggage compartment, see point 4).fThe vehicle must not be standing on the wheel to be secured during fitting.1. Tighten the central bolt with great force using a long lever (3/4-inch adapter required) and loosen again by 1/4 turn.2. Tighten the central bolt using a commercially available torque wrench (3/4-inch adapter required) to exactly 74 ftlb. (100 Nm).
Central bolt lock not engagedWARNINGh
NOTICE
NOTICE
14_991_Turbo_21.book Seite 263 Mittwoch, 9. April 2014 2:19 14
Page 266 of 300
264 Minor Repairs
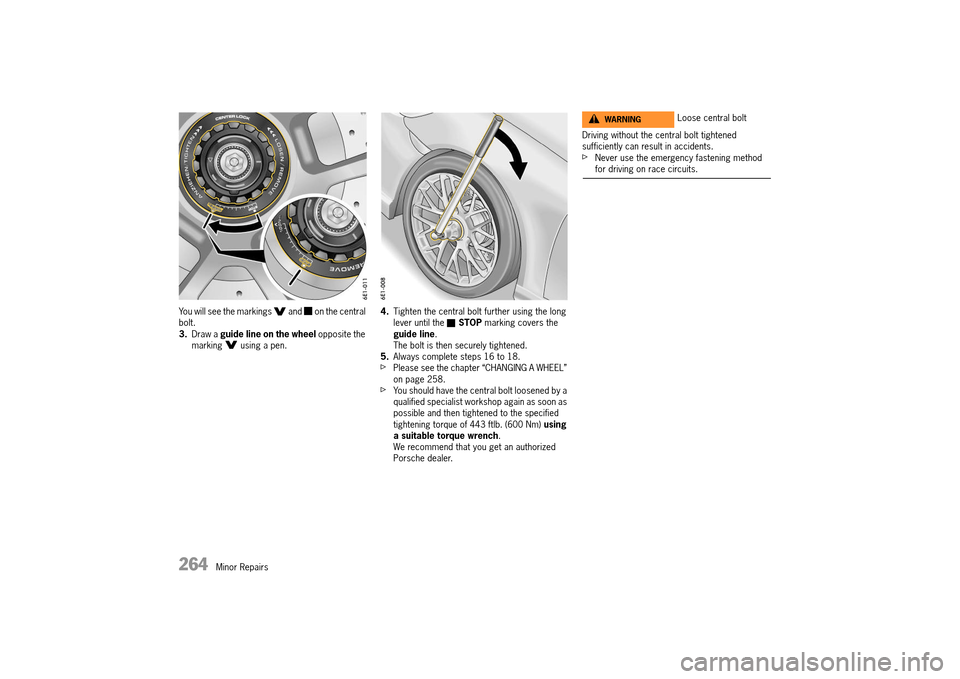
You will see the markings and on the central bolt.3. Draw a guide line on the wheel opposite the marking using a pen.
4. Tighten the central bolt further using the long lever until the STOP marking covers the guide line . The bolt is then securely tightened.5. Always complete steps 16 to 18.fPlease see the chapter “CHANGING A WHEEL” on page 258.fYou should have the central bolt loosened by a qualified specialist workshop again as soon as possible and then tightened to the specified tightening torque of 443 ftlb. (600 Nm) using a suitable torque wrench . We recommend that you get an authorized Porsche dealer.
Driving without the central bolt tightened sufficiently can result in accidents.fNever use the emergency fastening method for driving on race circuits.
Loose central boltWARNINGh
14_991_Turbo_21.book Seite 264 Mittwoch, 9. April 2014 2:19 14
Page 268 of 300
266 Minor Repairs
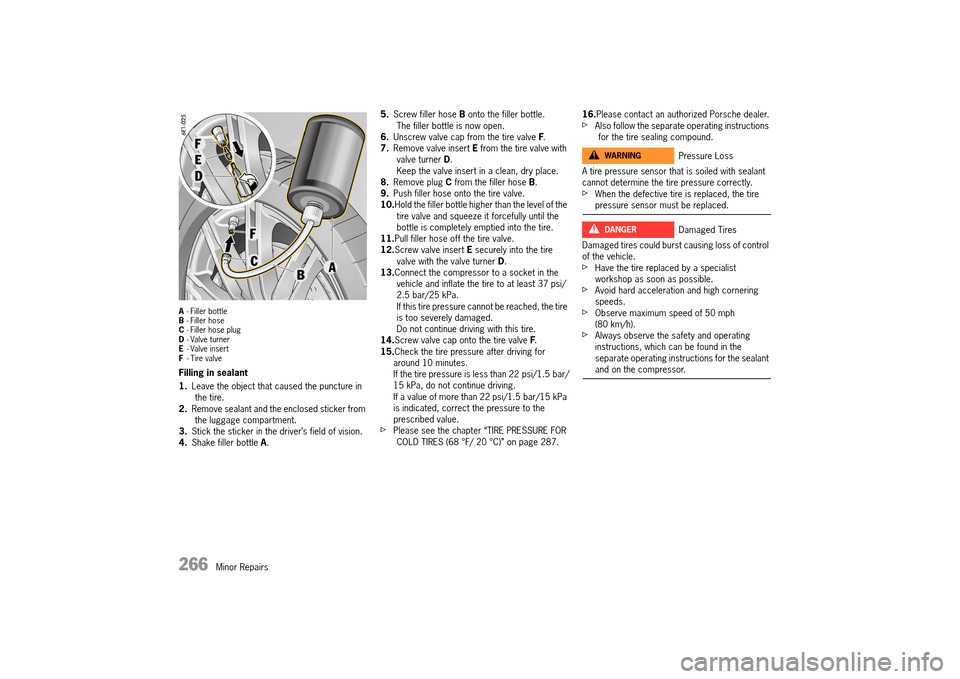
A- Filler bottle B - Filler hose C - Filler hose plug D - Valve turner E - Valve insert F - Tire valve
Filling in sealant
1. Leave the object that caused the puncture in the tire.2. Remove sealant and the enclosed sticker from the luggage compartment.3. Stick the sticker in the driver’s field of vision. 4. Shake filler bottle A.
5. Screw filler hose B onto the filler bottle. The filler bottle is now open.6. Unscrew valve cap from the tire valve F. 7. Remove valve insert E from the tire valve with valve turner D. Keep the valve insert in a clean, dry place.8. Remove plug C from the filler hose B. 9. Push filler hose onto the tire valve. 10. Hold the filler bottle higher than the level of the tire valve and squeeze it forcefully until the bottle is completely emptied into the tire.11. Pull filler hose off the tire valve. 12. Screw valve insert E securely into the tire valve with the valve turner D. 13. Connect the compressor to a socket in the vehicle and inflate the tire to at least 37 psi/2.5 bar/25 kPa.If this tire pressure cannot be reached, the tire is too severely damaged.Do not continue driving with this tire.14. Screw valve cap onto the tire valve F. 15. Check the tire pressure after driving for around 10 minutes.If the tire pressure is less than 22 psi/1.5 bar/15 kPa, do not continue driving.If a value of more than 22 psi/1.5 bar/15 kPa is indicated, correct the pressure to the prescribed value.fPlease see the chapter “TIRE PRESSURE FOR COLD TIRES (68 °F/ 20 °C)” on page 287.
16. Please contact an authorized Porsche dealer.fAlso follow the separate operating instructions for the tire sealing compound.
A tire pressure sensor that is soiled with sealant cannot determine the tire pressure correctly.fWhen the defective tire is replaced, the tire pressure sensor must be replaced.
Damaged tires could burst causing loss of control of the vehicle.fHave the tire replaced by a specialist workshop as soon as possible.fAvoid hard acceleration and high cornering speeds.fObserve maximum speed of 50 mph (80 km/h).fAlways observe the safety and operating instructions, which can be found in the separate operating instructions for the sealant and on the compressor.
Pressure Loss
Damaged Tires
WARNINGh
DANGERh
14_991_Turbo_21.book Seite 266 Mittwoch, 9. April 2014 2:19 14