torque PORSCHE 911 TURBO 2014 6.G User Guide
[x] Cancel search | Manufacturer: PORSCHE, Model Year: 2014, Model line: 911 TURBO, Model: PORSCHE 911 TURBO 2014 6.GPages: 300, PDF Size: 10.61 MB
Page 188 of 300
186 Driving and Driving Safety
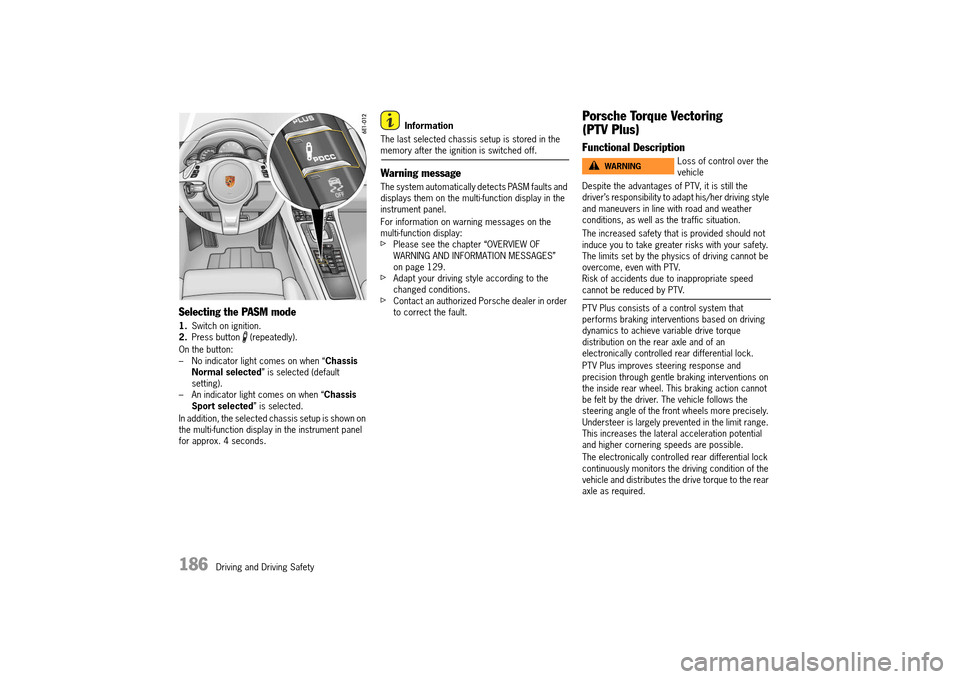
Selecting the PASM mode
1.Switch on ignition. 2. Press button (repeatedly).
On the button: – No indicator light comes on when “ Chassis Normal selected ” is selected (default setting).– An indicator light comes on when “ Chassis Sport selected ” is selected.
In addition, the selected chassis setup is shown on the multi-function display in the instrument panel for approx. 4 seconds.
Information
The last selected chassis setup is stored in the memory after the ignition is switched off.
Warning message
The system automatically detects PASM faults and displays them on the multi-function display in the instrument panel.
For information on warning messages on the multi-function display:fPlease see the chapter “OVERVIEW OF WARNING AND INFORMATION MESSAGES” on page 129.fAdapt your driving style according to the changed conditions.fContact an authorized Porsche dealer in order to correct the fault.
Porsche Torque Vectoring
(PTV Plus)
Functional Description
Despite the advantages of PTV, it is still the driver’s responsibility to adapt his/her driving style and maneuvers in line with road and weather conditions, as well as the traffic situation.
The increased safety that is provided should not induce you to take greater risks with your safety. The limits set by the physics of driving cannot be overcome, even with PTV.Risk of accidents due to inappropriate speed cannot be reduced by PTV.
PTV Plus consists of a control system that performs braking interventions based on driving dynamics to achieve variable drive torque distribution on the rear axle and of an electronically controlled rear differential lock.
PTV Plus improves steering response and precision through gentle braking interventions on the inside rear wheel. This braking action cannot be felt by the driver. The vehicle follows the steering angle of the front wheels more precisely. Understeer is largely prevented in the limit range. This increases the lateral acceleration potential and higher cornering speeds are possible.
The electronically controlled rear differential lock continuously monitors the driving condition of the vehicle and distributes the drive torque to the rear axle as required.
Loss of control over the vehicleWARNINGh
14_991_Turbo_21.book Seite 186 Mittwoch, 9. April 2014 2:19 14
Page 190 of 300
188 Driving and Driving Safety
Dynamic Engine Mounting (PADM)
On vehicles with Sport Chrono package
Dynamic Engine Mounting with variable damping is a system designed to enhance both driving dynamics and driving comfort. Depending on the driving situation, the ideal mounting rigidity and damping is automatically set in the range between an rigid engine-to-body connection (increase in driving dynamics) and decoupling of the engine from the body (increase in driving comfort).
“Sport” mode
When “ Sport” mode is switched on, a more rigid engine-to-body connection is achieved for a sporty driving style.
“Sport Plus” mode
When “ Sport Plus” mode is switched on, an optimal engine-to-body connection is achieved for driving on race circuits.
Warning message
Dynamic engine mounting faults are indicated by a warning message on the multi-function display.fPlease see the chapter “OVERVIEW OF WARNING AND INFORMATION MESSAGES” on page 129.
“Sport” and “Sport Plus” mode
The selectable chassis settings mean that the vehicle can offer various modes for a sportier overall setup.The “ Sport” mode pushes the control systems more in the direction of greater emotionality and performance during every day driving.
In “ Sport Plus” mode, maximum performance is set for race-circuit-like driving:– In “ Sport Plus” mode: PASM (Porsche Active Suspension Management) is automatically changed to “ Chassis Normal” or “Chassis Sport” mode. – In “ Sport Plus” mode: Like PASM, PDCC is switched to the corresponding “ Sport” mode, whereby the rolling movements of the vehicle are reduced further, depending on the selected mode.– The PDK transmission switches to a sporty gear-changing map and shortens the gear shifting times when Sport mode is activated. Gear changes take place faster.– The electronic accelerator pedal reacts sooner, and the engine is more responsive to throttle inputs. When Sport mode is switched on and the vehicle is traveling at a speed of less than 40 km/h (25 mph), this function is activated only after the driver has floored the accelerator pedal or released it briefly.– The rpm limiter characteristic is “harder”. In other words: the engine is immediately throttled when the performance limits are reached (only in manual selection mode on vehicles with PDK).
– PSM (Porsche Stability Management) control is more sporty in “ Sport Plus” mode. PSM interventions are later than in Normal mode. The driver can maneuver the vehicle with greater agility at its performance limits, without having to dispense with the assistance of PSM in emergency situations. This helps to achieve optimal lap times, particularly on race circuits with a dry road surface.– PADM changes to more sporty maps for the dynamic engine mountings to achieve a stiffer engine-to-body connection.In “ Sport” for a sporty driving style, in “ Sport Plus” mode for race-circuit-like driving. – PTV Plus changes to a more dynamic map when “ Sport Plus” is switched on. – The dynamic cornering light reacts more spontaneously to steering angle changes.– The sports exhaust system is be switched to a sound-optimized mode, but can be switched off separately via the button.The Auto Start Stop function and coasting mode are deactivated.fPlease read the relevant chapters.
Overboost function
On vehicles with Sport Chrono package
When “ Sport” or “Sport Plus” mode is switched on and the accelerator is fully pressed, the boost pressure is temporarily increased by approx. 2 psi (0.15 bar) in the medium engine-speed range and the maximum torque increases.
For information on the torque display:fPlease see the chapter “PERFORMANCE MENU” on page 116.
14_991_Turbo_21.book Seite 188 Mittwoch, 9. April 2014 2:19 14
Page 202 of 300
200 Storage, Luggage Compartment and Roof Transport System
Roof Transport System
A roof transport system can be fitted on the vehicle for transporting various sports and hobby equipment.
Various objects can be transported safely and securely using the roof transport system and additional attachments, e.g. ski rack, bicycle rack, surfboard rack, roof box or snowboard holder.fOnly use roof transport systems that have been tested and approved by Porsche. It is not possible to fit commercially available roof rack systems.
fInstall individual load-carrying devices, such as ski rack or roof box as centrally as possible with respect to the supports.fDo not exceed the permissible roof load, permissible gross weight and permissible axle loads.Details of these weights and loads can be found under “Technical data” in this Owner’s Manual:Please see the chapter “WEIGHTS” on page 288.fDistribute load evenly, with heavy items as low as possible. Items of luggage must not project beyond the side of the load area.fFix and secure every item to the basic carrier with a rope or lashing strap (do not use elastic rubber tensioners).fBefore every trip, and at regular intervals during long trips, check that the Roof Transport System and load are secure. Re-tighten if necessary and secure further by locking. Tighten all fastening screws again.
When the Roof Transport System is loaded, the maximum speeds depends on the nature, size and weight of the load being carried.fDriving, braking and steering behavior change due to the higher center of gravity and the greater wind resistance. You should adapt your driving style accordingly.Nevertheless, Porsche recommends that you do not exceed the posted speed limit.fNever drive faster than 80 mph (130 km/h) when the Roof Transport System is fitted and loaded.fWith the basic carrier fitted and no load, do not exceed a maximum speed of 110 mph (180 km/h).
Washing the vehicle in a car wash or failure to observe the overall vehicle height or the maximum permitted gross weight can damage the vehicle or roof transport system.fRemove the complete roof transport system before washing the vehicle in a car wash.fCheck the overall vehicle height with the roof transport system fitted before driving into multi-storey car parks, garages, underground garages and tunnels.fDo not exceed the permissible roof load, permissible gross weight and permissible axle loads.Details of these weights and loads can be found under “Technical data” in this Owner’s Manual:Please see the chapter “WEIGHTS” on page 288.
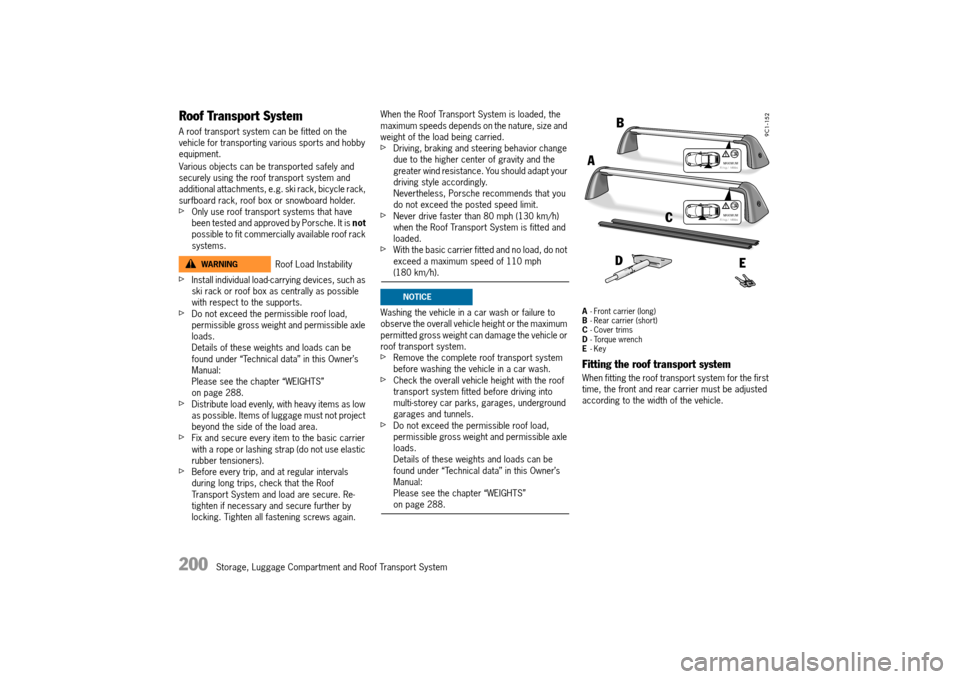
A - Front carrier (long) B - Rear carrier (short) C - Cover trims D - Torque wrench E - Key
Fitting the roof transport system
When fitting the roof transport system for the first time, the front and rear carrier must be adjusted according to the width of the vehicle.
Roof Load InstabilityWARNINGh
NOTICE
14_991_Turbo_21.book Seite 200 Mittwoch, 9. April 2014 2:19 14
Page 203 of 300

Storage, Luggage Compartment and Roof Transport System 201
1.Lift seals F on the roof rail using the hook of the torque wrench and pull them out. 2. Fold out all eight rotary holders G using the hook of the torque wrench. 3. Unlock cover flaps H using the key and fold upwards as far as possible.4. Ensure that the carriers are fitted in accordance with the stickers on the underside of the carriers.
14_991_Turbo_21.book Seite 201 Mittwoch, 9. April 2014 2:19 14
Page 204 of 300

202 Storage, Luggage Compartment and Roof Transport System
5. When fitting for the first time: Remove the handle from the torque wrench.Loosen screws on the underside of the carriers using the short side of the torque wrench.
Information
It is only necessary to loosen the screws on one underside section of the relevant carrier.
Place long carrier A at the front and short carrier B at the rear on the rotary holders G and, at the same time, adapt to the vehicle width by means of the moveable carrier supports.Tighten the screws on the underside sections of the carriers slightly.
Remove the carriers and retighten the screws on the underside sections of the carriers using the short side of the torque wrench.6. Refit the handle of the torque wrench.
14_991_Turbo_21.book Seite 202 Mittwoch, 9. April 2014 2:19 14
Page 205 of 300

Storage, Luggage Compartment and Roof Transport System 203
7.Place the carriers on rotary holders G.
Risk of damage to the seals through unintentional pinching between roof and supports.fInsert seals F in the supports.
8. First, screw in all eight carrier fastening screws using torque wrench D until flush with the surface. Then tighten all eight screws until the arrow markings on the torque wrench are exactly aligned.
9. Fold the cover flaps H of the carriers fully downwards and push the desired load-carrying device (e.g. ski box, bicycle carrier) into the carrier.
10. Cut the cover trims C to size and push them sideways into the carriers or press them into the carriers from above to protect against moisture and dirt as well as to prevent wind noise.11. Fold up and lock the cover flaps.
Information
fAfter driving 30 miles (50 km), retighten all screws on the carriers and load-carrying devices.
NOTICE
14_991_Turbo_21.book Seite 203 Mittwoch, 9. April 2014 2:19 14
Page 252 of 300
250 Minor Repairs
Wheel alignment, wheel balancing
As a precaution, have wheels with summer tires balanced in the spring, and those with mud and snow tires before winter. Unbalanced wheels may affect car handling and tire life.Only the specified weights may be used for wheel balancing.
Self-adhesive weights must not come into contact with cleaning agents, since they could drop off.Uneven tread wear indicates wheel imbalance. In this event, the vehicle should be checked at an authorized Porsche dealer.
If, during a trip, uneven running or vibrations occur that could be caused by damage to tires or the car, the speed must be reduced immediately, but without braking sharply. If you continue your trip without having the cause of the fault remedied, you might lose control of your vehicle.fStop the vehicle and check the tires.fIf no cause for the fault can be found, drive carefully to the nearest authorized Porsche dealer.
The summer tires of your Sports Car have been specially developed and adapted for high performance. At low outside temperatures (<15°C (60°F)), the tire characteristics change. This can result in noises occurring when parking or maneuvering at low outside temperatures.
Wheels with Tire Pressure Monitoring System (TPMS) sensors
Before changing wheels, make sure that the wheels are compatible with your vehicle’s TPMS.fCheck this with your authorized Porsche dealer.
Removing and storing tires
fAfter changing, adjust tire pressure and torque wheel bolts diagonally. Please see the chapter “CHANGING WHEELS” on page 254.fStore tires in a cool and dry place. Rotate periodically to avoid flat spots.fDo not store summer tires or park vehicles fitted with summer tires at ambient temperatures below 5 °F (-15 °C).fAvoid contact with fuel, oil and grease.
Tires must always remain on the same side of the vehicle.When wheels are removed, the direction of rotation and position of each wheel should be marked.
Example
FR (front right), FL, RR and RL.
Wheels must always be fitted in accordance with their marking.
The perception that tire durability and performance are not affected by storage and age is unfounded. Chemical additives, which make the rubber elastic, lose their effectiveness over the course of time and the rubber becomes brittle and cracks.
Therefore, the tires should be inspected from time to time.
Information
Under no circumstances should tires older than 6 years be used on your Porsche.
The age of the tire can be obtained from the “DOT” code number. If, for example, the last four numbers read 1213, then the tire was produced in the 12th week of 2013.
Snow tires
The installation of Porsche approved snow tires is recommended.
Use Porsche approved snow tires for grip on snow and ice. Summer performance tires are not suitable for usage in cold, snowy, or icy conditions.Check with your local Motor Vehicle Bureau for possible restrictions.
High-Speed tire Vibration
DANGERh
14_991_Turbo_21.book Seite 250 Mittwoch, 9. April 2014 2:19 14
Page 258 of 300
256 Minor Repairs
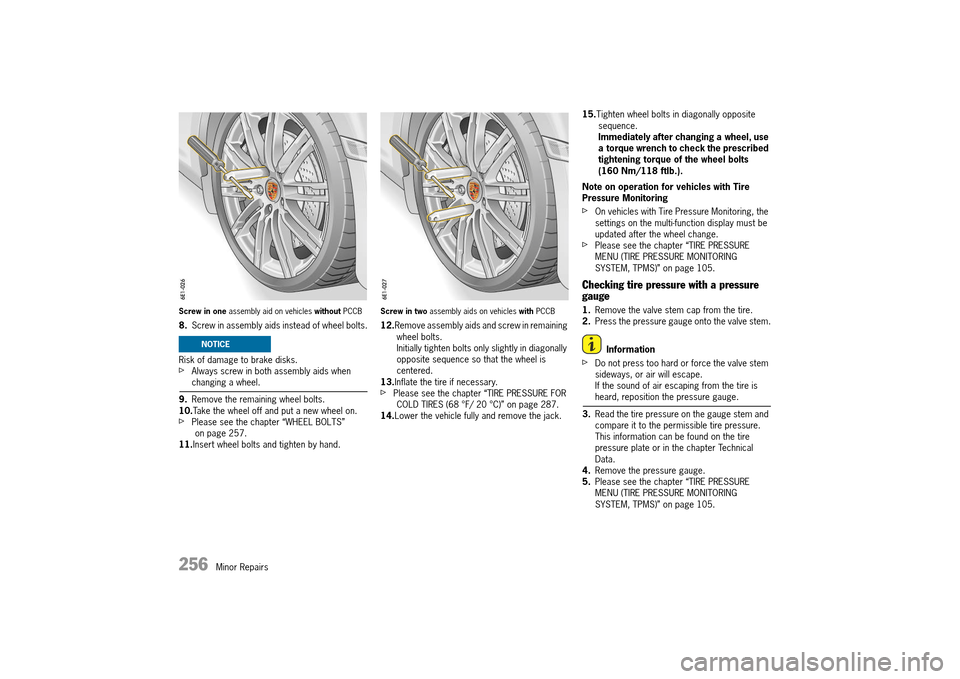
Screw in one assembly aid on vehicles without PCCB
8.Screw in assembly aids instead of wheel bolts.
Risk of damage to brake disks.fAlways screw in both assembly aids when changing a wheel.
9. Remove the remaining wheel bolts. 10. Take the wheel off and put a new wheel on.fPlease see the chapter “WHEEL BOLTS” on page 257.11. Insert wheel bolts and tighten by hand.
Screw in two assembly aids on vehicles with PCCB
12.Remove assembly aids and screw in remaining wheel bolts.Initially tighten bolts only slightly in diagonally opposite sequence so that the wheel is centered.13. Inflate the tire if necessary.fPlease see the chapter “TIRE PRESSURE FOR COLD TIRES (68 °F/ 20 °C)” on page 287.14. Lower the vehicle fully and remove the jack.
15. Tighten wheel bolts in diagonally opposite sequence.Immediately after changing a wheel, use a torque wrench to check the prescribed tightening torque of the wheel bolts (160 Nm/118 ftlb.).
Note on operation for vehicles with Tire Pressure Monitoring
fOn vehicles with Tire Pressure Monitoring, the settings on the multi-function display must be updated after the wheel change.fPlease see the chapter “TIRE PRESSURE MENU (TIRE PRESSURE MONITORING SYSTEM, TPMS)” on page 105.
Checking tire pressure with a pressure gauge
1. Remove the valve stem cap from the tire. 2. Press the pressure gauge onto the valve stem.
Information
fDo not press too hard or force the valve stem sideways, or air will escape.If the sound of air escaping from the tire is heard, reposition the pressure gauge.
3. Read the tire pressure on the gauge stem and compare it to the permissible tire pressure.This information can be found on the tire pressure plate or in the chapter Technical Data.4. Remove the pressure gauge. 5. Please see the chapter “TIRE PRESSURE MENU (TIRE PRESSURE MONITORING SYSTEM, TPMS)” on page 105.
NOTICE
14_991_Turbo_21.book Seite 256 Mittwoch, 9. April 2014 2:19 14
Page 259 of 300
Minor Repairs 257
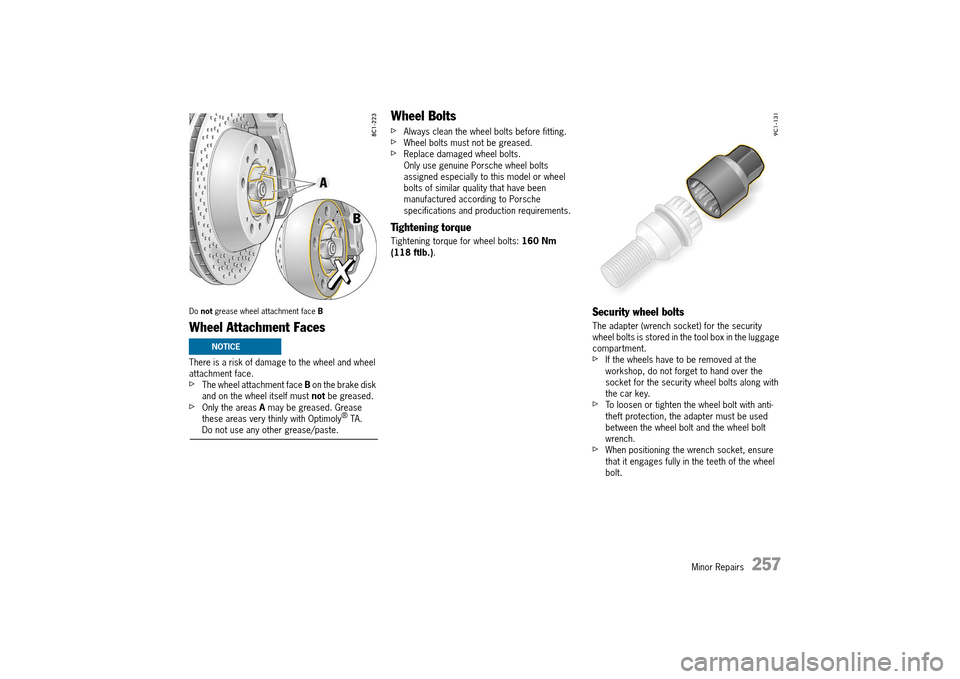
Do not grease wheel attachment face B
Wheel Attachment Faces
There is a risk of damage to the wheel and wheel attachment face.fThe wheel attachment face B on the brake disk and on the wheel itself must not be greased.fOnly the areas A may be greased. Grease these areas very thinly with Optimoly® TA. Do not use any other grease/paste.
Wheel Bolts
fAlways clean the wheel bolts before fitting.fWheel bolts must not be greased.fReplace damaged wheel bolts.Only use genuine Porsche wheel bolts assigned especially to this model or wheel bolts of similar quality that have been manufactured according to Porsche specifications and production requirements.
Tightening torque
Tightening torque for wheel bolts: 160 Nm (118 ftlb.) .
Security wheel bolts
The adapter (wrench socket) for the security wheel bolts is stored in the tool box in the luggage compartment.fIf the wheels have to be removed at the workshop, do not forget to hand over the socket for the security wheel bolts along with the car key.fTo loosen or tighten the wheel bolt with anti-theft protection, the adapter must be used between the wheel bolt and the wheel bolt wrench.fWhen positioning the wrench socket, ensure that it engages fully in the teeth of the wheel bolt.
NOTICE
14_991_Turbo_21.book Seite 257 Mittwoch, 9. April 2014 2:19 14
Page 260 of 300

258 Minor Repairs
Wheels with Central Lock
Racing technology for the road. Wheels with a central lock are perfectly normal in motor sport, but are not common on normal roads.Instead of the central lock nuts conventionally used in motor sport, the wheel has an encapsulated central bolt, which is used to fasten it to the wheel hub.
Driving on a race circuit (e.g. sports driving school, club sport events)
Wheels are subjected to significantly higher stresses during extremely sporty driving – particularly when driving on race circuits – compared to driving on public roads. For this reason, all the instructions specified below must always be noted and followed for driving on race circuits.fAlways make enquiries with your authorized Porsche dealer about any other driving and maintenance instructions before driving on race circuits.
The central lock, like all chassis components, requires greater attention while driving on race circuits.fCheck the tightening torque of the central bolts before, if necessary during and after driving on a race circuit.fWhenever wheels are changed, apply some aluminum paste to the trapezoidal thread on the wheel hub or have a second set of greased screws on hand.fNever drive the vehicle without a central lock bolt in the hub.fAll central wheel lock components, such as the central bolt, wheel, wheel hub, wheel hex and brake disk must always be checked for wear and replaced if necessary after driving on a race circuit.
fAxis components subject to high loads must be replaced at intervals specified by Porsche . Always make enquiries with your authorized Porsche dealer about the current stipulations before driving on race circuits.fOther parts such as ball joints, rubber mounts, etc., where wear may result in modified vehicle handling, must be checked and if applicable replaced without delay.
Deferring inspection, maintenance and replacement measures can result in accidents.
This is particularly true if you are clocking up high mileage on race circuits . We recommend that you get an authorized Porsche dealer to carry out these measures.
Components can break or become damaged. Unsuitable wheel sizes or incorrectly dimensioned components in the hub area of accessory wheels , the use of spacers, etc. can impair the overall function of the wheel mounting.fOnly use wheel/tire combinations approved by Porsche.fUnder no circumstances should spacers be used.
Central Bolts
The central bolt and central bolt lock are safety-related components. Always check them for signs of wear and damage.fThe conical surface, trapezoidal thread and inner toothing of the central bolt must not be scratched or cracked.fReplace damaged central bolts.Only use the genuine Porsche central bolts allocated specifically to this vehicle model.fThe conical surface and trapezoidal thread on the central bolt must be perfectly clean.
Tightening torque for central bolts: 443 ftlb. (600 Nm).
Changing a Wheel
fGet an authorized Porsche dealer to change the wheel.
Information
The tools required for changing a wheel (e.g. jack, torque wrench) are not supplied as standard with the car. Your authorized Porsche dealer will be pleased to advise you.
Deferred inspection, maintenance and replacement measures
Inadequate screw connections when using unapproved components and wheels
WARNINGh
WARNINGh
14_991_Turbo_21.book Seite 258 Mittwoch, 9. April 2014 2:19 14