bulb PORSCHE BOXSTER 2009 2.G Owners Manual
[x] Cancel search | Manufacturer: PORSCHE, Model Year: 2009, Model line: BOXSTER, Model: PORSCHE BOXSTER 2009 2.GPages: 294, PDF Size: 6.89 MB
Page 9 of 294
Table of Contents
7
Trip Odometer ........................................... 121
Speedometer ................ ............................ 122
Changing over between Miles / Kilometers .. 122
Tachometer ............... ................................ 123
Turn Signal Indicator Light .......................... 123
High Beam Indicator Li ght ........................... 123
Gear Shift Indicator
(in vehicles with manual transmission) .......... 123
Cooling System ......... ................................ 124
Porsche Doppelkupplung (PDK) ................... 125
Fuel .......................... ................................ 126
Clock ............................ ............................ 127
Outside Temperature ................................. 127
Check Engine (Emission Control) ................. 129
On-Board Computer (B C) ............................ 130
Warnings on the instrument panel and the on-
board computer ............. ............................ 162Shifting Gears.................................. 171Manual Transmission, Cl utch ....................... 172
Drive-Off Assistant ..... ................................ 173
Porsche Doppelkupplung (PDK) ................... 174Mobile Roofs ................................... 181Convertible Top ......... ................................ 182
Windstop ................... ................................ 189
Hardtop ........................ ............................ 190Maintenance, Car Care .................... 195Exercise Extreme Caution when Working
on your Vehicle .......................................... 196
Coolant Level ............ ................................ 197
Engine Oil ................. ................................ 199 Engine Oil Level ..
......................................199
Engine Oil Recommendat ion ........................200
Brake Fluid Level ...... ..................................202
Fuel Economy .......... ..................................204
Operating your Porsche in other Countries ...204
Fuel Recommendation s ..............................206
Portable Fuel Containers ............................207
Fuel Evaporation Control ............................207
Emission Control Syst em ............................208
How Emission Control Works ......................209
Washer Fluid ............ ..................................210
Power Steering ........ ..................................211
Air Filter .................. ..................................211
Combination Filter .... ..................................211
Fluids/Oils for Manual Transmission
and Porsche Doppelkuppl ung (PDK) .............211
Wiper Blades .......... ..................................212
Car Care Instructions ................................213
Practical Tips, Emergency Service .... 221Exercise Extreme Caution when Working
on your Vehicle ............................ .............222
Tires/Wheels ............... ............................. 223
Loading Information ...................... .............234
Wheel Bolts ................................. .............236
Changing a wheel .......................... .............237
Flat Tire........................ ............................. 239
Lifting the Vehicle with a Lifting Platform
or Garage Lift ...... ......................................242
Spacers ...................... ..............................243
Electrical System ......................................245
Battery ................... ..................................249
Replacing the remote-control battery ..........254
Emergency Starting with Jumper Cables ......255 Bulb chart ..............
................................... 257
Lights, Replacing Bulb s ............................. 257
Headlights ............. ................................... 258
Number Plate Light . ................................... 266
Changing Light-Emitting Diodes and Long-Life
Bulbs ......................... .............................. 266
Adjusting Headlights .................................. 267
Towing ....................... .............................. 269
Vehicle Identification,
Technical Data ......... ....................... 273Vehicle Identification .................................. 274
Technical Data ....... ................................... 276
Tire Pressure for Cold Tires ....................... 277
Tires, Rims, Tracks .................................. 278
Driving Performance* ................. .............. 280
Capacities ............. ................................... 281
Weights ..................... .............................. 282
Dimensions ........... ................................... 282
Diagrams ................... .............................. 283
Page 49 of 294
Operation, Safety
47
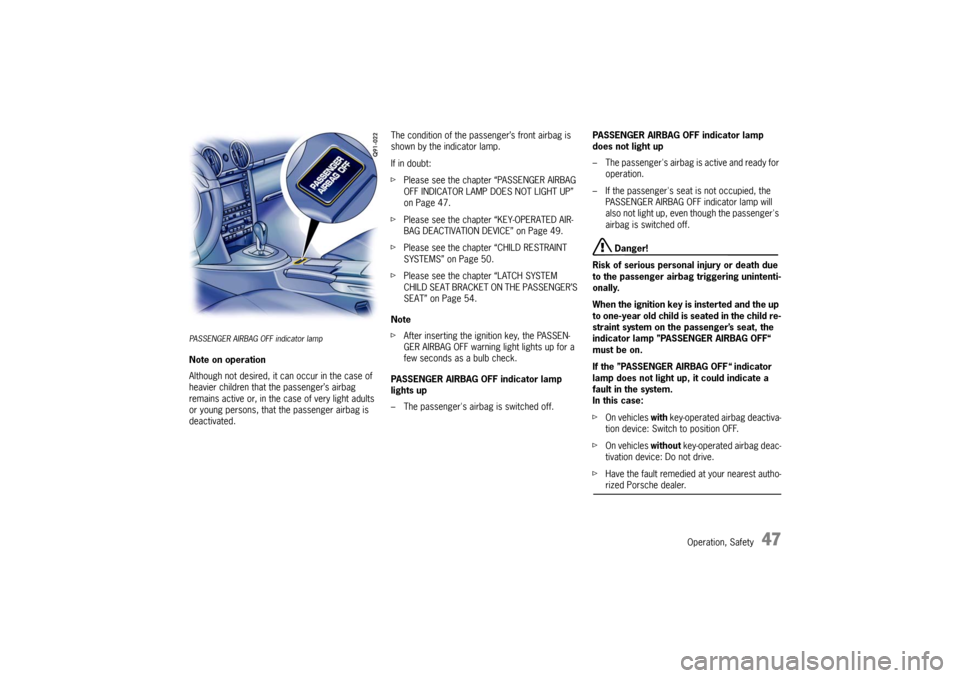
PASSENGER AIRBAG OFF indicator lampNote on operation
Although not desired, it can occur in the case of
heavier children that the passenger’s airbag
remains active or, in the case of very light adults
or young persons, that the passenger airbag is
deactivated.The condition of the passenger’s front airbag is
shown by the indicator lamp.
If in doubt:
f
Please see the chapter “PASSENGER AIRBAG
OFF INDICATOR LAMP DOES NOT LIGHT UP”
on Page 47.
f Please see the chapter “KEY-OPERATED AIR-
BAG DEACTIVATION DEVICE” on Page 49.
f Please see the chapter “CHILD RESTRAINT
SYSTEMS” on Page 50.
f Please see the chapter “LATCH SYSTEM
CHILD SEAT BRACKET ON THE PASSENGER’S
SEAT” on Page 54.
Note
f After inserting the ignition key, the PASSEN-
GER AIRBAG OFF warning light lights up for a
few seconds as a bulb check.
PASSENGER AIRBAG OFF indicator lamp
lights up
– The passenger's airbag is switched off. PASSENGER AIRBAG OFF indicator lamp
does not light up
– The passenger's airbag is active and ready for
operation.
– If the passenger's seat is not occupied, the PASSENGER AIRBAG OFF indicator lamp will
also not light up, even though the passenger's
airbag is switched off.
Danger!
Risk of serious personal injury or death due
to the passenger airbag triggering unintenti-
onally.
When the ignition key is insterted and the up
to one-year old child is seated in the child re-
straint system on the passenger’s seat, the
indicator lamp ”PASSENGER AIRBAG OFF“
must be on.
If the ”PASSENGER AIRBAG OFF “ indicator
lamp does not light up , it could indicate a
fault in the system.
In this case:
f On vehicles with key-operated airbag deactiva-
tion device: Switch to position OFF.
f On vehicles without key-operated airbag deac-
tivation device: Do not drive.
f Have the fault remedied at your nearest autho-rized Porsche dealer.
Page 83 of 294
Operation, Safety
81
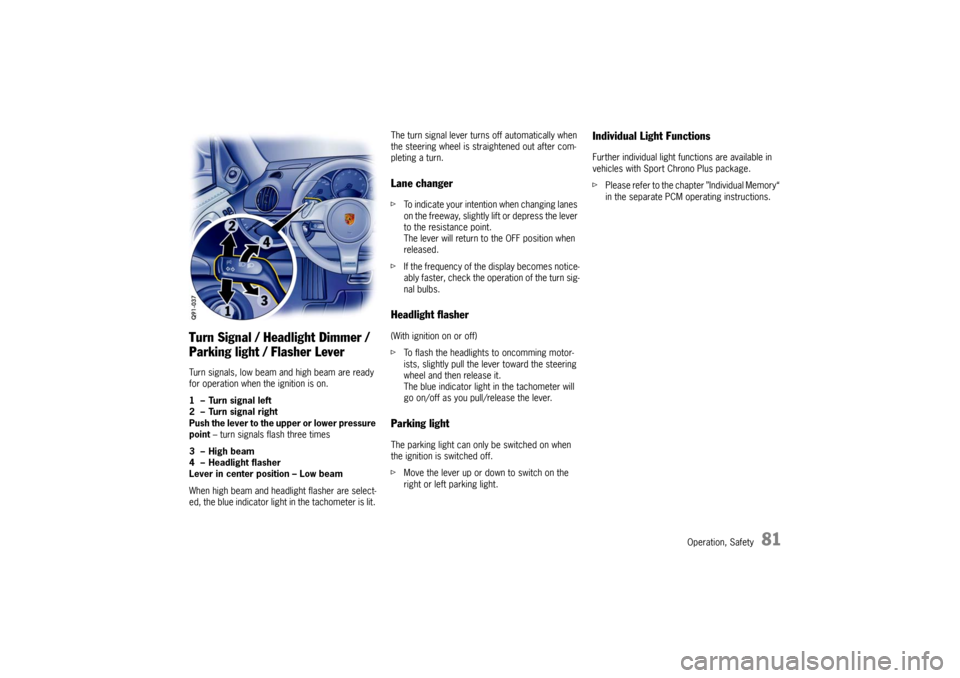
Turn Signal / Headlight Dimmer /
Parking light / Flasher Lever Turn signals, low beam and high beam are ready
for operation when the ignition is on.
1 – Turn signal left
2 – Turn signal right
Push the lever to the upper or lower pressure
point – turn signals flash three times
3 – High beam
4 – Headlight flasher
Lever in center position – Low beam
When high beam and head light flasher are select-
ed, the blue indicator light in the tachometer is lit. The turn signal lever turns off automatically when
the steering wheel is st
raightened out after com-
pleting a turn.
Lane changer f To indicate your intention when changing lanes
on the freeway, slightly lift or depress the lever
to the resistance point.
The lever will return to the OFF position when
released.
f If the frequency of the display becomes notice-
ably faster, check the operation of the turn sig-
nal bulbs. Headlight flasher (With ignition on or off)
fTo flash the headlights to oncomming motor-
ists, slightly pull the lever toward the steering
wheel and then release it.
The blue indicator light in the tachometer will
go on/off as you pull/release the lever. Parking lightThe parking light can only be switched on when
the ignition is switched off.
fMove the lever up or down to switch on the
right or left parking light.
Individual Light FunctionsFurther individual light functions are available in
vehicles with Sport Chrono Plus package.
f Please refer to the chapter ”Individual Memory“
in the separate PCM operating instructions.
Page 131 of 294

Instruments, On-Board Computer, Warnings
129
Check Engine
(Emission Control)The emission control system detects malfunctions
early that could, for example, cause increased
pollutant emissions or consequential damage.
Faults are indicated by a continuously lit or
flashing instrument panel warning light.
The faults are recorded in the control unit's fault
memory.
The warning light in the instrument panel lights up
when the ignition is switched on as a bulb check
and goes out approx. 4 seconds after the engine
starts. If the warning light does not light up, have
the bulb replaced promptly.
The warning light in the instrument panel flashes to
indicate operating states (e.g. engine misfiring)
which might cause damage to certain parts of the
emission control system.
fIn this case, immediately reduce the engine
load by easing off the accelerator.
f In order to avoid consequential damage to the
engine or emission control system (e.g. cata-
lytic converter), have the fault diagnosed and
rectified immediately at the nearest authorized
Porsche dealer. If the warning light in the
instrument panel lights up
permanently without flashing before and remains
on while driving, it suggests:
– a potential engine control problem and the need for system service or
– an improperly fastened tank cap or
– the vehicle was refueled while the engine was running.
f Stop immediately at a suitable and secure
place and check tank cap for proper fastening.
If tank cap was fastened correctly, see your au-
thorized Porsche dealer for service as soon as
possible.
Caution!
If the check engine warning light in the in-
strument panel is flashing, serious catalytic
converter damage and power loss will soon
occur.
Prolonged driving with the check engine war-
ning light on could cause damage to the
emission control system. It also could affect
fuel economy and driveability.
f Have the fault remedied at the nearest authorized Porsche dealer immediately.
Warning Light
Page 165 of 294

Warnings
163
Check left/right dipped beam (low
beam)
also applies to:
direction indicator, high beam, side in-
dicator light, reversing lightThe reported light is faulty. Check bulb.
Have the fault remedied
at an authorized
Porsche dealer.
Daytime
driving lights off Daytime driving lights switch off when the en-
gine is shut off. Switch
on lights if necessary.
Headlight beam
adjustment faulty Have the fault remedied
at an authorized
Porsche dealer.
Front lid not closed Close front lu ggage compartment lid properly.
Rear lid not closed Close rear luggage compartment lid properly.
Rain sensor faulty Have the faul t remedied at an authorized
Porsche dealer.
Steering wheel heating
ON Steering wheel heating was switched on.
Steering wheel heating
OFF Steering wheel heating was switched off.
Launch
control
active
Drive Off Assistant
failure Have the fault remedied
at an authorized
Porsche dealer.
Refill washer fluid
LIMIT
Cannot be accepted
with vehicle stopped The current speed can only
be accepted for the
acoustic warning signal when the vehicle is in
motion.
Instrument
panel On-board
computerText display on on-board
computer Meaning/measure
Page 223 of 294
Practical Tips, Emergency Service
221
Practical Tips, Emergency Service
Exercise Extreme Caution when Working
on your Vehicle .
....................................... 222
Tires/Wheels .............. ............................. 223
Loading Information ................................... 234
Wheel Bolts .......... ................................... 236
Changing a wheel ... ................................... 237
Flat Tire ....................... ............................. 239
Lifting the Vehicle with a Lifting Platform
or Garage Lift ........ ................................... 242
Spacers ..................... .............................. 243
Electrical System ..................................... 245
Battery ................. ................................... 249
Replacing the remote-con trol battery ......... 254
Emergency Starting with Jumper Cables ..... 255
Bulb chart .............. ................................... 257
Lights, Replacing Bulb s ............................. 257
Headlights ............. ................................... 258
Number Plate Light . ................................... 266
Changing Light-Emitting Diodes and Long-Life
Bulbs ......................... .............................. 266
Adjusting Headlights .................................. 267
Towing ....................... .............................. 269
Page 259 of 294

Practical Tips, Emergency Service
257
Bulb chart
Ty p e , r a t i n g
Halogen low beam H7, 55W
Halogen high beam H9, 65W
Low beam/high beam with Bi-Xen on headlights Philips, D2S 35W
Additional high beam with Bi-Xenon headlights H7, 55 W
Turn signal light, front Philips HY21W
Turn signal light, side WY5W
Fog light H8, 35W
License plate light C5W
Lights, Replacing Bulbs
Warning!
Risk of short circuit.
f Always switch off the relevant consumer when
changing bulbs.
Risk of serious personal injury or death.
The Bi-Xenon headlights are under high
voltage when installed.
f Be careful during all work in the area of the Bi-
Xenon headlights.
Risk of damage. Bulbs of a higher wattage
can damage the lamp housing.
f Only the bulbs shown in the chart may be used.
f New bulbs must be clean and free from oil,
grease and fingerprints. Therefore, never
touch bulbs with your bare hands.
Use a cloth or soft paper while replacing bulbs.
Page 262 of 294
260
Practical Tips, Emergency Service
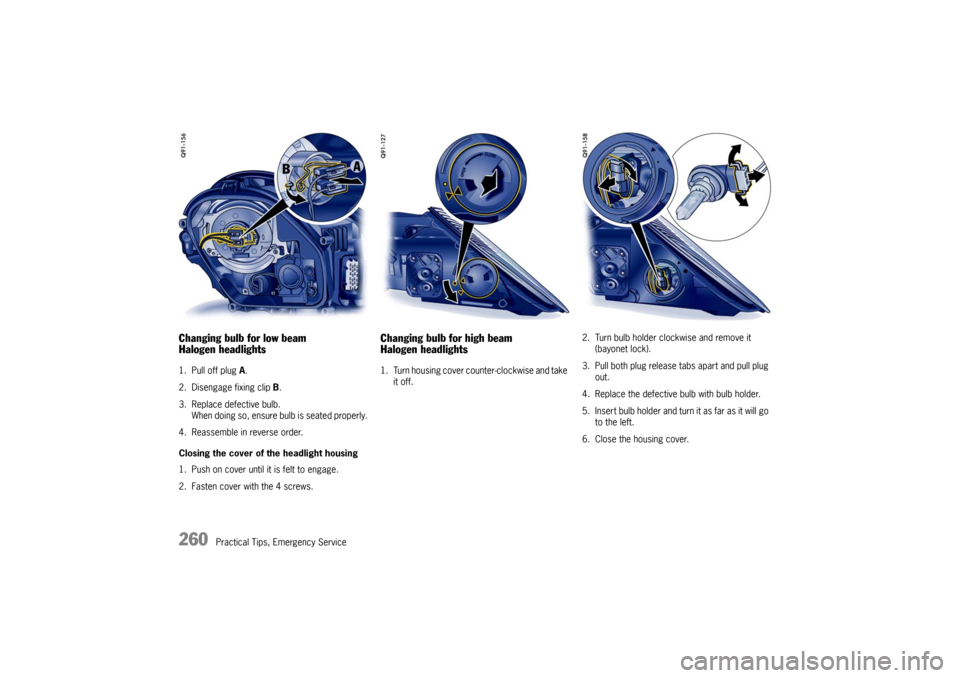
Changing bulb for low beam
Halogen headlights1. Pull off plug A.
2. Disengage fixing clip B.
3. Replace defective bulb. When doing so, ensure bulb is seated properly.
4. Reassemble in reverse order.
Closing the cover of the headlight housing
1. Push on cover until it is felt to engage.
2. Fasten cover with the 4 screws.
Changing bulb for high beam
Halogen headlights1. Turn housing cover counter-clockwise and take it off. 2. Turn bulb holder clockwise and remove it
(bayonet lock).
3. Pull both plug release tabs apart and pull plug out.
4. Replace the defective bulb with bulb holder.
5. Insert bulb holder and turn it as far as it will go to the left.
6. Close the housing cover.
Page 263 of 294
Practical Tips, Emergency Service
261
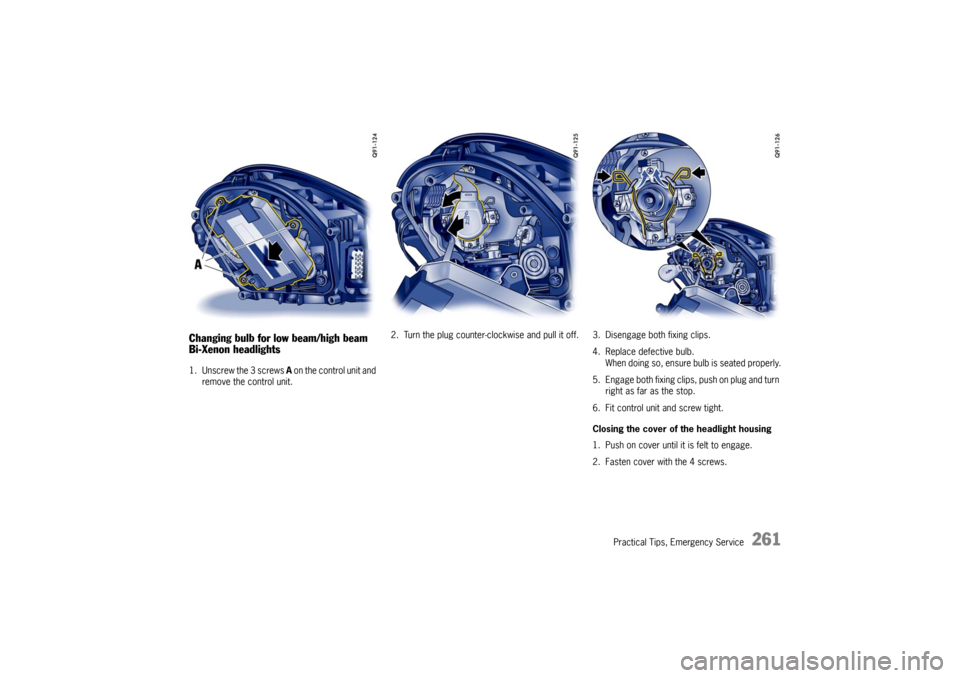
Changing bulb for low beam/high beam
Bi-Xenon headlights1. Unscrew the 3 screws A on the control unit and
remove the control unit. 2. Turn the plug counter-clockwise and pu
ll it off. 3. Disengage both fixing clips.
4. Replace defective bulb.When doing so, ensure bulb is seated properly.
5. Engage both fixing clips, push on plug and turn right as far as the stop.
6. Fit control unit and screw tight.
Closing the cover of the headlight housing
1. Push on cover until it is felt to engage.
2. Fasten cover with the 4 screws.
Page 264 of 294
262
Practical Tips, Emergency Service
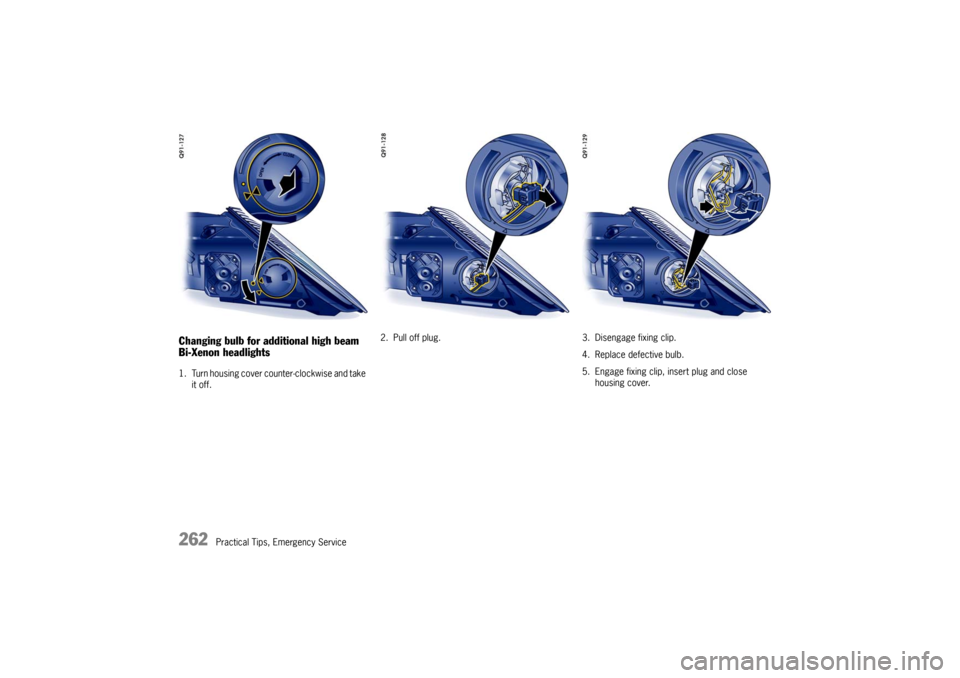
Changing bulb for additional high beam
Bi-Xenon headlights1. Turn housing cover counter-clockwise and take it off. 2. Pull off plug. 3. Disengage fixing clip.
4. Replace defective bulb.
5. Engage fixing clip, insert plug and close housing cover.