Lug PORSCHE CAYMAN 2009 1.G Owner's Guide
[x] Cancel search | Manufacturer: PORSCHE, Model Year: 2009, Model line: CAYMAN, Model: PORSCHE CAYMAN 2009 1.GPages: 284, PDF Size: 5.94 MB
Page 231 of 284

Practical Tips, Emergency Service
229
Flat Tire
Warning!
Failure to follow these instructions may result
in serious personal injury to you or to by-
standers.
f If you have a flat tire, move a safe distance off
the road. Turn the emergency flasher on and
use other warning devices to alert other motor-
ists. Set the parking brake.
f Do not park your vehicl e where it may contact
dry grass, brush or other flammable materials.
The hot parts of the exhaust system could set
such materials on fire, thereby causing both
property damage and serious personal injury or death.
A tire sealant and compressor with pressure
tester are located in the luggage compartment.
f Please observe the safety and operating in-
structions on the special sealant bottle with a
special Porsche part number and on the com-
pressor – these are essential. Important note
Sealing the tire with the tire repair kit is only
an emergency repair. Even with the tire air-
tight, it may be used only for short journeys
in an emergency.
The maximum permitted speed is 50 mph
(80 km/h).
f
Do not use commercially available sealant or
tire inflating bottles.
Use only the tire sealant located in the luggage
compartment.
Warning!
Risk of accident, resulting in serious
personal injury or death.
f Have tires replaced by a specialist workshop
as soon as possible.
f Avoid hard acceleration and high cornering speeds.
Page 232 of 284

230
Practical Tips, Emergency Service
A- Filler bottle
B - Filler hoseTire sealantThe tire sealant can be used to seal small cuts,
especially in the tire tread.
Sealing the tire with the tire sealant is only an
emergency repair, so you can drive to the next
workshop. Even with the tire air-tight, it may be
used only for short journeys in an emergency. The tire sealant and a compressor with pressure
tester can be found in the luggage compartment.
The tire sealant comprises:
– A filler bottle
– A sticker denoting the maximum permissible
speed for the driver’s field of vision
– A filler hose
– A valve turner and
– A spare valve insert.
Danger!
Risk of accident , resulting in serious per-
sonal injury or death.
f Use the tire sealant only in the case of cuts or
punctures no larger than 0.15 in. (4 mm).
f Never use the tire sealant if the rim is dam-aged.
Warning!
The sealant is highly flammable and harmful
to health.
f Fire, naked flame and smoking are prohibited
when handling tire sealant.
f Avoid contact with skin, ey es or clothing due to
caustic chemical properties of the tire sealant.
f Keep tire sealant away from children.
f Do not inhale vapors, due to consequent harm
to personal health resulting in serious personal injury or death.
In case of contact with the sealant:
f If sealant gets on the skin or in the eyes,
thoroughly rinse the affect ed part of the body
off immediately.
f Change soiled clothing immediately.
f Get medical attention immediately in the event
of an allergic reaction.
f If sealant was swallowed, thoroughly rinse out
the mouth without delay an d drink plenty of
water.
Do not induce vomiting.
Get medical attention immediately.
Page 233 of 284
Practical Tips, Emergency Service
231
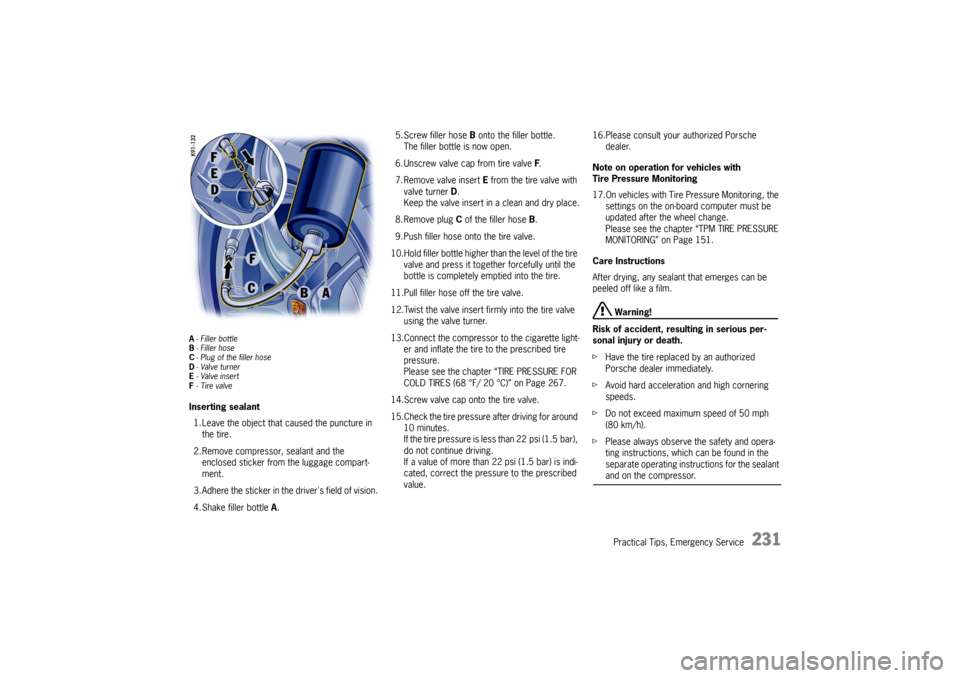
A- Filler bottle
B - Filler hose
C - Plug of the filler hose
D -Valve turner
E -Valve insert
F - Tire valveInserting sealant
1. Leave the object that caused the puncture in the tire.
2. Remove compressor, sealant and the enclosed sticker from the luggage compart-
ment.
3. Adhere the sticker in the driver's field of vision.
4. Shake filler bottle A. 5. Screw filler hose B
onto the filler bottle.
The filler bottle is now open.
6. Unscrew valve cap from tire valve F.
7. Remove valve insert E from the tire valve with
valve turner D.
Keep the valve insert in a clean and dry place.
8. Remove plug C of the filler hose B.
9. Push filler hose onto the tire valve.
10.Hold filler bottle higher than the level of the tire valve and press it together forcefully until the
bottle is completely emptied into the tire.
11.Pull filler hose off the tire valve.
12.Twist the valve insert fi rmly into the tire valve
using the valve turner.
13.Connect the compressor to the cigarette light- er and inflate the tire to the prescribed tire
pressure.
Please see the chapter “TIRE PRESSURE FOR
COLD TIRES (68 °F/ 20 °C)” on Page 267.
14.Screw valve cap onto the tire valve.
15.Check the tire pressure after driving for around 10 minutes.
If the tire pressure is less than 22 psi (1.5 bar),
do not continue driving.
If a value of more than 22 psi (1.5 bar) is indi-
cated, correct the pressure to the prescribed
value. 16.Please consult your authorized Porsche
dealer.
Note on operation for vehicles with
Tire Pressure Monitoring
17.On vehicles with Tire Pressure Monitoring, the settings on the on-board computer must be
updated after the wheel change.
Please see the chapter “TPM TIRE PRESSURE
MONITORING” on Page 151.
Care Instructions
After drying, any sealan t that emerges can be
peeled off like a film.
Warning!
Risk of accident , resulting in serious per-
sonal injury or death.
f Have the tire replaced by an authorized
Porsche dealer immediately.
f Avoid hard acceleration and high cornering
speeds.
f Do not exceed maximum speed of 50 mph
(80 km/h).
f Please always observe the safety and opera-
ting instructions, which can be found in the
separate operating instructions for the sealant and on the compressor.
Page 238 of 284
236
Practical Tips, Emergency Service
Alarm system, central lockingThe status of the central locking and alarm system
is not changed by disconnecting the battery.
When the battery is di sconnected, the alarm
system ceases to function.Central locking overload protectionIf the central locking sy stem is operated more
than ten times within a minut e, further operation is
blocked for 30 seconds.
Load switch-off after 2 hours or 7 daysIf the ignition key is removed, loads which are
switched on or are in standby mode (such as the
luggage compartment light and interior light) are
automatically switched off after approx. 2hours.
The Radio/PCM is automatically switched off after
approx. 10 minutes.
If the vehicle is not started or unlocked with the
remote control within 7days , the remote control
standby function is switched off (to save the
vehicle battery).
1. In this case, unlock the driver’s door with the key at the door lock.
Leave the door closed in order to prevent the
alarm system from being triggered.
2. Press button 1 on the remote control.
The remote control is now activated again.
Page 239 of 284
Practical Tips, Emergency Service
237
Replacing fuses In order to prevent damage to the electrical sys-
tem due to short circuits and overloads, the indi-
vidual circuits are protected by fuses.
The fuse box is located in the driver’s footwell.
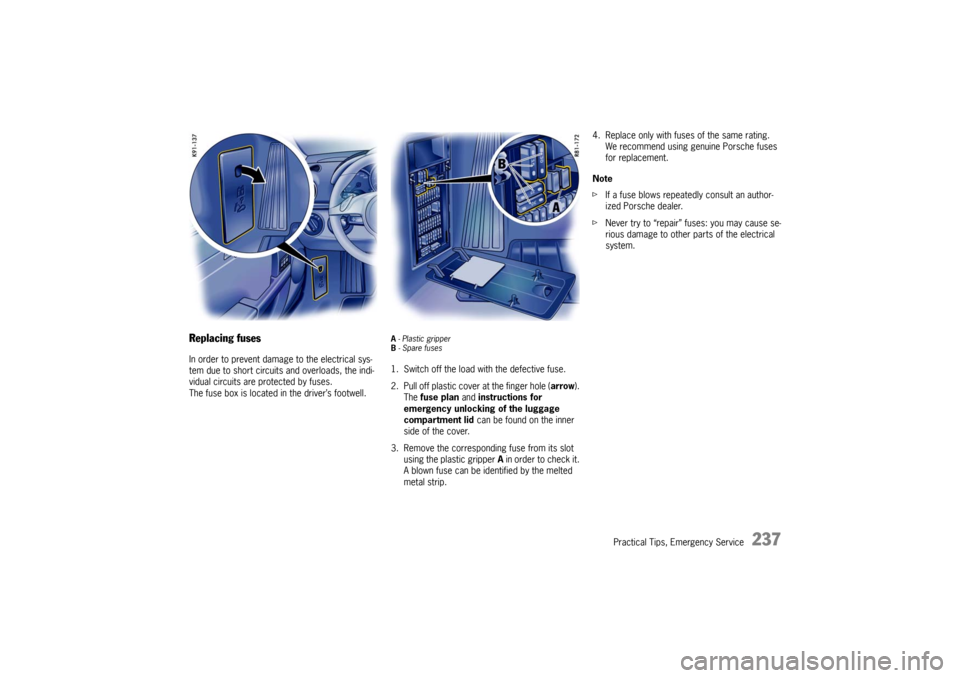
A - Plastic gripper
B - Spare fuses 1. Switch off the load with the defective fuse.
2. Pull off plastic cover at the finger hole (arrow ).
The fuse plan and instructions for
emergency unlocking of the luggage
compartment lid can be found on the inner
side of the cover.
3. Remove the corresponding fuse from its slot using the plastic gripper A in order to check it.
A blown fuse can be ide ntified by the melted
metal strip. 4. Replace only with fuses of the same rating.
We recommend using genuine Porsche fuses
for replacement.
Note
f If a fuse blows repeatedly consult an author-
ized Porsche dealer.
f Never try to “repair” fuses: you may cause se-
rious damage to other pa rts of the electrical
system.
Page 240 of 284
238
Practical Tips, Emergency Service
Emergency unlocking of the front luggage
compartment lidIf the battery is discharged, the front luggage
compartment lid can be opened only with the aid
of a donor battery.
Note
The engine cannot be started with this method.
f Please see the chapter “EMERGENCY
STARTING WITH JUMPER CABLES” on
Page 245.
Unlocking lid
1. Use the key to unlock the vehicle at the door lock.
2. Remove the plastic cover from the fuse box.
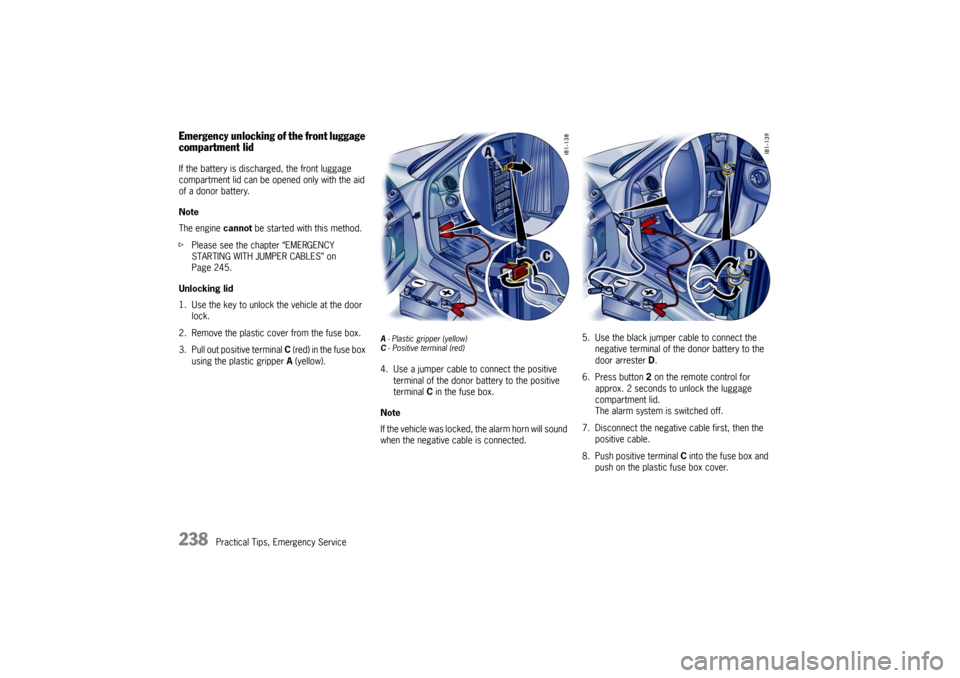
3. Pull out positive terminal C (red) in the fuse box
using the plastic gripper A (yellow).
A - Plastic gripper (yellow)
C - Positive terminal (red)4. Use a jumper cable to connect the positive
terminal of the donor battery to the positive
terminal C in the fuse box.
Note
If the vehicle was locked, the alarm horn will sound
when the negative cable is connected.
5. Use the black jumper cable to connect the negative terminal of the donor battery to the
door arrester D.
6. Press button 2 on the remote control for
approx. 2 seconds to unlock the luggage
compartment lid.
The alarm system is switched off.
7. Disconnect the negative cable first, then the positive cable.
8. Push positive terminal C into the fuse box and
push on the plastic fuse box cover.
Page 241 of 284
Practical Tips, Emergency Service
239
Battery The battery is located in the front luggage
compartment under a black plastic cover.
f Please see the chapter “EMERGENCY OPERA-
TION – PULLING OUT THE IGNITION KEY” on
Page 74.
f Please see the chapter “EMERGENCY UNLO-
CKING OF THE FRONT LUGGAGE COMPART-
MENT LID” on Page 238.
Warning!
Risk of short circuit, fire and damage to al-
ternator and electronic control units, result-
ing in serious personal injury or death.
f Observe all warning notes on the battery.
f Disconnect the negative terminal on the bat-
tery during all work on the electrical system.
f Do not lay tools or other metal objects on the
battery as they could cause a short circuit
across the battery terminal.
Hydrogen gas generated by the battery
could cause an explosion, resulting in
serious personal injury or death.
f Do not expose the battery to an open flame,
electrical spark or a lit cigarette.
f Do not wipe battery with a dry cloth.
Risk of serious personal injury or death and
damage to the fabric, metal or paint. f
Wear eye protection.
f Do not allow battery acid to come in contact
with your skin, eyes, fabric or painted
surfaces.
f If you get electrolyte, which is an acid, in your
eyes or on your skin, immediately rinse with
cold water for several minutes and call a doc-
tor.
f Spilled electrolyte must be rinsed off at once
with a solution of baki ng soda and water to
neutralize the acid.
Battery posts, terminals and related acces-
sories contain lead and lead compounds,
chemicals known to the State of California to
cause cancer and reproductive harm.
f Always protect your skin by washing thorough-
ly with soap and water.
Risk of explosion as a result of static charge,
resulting in serious personal injury or death.
f Do not wipe the battery with a dry cloth.
f Eliminate potential electrostatic charge by
touching the vehicle before touching the bat-
tery.
Charge state A well-charged battery prevents starting problems
and has a longer service life.
Traffic density, requirements regarding noise, ex-
haust gas and fuel consumption reduce the engine
speed and, hence, the alternator output.
However, the large number of electrical loads has
markedly increased the demand for electrical
power.
In order to avoid discharging the battery
unintentionally:
f Switch off unnecessary electrical loads in city
traffic, on short trips or in a line or traffic.
f Always remove the ignition key from the igni-
tion switch when leaving the car.
f Avoid frequent operation of the Porsche Com-
munication Management system and audio
system when the engine is not running.
f In the cold season in particular or if the vehicle
is used primarily for short journeys, it may be
necessary to recharge the battery from time to
time.
Page 242 of 284
240
Practical Tips, Emergency Service
Battery care fEnsure that battery is securely mounted.
f Keep terminals and connections clean and
properly tightened.
Corrosion can be prevented by coating the ter-
minals and connections with petroleum jelly or
silicone spray.
f Ensure that vent caps ar e securely tightened to
prevent spillage.
Checking the electrolyte fluid level
f The acid level should be checked more fre-
quently by a qualified specialist workshop dur-
ing the summer months and in predominantly
warm countries. Battery charging
Automotive batteries loose their efficiency when
not in use.
The charge available in your battery can be meas-
ured with a battery hydrometer.
We recommend that the battery voltage be tested
by your authorized Porsche dealer who has the ap-
propriate equipment.
If the car is not driven for prolonged periods, the
battery must be charged at least every 6 weeks.
A discharged battery allows
rapid formation of sul-
fates, leading to premature deterioration of the
plates.
Warning!
Hydrogen gas generated by the battery
could cause an explosion, resulting in
serious personal injury or death.
f Charge battery in a well ventilated area.
f Never charge a frozen battery. It may explode
because of gas trapped in the ice. Allow a fro-
zen battery to thaw out first.
f If you get electrolyte, wh ich is an acid, in your
eyes or on your skin, immediately rinse with
cold water for several minutes and call a doc-tor. Slow battery charging
Your authorized Porsche dealer will be pleased to
advise you about a suitable charger.
1. Always observe the instructions of the charger
manufacturer.
Depending on the type of charger, the battery
may have to be disconnected.
In this case, always disconnect the negative
lead first, and then the positive lead – risk of
short circuit!.
Reconnect the leads in reverse order.
2. Before charging, cold batteries must be warmed up indoors.
3. Frozen batteries must be thawed out first before being charged.
4. When charging, ensure that there is adequate ventilation.
5. Connect the charger to the battery. Only plug into the mains and switch the
charger on when it is connected up correctly.
6. Switch on the charger.
7. After charging, switch off the charger first and then disconnect it.
8. Please see the chapter “PUTTING VEHICLE INTO OPERATION” on Page 241.
Page 244 of 284
242
Practical Tips, Emergency Service
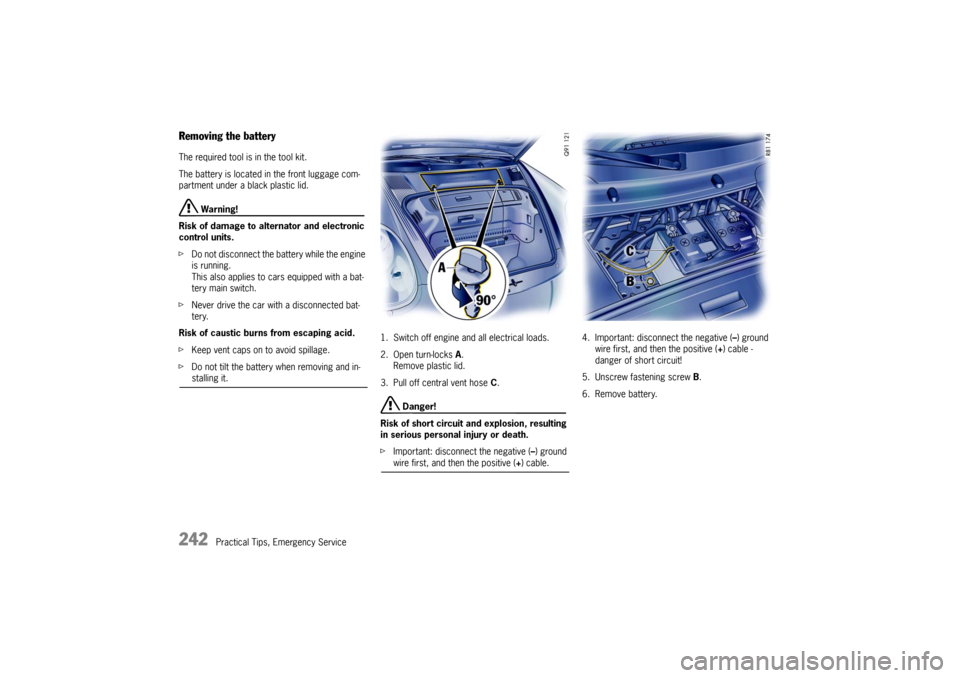
Removing the battery The required tool is in the tool kit.
The battery is located in the front luggage com-
partment under a black plastic lid.
Warning!
Risk of damage to alternator and electronic
control units.
f Do not disconnect the battery while the engine
is running.
This also applies to cars equipped with a bat-
tery main switch.
f Never drive the car with a disconnected bat-
tery.
Risk of caustic burns from escaping acid.
f Keep vent caps on to avoid spillage.
f Do not tilt the battery when removing and in-stalling it. 1. Switch off engine and all electrical loads.
2. Open turn-locks
A.
Remove plastic lid.
3. Pull off central vent hose C.
Danger!
Risk of short circuit an d explosion, resulting
in serious personal injury or death.
f Important: disconnect the negative ( –) ground wire first, and then the positive ( +) cable. 4. Important: disconnect the negative (
–) ground
wire first, and then the positive ( +) cable -
danger of short circuit!
5. Unscrew fastening screw B.
6. Remove battery.
Page 247 of 284
Practical Tips, Emergency Service
245
Emergency Starting with Jumper
Cables If the battery is discharged, e.g. in winter or after
the car has been parked for a long time, the bat-
tery of another car can be used for starting with
the help of jumper cables.
Make sure the voltage of both batteries is the
same. Both batteries must be 12 volt types.
The capacity (Ampere hours, Ah) of the booster
battery must not be substantially less than that of
the discharged battery.
The discharged battery must be correctly con-
nected to the vehicle’s electrical system.
f Please see the chapter “BATTERY” on
Page 239.
f Please see the chapter “EMERGENCY UNLO-
CKING OF THE FRONT LUGGAGE COMPART-
MENT LID” on Page 238.
Note
f Do not try to start the car by pushing or tow-
ing. Damage to the catalytic converters and
other components of the car may result.
Warning!
Risk of short circuit, damage and explosion,
resulting in serious personal injury or death.
f Use only jumper cables of adequate diameter
cross-section and fitted with completely insu-
lated alligator clips.
f Follow all warnings and instructions of the
jumper cable manufacturer.
f When connecting jumper cables, make sure
that they cannot get caught in any moving
parts in the engine compartment.
The jumper cables must be long enough so
that neither vehicles nor cables touch another.
f The vehicles must not be in contact, otherwise
current might flow as soon as the positive ter-
minals are connected.
f The cable clamps must not be allowed to con-
tact each other when one end of the jumper ca-
bles are connected to a battery.
f Ensure that tools or conductive jewelery (rings,
chains, watch straps) do not come into contact
with the positive jumper cable or the positive
battery post.
f Improper hook-up of jumper cables can ruin
the alternator. Danger of caustic burns from escaping acid.
f
Do not lean over the battery.
Danger of gas explosion.
f Improper use of booster battery to start a
vehicle may cause an explosion, resulting in
serious personal injury or death.
f Keep sources of ignition away from the bat-
tery, e.g. open flame, burning cigarettes or
sparking due to cable contact or welding work.
f A discharged battery can freeze even at 23 °F/
–5 °C.
Before connecting jumper cables, a frozen
battery must be thawed out.