Lug PORSCHE CAYMAN 2009 1.G Service Manual
[x] Cancel search | Manufacturer: PORSCHE, Model Year: 2009, Model line: CAYMAN, Model: PORSCHE CAYMAN 2009 1.GPages: 284, PDF Size: 5.94 MB
Page 250 of 284

248
Practical Tips, Emergency Service
Headlights
Caution!
Risk of damage to headlights due to exces-
sive temperatures and abrasion.
f To ensure optimum ventilation, do not cover
the gap between headlight and body
(e.g. “stone guards” or films).
f Use soapy water only to clean light lenses and
plastic headlight lenses.
In no case may chemical cleaners or other vol-
atile cleaning fluids be used.
f To prevent scratches, do not rub with a dry or merely moist cloth, tissue or insect sponges.
Removing headlights1. Unscrew plastic nut A.
Detach the side carpeting. 2. Remove rubber plug
B from the unlocking
opening.
Page 251 of 284
Practical Tips, Emergency Service
249
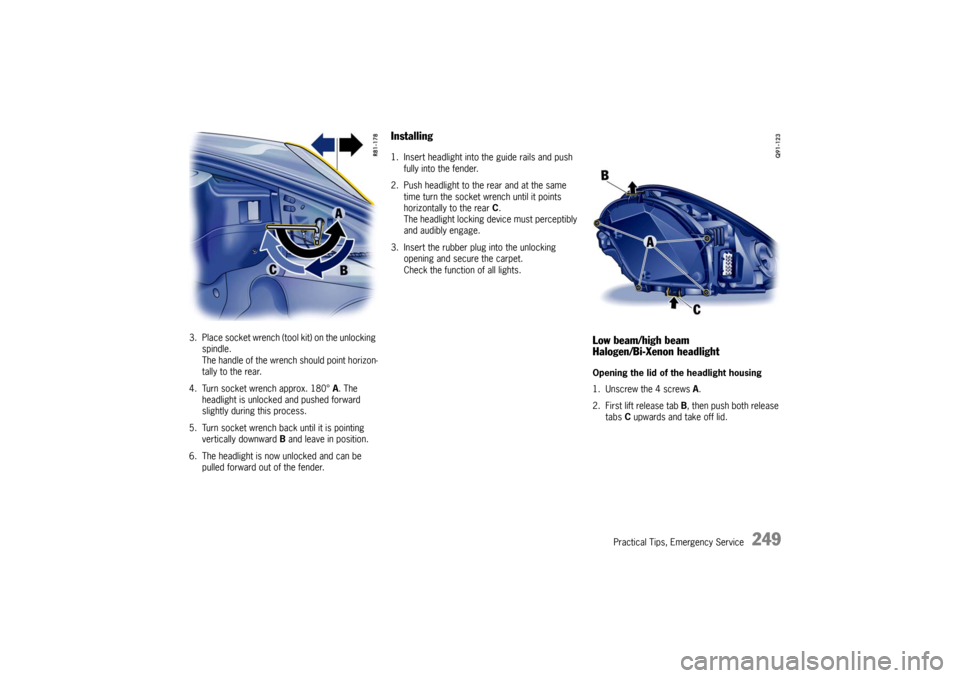
3. Place socket wrench (tool kit) on the unlocking spindle.
The handle of the wrench should point horizon-
tally to the rear.
4. Turn socket wrench approx. 180° A. The
headlight is unlocked and pushed forward
slightly during this process.
5. Turn socket wrench ba ck until it is pointing
vertically downward B and leave in position.
6. The headlight is now unlocked and can be pulled forward out of the fender.
Installing1. Insert headlight into the guide rails and push
fully into the fender.
2. Push headlight to the rear and at the same time turn the socket wrench until it points
horizontally to the rear C.
The headlight locking device must perceptibly
and audibly engage.
3. Insert the rubber plug into the unlocking opening and secure the carpet.
Check the function of all lights.
Low beam/high beam
Halogen/Bi-Xenon headlightOpening the lid of the headlight housing
1. Unscrew the 4 screws A .
2. First lift release tab B, then push both release
tabs C upwards and take off lid.
Page 252 of 284

250
Practical Tips, Emergency Service
Changing bulb for low beam
Halogen headlights1. Pull off plug A.
2. Disengage fixing clip B.
3. Replace defective bulb. When doing so, ensure bulb is seated properly.
4. Reassemble in reverse order.
Closing the cover of the headlight housing
1. Push on cover until it is felt to engage.
2. Fasten cover with the 4 screws.
Changing bulb for high beam
Halogen headlights1. Turn housing cover counter-clockwise and take it off. 2. Turn bulb holder clockwise and remove it
(bayonet lock).
3. Pull both plug release tabs apart and pull plug out.
4. Replace the defective bulb with bulb holder.
5. Insert bulb holder and turn it as far as it will go to the left.
6. Close the housing cover.
Page 253 of 284

Practical Tips, Emergency Service
251
Changing bulb for low beam/high beam
Bi-Xenon headlights1. Unscrew the 3 screws A on the control unit and
remove the control unit. 2. Turn the plug counter-clockwise and pu
ll it off. 3. Disengage both fixing clips.
4. Replace defective bulb.When doing so, ensure bulb is seated properly.
5. Engage both fixing clips, push on plug and turn right as far as the stop.
6. Fit control unit and screw tight.
Closing the cover of the headlight housing
1. Push on cover until it is felt to engage.
2. Fasten cover with the 4 screws.
Page 254 of 284

252
Practical Tips, Emergency Service
Changing bulb for additional high beam
Bi-Xenon headlights1. Turn housing cover counter-clockwise and take it off. 2. Pull off plug. 3. Disengage fixing clip.
4. Replace defective bulb.
5. Engage fixing clip, insert plug and close housing cover.
Page 256 of 284

254
Practical Tips, Emergency Service
A- Fog light height adjustmentChanging bulb for fog lights1. Pull cover forward in direction of arrow. 2. Loosen the two screws on the bulb housing,
swivel the housing out to the side and
remove it. 3. Pull both plug release tabs apart and pull
plug out.
4. Turn bulb holder in direction of arrow and remove it.
5. Replace the defective bulb with bulb holder.
6. Insert bulb holder and turn it as far as it will go to the right. Then insert plug. Make sure that
the two tabs engage correctly.
Page 258 of 284

256
Practical Tips, Emergency Service
3. Remove side marker and undo bulb holder
(bayonet lock).
4. Remove the bulb from the holder and replace it. Insert holder.
Check operation of the light.
5. Insert the side marker’s retaining lugs A into
the side section at the front.
Push in side marker until the securing spring B
is felt to engage.
6. Press the cap into the wheel housing liner.
Number Plate LightChanging bulb1. Unscrew both screws A and take off the light
lens.
2. Remove defective bulb from between the contact springs and replace.
3. Reassemble in reverse order. Check operation of the light.
Changing Light-Emitting Diodes
and Long-Life BulbsThe following lights are equipped with light-
emitting diodes (LEDs) or long-life bulbs and
cannot be replaced individually. Replacement also
involves a greater amount of installation work.
– Side light, front,
– Daytime driving lights on vehicles with Bi-Xenon headlights,
– Tail lights and
– Additional brake lights
f Have the defective light replaced at an autho-
rized Porsche dealer.
Page 260 of 284

258
Practical Tips, Emergency Service
Floor
The surface upon which the
vehicle rests is flat
and approximately level.
Screen
The screen upon which headlamp beams are pro-
jected is perpendicular to the floor and the vehi-
cle’s longitudinal axis, flat, uniformly light in color,
unobstructed, and wide and high enough to ac-
commodate the vehicle beam patterns to be
aimed.
The screen should be wide enough to provide at
least 3.3 ft. (1 m) of space outboard of the vehi-
cle’s headlamp spacing.
Adjustment screws
fDetach side carpeting in luggage compart-
ment.
Unscrew plastic nut A.
Open the cover of the appropriate adjustment
screw.
The setting is adjusted by turning the hexagon
socket screws right or left, as appropriate.
B - Headlight vertical adjustmentVertical adjustment (screw B)
f turn clockwise = beam moves down
turn counter-clockwise = beam moves up
Note
f Do not alter the lateral adjustment.
Page 261 of 284
Practical Tips, Emergency Service
259
TowingCertain state statutes and local ordinances prohib-
it towing with a chain, rope or even a tow bar.
In addition, damage to your vehicle may result
from improper procedures.
Consult your authorized Porsche dealer for de-
tails. Vehicle towing Flat bed towing is the preferred type of towing to
be used on Porsche vehicles.
Under certain circumstances, wheel lifts may be
used when the vehicle will not roll.
The vehicle must be towed with all four
wheels off the ground, otherwise damage to
the vehicle may result.
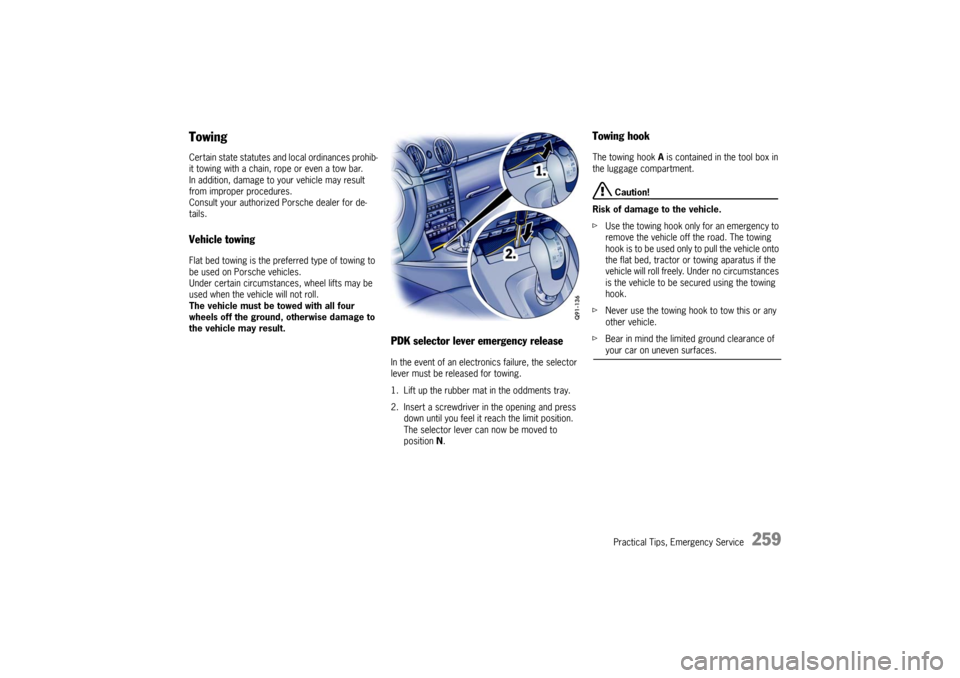
PDK selector lever emergency releaseIn the event of an electronics failure, the selector
lever must be released for towing.
1. Lift up the rubber mat in the oddments tray.
2. Insert a screwdriver in the opening and press down until you feel it reach the limit position.
The selector lever ca n now be moved to
position N .
Towing hook The towing hook A is contained in the tool box in
the luggage compartment.
Caution!
Risk of damage to the vehicle.
f Use the towing hook only for an emergency to
remove the vehicle off the road. The towing
hook is to be used only to pull the vehicle onto
the flat bed, tractor or towing aparatus if the
vehicle will roll freely. Under no circumstances
is the vehicle to be secured using the towing
hook.
f Never use the towing hook to tow this or any
other vehicle.
f Bear in mind the limited ground clearance of your car on uneven surfaces.
Page 266 of 284

264
Vehicle Identification, Technical Data
Vehicle IdentificationWhen ordering spare parts or making inquiries,
please always quote the vehicle identification
number. Vehicle data bankThe vehicle data bank is attached to the inside of
the “Maintenance” booklet.
It contains all important data about your vehicle.
Note
This data bank cannot be re -ordered if it is lost or
damaged.
This label contains the following information:
1. Vehicle Identification No.
2. Type/Type description
3. Engine code/Transmission code
4. Paint No./Interior
5. Optional equipment
Vehicle identification number In accordance with Federal Safety Regulations,
the vehicle identification number of your car is lo-
cated at the bottom left of the windshield frame
and can be seen from the outside.
The vehicle identification number is in the luggage
compartment under the battery cover and at the
bottom left behind the windshield.
Removing the battery cover
f Please see the chapter “BATTERY” on
Page 239.
Safety compliance stickerThe safety compliance sticker is your assurance
that your new Porsche complies with all applicable
Federal Motor Vehicle Safety Standards which
were in effect at the time the vehicle was manufac-
tured.
fThe sticker also shows the month and year of
production and the vehicle identification
number of your car (perforations) as well as
the Gross Vehicle Weight Rating and the G ross
A xle Weight Rating.