tow PORSCHE CAYNNE 2010 1.G User Guide
[x] Cancel search | Manufacturer: PORSCHE, Model Year: 2010, Model line: CAYENNE, Model: PORSCHE CAYENNE 2010 1.GPages: 379, PDF Size: 13.91 MB
Page 175 of 379
Driving and Driving Safety
175
ParkingfGo easy on the accelerator.
fWhen parking or maneuvring in a small space,
control the speed by careful use of the foot-
brake.Driving in winterIn wintry road conditions it is advisable to take
steep inclines in manual mode M. This prevents
the occurrence of gear changes that could cause
wheelspin.
Limp-home modeIf there is a fault in the transmission:
–An X appears instead of the current gear
indicator on the multi-purpose display of the
instrument panel.
The transmission no longer shifts.
fTo remedy the fault, immediately consult an
authorized Porsche dealer.
Warning!
Reverse gear lock monitoring is disabled in
the emergency running program.
Damage to the vehicle may result as well as
loss of control, if the vehicle is moving for-
ward fast enough to cause rear wheel lockup.
fDo not shift into R while the vehicle is moving forward.
Tip on driving
3rd or 5th gear in selector position D and reverse
gear R are now available and will allow you to
reach the nearest authorized Porsche dealer.
fPlease go to your authorized Porsche dealer
as soon as possible.
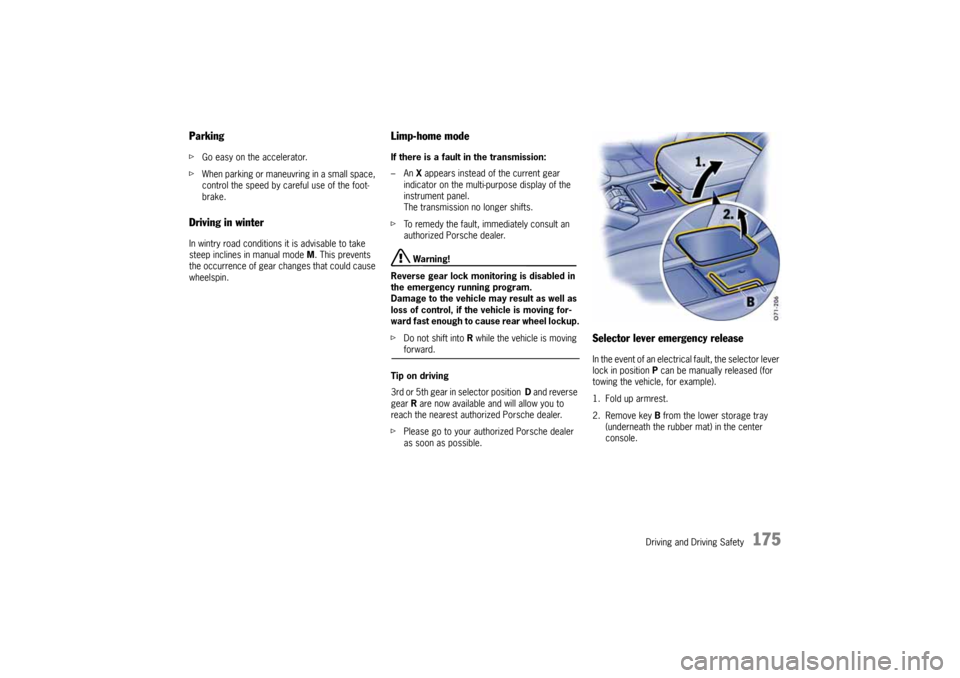
Selector lever emergency releaseIn the event of an electrical fault, the selector lever
lock in position P can be manually released (for
towing the vehicle, for example).
1. Fold up armrest.
2. Remove key B from the lower storage tray
(underneath the rubber mat) in the center
console.
10_Cayenne_21_KW17.book Seite 175 Donnerstag, 9. April 2009 3:33 15
Page 177 of 379
Driving and Driving Safety
177
Driving Programs for On-Road and
Off-Road DrivingTwo different driving programs with special power-
transmission and running-gear control systems
(such as ABS, off-road ABS and PSM, etc.) are pro-
vided in your Porsche for realising the best possib-
le driving dynamics combined with maximum safe-
ty.
– Low Range off-road driving program
(with reduction)
– High Range on-road driving program
(without reduction)When the driving program is active, the power
transmission and running-gear control systems
are automatically adapted to the requirements for
off-road or on-road driving.
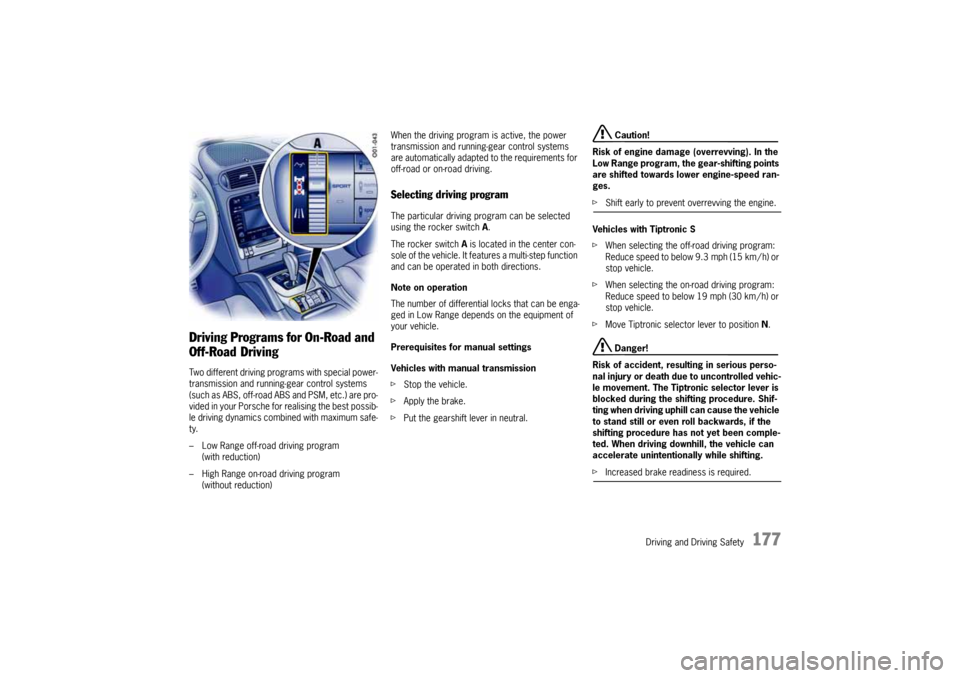
Selecting driving programThe particular driving program can be selected
using the rocker switch A.
The rocker switch A is located in the center con-
sole of the vehicle. It features a multi-step function
and can be operated in both directions.
Note on operation
The number of differential locks that can be enga-
ged in Low Range depends on the equipment of
your vehicle.
Prerequisites for manual settings
Vehicles with manual transmission
fStop the vehicle.
fApply the brake.
fPut the gearshift lever in neutral.
Caution!
Risk of engine damage (overrevving). In the
Low Range program, the gear-shifting points
are shifted towards lower engine-speed ran-
ges.
fShift early to prevent overrevving the engine.
Vehicles with Tiptronic S
fWhen selecting the off-road driving program:
Reduce speed to below 9.3 mph (15 km / h) or
stop vehicle.
fWhen selecting the on-road driving program:
Reduce speed to below 19 mph (30 km / h) or
stop vehicle.
fMove Tiptronic selector lever to position N.
Danger!
Risk of accident, resulting in serious perso-
nal injury or death due to uncontrolled vehic-
le movement. The Tiptronic selector lever is
blocked during the shifting procedure. Shif-
ting when driving uphill can cause the vehicle
to stand still or even roll backwards, if the
shifting procedure has not yet been comple-
ted. When driving downhill, the vehicle can
accelerate unintentionally while shifting.
fIncreased brake readiness is required.
10_Cayenne_21_KW17.book Seite 177 Donnerstag, 9. April 2009 3:33 15
Page 179 of 379
Driving and Driving Safety
179
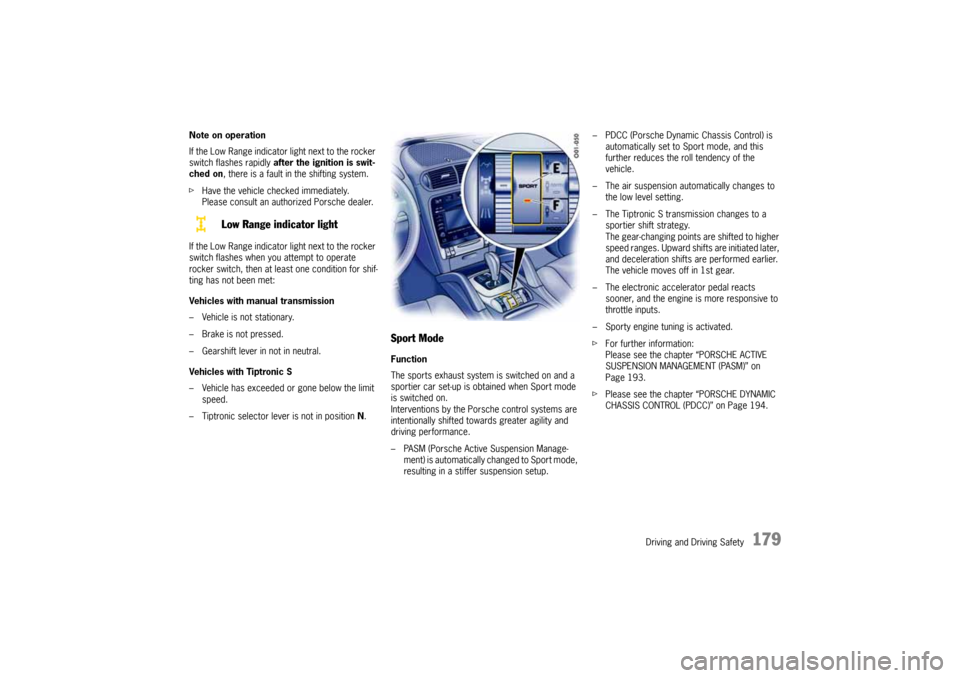
Note on operation
If the Low Range indicator light next to the rocker
switch flashes rapidly after the ignition is swit-
ched on, there is a fault in the shifting system.
fHave the vehicle checked immediately.
Please consult an authorized Porsche dealer.
If the Low Range indicator light next to the rocker
switch flashes when you attempt to operate
rocker switch, then at least one condition for shif-
ting has not been met:
Vehicles with manual transmission
– Vehicle is not stationary.
– Brake is not pressed.
– Gearshift lever in not in neutral.
Vehicles with Tiptronic S
– Vehicle has exceeded or gone below the limit
speed.
– Tiptronic selector lever is not in position N.
Sport ModeFunction
The sports exhaust system is switched on and a
sportier car set-up is obtained when Sport mode
is switched on.
Interventions by the Porsche control systems are
intentionally shifted towards greater agility and
driving performance.
– PASM (Porsche Active Suspension Manage-
ment) is automatically changed to Sport mode,
resulting in a stiffer suspension setup.– PDCC (Porsche Dynamic Chassis Control) is
automatically set to Sport mode, and this
further reduces the roll tendency of the
vehicle.
– The air suspension automatically changes to
the low level setting.
– The Tiptronic S transmission changes to a
sportier shift strategy.
The gear-changing points are shifted to higher
speed ranges. Upward shifts are initiated later,
and deceleration shifts are performed earlier.
The vehicle moves off in 1st gear.
– The electronic accelerator pedal reacts
sooner, and the engine is more responsive to
throttle inputs.
– Sporty engine tuning is activated.
fFor further information:
Please see the chapter “PORSCHE ACTIVE
SUSPENSION MANAGEMENT (PASM)” on
Page 193.
fPlease see the chapter “PORSCHE DYNAMIC
CHASSIS CONTROL (PDCC)” on Page 194.
Low Range indicator light
10_Cayenne_21_KW17.book Seite 179 Donnerstag, 9. April 2009 3:33 15
Page 186 of 379

186
Driving and Driving Safety Collapsible spare wheel
fNever switch the PSM off when driving with a
collapsible spare wheel.
To w i n g
fFor information on towing:
Please see the chapter “TOWING” on
Page 342.
Tip on driving
When PSM is switched off, wheel-specific brake
interventions and the traction control system
(TCS) are also inactive.
The automatic brake differential (ABD) remains on.
Switching PSM back onfPress PSM OFF button A.
PSM is switched on after a short delay.
The light-emitting diode in the button and the
multi-functional PSM light on the instrument
panel go out. A message is shown on the multi-
purpose display of the instrument panel.
ABS
(Anti-lock Brake System)
Warning!
In spite of the advantages of ABS, it is still the
driver’s responsibility to adapt her/his driving style
and maneuvers in line with road and weather
conditions, as well as the traffic situation.
The increased safety that is provided should not
induce you to take greater risks with your safety.
The limits set by the physics of driving cannot be
overcome, even with ABS.
Risks of accident due to inappropriate speed can-
not be reduced by ABS.
ABS ensures:
–Full steering control
The vehicle remains steerable
–Good driving stability
No skidding due to locked wheels
–Optimum braking distance
Shorter stopping distances in most cases
–Lock prevention
No flat spots on the tiresFunction
The decisive advantage of ABS is in the driving
stability and maneuvrability of the vehicle in
hazardous situations.
ABS prevents locking of the wheels during full
braking, on almost all road surfaces, until shortly
before the vehicle stops.
The ABS begins to control the braking process as
soon as a wheel shows a tendency to lock.
This controlled braking process is comparable to
extremely rapid cadence braking.
The pulsating brake pedal and a “rattling noise”
warn the driver to adapt her/his driving speed to
the road conditions.
fIf full braking should be necessary, press the
brake pedal all the way down throughout the
entire braking procedure, regardless of the
pulsating pedal. Do not ease up on pressure
applied to the pedal.
10_Cayenne_21_KW17.book Seite 186 Donnerstag, 9. April 2009 3:33 15
Page 195 of 379

Driving and Driving Safety
195
Off-Road DrivingPlease read this chapter carefully before driving
off road with your Porsche.
The information provided will familiarise you with
the special advantages of your vehicle, allowing
you to arrive at your destination safely every time.
We recommend practicing on less rugged terrain.Vehicles with SportDesign package
Caution!
Risk of damage. On vehicles with Sport-
Design package, front, rear, and side
member trim are painted. Off-road driving
can seriously damage these trim parts.
fWhen driving off-road, make sure these parts
are not damaged.
fMake sure there is sufficient clearance
between obstacles and the underside of the
vehicle.
fAvoid driving through water.
fDo not use side member trims or rear wheel spoilers as a running board.Maintenance Note
Please bear in mind that off-road driving subjects
all vehicle components to considerably more wear
than normal use, making professional inspection
and maintenance after each use a vital precondi-
tion for functioning and safety.
Grains of sand, dirt particles and other abrasive
materials entering the brakes can cause exces-
sive wear or unpredictable braking action.
Rules for off-road drivingfEnsure vehicle is equipped with approved all-
terrain tires.
fPay attention to the ground clearance of the
vehicle.
Please see the chapter “GROUND
CLEARANCE” on Page 357.
fActivate Low Range.
Please see the chapter “SELECTING OFF-
ROAD DRIVING PROGRAM” on Page 178.
fStow or fasten luggage and loads securely.
Please see the chapter “LOADING
INFORMATION” on Page 231.
fIf unknown terrain is obscured from view,
examine it on foot first and traverse it with
extreme caution.
This way, obstacles are easier to recognize
and damage to the vehicle is avoided.fAlways drive with the engine running.
Power steering assistance is provided only
with the engine running.
fDrive slowly and uniformly.
fAlways make sure that the wheels touch the
ground.
fBefore driving through water, check the water
depth, the condition of the surface beneath it
and the speed of the water.
fLook out for obstacles such as boulders,
holes, tree stumps or ruts.
fAlways keep the sliding/lifting roof or
Panorama roof system and the side windows
closed while driving.
fDo not depart from marked routes or paths.
fRespect Nature.
Always obey off-limits signs.
10_Cayenne_21_KW17.book Seite 195 Donnerstag, 9. April 2009 3:33 15
Page 208 of 379
208
Luggage Compartment, Loadspace and Storage
Cargo management systemThe cargo management system is a variable
system for securing objects in the luggage
compartment.
It is comprised of two telescopic rails integrated
in the loadspace, a telescopic bar, four tie-down
rings as well as a strap reel and a reversible mat.
The reversible mat is provided with an anti-slip
structure on the underside.
fFor information on stowing loads and luggage:
Please see the chapter “LOADING
INFORMATION” on Page 231.
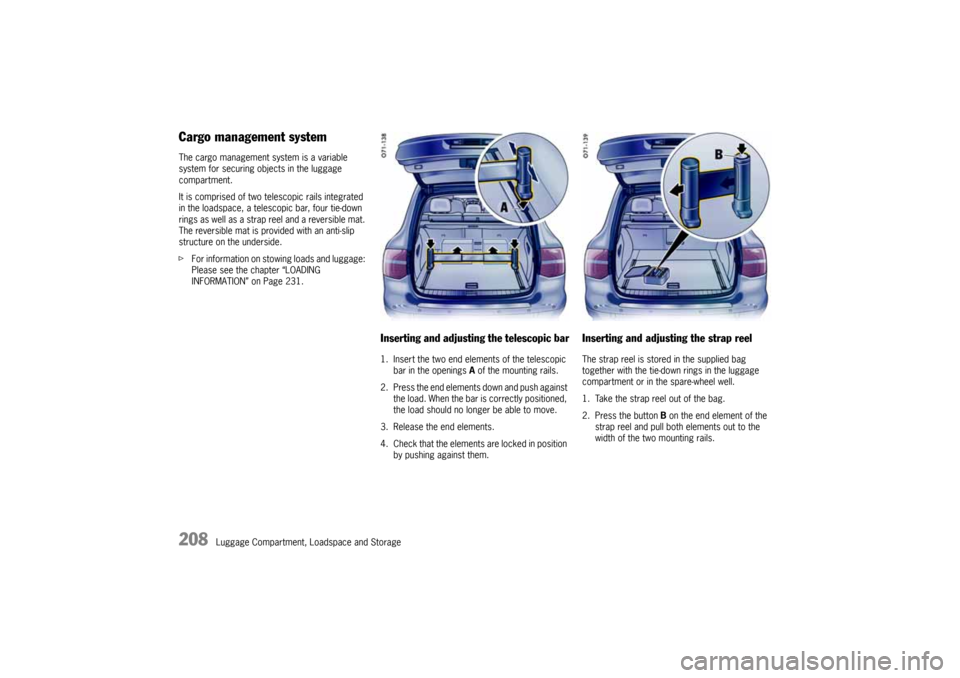
Inserting and adjusting the telescopic bar1. Insert the two end elements of the telescopic
bar in the openings A of the mounting rails.
2. Press the end elements down and push against
the load. When the bar is correctly positioned,
the load should no longer be able to move.
3. Release the end elements.
4. Check that the elements are locked in position
by pushing against them.
Inserting and adjusting the strap reelThe strap reel is stored in the supplied bag
together with the tie-down rings in the luggage
compartment or in the spare-wheel well.
1. Take the strap reel out of the bag.
2. Press the button B on the end element of the
strap reel and pull both elements out to the
width of the two mounting rails.
10_Cayenne_21_KW17.book Seite 208 Donnerstag, 9. April 2009 3:33 15
Page 212 of 379
212
Luggage Compartment, Loadspace and Storage
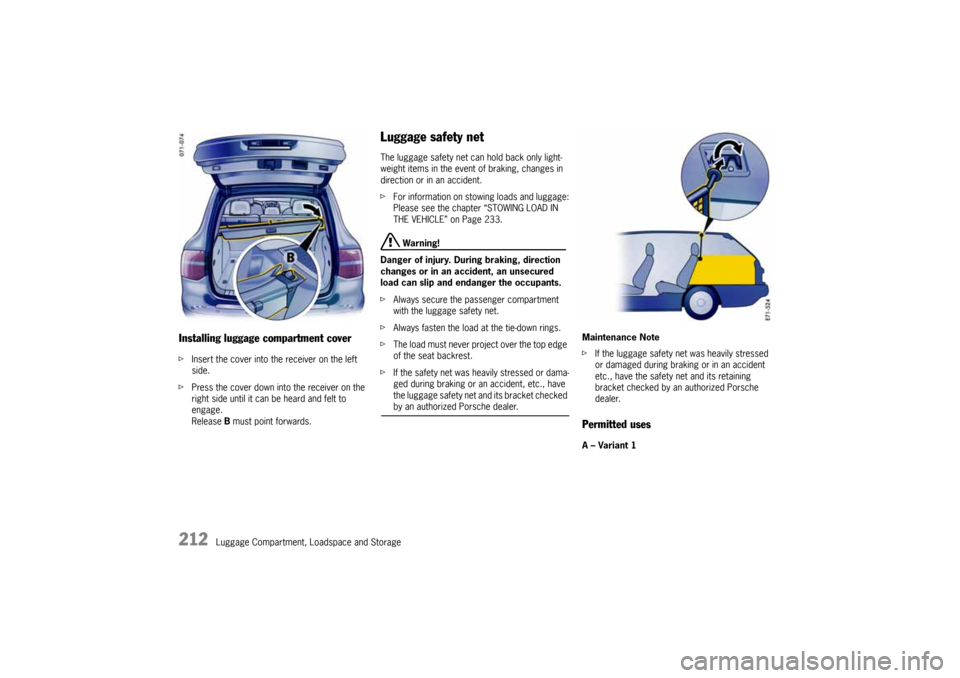
Installing luggage compartment coverfInsert the cover into the receiver on the left
side.
fPress the cover down into the receiver on the
right side until it can be heard and felt to
engage.
Release B must point forwards.
Luggage safety netThe luggage safety net can hold back only light-
weight items in the event of braking, changes in
direction or in an accident.
fFor information on stowing loads and luggage:
Please see the chapter “STOWING LOAD IN
THE VEHICLE” on Page 233.
Warning!
Danger of injury. During braking, direction
changes or in an accident, an unsecured
load can slip and endanger the occupants.
fAlways secure the passenger compartment
with the luggage safety net.
fAlways fasten the load at the tie-down rings.
fThe load must never project over the top edge
of the seat backrest.
fIf the safety net was heavily stressed or dama-
ged during braking or an accident, etc., have
the luggage safety net and its bracket checked by an authorized Porsche dealer.Maintenance Note
fIf the luggage safety net was heavily stressed
or damaged during braking or in an accident
etc., have the safety net and its retaining
bracket checked by an authorized Porsche
dealer.
Permitted usesA – Variant 1
10_Cayenne_21_KW17.book Seite 212 Donnerstag, 9. April 2009 3:33 15
Page 215 of 379
Luggage Compartment, Loadspace and Storage
215
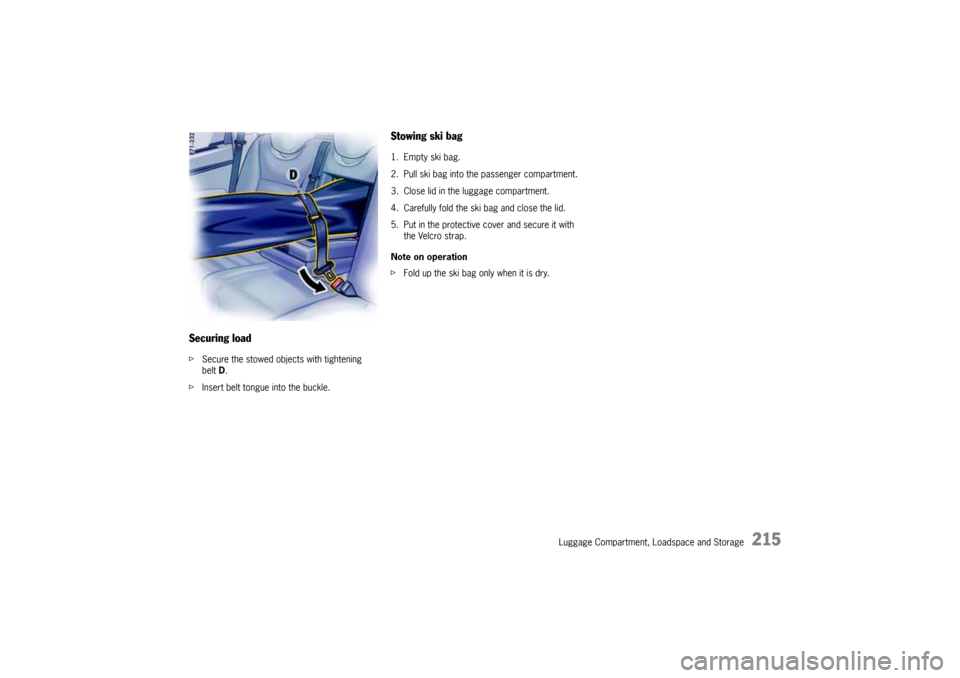
Securing loadfSecure the stowed objects with tightening
beltD.
fInsert belt tongue into the buckle.
Stowing ski bag1. Empty ski bag.
2. Pull ski bag into the passenger compartment.
3. Close lid in the luggage compartment.
4. Carefully fold the ski bag and close the lid.
5. Put in the protective cover and secure it with
the Velcro strap.
Note on operation
fFold up the ski bag only when it is dry.
10_Cayenne_21_KW17.book Seite 215 Donnerstag, 9. April 2009 3:33 15
Page 231 of 379

Trailer Hitch
231
Loading InformationDefinitionsThe towing capacity (gross weight of the trailer)
is the sum of the trailer's empty weight and the
weight of the load.
The vertical coupling load is the weight that the
trailer drawbar exerts on the trailer coupling of the
vehicle.
The rear-axle load is the vehicle weight on the
rear axle plus the weight of the transported load
and the vertical coupling load of the trailer.
The gross weight of the vehicle and trailer is
the sum of the weight of the towing vehicle and the
weight of the trailer.
The Curb weight - actual weight of your vehicle -
vehicle weight including standard and optional
equipment, fluids, emergency tools, and spare tire
assembly. This weight does not include passen-
gers and cargo.
The Gross Vehicle Weight is sum of the curb
weight and the weight of passengers and cargo
combined.
The Gross Vehicle Weight Rating is the
maximum total weight of vehicle, passengers,
luggage, hitch, trailer tongue load and optional
equipment.The Gross Axle Weight Rating is the maximum
load limit for the front or the rear axle. This infor-
mation is located on the safety comliance sticker
located in the driver’s side door jamb.
For determining the compatibility of the tire and
vehicle load capabilities:
fPlease see the chapter “TIRES, RIMS, TRACKS”
on Page 350.
The load capacity coefficient (e.g. “106”) is a
minimum requirement. For more information:
fPlease see the chapter “INSCRIPTION ON
RADIAL TIRE” on Page 290.
The Gross Combined Weight Rating is the
maximum total weight rating of vehicle, passen-
gers, cargo and trailer.
The Vehicle Capacity Weight - Load Limit - is
the maximum total weight limit specified of the
load (passengers and cargo) for the vehicle. This
is the maximum weight of passengers and cargo
that can be loaded into the vehicle. This informa-
tion can be found on the tire pressure plate.
If a trailer is being towed, the trailer tongue weight
must be included as part of the cargo load.
The maximum loaded vehicle weight is the
sum of curb weight, accessory weight, vehicle
capacity weight and production options weight.
The load rating is the maximum load that a tire
is rated to carry for a given inflation pressure.The maximum load rating is the load rating for
a tire at the maximum permissible inflation pres-
sure.
The cargo capacity is the permissible weight of
cargo, the subtracted weight of passengers from
the load limit.
fNever exceed the permissible limits.
Danger!
Risk of personal injury or death.
Injuries are much more likely in an accident
if persons ride in the cargo area.
fPersons must ride only on the seats provided
for this purpose.
fMake sure that everybody fastens their safety
belts.
Risk of loss of control, damage to the vehicle
and serious personal injury or death.
fNever exceed the specified axle loads. Over-
loading can shorten the service life of the tires
and car, as well as lead to dangerous vehicle
reactions and long braking distances. Damage
due to overloading is not covered by the vehicle warranty.
10_Cayenne_21_KW17.book Seite 231 Donnerstag, 9. April 2009 3:33 15
Page 232 of 379
232
Tr a i l e r H i t c h
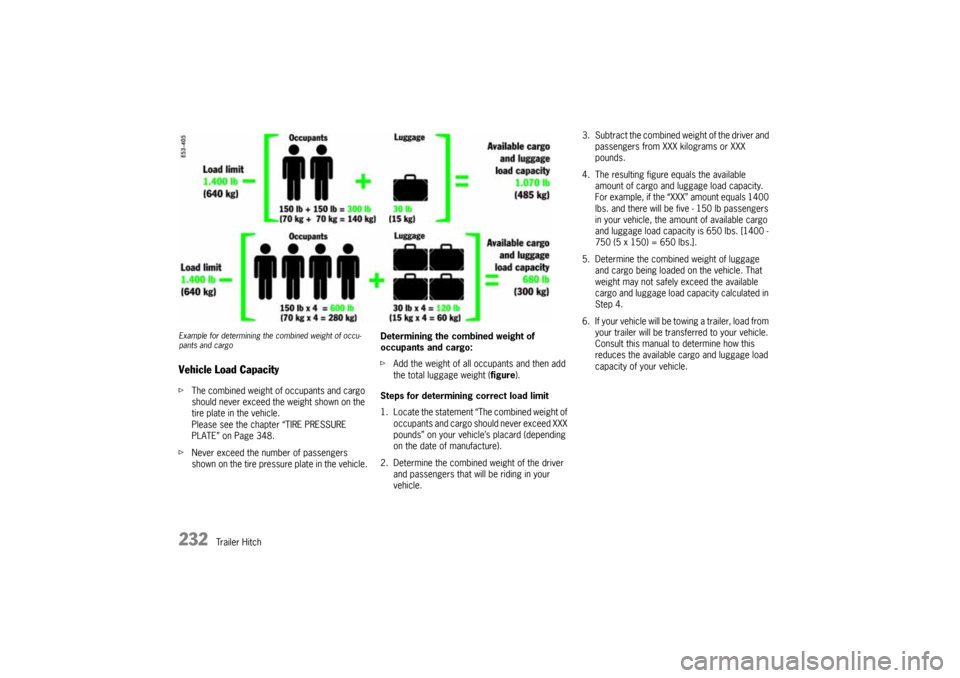
Example for determining the combined weight of occu-
pants and cargoVehicle Load CapacityfThe combined weight of occupants and cargo
should never exceed the weight shown on the
tire plate in the vehicle.
Please see the chapter “TIRE PRESSURE
PLATE” on Page 348.
fNever exceed the number of passengers
shown on the tire pressure plate in the vehicle.Determining the combined weight of
occupants and cargo:
fAdd the weight of all occupants and then add
the total luggage weight (figure).
Steps for determining correct load limit
1. Locate the statement “The combined weight of
occupants and cargo should never exceed XXX
pounds” on your vehicle’s placard (depending
on the date of manufacture).
2. Determine the combined weight of the driver
and passengers that will be riding in your
vehicle.
3. Subtract the combined weight of the driver and
passengers from XXX kilograms or XXX
pounds.
4. The resulting figure equals the available
amount of cargo and luggage load capacity.
For example, if the “XXX” amount equals 1400
lbs. and there will be five - 150 lb passengers
in your vehicle, the amount of available cargo
and luggage load capacity is 650 lbs. [1400 -
750 (5 x 150) = 650 lbs.].
5. Determine the combined weight of luggage
and cargo being loaded on the vehicle. That
weight may not safely exceed the available
cargo and luggage load capacity calculated in
Step 4.
6. If your vehicle will be towing a trailer, load from
your trailer will be transferred to your vehicle.
Consult this manual to determine how this
reduces the available cargo and luggage load
capacity of your vehicle.
10_Cayenne_21_KW17.book Seite 232 Donnerstag, 9. April 2009 3:33 15