tow PORSCHE CAYNNE 2010 1.G Owner's Guide
[x] Cancel search | Manufacturer: PORSCHE, Model Year: 2010, Model line: CAYENNE, Model: PORSCHE CAYENNE 2010 1.GPages: 379, PDF Size: 13.91 MB
Page 281 of 379

Minor Repairs
281
Notes on minor repairsTool kit
The tool kit is accommodated in the spare-wheel
well under the cover of the loadspace floor.
Note
The tools required for changing a wheel (e.g. jack,
wheel bolt wrench, assembly aids, folding
wedges) are only supplied with the vehicle if the
vehicle comes with a collapsible spare wheel or
full-size spare wheel as standard. Your authorized
Porsche dealer will be pleased to advise you.
Tires/WheelsThe original equipment tires and wheel rims on
your Porsche comply with all applicable Federal
Motor Vehicle Safety Standards.For your safety remember the following:– Wheel rims and wheel bolts are matched to fit
your Porsche.
– If you intend to use other than original equip-
ment wheels, be sure that they conform to
Porsche specifications for your model. Only
tires with the same make and with the same
specification code (e.g. “N0”, “N1”...) can be
mounted.
– The use of wheel rims and wheel bolts that do
not meet specifications of the original factory
installed equipment will affect the safe opera-
tion of your vehicle and affect warranty
coverage.
– Before you plan on exchanging wheels, or
snow tires already mounted on the wheel rims,
consult your authorized Porsche dealer.
Your dealer has the technical information
necessary to advise you which wheel rims and
wheel bolts are compatible with the original
factory installations.
Danger!
Risk of loss of control and serious personal
injury or death.
fIf while driving, your vehicle experiences a sud-
den vibration or ride disturbance, and/or you
suspect that possible damage to your tires or
vehicle has occurred, you should immediately
reduce your speed without excessive use of
the brakes.
fStop the vehicle as soon as possible, and
inspect the tires.
If you cannot determine the cause for the
disturbance, have your vehicle towed to the
nearest Porsche or tire dealer to have your
vehicle or tire(s) inspected.
fContinuing to operate the vehicle without
correction could result in a loss of control and serious personal injury.
10_Cayenne_21_KW17.book Seite 281 Donnerstag, 9. April 2009 3:33 15
Page 284 of 379

284
Minor Repairs Overloading
Danger!
Risk of damage to vehicle parts, loss of con-
trol and serious personal injury or death.
fDo not overload your vehicle. Be careful about
the roof load.
fIf loading the vehicle also correct the tire pres-
sure. Tire pressure for loaded vehicle can be
found on the tire pressure plate and in the
chapter technical data.
fNever exceed the specified axle load.
Overloading can shorten the service life of the
tires and car, as well as lead to dangerous
vehicle reactions and long braking distances.
Damage due to overloading is not covered by the vehicle warranty.
fPlease see the chapter “LOADING
INFORMATION” on Page 231.
Example of a tire pressure plateTire Pressure plateInformation on the tire pressure plate
A Seating capacity
Maximum number of vehicle occupants,
including the driver.B Vehicle load limit
Is the maximum total weight limit specified of
the load (passengers and cargo) for the vehi-
cle. This is the maximum weight of passengers
and cargo that can be loaded into the vehicle.
If a trailer is being towed, the trailer tongue
weight must be included as part of the cargo
load.
Please see the chapter “LOADING
INFORMATION” on Page 231.
C Original tire size
Size of tires mounted at the factory.
D Recommended cold tire inflation pressure
These values are for cold tires (68 °F/20 °C).
E Approved tire sizes
F Size and tire pressure for the collapsible spare
wheel
Tire traction
Warning!
When driving on wet or slushy roads, a
wedge of water may build up between the
tires and the road. This phenomenon is
known as “hydroplane“ and may cause par-
tial or complete loss of traction, vehicle con-
trol or stopping ability.
fReduce speed on wet surfaces to prevent this.
10_Cayenne_21_KW17.book Seite 284 Donnerstag, 9. April 2009 3:33 15
Page 306 of 379

306
Minor Repairs
Warning!
Risk of accident.
fThe collapsible spare wheel must be used only
over short distances in cases of emergency.
For safety reasons, replace the tires before
the wear indicators appear (webs in the tire
grooves, 1/16 in. (1.6 mm) high).
fNever deactivate the Porsche Stability
Management (PSM) system.
fAvoid hard acceleration and high cornering
speeds.
The maximum permitted speed is 50 mph
(80 km/h) and must not be exceeded
because of altered driving characteristics and
for reasons of wear.
The tread depth of the spare wheel is subject
to the same laws as the original tires.
fDo not use a collapsible spare wheel from a
different vehicle type.
fDo not mount the collapsible spare wheel from
your car on a different vehicle.
fOnly fit one collapsible spare wheel on the
vehicle at a time.
fOn vehicles with air suspension, use the tire fil-
ling connection A only to inflate the collapsible
spare wheel.
fTo avoid damage, do not use automatic car washes when the spare wheel is installed.After using the collapsible spare wheel
fRelease air by unscrewing the valve insert.
Notes on operation
The tire will revert to its original shape only after
several hours. Only then can it be stowed in the
spare wheel recess in the luggage compartment.
There is a plastic sheet in the tool box to store the
damaged wheel.
Maintenance Note
The collapsible spare wheel must be repaired only
by the manufacturer.
fPlease consult your authorized Porsche dealer
if the collapsible spare wheel is defective.
Checking tire pressure with a pressure
gage1. Remove the valve stem cap from the tire.
2. Press the pressure gage onto the valve stem.
Note on operation
fDo not press too hard or force the valve stem
sideways, or air will escape.
If the sound of air escaping from the tire is
heard, reposition the pressure gage.
3. Read the tire pressure on the gage stem and
compare it to the permissible tire pressure.
This information can be found on the tire pres-
sure plate in the left door aperture.
Please see the chapter “TIRE PRESSURES,
COLD (68 °F/20 °C)” on Page 354.
4. Remove the pressure gage.
10_Cayenne_21_KW17.book Seite 306 Donnerstag, 9. April 2009 3:33 15
Page 308 of 379
308
Minor Repairs
Inflating tires on vehicles with air
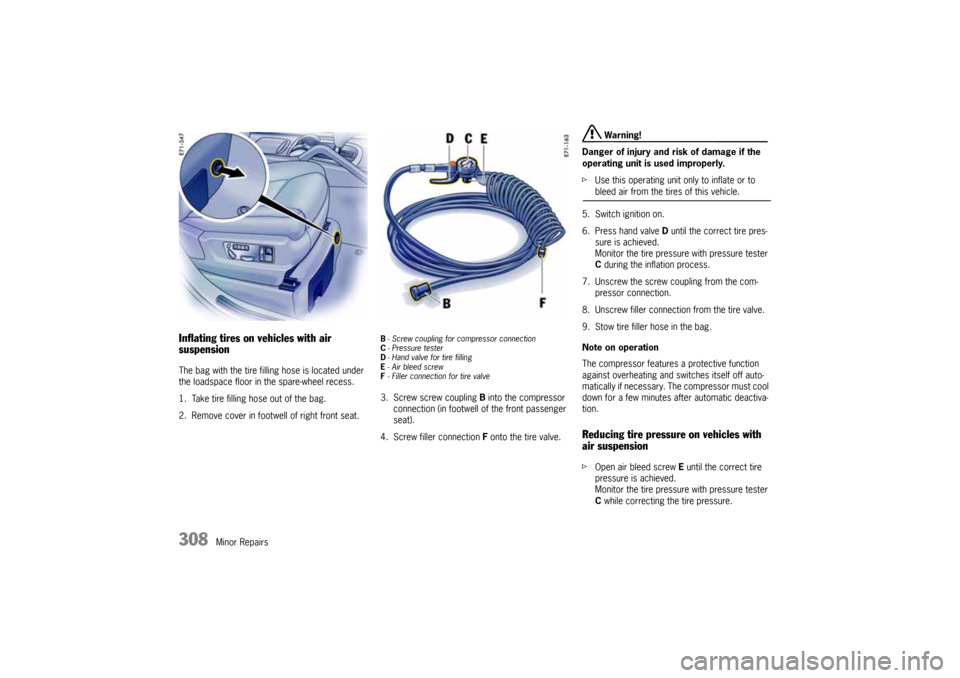
suspensionThe bag with the tire filling hose is located under
the loadspace floor in the spare-wheel recess.
1. Take tire filling hose out of the bag.
2. Remove cover in footwell of right front seat.
B- Screw coupling for compressor connection
C-Pressure tester
D- Hand valve for tire filling
E-Air bleed screw
F- Filler connection for tire valve3. Screw screw coupling B into the compressor
connection (in footwell of the front passenger
seat).
4. Screw filler connection F onto the tire valve.
Warning!
Danger of injury and risk of damage if the
operating unit is used improperly.
fUse this operating unit only to inflate or to bleed air from the tires of this vehicle.
5. Switch ignition on.
6. Press hand valve D until the correct tire pres-
sure is achieved.
Monitor the tire pressure with pressure tester
C during the inflation process.
7. Unscrew the screw coupling from the com-
pressor connection.
8. Unscrew filler connection from the tire valve.
9. Stow tire filler hose in the bag.
Note on operation
The compressor features a protective function
against overheating and switches itself off auto-
matically if necessary. The compressor must cool
down for a few minutes after automatic deactiva-
tion.
Reducing tire pressure on vehicles with
air suspensionfOpen air bleed screw E until the correct tire
pressure is achieved.
Monitor the tire pressure with pressure tester
C while correcting the tire pressure.
10_Cayenne_21_KW17.book Seite 308 Donnerstag, 9. April 2009 3:33 15
Page 311 of 379
Minor Repairs
311
Closing spare wheel bracket
Warning!
Danger of injury and risk of accident if the
spare wheel bracket is operated improperly.
fOperate the spare wheel bracket only using
button B.
fIf the vehicle is tilted to the side, more effort
will be required to swing the spare wheel
bracket.
fMake sure that no persons or animals are
within the range of movement of the spare wheel bracket.
1. Check whether additional lock C is engaged. If
necessary, slide additional lock C to the right.
2. Swing spare wheel bracket closed with force.
3. Check lock and observe indication on the multi-
purpose display of the instrument panel.
The indicator light must go out when the spare
wheel bracket is locked.
Automatic locking
In the multi-purpose display of the instrument
panel, you can set different variants of locking and
unlocking the doors and the rear lid as well as the
check-back signal when locking and unlocking the
vehicle and save them on the respective remote
control.
fPlease see the chapter “SETTING REAR LID
LOCKING” on Page 144.
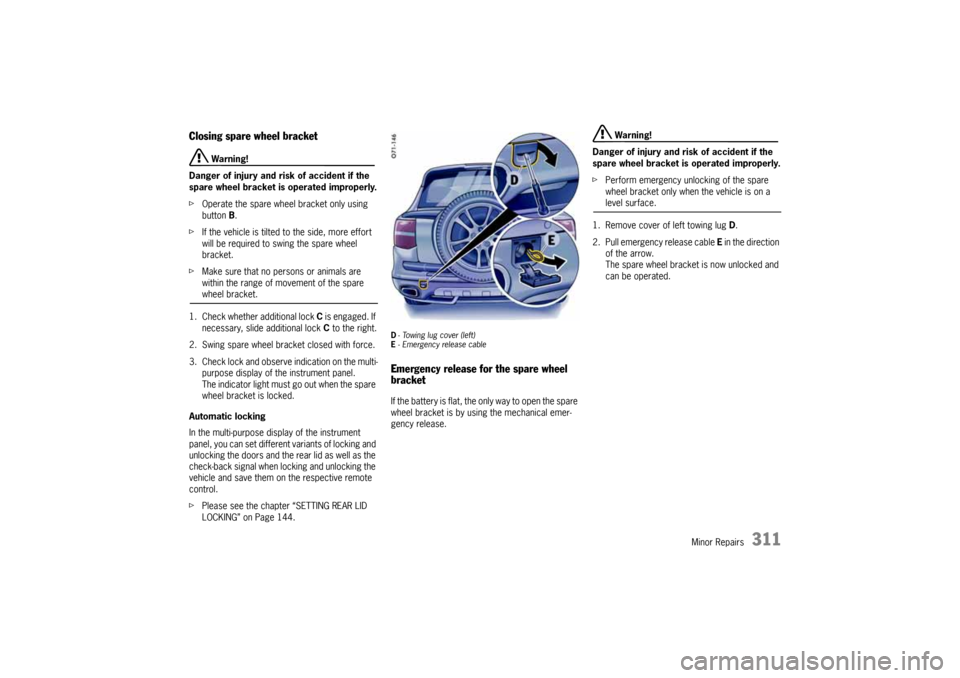
D- Towing lug cover (left)
E- Emergency release cableEmergency release for the spare wheel
bracketIf the battery is flat, the only way to open the spare
wheel bracket is by using the mechanical emer-
gency release.
Warning!
Danger of injury and risk of accident if the
spare wheel bracket is operated improperly.
fPerform emergency unlocking of the spare
wheel bracket only when the vehicle is on a level surface.
1. Remove cover of left towing lug D.
2. Pull emergency release cable E in the direction
of the arrow.
The spare wheel bracket is now unlocked and
can be operated.
10_Cayenne_21_KW17.book Seite 311 Donnerstag, 9. April 2009 3:33 15
Page 323 of 379

Minor Repairs
323
Emergency Starting with Jumper
CablesIf the battery is discharged, e.g. in winter or after
the car has been parked for a long time, the bat-
tery of another car can be used for starting with
the help of jumper cables.
Make sure the voltage of both batteries is the
same.
The capacity (Ampere hours, Ah) of the booster
battery must not be substantially less than that of
the discharged battery.The discharged battery
must be correctly connected to the vehicle's elec-
trical system.
fPlease see the chapter “BATTERY” on
Page 320.
Note
Do not try to start the car by pushing or towing.
Damage to the catalytic converters and other
components of the car may result.
Danger!
Risk of short circuit, damage and explosion,
resulting in serious personal injury or death.
fUse only jumper cables of adequate diameter
cross-section and fitted with completely
insulated alligator clips.
fFollow all warnings and instructions of the
jumper cable manufacturer.
fWhen connecting jumper cables, make sure
that they cannot get caught in any moving
parts in the engine compartment.
The jumper cables must be long enough so
that neither vehicles nor cables touch another.
fThe vehicles must not be in contact, otherwise
current might flow as soon as the positive
terminals are connected.
fThe cable clamps must not be allowed to con-
tact each other when one end of the jumper ca-
bles are connected to a battery.
fCarefully ensure that tools or conductive jewe-
lery (rings, chains, watch straps) do not come
into contact with the positive jumper cable or
the positive battery post.
fImproper hook-up of jumper cables can ruin
the alternator.
Danger of caustic burns.
fDo not lean over the battery.Danger of gas explosion.
fImproper use of booster battery to start a
vehicle may cause an explosion, resulting in
serious personal injury or death.
fKeep sources of ignition away from the
battery, e.g. open flame, burning cigarettes or
sparking due to cable contact or welding work.
fA discharged battery can freeze even at
14 °F (−10 °C). Before connecting jumper
cables, a frozen battery must be thawed out.
10_Cayenne_21_KW17.book Seite 323 Donnerstag, 9. April 2009 3:33 15
Page 342 of 379
342
Minor Repairs
Bulb ChartExterior lights Type, ratingHalogen low beam and high beam
H7
Xenon low beam and high beam D1S
Side marker lights, front
W5W
Turn signal light, rear P21W
Turn signal light, front
PY21W
License plate light C5W
Fog light
H11
Rear fog light P21W
Back up light
P21W
Additional high beam H7
Cornering light
H11
Interior lights
Interior light, front
W5W
Reading light W5W
Footwell light
W3W
Glove compartment light W3W
Center console
W3W
Curb lights (doors) W3W
Warning lights (doors)
W3W
Curb light (rear lid) W5W
Guard light (rear lid)
W5W
Luggage compartment light K12V10W
TowingCertain state statutes and local ordinances prohi-
bit towing with a chain, rope or even a tow bar. In
addition, damage to your vehicle may result from
improper procedures. Consult your authorized
Porsche dealer for details.
When the turn signal light is set with the ignition on
and the emergency warning lights active, only the
turn signal light on the corresponding side of the
vehicle will light up. After the turn signal light is re-
set, the emergency warning lights will be switched
on again.Vehicle towingFlat bed towing is the preferred type of towing to
be used on Porsche vehicles. Under certain cir-
cumstances, wheel lifts may be used when the
vehicle will not roll.
The vehicle must be towed with all four
wheels off the ground, otherwise damage to
the vehicle may result.
10_Cayenne_21_KW17.book Seite 342 Donnerstag, 9. April 2009 3:33 15
Page 343 of 379
Minor Repairs
343
Towing hookDepending on the vehicle equipment, the spare-
wheel well contains one or two towing hooks.
Caution!
Risk of damage to the vehicle.
fUse the towing hook only for an emergency to
remove the vehicle off the road. The towing
hook is to be used only to pull the vehicle onto
the flat bed, tractor or towing aparatus if the
vehicle will roll freely. Under no circumstances
is the vehicle to be secured using the towing
hook.
fNever use the towing hook to tow this or any other vehicle.
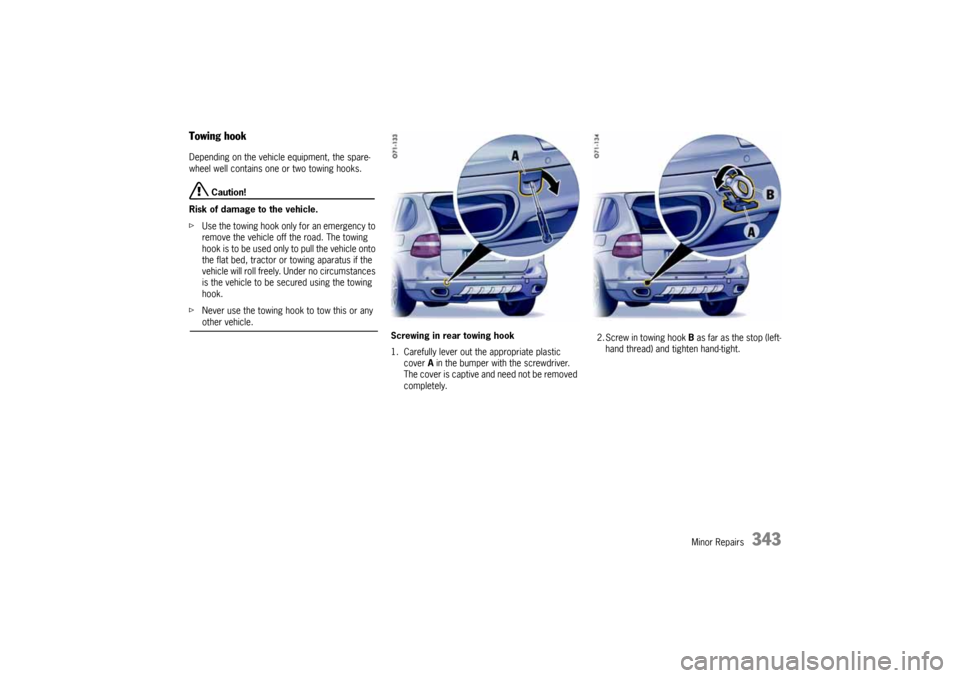
Screwing in rear towing hook
1. Carefully lever out the appropriate plastic
cover A in the bumper with the screwdriver.
The cover is captive and need not be removed
completely.2. Screw in towing hook B as far as the stop (left-
hand thread) and tighten hand-tight.
10_Cayenne_21_KW17.book Seite 343 Donnerstag, 9. April 2009 3:33 15
Page 344 of 379
344
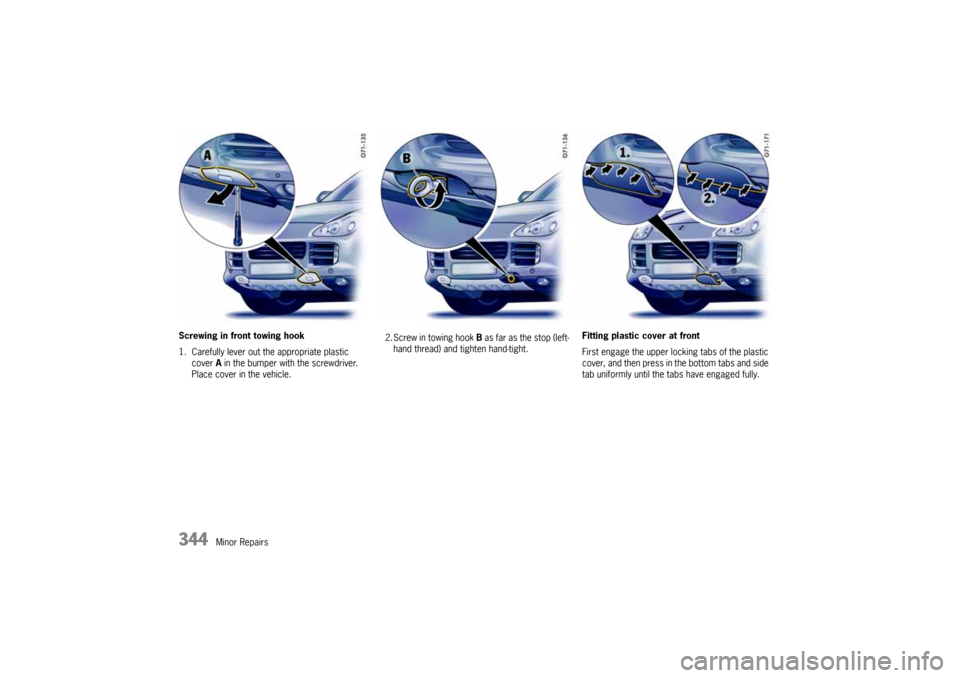
Minor Repairs Screwing in front towing hook
1. Carefully lever out the appropriate plastic
cover A in the bumper with the screwdriver.
Place cover in the vehicle.2. Screw in towing hook B as far as the stop (left-
hand thread) and tighten hand-tight.Fitting plastic cover at front
First engage the upper locking tabs of the plastic
cover, and then press in the bottom tabs and side
tab uniformly until the tabs have engaged fully.
10_Cayenne_21_KW17.book Seite 344 Donnerstag, 9. April 2009 3:33 15
Page 345 of 379
Minor Repairs
345
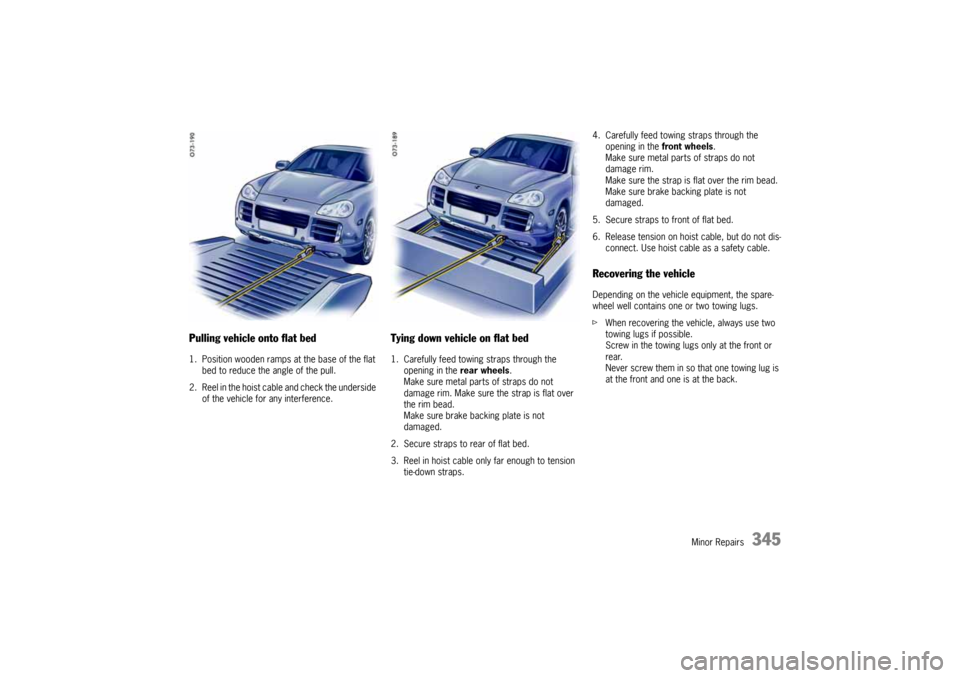
Pulling vehicle onto flat bed1. Position wooden ramps at the base of the flat
bed to reduce the angle of the pull.
2. Reel in the hoist cable and check the underside
of the vehicle for any interference.
Tying down vehicle on flat bed1. Carefully feed towing straps through the
opening in the rear wheels.
Make sure metal parts of straps do not
damage rim. Make sure the strap is flat over
the rim bead.
Make sure brake backing plate is not
damaged.
2. Secure straps to rear of flat bed.
3. Reel in hoist cable only far enough to tension
tie-down straps.4. Carefully feed towing straps through the
opening in the front wheels.
Make sure metal parts of straps do not
damage rim.
Make sure the strap is flat over the rim bead.
Make sure brake backing plate is not
damaged.
5. Secure straps to front of flat bed.
6. Release tension on hoist cable, but do not dis-
connect. Use hoist cable as a safety cable.
Recovering the vehicleDepending on the vehicle equipment, the spare-
wheel well contains one or two towing lugs.
fWhen recovering the vehicle, always use two
towing lugs if possible.
Screw in the towing lugs only at the front or
rear.
Never screw them in so that one towing lug is
at the front and one is at the back.
10_Cayenne_21_KW17.book Seite 345 Donnerstag, 9. April 2009 3:33 15