display PORSCHE CAYNNE 2010 1.G Service Manual
[x] Cancel search | Manufacturer: PORSCHE, Model Year: 2010, Model line: CAYENNE, Model: PORSCHE CAYENNE 2010 1.GPages: 379, PDF Size: 13.91 MB
Page 124 of 379
124
Multi-Purpose Display and Instruments
Operating the multi-purpose
display on the instrument panelOn-board computer information can be displayed
on the multi-purpose display. Additional functions
are also available in the main menu which allow
you to change the settings for your vehicle.
Warning!
There is a danger of accident, resulting in
serious personal injury or death if you set or
operate the multi-purpose display, radio,
navigation system, telephone or other equip-
ment while driving. Operating these devices
while driving could distract you from traffic
and cause you to lose control of the vehicle.
fOperate these components while driving only if
the traffic situation allows you to do so safely.
fCarry out any complicated operating or setting procedures only with the vehicle stationary.
It is not possible to describe all details of the
functions in this Owner’ s Manual.
The examples clearly demonstrate the functional
principle and clarify the menu structure.Note on operation
Depending on the equipment of your vehicle,
some information or functions may not be avai-
lable on the multi-purpose display (e.g. navigation,
audio system, compass or tire pressure)
Various menus can only be called up when the
vehicle is stationary.
Note
The multi-purpose display is ready for operation
only when the ignition is on.
Note on operation
By selecting the menu items
MAIN MENU > SETTINGS > FACTORY SET, you
can reset all individual settings to the basic factory
settings.
Note on operation
Arrows at the top and bottom of the menu indicate
additional entries.
fPress rocker switch A up or down.
In the COMFORT menu, the menu scrolls
automatically as you approach the end of the list.
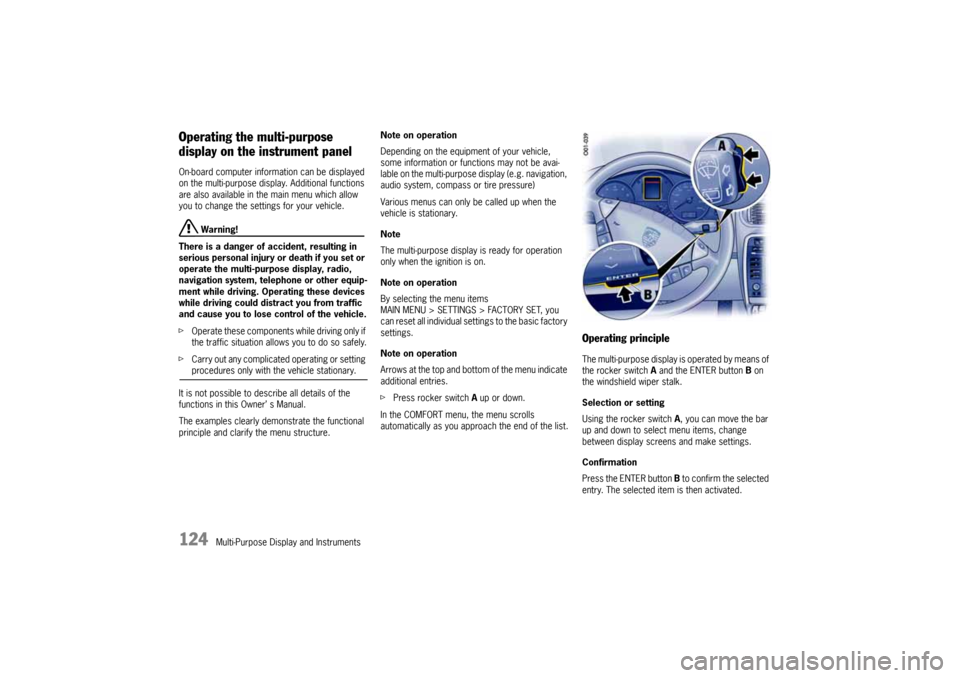
Operating principleThe multi-purpose display is operated by means of
the rocker switch A and the ENTER button B on
the windshield wiper stalk.
Selection or setting
Using the rocker switch A, you can move the bar
up and down to select menu items, change
between display screens and make settings.
Confirmation
Press the ENTER button B to confirm the selected
entry. The selected item is then activated.
10_Cayenne_21_KW17.book Seite 124 Donnerstag, 9. April 2009 3:33 15
Page 125 of 379
Multi-Purpose Display and Instruments
125
Opening the main menuThe main menu contains the following functions:
fPHONE
MPH-LIMIT
VEHICLE INFO
TYRE PRESS.
SETTINGS
Operating example: Displaying
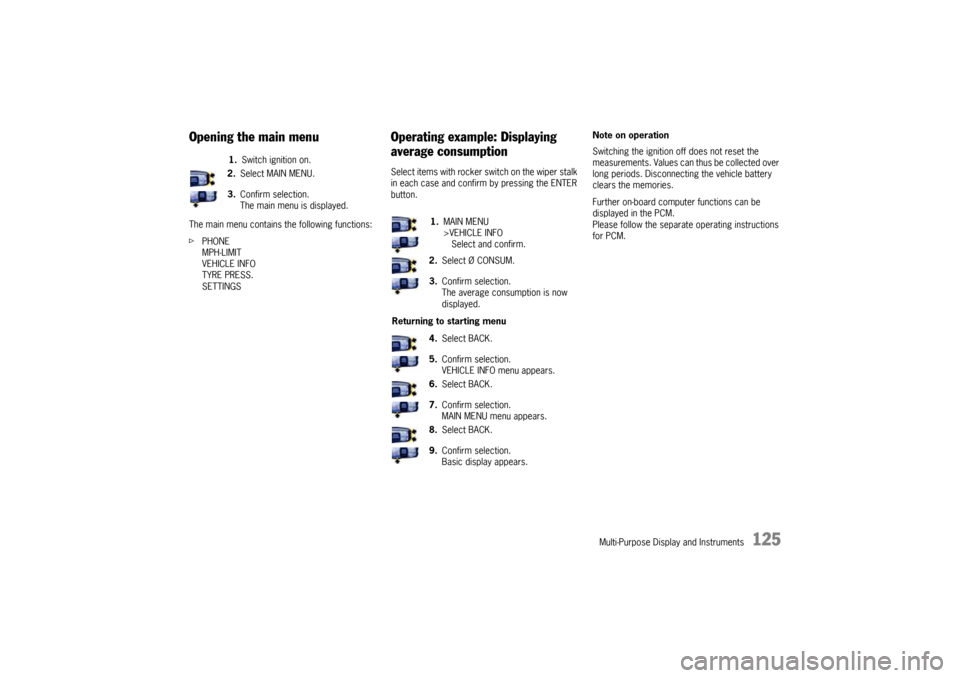
average consumptionSelect items with rocker switch on the wiper stalk
in each case and confirm by pressing the ENTER
button.Note on operation
Switching the ignition off does not reset the
measurements. Values can thus be collected over
long periods. Disconnecting the vehicle battery
clears the memories.
Further on-board computer functions can be
displayed in the PCM.
Please follow the separate operating instructions
for PCM. 1.Switch ignition on.
2.Select MAIN MENU.
3.Confirm selection.
The main menu is displayed.
1.MAIN MENU
>VEHICLE INFO
Select and confirm.
2.Select Ø CONSUM.
3.Confirm selection.
The average consumption is now
displayed.
Returning to starting menu
4.Select BACK.
5.Confirm selection.
VEHICLE INFO menu appears.
6.Select BACK.
7.Confirm selection.
MAIN MENU menu appears.
8.Select BACK.
9.Confirm selection.
Basic display appears.
10_Cayenne_21_KW17.book Seite 125 Donnerstag, 9. April 2009 3:33 15
Page 126 of 379
126
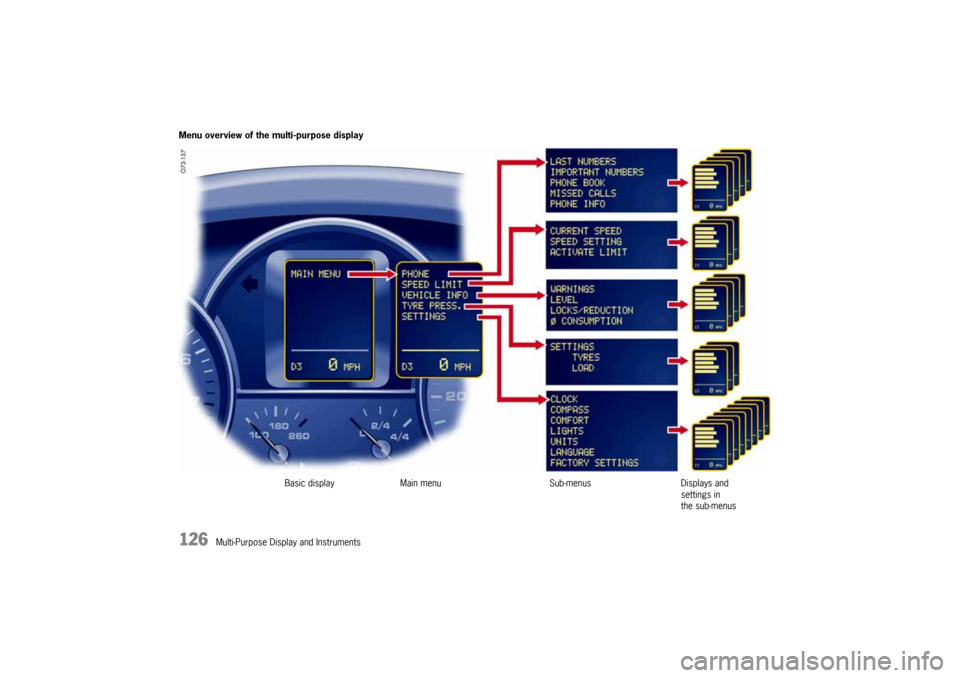
Multi-Purpose Display and Instruments Menu overview of the multi-purpose display
Basic display Main menu Sub-menus Displays and
settings in
the sub-menus
10_Cayenne_21_KW17.book Seite 126 Donnerstag, 9. April 2009 3:33 15
Page 127 of 379

Multi-Purpose Display and Instruments
127
Displaying/resetting average
speed
Displaying range on remaining fuelThe range on remaining fuel is continuously
recomputed while driving based on fuel level,
current consumption and average consumption.
Displaying tire pressureThis display is available only in conjunction with the
Tire Pressure Monitoring option.
The current tire pressures at the actually present
levels are displayed in the “Tyre pressure” screen
of the on-board computer. These values would be
identical to those of a pressure gage connected to
the four valves. These pressures change while the
vehicle is being driven.
– The tire pressures increase as the temperature
in the tires rises, e.g. during high-speed
motorway driving.
– The tire pressures decrease as the tempera-
tures drop, e.g. during trips in cold regions
(such as mountains).
The values displayed therefore do not allow
conclusions to be drawn about possible pressure
deviations.
fIn order to display pressure deviations from
the prescribed pressure, select the menu item
TYRE PRESS. in the MAIN MENU.
Displaying compassThis display is available only in conjunction with the
Compass or PCM option.Displaying navigation informationNavigation information can also be displayed on
the multi-purpose display.
This display is available only in conjunction with the
Navigation (PCM) option. Displaying average speed
1.Switch ignition on.
2.Select Ø MPH.
The average speed is displayed.
The displayed values are based on the
distance travelled since the last reset to
“zero”.
Resetting average speed
3.Select Ø MPH.
The average speed is displayed.
4.Press the ENTER button for longer than
1second.
1.Switch ignition on.
2.Select remaining range.1.Switch ignition on.
2.Select TYRE PRESS.1.Switch ignition on.
2.Select COMPASS.
1.Switch ignition on.
2.Select NAVIGATION.
The navigation arrows are displayed.
10_Cayenne_21_KW17.book Seite 127 Donnerstag, 9. April 2009 3:33 15
Page 128 of 379
128
Multi-Purpose Display and Instruments
Operating the telephone via the
multi-purpose displayNote
The telephone function of the multi-purpose
display is linked to both the PCM and the multi-
functional buttons on the steering wheel as well as
the control stalk.
A SIM card must be inserted in the drawer of
the PCM as a prerequisite for telephone
operation.
If the link to the network is lost, no PIN is entered,
no SIM card is inserted or the telephone is
switched off, a corresponding indication will
appear.
Note
The phone number of an incoming call is shown on
the multi-purpose display. The name of the caller
is shown only if the caller is stored in the telephone
book.Notes on operation
If the rocker switch is pressed for longer than one
second, the initial letters for which entries exist
are shown.
This allows the desired entry to be found more
quickly.
fFor information on the operating principle of
the multi-purpose display:
Please see the chapter “OPERATING
PRINCIPLE” on Page 124.
Accepting, refusing, ending a callIncoming calls are shown on the multi-purpose
display (PHONE INFO must be activated).
Displaying telephone calls on the multi-
purpose displayAutomatic indication of an incoming call on the
multi-purpose display can be switched on or off
with the PHONE INFO menu.Displaying last numbers and last-number
redialThe LAST NUMBERS menu shows the most recent
entries dialled via the respective SIM card. 1.Press the ENTER button.
The display reverts to the last menu.
Display on display screen
1.Select ACCEPT or
REFUSE.
2.Confirm selection.
After the call is accepted, END appears in the
menu.
Ending a call
3.Select END.
4.Confirm selection.
1.MAIN MENU
> PHONE
> PHONE INFO
Select and confirm.
2.Select ON or OFF.
3.Confirm selection.
The selected item is then accepted.1.MAIN MENU
> PHONE
> LAST NUMBERS
Select and confirm.
2.Select entry from the list.
3.Confirm selection.
10_Cayenne_21_KW17.book Seite 128 Donnerstag, 9. April 2009 3:33 15
Page 129 of 379
Multi-Purpose Display and Instruments
129
Displaying important numbers and callingThe IMPORTANT NOS. menu shows the entries
stored as important numbers on the SIM card.Displaying telephone book, selecting
party and callingThe PHONE BOOK menu shows the entries of the
telephone book that are stored on the SIM card.
Displaying missed calls, calling back
partyThe telephone numbers of the rejected calls are
shown in the MISSED CALLS menu. The numbers
are stored on the SIM card.
Setting speed limit on the multi-
purpose displayA speed limit can be entered to monitor the driving
speed. When it is exceeded, a signal sounds and
the multi-purpose display displays the message
LIMIT EXCEEDED.
Note on operation
fFor information on the operating principle of
the multi-purpose display:
Please see the chapter “OPERATING
PRINCIPLE” on Page 124.Accepting current speedYou can define the current speed as the speed
limit in the menu MPH-LIMIT.
1.MAIN MENU
> PHONE
> IMPORTANT NOS.
Select and confirm.
2.Select entry from the list.
3.Confirm selection.1.MAIN MENU
> PHONE
> PHONE BOOK
Select and confirm.
2.Select entry from the list.
3.Confirm selection.
1.MAIN MENU
> PHONE
> MISSED CALLS
Select and confirm.
2.Select entry from the list.
3.Confirm selection.
1.MAIN MENU
>MPH-LIMIT
Select and confirm
2.Select CURRENT MPH.
3.Confirm selection.
LIMIT ACTIVE is activated automatically and
the selected speed limit is shown.
10_Cayenne_21_KW17.book Seite 129 Donnerstag, 9. April 2009 3:33 15
Page 130 of 379
130
Multi-Purpose Display and Instruments
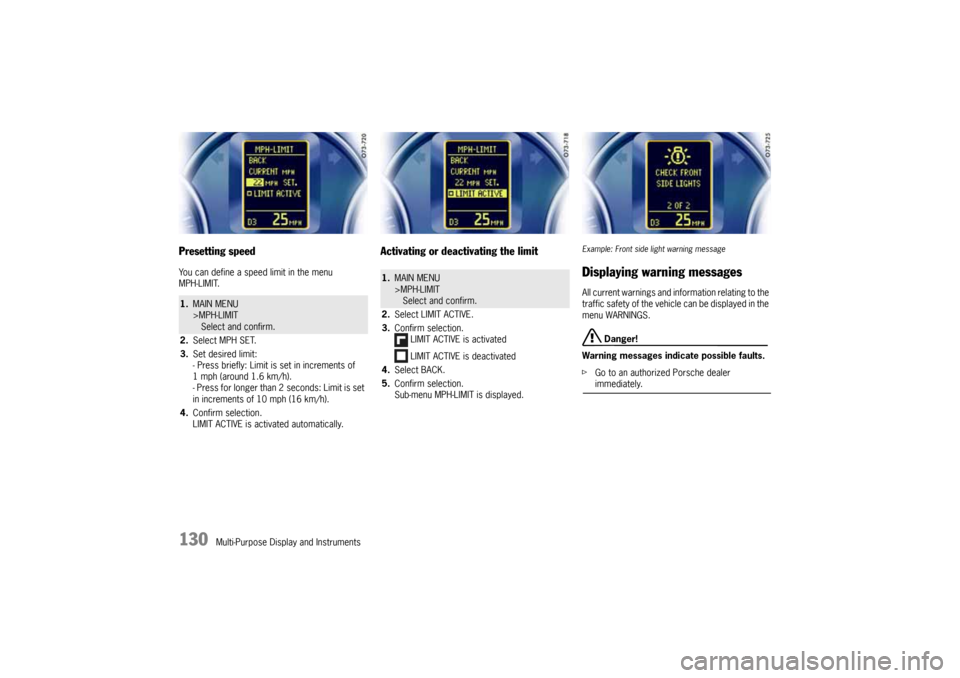
Presetting speedYou can define a speed limit in the menu
MPH-LIMIT.
Activating or deactivating the limit
Example: Front side light warning messageDisplaying warning messagesAll current warnings and information relating to the
traffic safety of the vehicle can be displayed in the
menu WARNINGS.
Danger!
Warning messages indicate possible faults.
fGo to an authorized Porsche dealer immediately.
1.MAIN MENU
>MPH-LIMIT
Select and confirm.
2.Select MPH SET.
3.Set desired limit:
- Press briefly: Limit is set in increments of
1 mph (around 1.6 km/h).
- Press for longer than 2 seconds: Limit is set
in increments of 10 mph (16 km/h).
4.Confirm selection.
LIMIT ACTIVE is activated automatically.
1.MAIN MENU
>MPH-LIMIT
Select and confirm.
2.Select LIMIT ACTIVE.
3.Confirm selection.
LIMIT ACTIVE is activated
LIMIT ACTIVE is deactivated
4.Select BACK.
5.Confirm selection.
Sub-menu MPH-LIMIT is displayed.
10_Cayenne_21_KW17.book Seite 130 Donnerstag, 9. April 2009 3:33 15
Page 131 of 379
Multi-Purpose Display and Instruments
131
Note on operation
fFor information on the operating principle of
the multi-purpose display:
Please see the chapter “OPERATING
PRINCIPLE” on Page 124.
Displaying status of level controlThe ground clearance of vehicles equipped with
level control is shown in the LEVEL menu.
Note on operation
The level control is adjusted by means of the
rocker switch behind the gearshift lever in the
center console.
For information on level control and height
adjustment:
Please see the chapter “AIR SUSPENSION WITH
LEVEL CONTROL AND HEIGHT ADJUSTMENT” on
Page 190.
Displaying status of locks/reduc-
tionThe selected driving programs for Low Range/
High Range as well as the engaged locks can be
displayed.
Note on operation
The driving programs are set by means of the
rocker switch behind the gearshift lever in the
center console.
fFor information on the programs for Off Road
and On Road driving and engaging locks/
reduction:
Please see the chapter “DRIVING PROGRAMS
FOR ON-ROAD AND OFF-ROAD DRIVING” on
Page 177.
1.MAIN MENU
>VEHICLE INFO
Select and confirm.
2.Select WARNINGS.
3.Confirm selection.
NO WARNING is displayed if the vehicle is in
perfect condition. Any warning messages
which are present are displayed.
4.Press repeatedly to display the warnings one
after the other.
5.Confirm selection.
VEHICLE INFO menu is displayed.
1.MAIN MENU
>VEHICLE INFO
Select and confirm.
2.Select LEVEL.
3.Confirm selection.
The current level settings are displayed.
4.Confirm selection.
VEHICLE INFO menu is displayed.
1.MAIN MENU
>VEHICLE INFO
Select and confirm.
2.Select LOCKS/REDUCT.
3.Confirm selection.
The current settings for
- Longitudinal lock on/off
- Reduction on/off
- Transverse axle differential lock on/off are
displayed.
4.Confirm selection.
VEHICLE INFO menu is displayed.
10_Cayenne_21_KW17.book Seite 131 Donnerstag, 9. April 2009 3:33 15
Page 132 of 379
132
Multi-Purpose Display and Instruments
Displaying average consumptionNote on operation
fFor information on the operating principle of
the multi-purpose display:
Please see the chapter “OPERATING
PRINCIPLE” on Page 124.
Setting Tire Pressure Monitoring
Danger!
Risk of serious personal injury or death.
Driving the vehicle with low tire pressure
increases risk of a tire failure and resulting
loss of control. Furthermore, low tire
pressure increases rate of wear of the
affected tires.
Despite the advantages offered by Tire
Pressure Monitoring, it is not a substitute for
proper tire maintenance, and it is still the
driver’s responsibility to update the settings
in the multi-purpose display and maintain the
correct tire pressure, even if under-inflation
has not reached the level to trigger illumina-
tion of Tire Pressure Monitoring low tire
pressure message. Low tire pressure
reduces the road safety of the vehicle and
destroys the tire and wheel.
fWhen a flat tire has been displayed, immedi-
ately stop in a suitable place and check the
tires for damage. If necessary, remedy the damage with tire sealant or fit the spare wheel.
fDo not by any means continue to drive with
leaking tires.
fSealing the tire with the tire sealant is only an
emergency repair so you can drive to the next
authorized Porsche dealer.
The maximum permitted speed is 50 mph
(80 km/h).
fDefective tires must be immediately replaced
by an authorized Porsche dealer.
Tire repairs are not permissible under any
circumstances.
fDo not drive with tires whose tire pressure
drops again in a short period of time. Have
tires checked by an authorized Porsche dealer.
fIf Tire Pressure Monitoring is defective (e.g.
defective wheel transmitters), contact an
authorized Porsche dealer immediately and
have the damage repaired.
The tire pressure will not be monitored by
defective Tire Pressure Monitoring.
For information on warning messages on the
multi-purpose display: Please see the chapter
“OVERVIEW OF WARNING MESSAGES” on
Page 149.
fTire Pressure Monitoring gives a warning about
tire damage due to insufficient tire pressure as
well as about a gradual loss of pressure due to
foreign objects. Tire Pressure Monitoring
cannot warn you about tire damage that
occurs suddenly (e.g. flat tire due to acute
external effects).
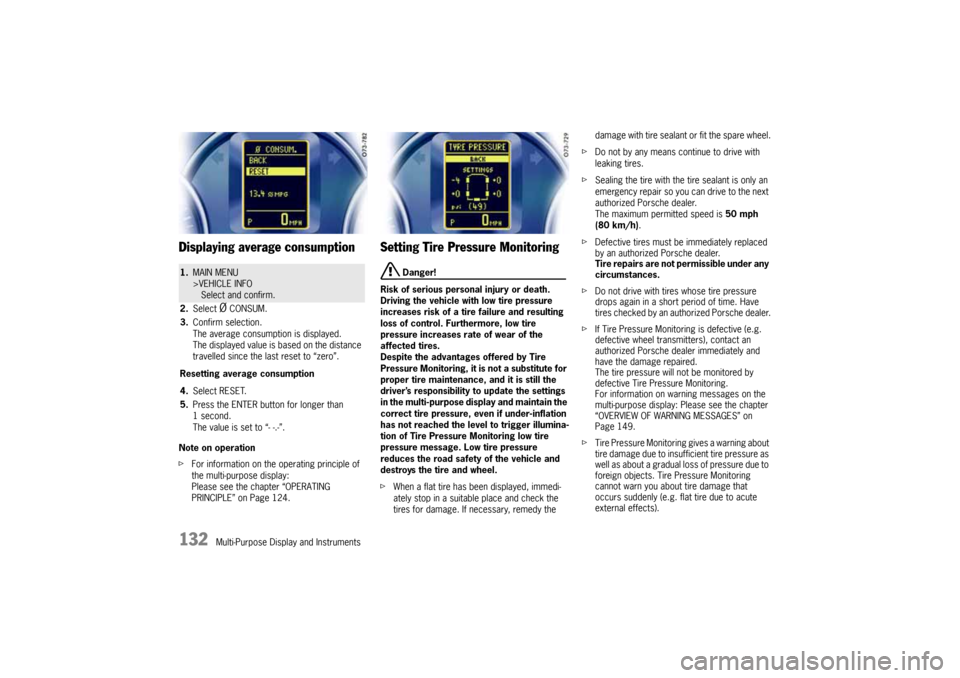
1.MAIN MENU
>VEHICLE INFO
Select and confirm.
2.Select
Ø CONSUM.
3.Confirm selection.
The average consumption is displayed.
The displayed value is based on the distance
travelled since the last reset to “zero”.
Resetting average consumption
4.Select RESET.
5.Press the ENTER button for longer than
1second.
The value is set to “- -.-”.
10_Cayenne_21_KW17.book Seite 132 Donnerstag, 9. April 2009 3:33 15
Page 133 of 379
Multi-Purpose Display and Instruments
133
fIf a tire pressure message is displayed, correct
the tire pressure at the next opportunity.
fIncomplete entries or selection of the wrong
tires on the multi-purpose display affect
correct indication of warnings and messages.
The settings in the TYRE PRESSURE menu
must be updated after wheel changes, use of
a spare wheel or changes in vehicle loading.
fUse only the pressure differences shown in the
TYRE PRESSURE menu or from tire pressure
messages or warnings when correcting the
tire pressure.
fTires lose air over time without a tire defect
being present. A tire pressure warning will then
appear on the multi-purpose display.
Correct tire pressure.
Functional description of Tire Pressure
MonitoringTire Pressure Monitoring continuously monitors
tire pressure and tire temperature on all four
wheels and warns the driver when the tire
pressure is too low.The display as well as the settings for Tire
Pressure Monitoring take place on the multi-
purpose display in the sub-menu
TYRE PRESSURE.
However, the tire pressure must still be set
manually on the wheel.
The deviations in the tire pressures from the
required pressures are shown in the sub-menu
TYRE PRESSURE.
Example:
If the tire pressure display shows “–4 psi
(–0.3 bar)”, you must increase the tire pressure by
4 psi (0.3 bar).
The tire pressures to be monitored are fixed in the
Tire Pressure Monitoring system and cannot be
changed.
The following settings must be made to permit
correct monitoring.
–Tires
Select the type and size of the tires fitted on
the vehicle.
–Load
Select the type of loading.
Note on operation
Settings can be made only when the vehicle is
stationary.
fFor information on tires and wheels:
Please see the chapter “TIRES/WHEELS” on
Page 281.
Warning!
Your vehicle has also been equipped with a TPM
malfunction indicator to indicate when the system
is not operating properly.
The TPM malfunction indicator is combined with
the low tire pressure telltale.
When the system detects a malfunction, the
telltale will flash for approximately one minute and
then remain continuously illuminated. This
sequence will continue upon subsequent vehicle
start-ups as long as the malfunction exists.
When the malfunction indicator is illuminated, the
system may not be able to detect or signal low tire
pressure as intended.
TPM malfunctions may occur for a variety of
reasons, including the installation of replacement
or alternate tires or wheels on the vehicle that
prevent the TPM from functioning properly.
Always check the TPM malfunction telltale after
replacing one or more tires or wheels on your
vehicle to ensure that the replacement or alternate
tires and wheels allow the TPM to continue to
function properly.Warning light
10_Cayenne_21_KW17.book Seite 133 Donnerstag, 9. April 2009 3:33 15