PORSCHE CAYNNE S 2005 1.G Owners Manual
Manufacturer: PORSCHE, Model Year: 2005, Model line: CAYENNE S, Model: PORSCHE CAYENNE S 2005 1.GPages: 380, PDF Size: 3.17 MB
Page 181 of 380
Controls, Safety, Instruments
181
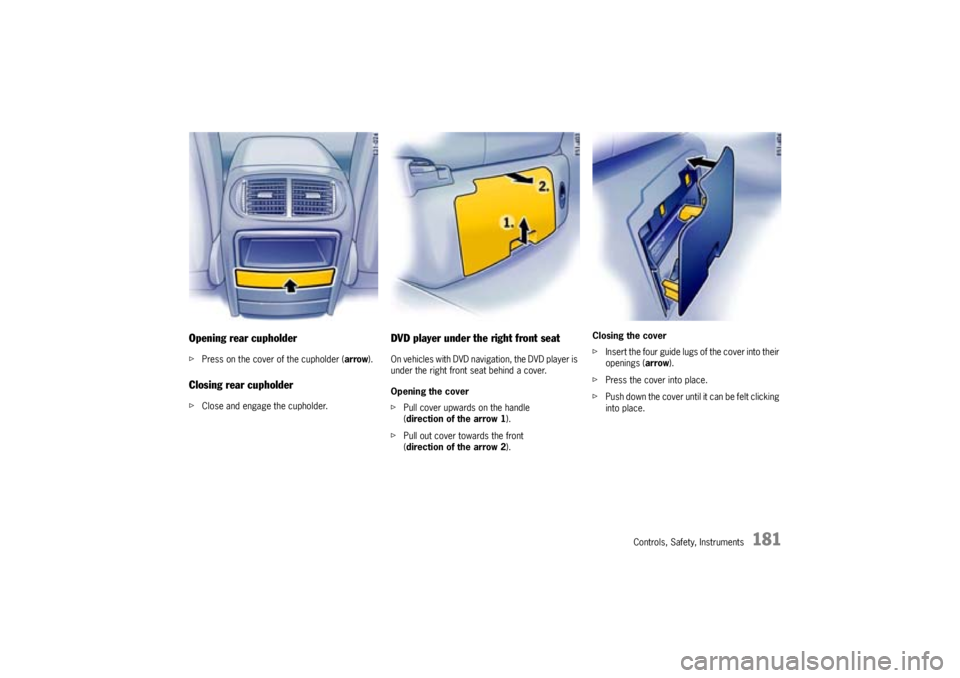
Opening rear cupholderfPress on the cover of the cupholder (arrow).Closing rear cupholderfClose and engage the cupholder.
DVD player under the right front seatOn vehicles with DVD navigation, the DVD player is
under the right front seat behind a cover.
Opening the cover
fPull cover upwards on the handle
(direction of the arrow 1).
fPull out cover towards the front
(direction of the arrow 2).Closing the cover
fInsert the four guide lugs of the cover into their
openings (arrow).
fPress the cover into place.
fPush down the cover until it can be felt clicking
into place.
Page 182 of 380
182
Controls, Safety, Instruments
Rear LidThe equipment features “Porsche Entry & Drive”
and “spare wheel bracket” affect operation of the
rear lid.
fPlease observe the chapter “UNLOCKING VE-
HICLE DOORS” on Page 24.
fPlease observe the chapter “SPARE WHEEL”
on Page 307.
Danger!
Risk of poisoning. Exhaust gases can enter
the passenger compartment when the rear
lid is open.
fAlways keep the rear lid closed when the
engine is running.
fAlways keep the rear lid closed while driving.
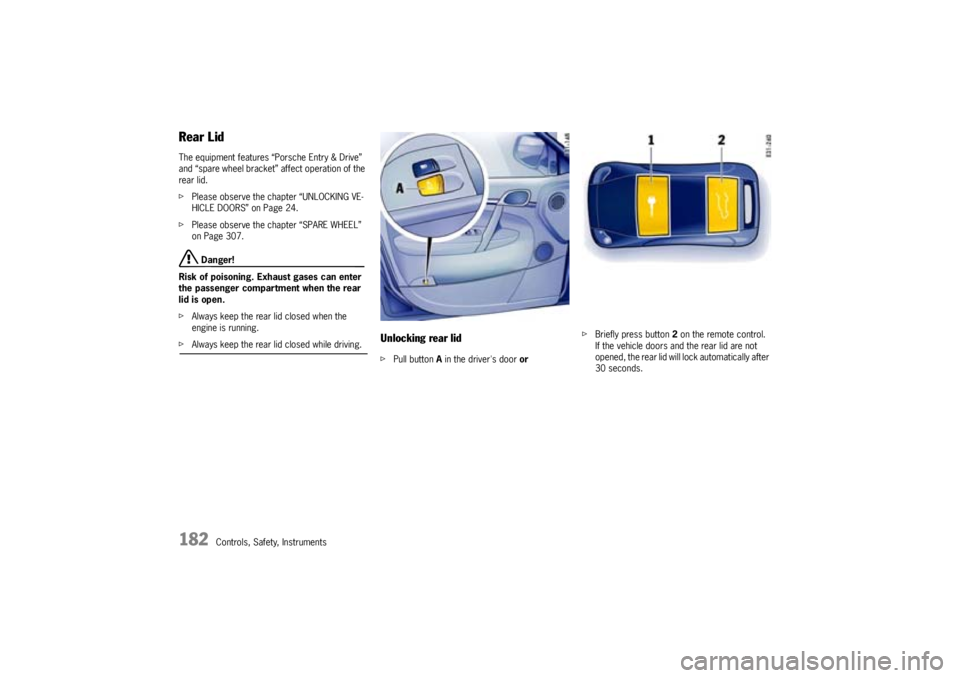
Unlocking rear lidfPull button Ain the driver's door orfBriefly press button 2 on the remote control.
If the vehicle doors and the rear lid are not
opened, the rear lid will lock automatically after
30 seconds.
Page 183 of 380
Controls, Safety, Instruments
183
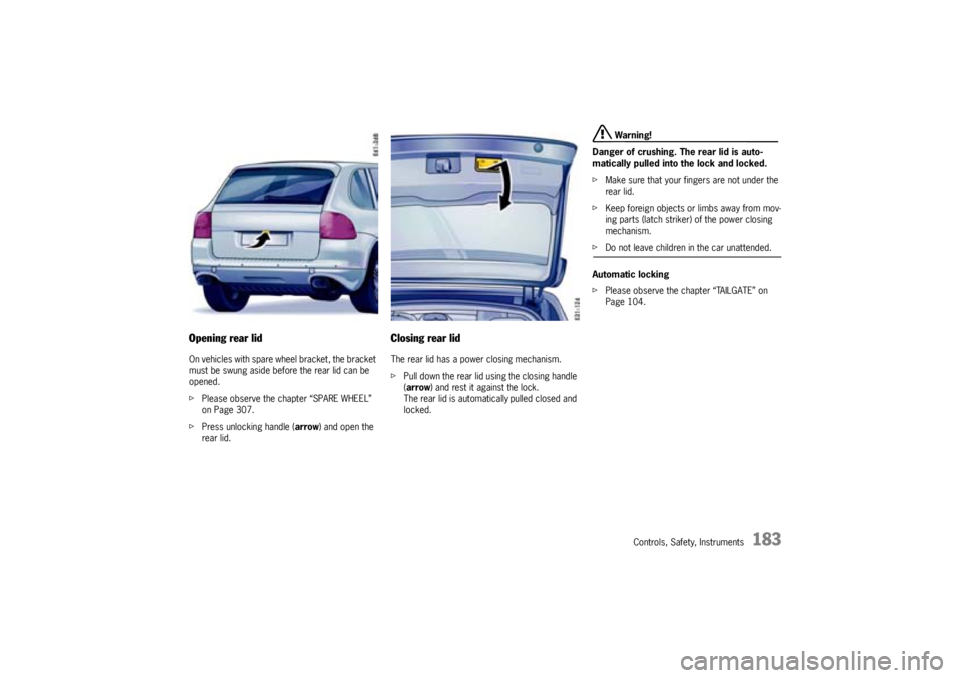
Opening rear lidOn vehicles with spare wheel bracket, the bracket
must be swung aside before the rear lid can be
opened.
fPlease observe the chapter “SPARE WHEEL”
on Page 307.
fPress unlocking handle (arrow) and open the
rear lid.
Closing rear lidThe rear lid has a power closing mechanism.
fPull down the rear lid using the closing handle
(arrow) and rest it against the lock.
The rear lid is automatically pulled closed and
locked.
Warning!
Danger of crushing. The rear lid is auto-
matically pulled into the lock and locked.
fMake sure that your fingers are not under the
rear lid.
fKeep foreign objects or limbs away from mov-
ing parts (latch striker) of the power closing
mechanism.
fDo not leave children in the car unattended.
Automatic locking
fPlease observe the chapter “TAILGATE” on
Page 104.
Page 184 of 380
184
Controls, Safety, Instruments
Rear Window
Danger!
Risk of poisoning. Exhaust gases can enter
the passenger compartment when the rear
window is open.
fAlways keep the rear window closed when the
engine is running.
fAlways keep the rear window closed while driving.
fPlease observe the chapter “UNLOCKING VE-
HICLE DOORS” on Page 24.
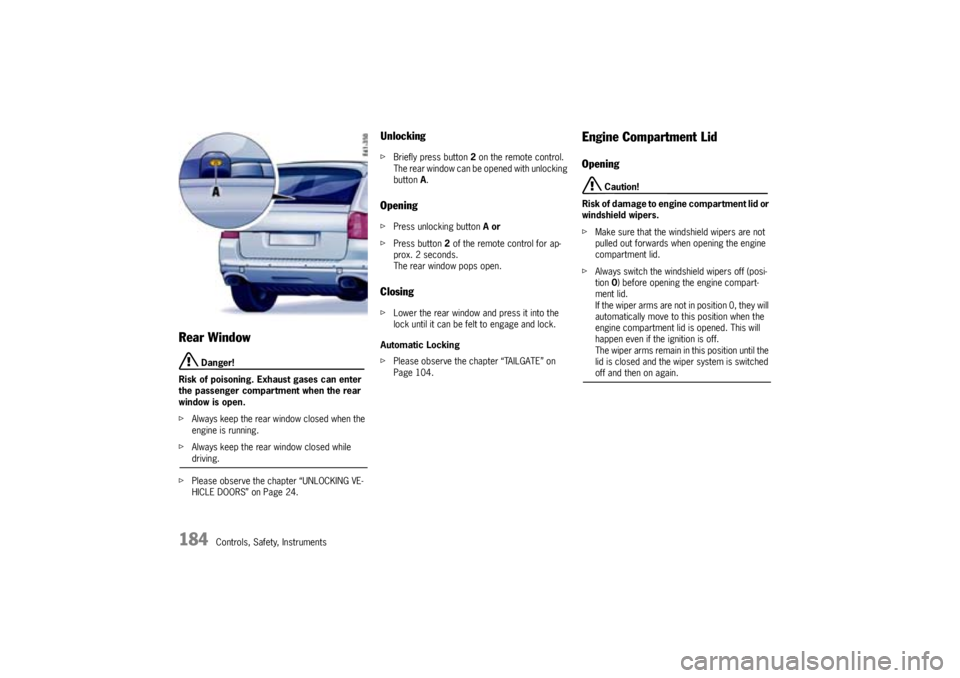
UnlockingfBriefly press button 2 on the remote control.
The rear window can be opened with unlocking
buttonA.OpeningfPress unlocking button Aor
fPress button 2of the remote control for ap-
prox. 2 seconds.
The rear window pops open.ClosingfLower the rear window and press it into the
lock until it can be felt to engage and lock.
Automatic Locking
fPlease observe the chapter “TAILGATE” on
Page 104.
Engine Compartment LidOpening
Caution!
Risk of damage to engine compartment lid or
windshield wipers.
fMake sure that the windshield wipers are not
pulled out forwards when opening the engine
compartment lid.
fAlways switch the windshield wipers off (posi-
tion0) before opening the engine compart-
ment lid.
If the wiper arms are not in position 0, they will
automatically move to this position when the
engine compartment lid is opened. This will
happen even if the ignition is off.
The wiper arms remain in this position until the
lid is closed and the wiper system is switched off and then on again.
Page 185 of 380
Controls, Safety, Instruments
185
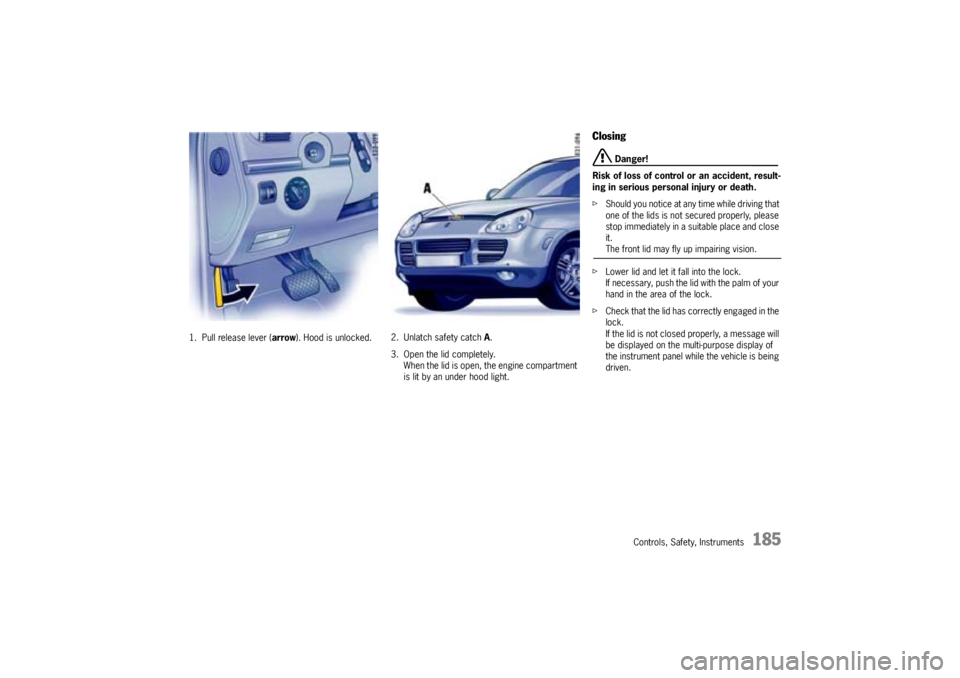
1. Pull release lever (arrow). Hood is unlocked.2. Unlatch safety catch A.
3. Open the lid completely.
When the lid is open, the engine compartment
is lit by an under hood light.
Closing
Danger!
Risk of loss of control or an accident, result-
ing in serious personal injury or death.
fShould you notice at any time while driving that
one of the lids is not secured properly, please
stop immediately in a suitable place and close
it.The front lid may fly up impairing vision.
fLower lid and let it fall into the lock.
If necessary, push the lid with the palm of your
hand in the area of the lock.
fCheck that the lid has correctly engaged in the
lock.
If the lid is not closed properly, a message will
be displayed on the multi-purpose display of
the instrument panel while the vehicle is being
driven.
Page 186 of 380
186
Controls, Safety, Instruments
LoadspaceThe maximum permissible load on the loadspace
floor is 400 kg or 880 lbs. The weight must be dis-
tributed evenly over the entire loadspace.
fPlease observe the chapter “LOADING INFOR-
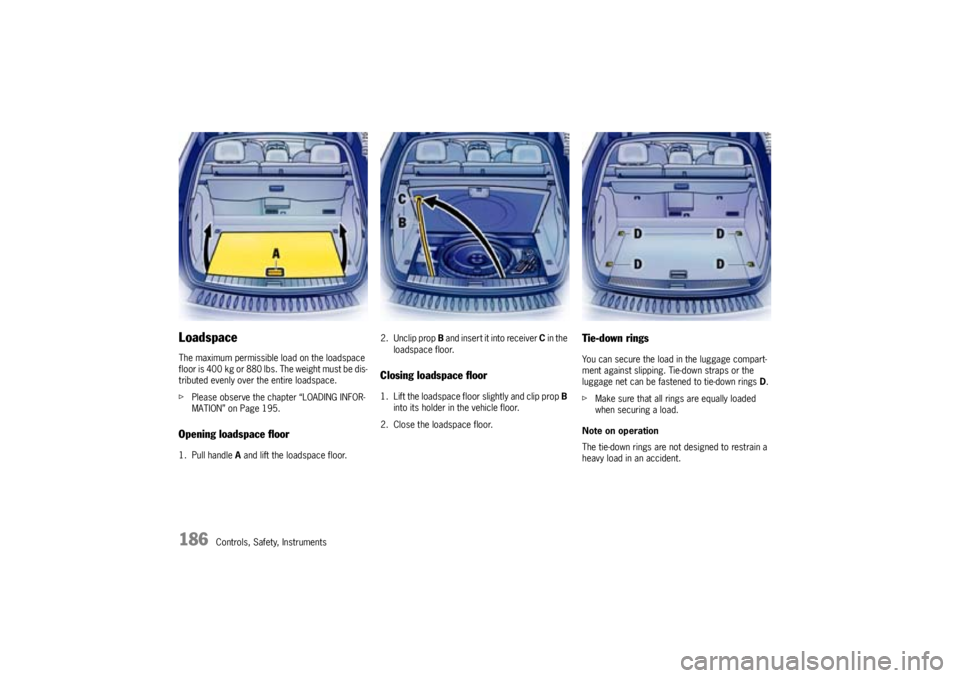
MATION” on Page 195.Opening loadspace floor1. Pull handle A and lift the loadspace floor.2. Unclip prop B and insert it into receiver C in the
loadspace floor.
Closing loadspace floor1. Lift the loadspace floor slightly and clip prop B
into its holder in the vehicle floor.
2. Close the loadspace floor.
Tie-down ringsYou can secure the load in the luggage compart-
ment against slipping. Tie-down straps or the
luggage net can be fastened to tie-down rings D.
fMake sure that all rings are equally loaded
when securing a load.
Note on operation
The tie-down rings are not designed to restrain a
heavy load in an accident.
Page 187 of 380
Controls, Safety, Instruments
187
Luggage Compartment CoverThe luggage can be protected against prying eyes
with the luggage compartment cover.
fAlways pull out the luggage compartment cov-
er when transporting objects in the luggage
compartment.
The luggage compartment cover is not de-
signed to carry objects.
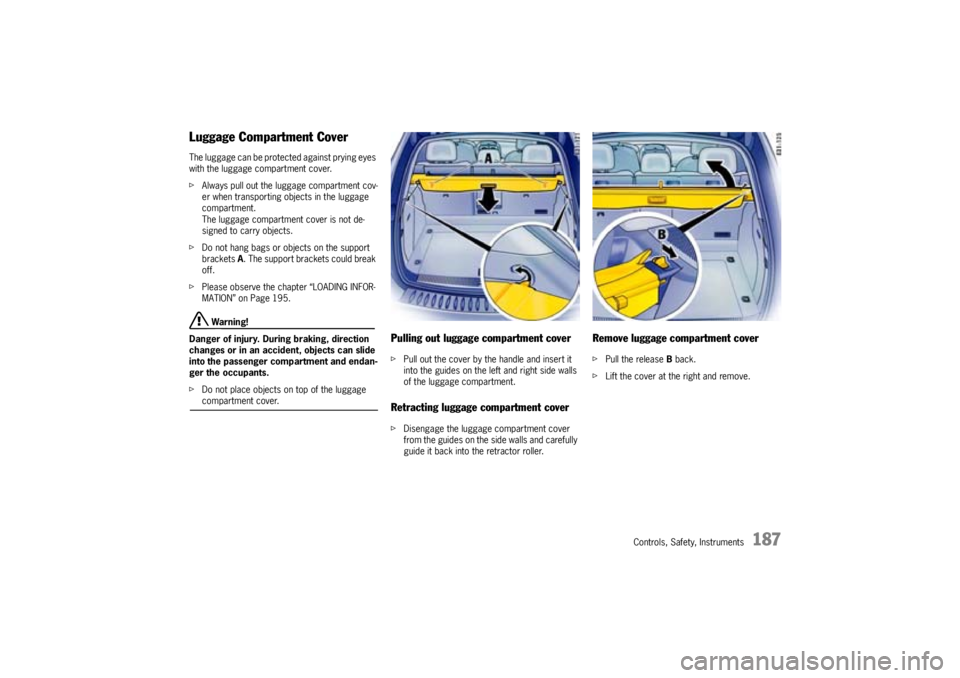
fDo not hang bags or objects on the support
bracketsA. The support brackets could break
off.
fPlease observe the chapter “LOADING INFOR-
MATION” on Page 195.
Warning!
Danger of injury. During braking, direction
changes or in an accident, objects can slide
into the passenger compartment and endan-
ger the occupants.
fDo not place objects on top of the luggage compartment cover.
Pulling out luggage compartment coverfPull out the cover by the handle and insert it
into the guides on the left and right side walls
of the luggage compartment.Retracting luggage compartment coverfDisengage the luggage compartment cover
from the guides on the side walls and carefully
guide it back into the retractor roller.
Remove luggage compartment coverfPull the release Bback.
fLift the cover at the right and remove.
Page 188 of 380
188
Controls, Safety, Instruments
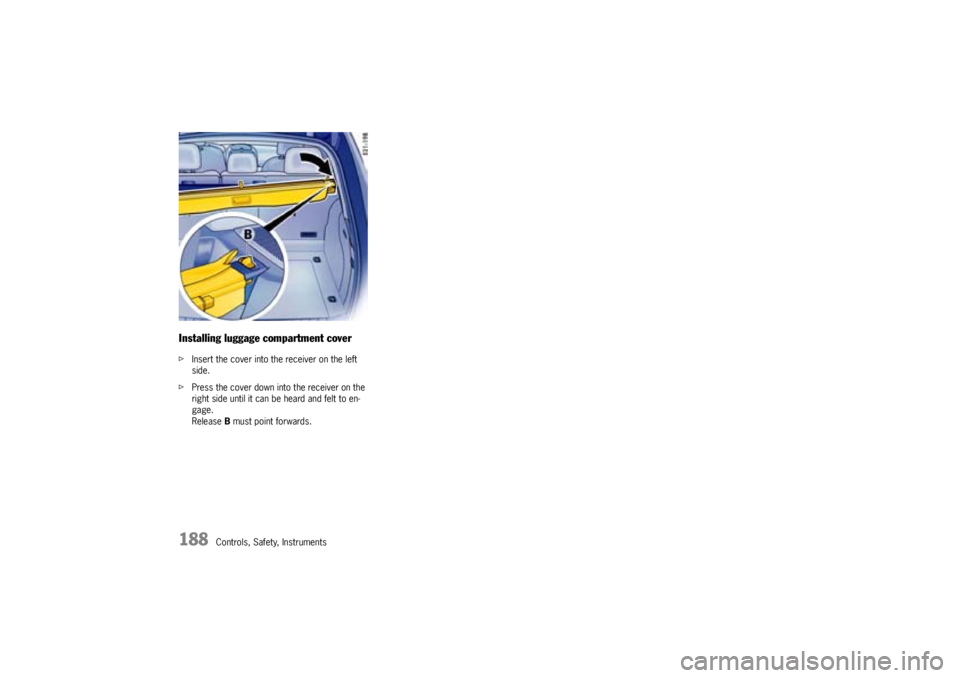
Installing luggage compartment coverfInsert the cover into the receiver on the left
side.
fPress the cover down into the receiver on the
right side until it can be heard and felt to en-
gage.
ReleaseB must point forwards.
Page 189 of 380
Controls, Safety, Instruments
189
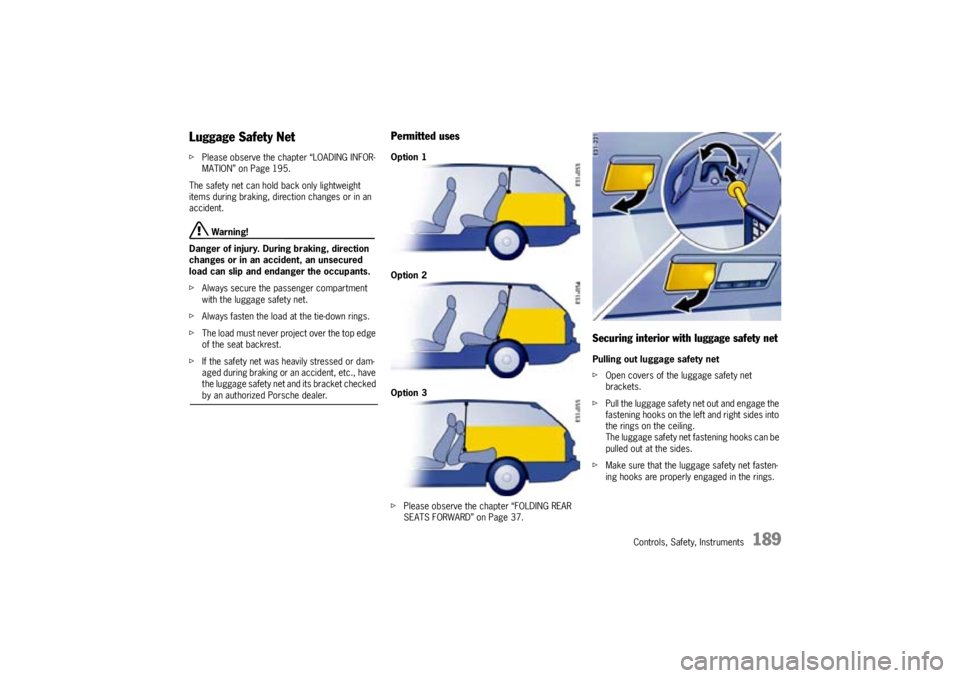
Luggage Safety NetfPlease observe the chapter “LOADING INFOR-
MATION” on Page 195.
The safety net can hold back only lightweight
items during braking, direction changes or in an
accident.
Warning!
Danger of injury. During braking, direction
changes or in an accident, an unsecured
load can slip and endanger the occupants.
fAlways secure the passenger compartment
with the luggage safety net.
fAlways fasten the load at the tie-down rings.
fThe load must never project over the top edge
of the seat backrest.
fIf the safety net was heavily stressed or dam-
aged during braking or an accident, etc., have
the luggage safety net and its bracket checked by an authorized Porsche dealer.
Permitted usesOption 1
Option 2
Option 3
fPlease observe the chapter “FOLDING REAR
SEATS FORWARD” on Page 37.
Securing interior with luggage safety netPulling out luggage safety net
fOpen covers of the luggage safety net
brackets.
fPull the luggage safety net out and engage the
fastening hooks on the left and right sides into
the rings on the ceiling.
The luggage safety net fastening hooks can be
pulled out at the sides.
fMake sure that the luggage safety net fasten-
ing hooks are properly engaged in the rings.
Page 190 of 380
190
Controls, Safety, Instruments
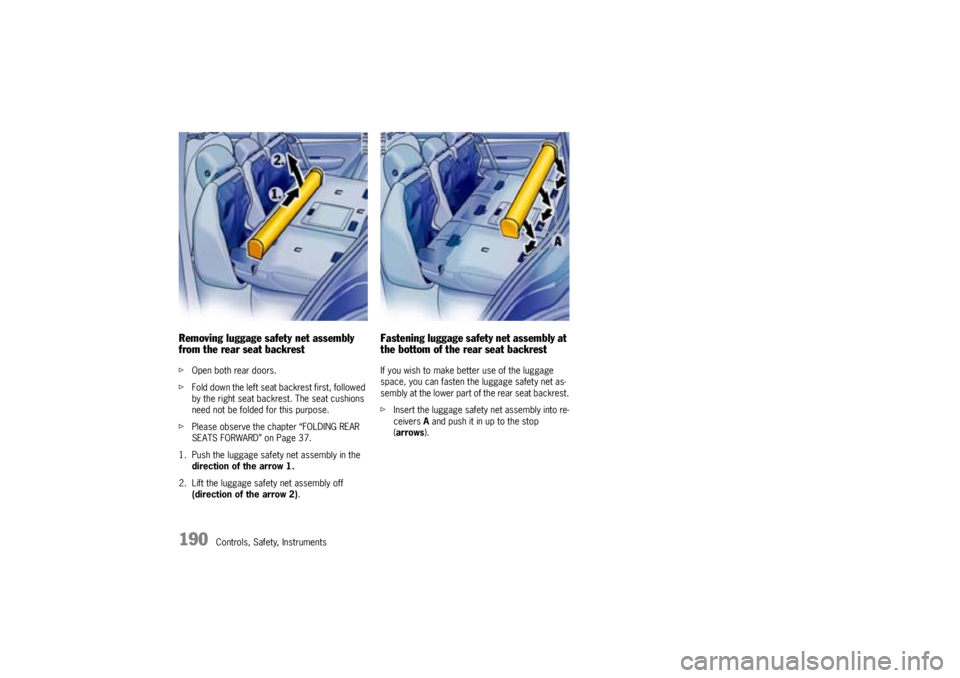
Removing luggage safety net assembly
from the rear seat backrestfOpen both rear doors.
fFold down the left seat backrest first, followed
by the right seat backrest. The seat cushions
need not be folded for this purpose.
fPlease observe the chapter “FOLDING REAR
SEATS FORWARD” on Page 37.
1. Push the luggage safety net assembly in the
direction of the arrow 1.
2. Lift the luggage safety net assembly off
(direction of the arrow 2).
Fastening luggage safety net assembly at
the bottom of the rear seat backrestIf you wish to make better use of the luggage
space, you can fasten the luggage safety net as-
sembly at the lower part of the rear seat backrest.
fInsert the luggage safety net assembly into re-
ceiversA and push it in up to the stop
(arrows).