check engine PORSCHE CAYNNE S 2005 1.G User Guide
[x] Cancel search | Manufacturer: PORSCHE, Model Year: 2005, Model line: CAYENNE S, Model: PORSCHE CAYENNE S 2005 1.GPages: 380, PDF Size: 3.17 MB
Page 75 of 380
Controls, Safety, Instruments
75
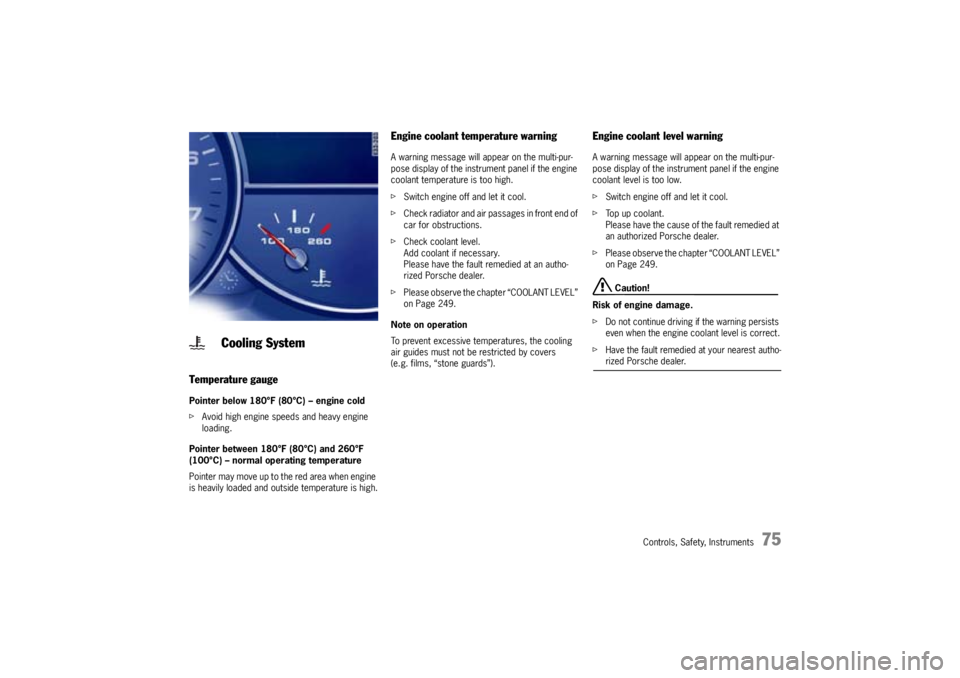
Temperature gaugePointer below 180°F (80°C) – engine cold
fAvoid high engine speeds and heavy engine
loading.
Pointer between 180°F (80°C) and 260°F
(100°C) – normal operating temperature
Pointer may move up to the red area when engine
is heavily loaded and outside temperature is high.
Engine coolant temperature warningA warning message will appear on the multi-pur-
pose display of the instrument panel if the engine
coolant temperature is too high.
fSwitch engine off and let it cool.
fCheck radiator and air passages in front end of
car for obstructions.
fCheck coolant level.
Add coolant if necessary.
Please have the fault remedied at an autho-
rized Porsche dealer.
fPlease observe the chapter “COOLANT LEVEL”
on Page 249.
Note on operation
To prevent excessive temperatures, the cooling
air guides must not be restricted by covers
(e.g. films, “stone guards”).
Engine coolant level warningA warning message will appear on the multi-pur-
pose display of the instrument panel if the engine
coolant level is too low.
fSwitch engine off and let it cool.
fTop up coolant.
Please have the cause of the fault remedied at
an authorized Porsche dealer.
fPlease observe the chapter “COOLANT LEVEL”
on Page 249.
Caution!
Risk of engine damage.
fDo not continue driving if the warning persists
even when the engine coolant level is correct.
fHave the fault remedied at your nearest autho-rized Porsche dealer.
Cooling System
Page 78 of 380
78
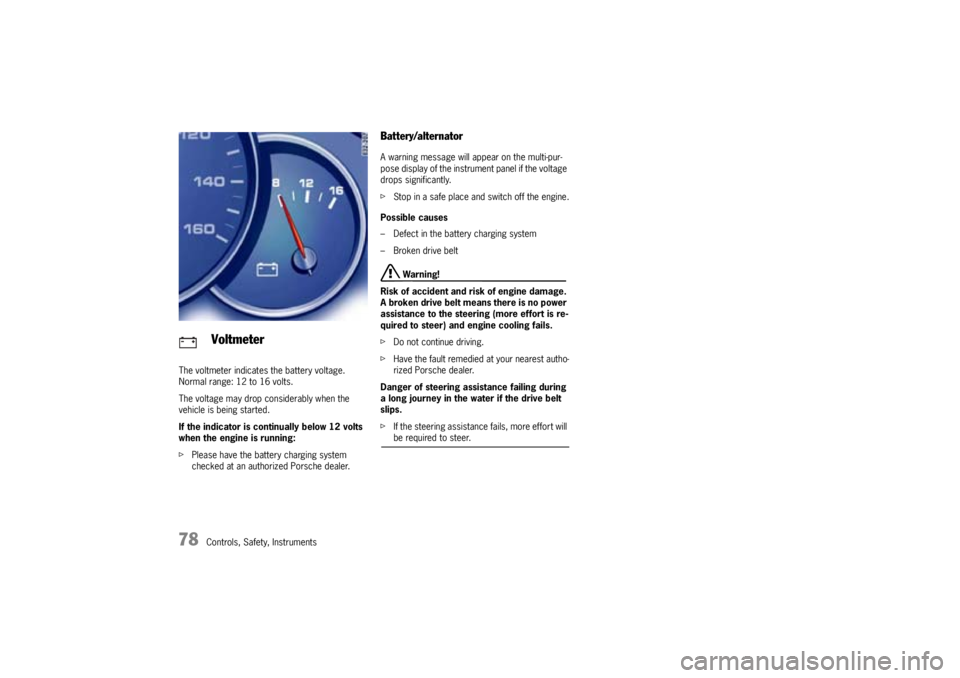
Controls, Safety, Instruments The voltmeter indicates the battery voltage.
Normal range: 12 to 16 volts.
The voltage may drop considerably when the
vehicle is being started.
If the indicator is continually below 12 volts
when the engine is running:
fPlease have the battery charging system
checked at an authorized Porsche dealer.
Battery/alternatorA warning message will appear on the multi-pur-
pose display of the instrument panel if the voltage
drops significantly.
fStop in a safe place and switch off the engine.
Possible causes
– Defect in the battery charging system
– Broken drive belt
Warning!
Risk of accident and risk of engine damage.
A broken drive belt means there is no power
assistance to the steering (more effort is re-
quired to steer) and engine cooling fails.
fDo not continue driving.
fHave the fault remedied at your nearest autho-
rized Porsche dealer.
Danger of steering assistance failing during
a long journey in the water if the drive belt
slips.
fIf the steering assistance fails, more effort will be required to steer.
Voltmeter
Page 79 of 380

Controls, Safety, Instruments
79
Emission ControlThe emission control system detects malfunctions
early that could, for example, cause increased pol-
lutant emissions or consequential damage.
Faults are indicated by the warning light in the in-
strument panel by being continuously lit or flash-
ing.
The faults are recorded in the control unit's fault
memory.
The warning light in the instrument panel lights up
when the ignition is switched on as a lamp check
and goes out approx. 4 seconds after the engine
starts.The warning light in the instrument panel flashes to
indicate operating states (e.g. engine misfiring)
which might cause damage to certain parts of the
emission control system.
fIn this case, immediately reduce the engine
load by easing off the accelerator.
The warning light in the instrument panel is lit
continuously after the critical range is left.
fIn order to avoid consequential damage to the
engine or emission control system (e.g. cata-
lytic converter) go immediately to the nearest
authorized Porsche dealer to have the fault
diagnosed and rectified.
Caution!
Risk of damage. If the warning light in the in-
strument panel continues flashing even when
you have eased off the accelerator pedal,
the emission control system may overheat.
fStop as soon as possible in a safe place.
Make sure that combustible materials, such as
dry grass or leaves, cannot come into contact
with the hot exhaust system.
fSwitch off the engine.
fContact your nearest authorized Porsche deal-er to have the fault rectified.
Check engine warning light
Page 109 of 380
Controls, Safety, Instruments
109
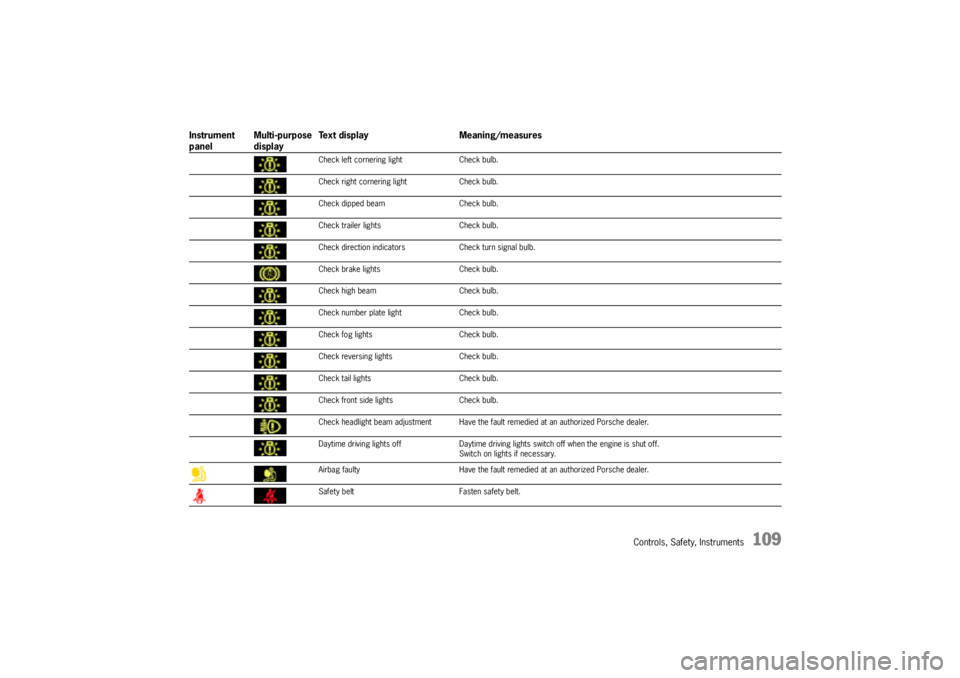
Check left cornering light Check bulb.
Check right cornering light Check bulb.
Check dipped beam Check bulb.
Check trailer lights Check bulb.
Check direction indicators Check turn signal bulb.
Check brake lights Check bulb.
Check high beam Check bulb.
Check number plate light Check bulb.
Check fog lights Check bulb.
Check reversing lights Check bulb.
Check tail lights Check bulb.
Check front side lights Check bulb.
Check headlight beam adjustment Have the fault remedied at an authorized Porsche dealer.
Daytime driving lights off Daytime driving lights switch off when the engine is shut off.
Switch on lights if necessary.
Airbag faulty Have the fault remedied at an authorized Porsche dealer.
Safety belt Fasten safety belt.
Instrument
panelMulti-purpose
displayText display Meaning/measures
Page 111 of 380
Controls, Safety, Instruments
111
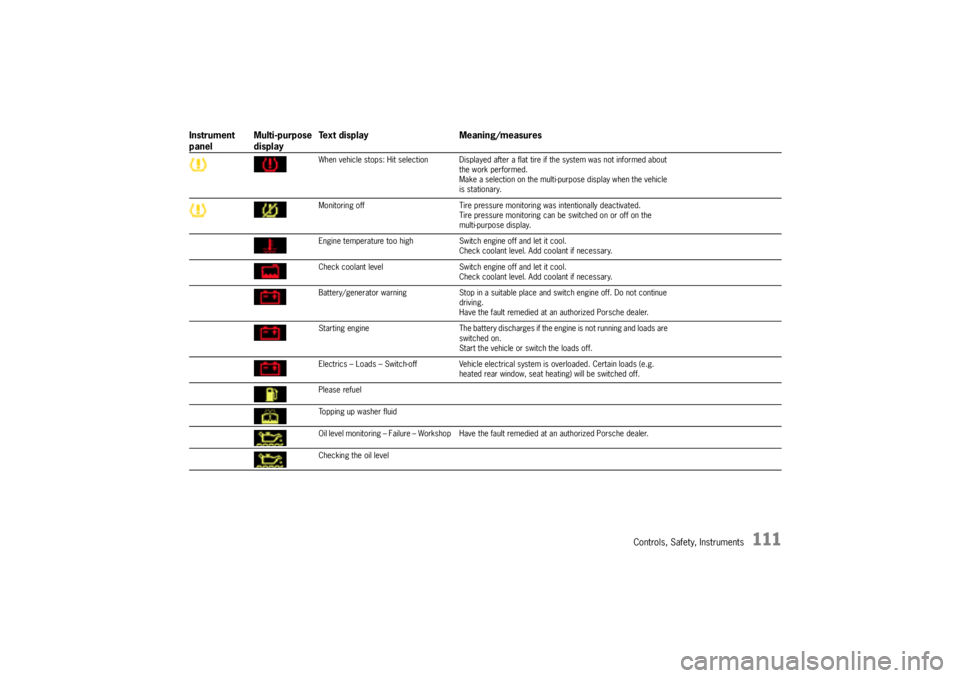
When vehicle stops: Hit selection Displayed after a flat tire if the system was not informed about
the work performed.
Make a selection on the multi-purpose display when the vehicle
is stationary.
Monitoring off Tire pressure monitoring was intentionally deactivated.
Tire pressure monitoring can be switched on or off on the
multi-purpose display.
Engine temperature too high Switch engine off and let it cool.
Check coolant level. Add coolant if necessary.
Check coolant level Switch engine off and let it cool.
Check coolant level. Add coolant if necessary.
Battery/generator warning Stop in a suitable place and switch engine off. Do not continue
driving.
Have the fault remedied at an authorized Porsche dealer.
Starting engine The battery discharges if the engine is not running and loads are
switched on.
Start the vehicle or switch the loads off.
Electrics – Loads – Switch-off Vehicle electrical system is overloaded. Certain loads (e.g.
heated rear window, seat heating) will be switched off.
Please refuel
Topping up washer fluid
Oil level monitoring – Failure – Workshop Have the fault remedied at an authorized Porsche dealer.
Checking the oil level
Instrument
panelMulti-purpose
displayText display Meaning/measures
Page 112 of 380

112
Controls, Safety, Instruments
Oil pressure too low Immediately stop in a suitable place and switch engine off.
Do not continue driving.
Check engine oil level. Add oil if necessary.
Do not continue driving if the warning light comes on even when
the oil level is correct. Have the fault remedied at an authorized
Porsche dealer.
Service in 1864 mls (3000 km)Service indicator
Bring the vehicle in for service no later than after the distance
shown has been covered.
Service nowService indicator
Have your vehicle serviced at an authorized Porsche dealer.
Brake pads – Workshop Have the brake pads replaced at an authorized Porsche dealer
without delay.
Warning – Brake circuit division Stop immediately in a suitable place. Do not continue driving.
Have the fault remedied at an authorized Porsche dealer.
ABS failure – WorkshopDrive carefully. Have the fault remedied at an authorized
Porsche dealer.
PSM failure – WorkshopDrive carefully. Have the fault remedied at an authorized
Porsche dealer.
Warning – Brake fluid level Stop immediately in a suitable place. Do not continue driving.
Have the fault remedied at an authorized Porsche dealer.
Parking brake Parking brake not released.
PSM onPorsche Stability Management was switched on.
PSM offPorsche Stability Management was switched off.
PHC failureThe Porsche Drive-Off Assistant (manual transmission) and the
Engine Braking Support (downhill assistance) are not available.
Brake booster faulty Greater braking pedal force necessary. Drive carefully to the
nearest authorized Porsche dealer.
Instrument
panelMulti-purpose
displayText display Meaning/measures
Page 185 of 380
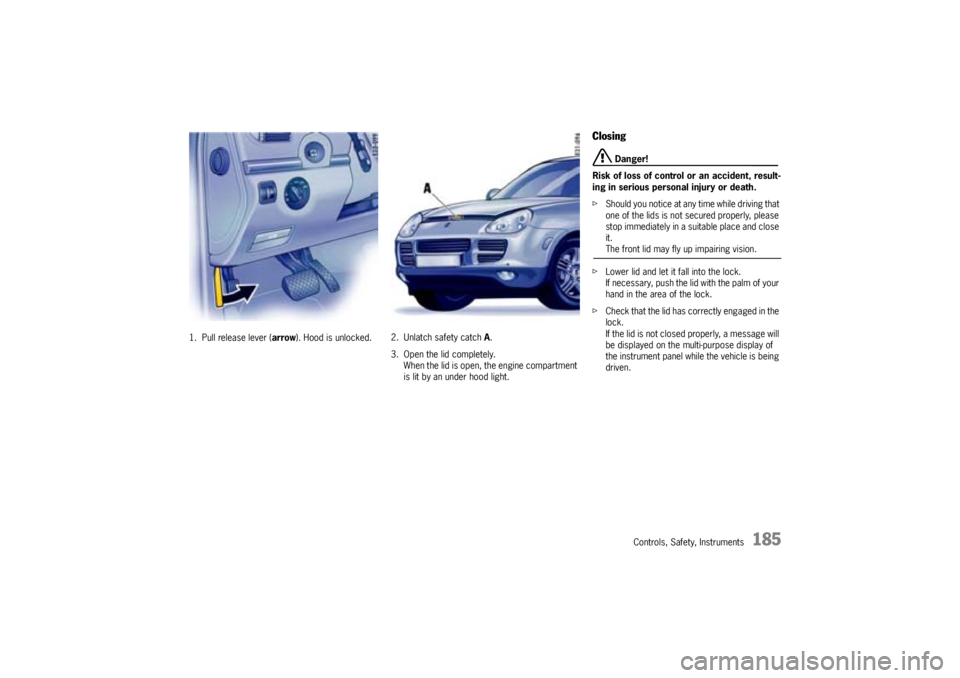
Controls, Safety, Instruments
185
1. Pull release lever (arrow). Hood is unlocked.2. Unlatch safety catch A.
3. Open the lid completely.
When the lid is open, the engine compartment
is lit by an under hood light.
Closing
Danger!
Risk of loss of control or an accident, result-
ing in serious personal injury or death.
fShould you notice at any time while driving that
one of the lids is not secured properly, please
stop immediately in a suitable place and close
it.The front lid may fly up impairing vision.
fLower lid and let it fall into the lock.
If necessary, push the lid with the palm of your
hand in the area of the lock.
fCheck that the lid has correctly engaged in the
lock.
If the lid is not closed properly, a message will
be displayed on the multi-purpose display of
the instrument panel while the vehicle is being
driven.
Page 198 of 380

198
Controls, Safety, Instruments
Towing a trailer
Warning!
Driving with a trailer
fAlways observe the permissible towing capac-
ity, vertical coupling load and rear-axle load.
Please observe the chapter “WEIGHTS” on
Page 363.
fWhen connected, the trailer must always be
horizontal behind the towing vehicle. If neces-
sary, use a trailer with an adjustable drawbar.
fWhen the vehicle is driven in the mountains, the
engine output decreases as altitude increases.
The maximum weights stated are the values at
sea level. The total permissable weight of the
car-trailer combination must therefore be re-
duced by 10% for each increment of 3,280 ft.
(1,000 meters) altitude. A fractional increment
counts as the full 3,280 ft. (1,000 meters).
Please take this into consideration when plan-
ning your route.Distributing the load
fDistribute the load in the trailer so that heavy
objects are as close to the axle as possible.
Always safeguard all objects against slipping
and tie them down securely.
fYou should make the best possible use of the
trailer coupling's rated vertical coupling load
when loading the trailer, but never exceed it.
Tire pressure
fSelect the vehicle tire pressure for full load
when towing a trailer.
fPlease observe the chapter “Tire pressure ta-
bles”.
fCheck the tire pressure of the trailer's wheels
according to the manufacturer's instructions.Door mirrors
fIf the width of the trailer obstructs your view of
the traffic behind the trailer, you must have ad-
ditional door mirrors fitted.
Headlights, lights
fAlways check the headlight adjustment before
driving with a trailer.
If necessary, correct with the headlight beam
adjustment function.
fCheck whether the plug of the trailer is
plugged into the towing vehicle and whether all
lights function.
Page 223 of 380

Shifting Gear, Traction Systems
223
ABS
(Anti-lock Brake System)
Safety notes!
In spite of the advantages of ABS, it is still the driv-
er’s responsibility to adapt his driving style and
maneuvres in line with road and weather condi-
tions, as well as the traffic situation.
The increased safety that is provided should not in-
duce you to take greater risks with your safety.
The limits set by the physics of driving cannot be
overcome, even with ABS.
Risks of accident due to inappropriate speed can-
not be reduced by ABS.
ABS ensures:
–Full steering control
The vehicle remains steerable
–Good driving stability
No skidding due to locked wheels
–Optimum braking distance
Shorter stopping distances in most cases
–Lock prevention
No flat spots on the tiresFunction
The decisive advantage of ABS is in the driving
stability and maneuvrability of the vehicle in
hazardous situations, even during heavy braking
while cornering.
ABS prevents locking of the wheels during full
braking, on almost all road surfaces, until shortly
before the vehicle stops.
The ABS begins to control the braking process as
soon as a wheel shows a tendency to lock.
This controlled braking process is comparable to
extremely rapid cadence braking.
The pulsating brake pedal and a “rattling noise”
warn the driver to adapt his driving speed to the
road conditions.Warning light
If the ABS warning lights light up in the instrument
panel and on the multi-purpose display of the in-
strument panel while the engine is running, the
ABS has switched off because of a fault.
In this event, the braking system will operate with-
out lock prevention,as in cars without ABS.
fAdapt your driving style to the changed brak-
ing behavior.
The ABS must be checked immediately at an
authorized Porsche dealer in order to prevent
the occurrence of further faults the effects of
which cannot be defined.
The ABS control unit is adjusted for the approved
tire dimensions.
The use of tires with non-approved dimensions can
lead to different wheel speeds, causing the ABS to
switch off.
f f f
Page 226 of 380

226
Shifting Gear, Traction Systems
Engine Braking Support
(Assistance when heading downhill)The Porsche Down-Hill Assistant is an assistance
system which helps the driver at slower downhill
driving up to approx. 12 mph (20 km/h), e.g., on
steep slopes or on wintry mountain roads.
As long as the gas pedal is not used when trav-
eling downhill, the Porsche Down-Hill Assistant is
active and brakes the vehicle.
The braking ability of the Engine Braking Support
is affected by slippery surfaces (e.g., on icy or
loose surfaces), like all brakes.
If road grip is lost on one or more wheels, the
system brakes the wheels which have good road
contact.
Conditions:
– The gas pedal must not be used when
travelling downhill.
– The speed must not exceed 12 mph
(20 km/h).
– The selector lever position D or Mmust be
engaged.
Warning!
Risk of accident. Reduced braking ability on
a slippery surface.
fAlways adjust your driving style to the driving situation.
Tip on driving
The Porsche Down-Hill Assistant is active when
driving downhill either forwards or backwards.
Checks on test standsPower measurement
Power measurements on roller test stands are not
approved by Porsche.
Brake tests
Brake tests must be carried out only in High Range
and on plate-type test stands or roller test stands.
The following limit values must not be exceeded
on roller test stands:
– Testing speed 4.7 mph (7.5 km/h)
– Test duration 20 seconds
Parking brake test
Parking brake tests on the brake tester must be
performed only with the ignition switched off and
the selector lever in position N.
Balancing wheels on the vehicle
During finish balancing of the wheels, the entire ve-
hicle must be lifted and the wheels must be free to
turn.