ignition PORSCHE CAYNNE S 2006 1.G Owners Manual
[x] Cancel search | Manufacturer: PORSCHE, Model Year: 2006, Model line: CAYENNE S, Model: PORSCHE CAYENNE S 2006 1.GPages: 420, PDF Size: 3.81 MB
Page 352 of 420
352
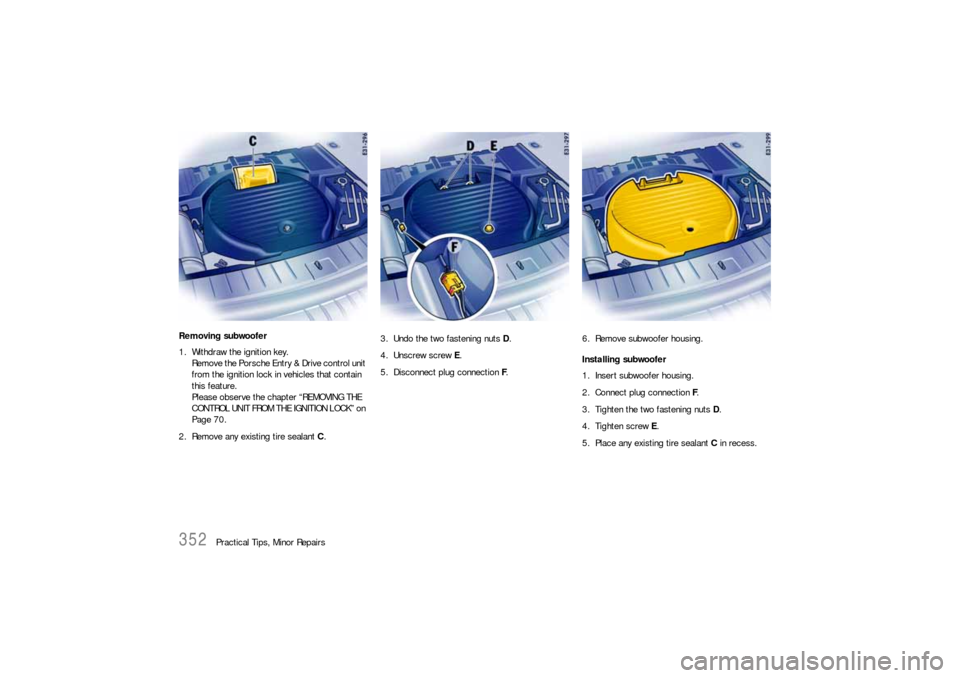
Practical Tips, Minor Repairs Removing subwoofer
1. Withdraw the ignition key.
Remove the Porsche Entry & Drive control unit
from the ignition lock in vehicles that contain
this feature.
Please observe the chapter “REMOVING THE
CONTROL UNIT FROM THE IGNITION LOCK” on
Page 70.
2. Remove any existing tire sealant C.3. Undo the two fastening nuts D.
4. Unscrew screw E.
5. Disconnect plug connection F.6. Remove subwoofer housing.
Installing subwoofer
1. Insert subwoofer housing.
2. Connect plug connection F.
3. Tighten the two fastening nuts D.
4. Tighten screw E.
5. Place any existing tire sealant C in recess.
Page 353 of 420
Practical Tips, Minor Repairs
353
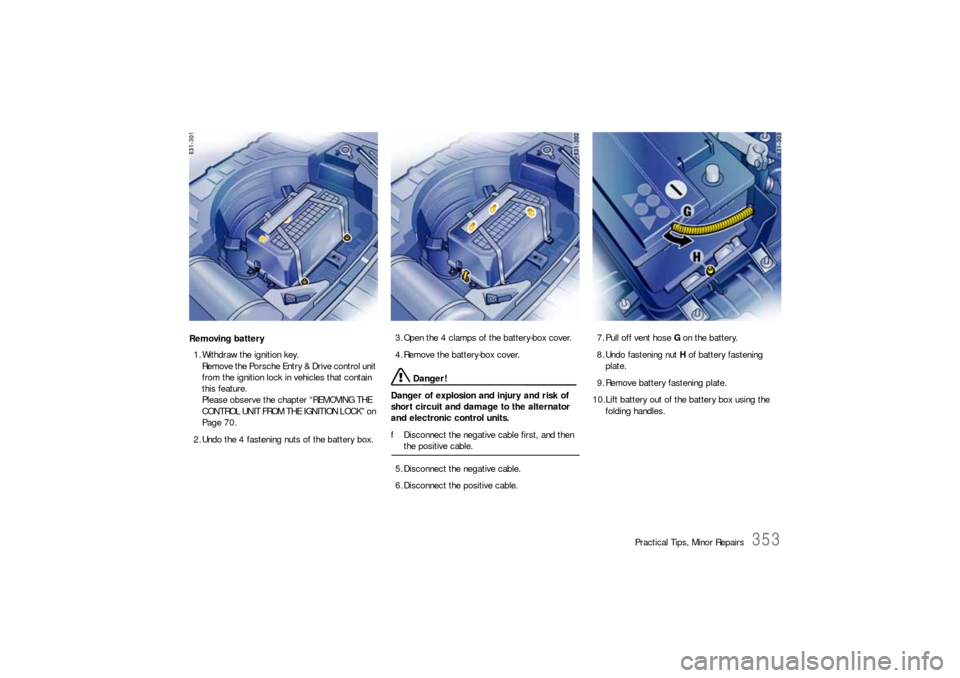
Removing battery
1. Withdraw the ignition key.
Remove the Porsche Entry & Drive control unit
from the ignition lock in vehicles that contain
this feature.
Please observe the chapter “REMOVING THE
CONTROL UNIT FROM THE IGNITION LOCK” on
Page 70.
2. Undo the 4 fastening nuts of the battery box.3. Open the 4 clamps of the battery-box cover.
4. Remove the battery-box cover.
Danger!
Danger of explosion and injury and risk of
short circuit and damage to the alternator
and electronic control units.
fDisconnect the negative cable first, and then the positive cable.
5. Disconnect the negative cable.
6. Disconnect the positive cable.7. Pull off vent hose G on the battery.
8. Undo fastening nut H of battery fastening
plate.
9. Remove battery fastening plate.
10.Lift battery out of the battery box using the
folding handles.
Page 355 of 420
Practical Tips, Minor Repairs
355
Emergency Starting with Jumper
CablesIf the battery is discharged, e.g. in winter or after
the car has been parked for a long time, the bat-
tery of another car can be used for starting with
the help of jumper cables.
Make sure the voltage of both batteries is the
same.
The capacity (Ampere hours, Ah) of the booster
battery must not be substantially less than that of
the discharged battery.The discharged battery
must be correctly connected to the vehicle's elec-
trical system.
fPlease observe the chapter “BATTERY” on
Page 344.
Note
Do not try to start the car by pushing or towing.
Damage to the catalytic converters and other
components of the car may result.
Danger!
Risk of damage and serious personal injury
due to short circuit.
fUse only jumper cables of adequate diameter
cross-section and fitted with completely insu-
lated alligator clips.
fFollow all warnings and instructions of the
jumper cable manufacturer.
fWhen connecting jumper cables, make sure
that they cannot get caught in any moving
parts in the engine compartment.
The jumper cables must be long enough so
that neither vehicles nor cables touch another.
fThe vehicles must not be in contact, otherwise
current might flow as soon as the positive ter-
minals are connected.
fThe cable clamps must not be allowed to con-
tact each other when one end of the jumper ca-
bles are connected to a battery.
fCarefully ensure that tools or conductive jewel-
ery (rings, chains, watch straps) do not come
into contact with the positive jumper cable or
the positive battery post.
fImproper hook-up of jumper cables can ruin
the alternator.
Danger of caustic burns.
fDo not lean over the battery.Danger of gas explosion.
fImproper use of booster battery to start a ve-
hicle may cause an explosion, resulting in se-
vere personal injuries.
fKeep sources of ignition away from the bat-
tery, e.g. open flame, burning cigarettes or
sparking due to cable contact or welding work.
fA discharged battery can freeze even at
14°F (−10°C). Before connecting jumper ca-
bles, a frozen battery must be thawed out.
Page 357 of 420
Practical Tips, Minor Repairs
357
Charging the batteryYour authorized Porsche dealer will be pleased to
advise you about a suitable charger.
1. Always observe the instructions of the charger
manufacturer.
2. When charging the battery, ensure adequate
ventilation.
3. Check the acid level of a low-maintenance bat-
tery.
4. Connect charger to the jump starting points.
Only plug into the mains and switch the charg-
er on when it has been correctly connected up.
5. After charging, disconnect the charger.
6. Check the acid level of a low-maintenance bat-
tery.
After charging the battery After the battery is connected or the completely
discharged battery is charged, the PSM warning
light lights up on the instrument panel and a mes-
sage appears on the multi-purpose display of the
instrument panel to indicate a fault.
This fault can be remedied with a few simple
steps:
1. Start the engine.
To do this, turn the ignition key or the control
unit (on vehicles that have Porsche Entry &
Drive) to ignition lock position 2 twice.
2. Perform a few steering movements to the left
and to the right when vehicle is standing and
drive a short distance in a straight line until the
PSM warning light goes out and the message
is erased from the memory of the multi-pur-
pose display of the instrument panel.
3. If the warnings does not go out, then:
Drive carefully to the nearest authorized
Porsche dealer.
Have the fault remedied by an authorized
Porsche dealer.4. After the warnings disappear:
Stop the vehicle in a suitable place.
5. Perform adaptation of the power windows:
Please observe the chapter “STORING FINAL
POSITION OF THE DOOR WINDOWS” on
Page 35.
6. On vehicles with tire pressure monitoring:
Please observe the chapter “SYSTEM LEAR-
NING PHASE” on Page 104.
Page 361 of 420
Practical Tips, Minor Repairs
361
Headlights
Caution!
Risk of damage to headlights due to abrasion
and excessive temperatures.
fDo not affix any coverings (e.g. “stone guards” or films) in the area of the headlights.
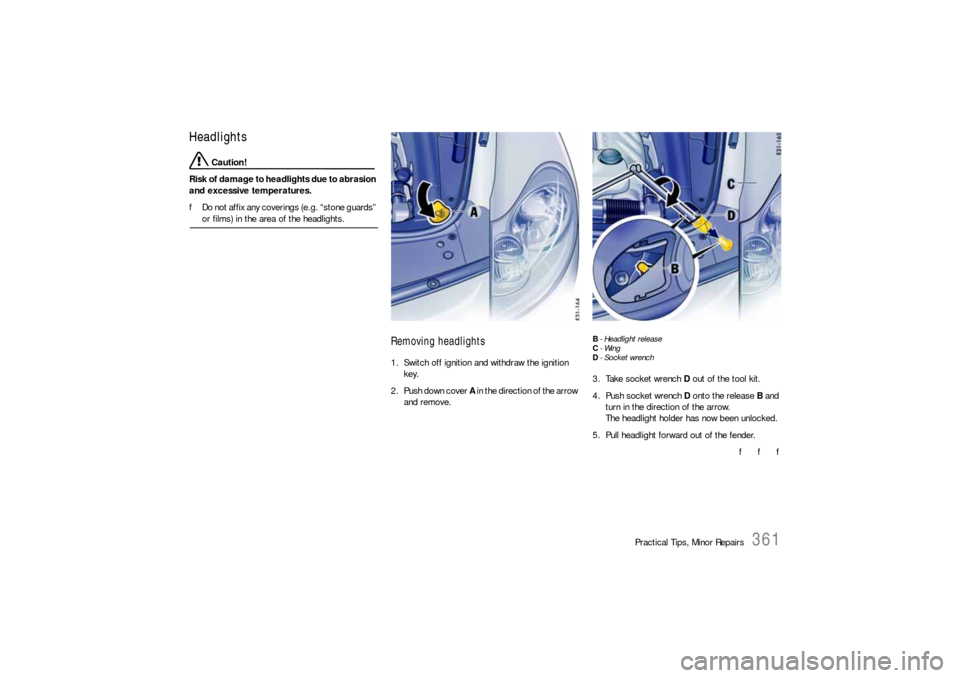
Removing headlights1. Switch off ignition and withdraw the ignition
key.
2. Push down cover A in the direction of the arrow
and remove.
B- Headlight release
C-Wing
D- Socket wrench3. Take socket wrench D out of the tool kit.
4. Push socket wrench D onto the release B and
turn in the direction of the arrow.
The headlight holder has now been unlocked.
5. Pull headlight forward out of the fender.
f f f
Page 369 of 420
Practical Tips, Minor Repairs
369
Tail LightRemoving tail lightBecause of the design, a relatively large amount of
effort is required to remove the tail light.
In cases of doubt, please contact your authorized
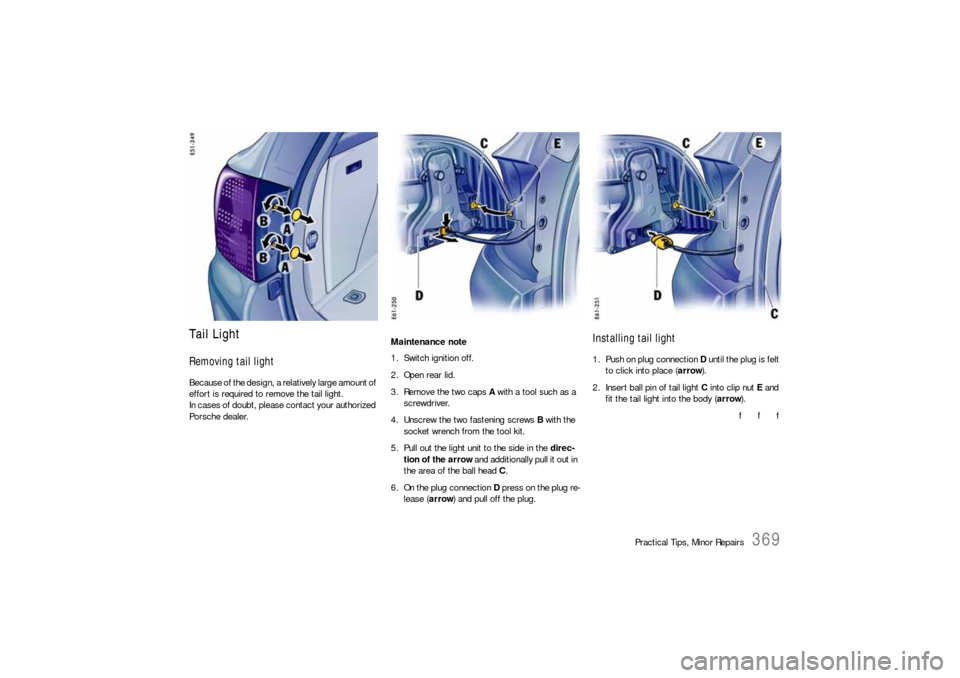
Porsche dealer.Maintenance note
1. Switch ignition off.
2. Open rear lid.
3. Remove the two caps A with a tool such as a
screwdriver.
4. Unscrew the two fastening screws B with the
socket wrench from the tool kit.
5. Pull out the light unit to the side in the direc-
tion of the arrow and additionally pull it out in
the area of the ball head C.
6. On the plug connection D press on the plug re-
lease (arrow) and pull off the plug.
Installing tail light1. Push on plug connection D until the plug is felt
to click into place (arrow).
2. Insert ball pin of tail light C into clip nut E and
fit the tail light into the body (arrow).
f f f
Page 373 of 420

Practical Tips, Minor Repairs
373
Height adjustment for low beam/
high beam and additional high beam1. Push down cover in the engine compartment
and remove.
2. Switch ignition on.
3. Switch on low beam and/or high beam.
4. Adjust low beam in direction of the arrow.
Changing Headlights from Left to
Right-Hand TrafficIf you travel to a corresponding country where traf-
fic uses the other side of the road, the headlights
must be partially masked with films when you
cross the border.
fYou can obtain the films and a set of instruc-
tions from an authorized Porsche dealer.
Page 386 of 420
386
Vehicle Identification, Technical Data
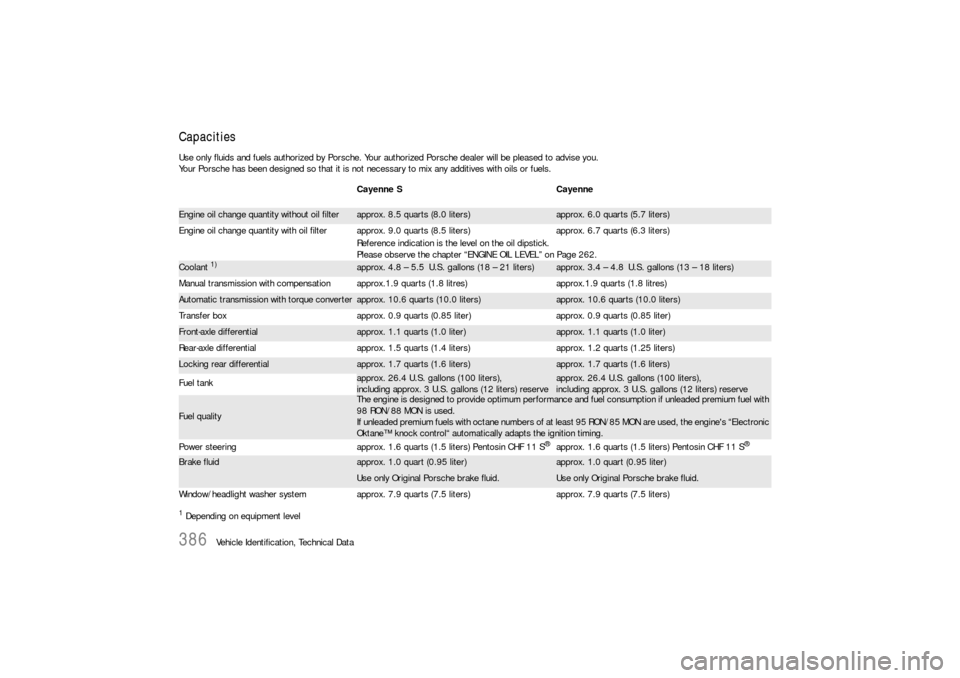
CapacitiesUse only fluids and fuels authorized by Porsche. Your authorized Porsche dealer will be pleased to advise you.
Your Porsche has been designed so that it is not necessary to mix any additives with oils or fuels.1 Depending on equipment levelCayenne S CayenneEngine oil change quantity without oil filter
approx. 8.5 quarts (8.0 liters)
approx. 6.0 quarts (5.7 liters)
Engine oil change quantity with oil filter approx. 9.0 quarts (8.5 liters) approx. 6.7 quarts (6.3 liters)
Reference indication is the level on the oil dipstick.
Please observe the chapter “ENGINE OIL LEVEL” on Page 262.
Coolant
1)
approx. 4.8 – 5.5 U.S. gallons (18 – 21 liters)
approx. 3.4 – 4.8 U.S. gallons (13 – 18 liters)
Manual transmission with compensation approx.1.9quarts (1.8 litres) approx.1.9 quarts (1.8 litres)
Automatic transmission with torque converter
approx. 10.6 quarts (10.0 liters)
approx. 10.6 quarts (10.0 liters)
Transfer box approx. 0.9 quarts (0.85 liter) approx. 0.9 quarts (0.85 liter)
Front-axle differential
approx. 1.1 quarts (1.0 liter)
approx. 1.1 quarts (1.0 liter)
Rear-axle differential approx. 1.5 quarts (1.4 liters) approx. 1.2 quarts (1.25 liters)
Locking rear differential
approx. 1.7 quarts (1.6 liters)
approx. 1.7 quarts (1.6 liters)
Fuel tank
approx. 26.4 U.S. gallons (100 liters),
including approx. 3 U.S. gallons (12 liters) reserve
approx. 26.4 U.S. gallons (100 liters),
including approx. 3 U.S. gallons (12 liters) reserve
Fuel quality
The engine is designed to provide optimum performance and fuel consumption if unleaded premium fuel with
98 RON/88 MON is used.
If unleaded premium fuels with octane numbers of at least 95 RON/85 MON are used, the engine's “Electronic
Oktane™ knock control“ automatically adapts the ignition timing.
Power steering
approx. 1.6 quarts (1.5 liters) Pentosin CHF 11 S
®approx. 1.6 quarts (1.5 liters) Pentosin CHF 11 S
®
Brake fluid
approx. 1.0 quart (0.95 liter)
approx. 1.0 quart (0.95 liter)
Use only Original Porsche brake fluid.
Use only Original Porsche brake fluid.
Window/headlight washer system approx. 7.9 quarts (7.5 liters) approx. 7.9 quarts (7.5 liters)
Page 395 of 420
Index
395
Footwell light .............................................. 168
Fresh-air intake ........................................... 143
Front seat with memory................... 37
, 38, 68
Front seats ................................................... 36
Adjusting the seats................................ 36
Seat position ........................................ 36
Front windshield wiper ................................. 138
Fuel .................................................... 88
, 277
Economy ............................................ 276
Evaporation control ............................. 281
Level gauges ........................................ 88
Recommendations .............................. 280
Fuel containers, portable ........................ 6, 281
Fuel gauge ................................................... 88
Fuel quality ..................................................... 8
Function keys ............................................... 64
Lighting ................................................ 65
Fuse assignment......................................... 337
Fuses......................................................... 335
GGarage door opener.................................... 184
Allocating ........................................... 185
Changeable code system .................... 185
Deleting ............................................. 186
Fixed code system .............................. 185
Gas discharge lamp .................................... 366
Glasses case .............................................. 193
Glove compartment .................................... 194
Gross weight .............................................. 213
Ground clearance ....................................... 389
HHand-held transmitter..................................184
Headlight beam adjustment........125
, 134
, 216
Headlights ................................216
, 290
, 361
Bi-Xenon ....................................363, 366
Changing for left-hand traffic ................373
Closing the housing lid.........................364
Halogen.....................................363, 365
Height adjustment ...............................373
Opening the housing lid .......................364
Setting ...............................................372
Washer system ...................................138
Headrest ......................................................40
Installing ...............................................40
Removing .............................................40
Setting .................................................40
Heated rear window .........143
, 144
, 148
, 152
Height adjustment ..............................235, 254
High beam.........................................132, 135
Indicator light .................................82, 84
Switch ................................................135
High Range.............101
, 223
, 225
, 230
, 234
On-road driving program ......................229
High-pressure cleaning units.........................285
Hillholder ....................................................242
Horn ............................................................62
IIdentification number ...................................378
Idling..........................................................222
Ignition lock ..................................................70
Immobilizer...................................................21Inclination sensor ............. 24
, 26, 28, 34, 35
Function indication................................ 32
Monitored areas ................................... 28
Switching off ........................................ 29
Switching on ........................................ 29
Switching on, temporarily ...................... 30
Instrument panel
Lighting ............................................. 134
Interior light, front...................................... 166
Interior lighting ........................................... 166
Interior mirror .............................................. 66
ISOFIX system .............................................. 60
JJack ................................................. 256
, 311
Jacking point ............................................. 319
Jump lead starting
Leads ................................................ 356
Jumper cables ........................................... 355
KKeys............................................................ 17
Changing the battery .......................... 358
Kickdown................................................... 224