PORSCHE CAYNNE S 2006 1.G Owners Manual
Manufacturer: PORSCHE, Model Year: 2006, Model line: CAYENNE S, Model: PORSCHE CAYENNE S 2006 1.GPages: 420, PDF Size: 3.81 MB
Page 111 of 420
Controls, Safety, Instruments
111
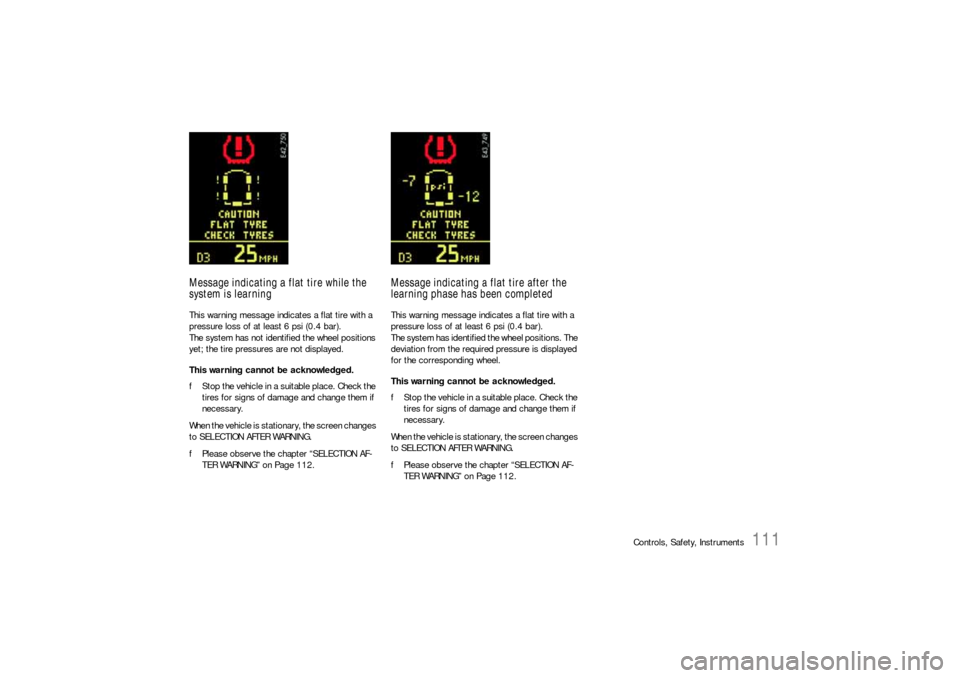
Message indicating a flat tire while the
system is learningThis warning message indicates a flat tire with a
pressure loss of at least 6 psi (0.4 bar).
The system has not identified the wheel positions
yet; the tire pressures are not displayed.
This warning cannot be acknowledged.
fStop the vehicle in a suitable place. Check the
tires for signs of damage and change them if
necessary.
When the vehicle is stationary, the screen changes
to SELECTION AFTER WARNING.
fPlease observe the chapter “SELECTION AF-
TER WARNING” on Page 112.
Message indicating a flat tire after the
learning phase has been completedThis warning message indicates a flat tire with a
pressure loss of at least 6 psi (0.4 bar).
The system has identified the wheel positions. The
deviation from the required pressure is displayed
for the corresponding wheel.
This warning cannot be acknowledged.
fStop the vehicle in a suitable place. Check the
tires for signs of damage and change them if
necessary.
When the vehicle is stationary, the screen changes
to SELECTION AFTER WARNING.
fPlease observe the chapter “SELECTION AF-
TER WARNING” on Page 112.
Page 112 of 420

112
Controls, Safety, Instruments
Selection after warningWhen the vehicle is stationary after a tire pressure
warning, the screen changes to SELECTION AF-
TER WARNING.
fIn the menu, select the task performed.Adding air
1. Inflate the tire.
For vehicles without air suspension: Please ob-
serve the chapter “REDUCING FILLING PRES-
SURE ON VEHICLES WITHOUT AIR SUSPENSI-
ON” on Page 328.
For vehicles with air suspension:
Please observe the chapter “REDUCING TIRE
PRES SU RE ON V EHICL ES WITH AIR S U SPENS I-
ON” on Page 330.
2. After inflating the wheel in question, select
ADD AIR.
The display returns to the basic screen after
acknowledgement.
Wheel change
1. Change wheel.
2. After changing a wheel, select menu item
WHEEL CHANGE.
The display returns to the SPARE WHEEL menu
after acknowledgement.
3. Select spare wheel type.
Please observe the chapter “SPARE WHEEL”
on Page 106.Sealing set
1. Remedy the tire damage with a tire sealant.
Please observe the chapter “TIRE SEALANT”
on Page 317.
2. After filling in the flat with the tire sealant, se-
lect menu item SEALING SET.
Please observe the chapter “TIRE SEALANT/
SEALING SET” on Page 107.
The display returns to the basic screen after
selecting SEALING SET.
A warning appears on the multi-purpose dis-
play if the speed limit of 50 mph (80 km/h) is
exceeded.
Note on operation
If you make a selection without performing the
action described in the selection, the message
CAUTION – FLAT TIRE – CHECK TIRES will appear
again.
fCheck the tires for signs of damage and fill or
change them if necessary.
Page 113 of 420
Controls, Safety, Instruments
113
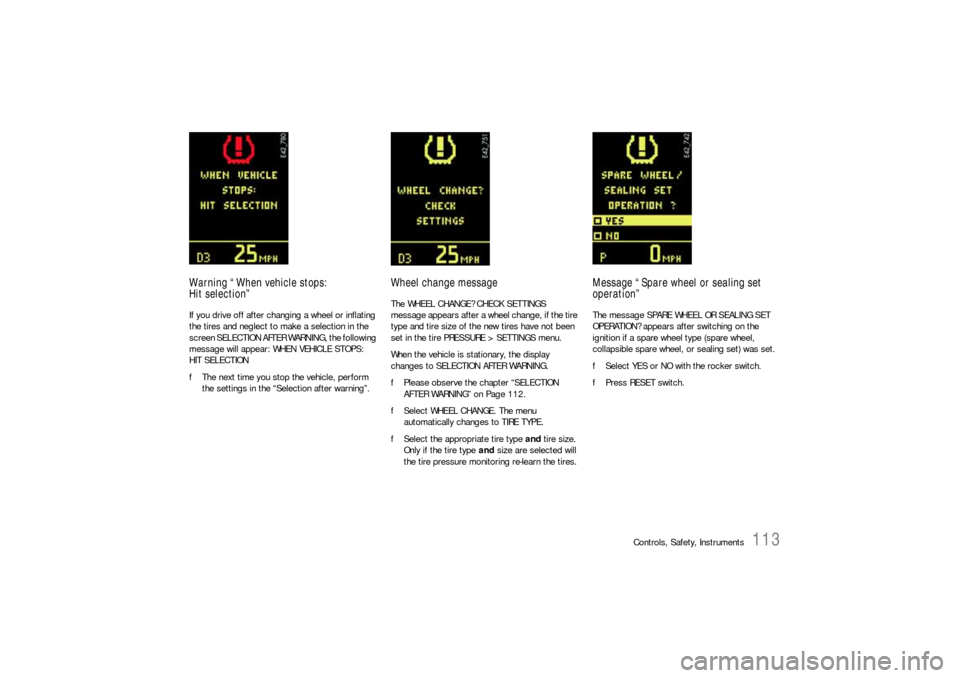
Warning “When vehicle stops:
Hit selection”If you drive off after changing a wheel or inflating
the tires and neglect to make a selection in the
screen SELECTION AFTER WARNING, the following
message will appear: WHEN VEHICLE STOPS:
HIT SELECTION
fThe next time you stop the vehicle, perform
the settings in the “Selection after warning”.
Wheel change messageThe WHEEL CHANGE? CHECK SETTINGS
message appears after a wheel change, if the tire
type and tire size of the new tires have not been
set in the tire PRESSURE > SETTINGS menu.
When the vehicle is stationary, the display
changes to SELECTION AFTER WARNING.
fPlease observe the chapter “SELECTION
AFTER WARNING” on Page 112.
fSelect WHEEL CHANGE. The menu
automatically changes to TIRE TYPE.
fSelect the appropriate tire type and tire size.
Only if the tire type and size are selected will
the tire pressure monitoring re-learn the tires.
Message “Spare wheel or sealing set
operation”The message SPARE WHEEL OR SEALING SET
OPERATION? appears after switching on the
ignition if a spare wheel type (spare wheel,
collapsible spare wheel, or sealing set) was set.
fSelect YES or NO with the rocker switch.
fPress RESET switch.
Page 114 of 420

114
Controls, Safety, Instruments Ye s :
– In case of sealing-set operation, the menu
changes directly to the basic screen. All
settings are retained.
– If the vehicle is operated with a collapsible
spare wheel or spare wheel, the warning mes-
sage “SYSTEM NOT ACTIVE, WORKSHOP” is
initially displayed for 10 seconds. The system
then returns to the basic screen.
No:
The display automatically returns to the menu TIRE
PRESSURE > SETTINGS.
fSet the mounted tire set with tire type and tire
size. The system will re-learn the tires.
No monitoringIn the event of faults the tire pressure monitoring
cannot monitor the tire pressure.
The warning light on the instrument panel and a
message on the multi-purpose display light up.
Monitoring is not active when:
– the tire pressure monitoring is faulty,
– wheel transmitters for the tire pressure
monitoring are not present,
– temporarily after changing a wheel,
– has detected too many wheel transmitters,
– there is external interference by other radio
sources, e.g., wireless headphones,
– tire temperatures are too high.
fPlease observe the chapter “WARNING LIGHTS
AND WARNING MESSAGES” on Page 124.fAll warnings and messages in the tire pressure
monitoring are also indicated by the warning
light in the instrument panel.
The warning light goes out as soon as all faults
are remedied.
Tire pressure monitoring warning
light
Page 115 of 420
Controls, Safety, Instruments
115
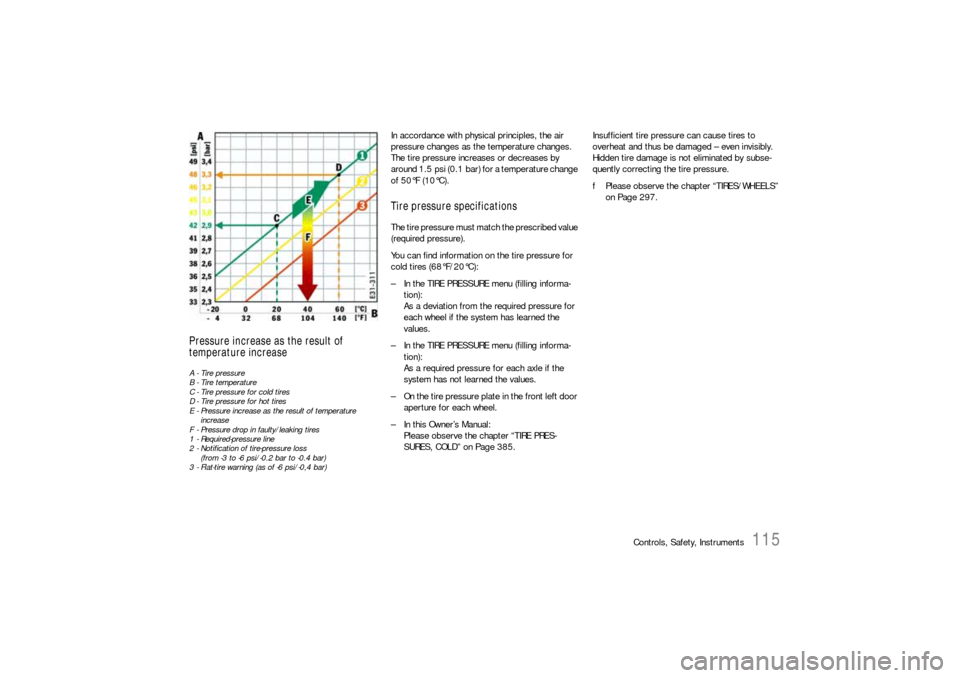
Pressure increase as the result of
temperature increaseA - Tire pressure
B - Tire temperature
C - Tire pressure for cold tires
D - Tire pressure for hot tires
E - Pressure increase as the result of temperature
increase
F - Pressure drop in faulty/leaking tires
1 - Required-pressure line
2 - Notification of tire-pressure loss
(from -3 to -6 psi/-0.2 bar to -0.4 bar)
3 - Flat-tire warning (as of -6 psi/-0,4 bar)
In accordance with physical principles, the air
pressure changes as the temperature changes.
The tire pressure increases or decreases by
around 1.5 psi (0.1 bar) for a temperature change
of 50°F (10°C).Tire pressure specificationsThe tire pressure must match the prescribed value
(required pressure).
You can find information on the tire pressure for
cold tires (68°F/20°C):
– In the TIRE PRESSURE menu (filling informa-
tion):
As a deviation from the required pressure for
each wheel if the system has learned the
values.
– In the TIRE PRESSURE menu (filling informa-
tion):
As a required pressure for each axle if the
system has not learned the values.
– On the tire pressure plate in the front left door
aperture for each wheel.
– In this Owner’s Manual:
Please observe the chapter “TIRE PRES-
SURES, COLD” on Page 385.Insufficient tire pressure can cause tires to
overheat and thus be damaged – even invisibly.
Hidden tire damage is not eliminated by subse-
quently correcting the tire pressure.
fPlease observe the chapter “TIRES/WHEELS”
on Page 297.
Page 116 of 420
116
Controls, Safety, Instruments
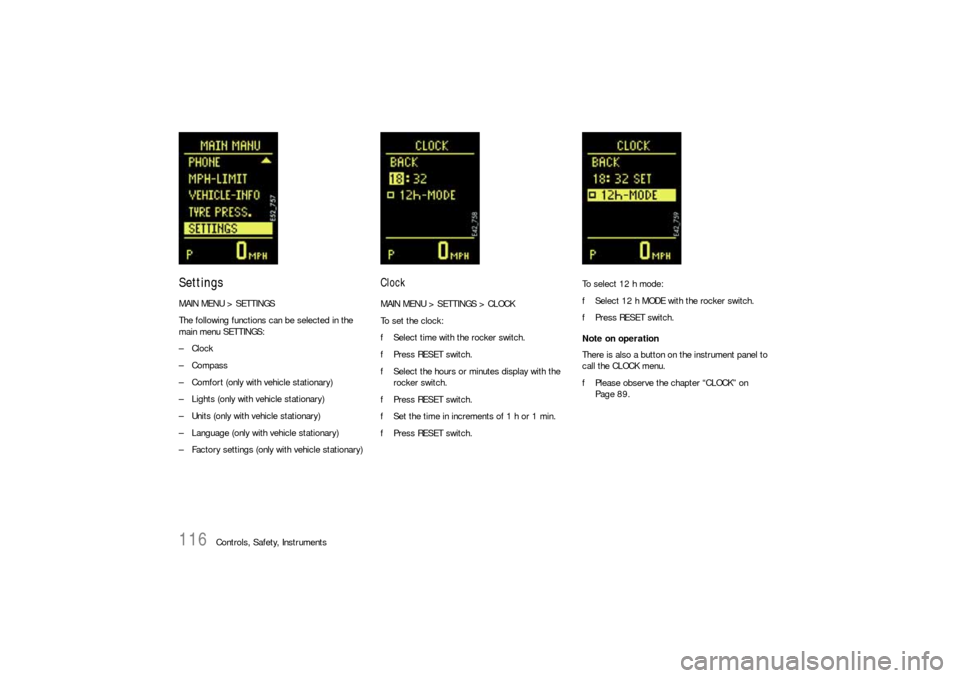
SettingsMAIN MENU > SETTINGS
The following functions can be selected in the
main menu SETTINGS:
–Clock
–Compass
– Comfort (only with vehicle stationary)
– Lights (only with vehicle stationary)
– Units (only with vehicle stationary)
– Language (only with vehicle stationary)
– Factory settings (only with vehicle stationary)
ClockMAIN MENU > SETTINGS > CLOCK
To set the clock:
fSelect time with the rocker switch.
fPress RESET switch.
fSelect the hours or minutes display with the
rocker switch.
fPress RESET switch.
fSet the time in increments of 1 h or 1 min.
fPress RESET switch.To select 12 h mode:
fSelect 12 h MODE with the rocker switch.
fPress RESET switch.
Note on operation
There is also a button on the instrument panel to
call the CLOCK menu.
fPlease observe the chapter “CLOCK” on
Page 89.
Page 117 of 420
Controls, Safety, Instruments
117
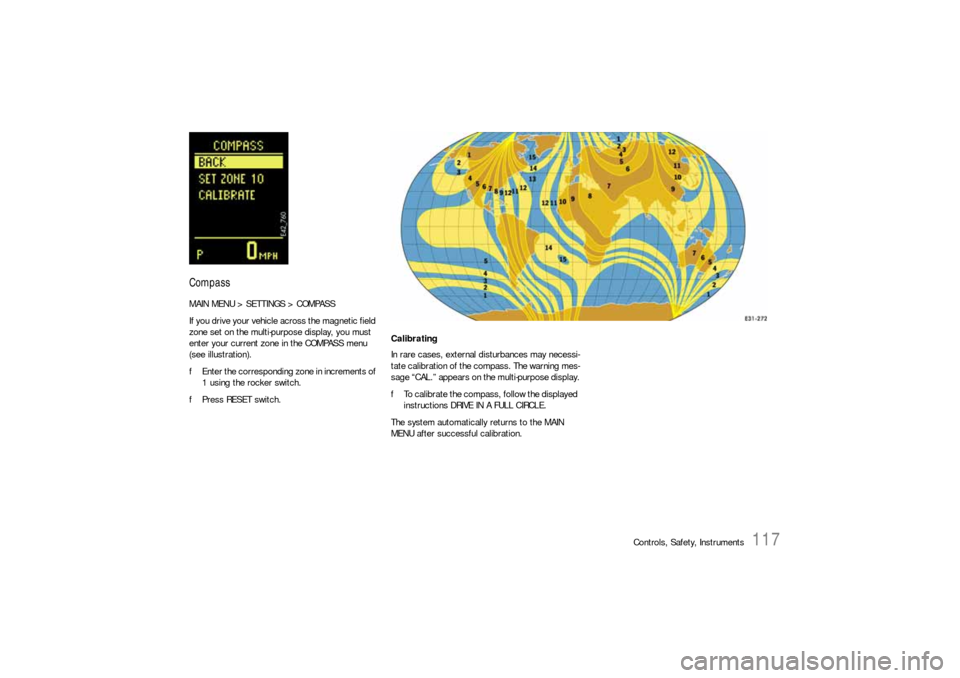
CompassMAIN MENU > SETTINGS > COMPASS
If you drive your vehicle across the magnetic field
zone set on the multi-purpose display, you must
enter your current zone in the COMPASS menu
(see illustration).
fEnter the corresponding zone in increments of
1 using the rocker switch.
fPress RESET switch.
Calibrating
In rare cases, external disturbances may necessi-
tate calibration of the compass. The warning mes-
sage “CAL.” appears on the multi-purpose display.
fTo calibrate the compass, follow the displayed
instructions DRIVE IN A FULL CIRCLE.
The system automatically returns to the MAIN
MENU after successful calibration.
Page 118 of 420

118
Controls, Safety, Instruments
ComfortMAIN MENU > SETTINGS > COMFORT
The COMFORT menu offers the following
submenus:
–Alarm
– Door opening
–Mirrors
fSelect the entry with the rocker switch.
fPress RESET switch.
Note on operation
Comfort settings can be made only when the vehi-
cle is stationary.Alarm
MAIN MENU > SETTINGS > COMFORT > ALARM
The passenger compartment monitoring system
and the inclination sensor (protection against
towing) can be temporarily deactivated in the
ALARM menu.
When locked again, the ultrasound passenger
compartment monitoring system and inclination
sensor are activated once more.
fPlease observe the chapter “TEMPORARILY
DEACTIVATING PASSENGER COMPARTMENT
MONITORING SYSTEM AND INCLINATION SEN-
SOR” on Page 29.Passenger compartment
The alarm is triggered if motion is detected in the
interior with the doors closed (e.g. if a window is
broken in a theft).
fSelect INTERIOR with the rocker switch.
fPress RESET switch.
This activates/deactivates passenger com-
partment monitoring.
Inclination
The alarm is triggered if the vehicle is raised mark-
edly at one end with the doors closed (e.g. theft
attempt by towing).
fSelect ANGLE with the rocker switch.
fPress RESET switch.
This activates/deactivates the inclination sen-
sor.
Page 119 of 420
Controls, Safety, Instruments
119
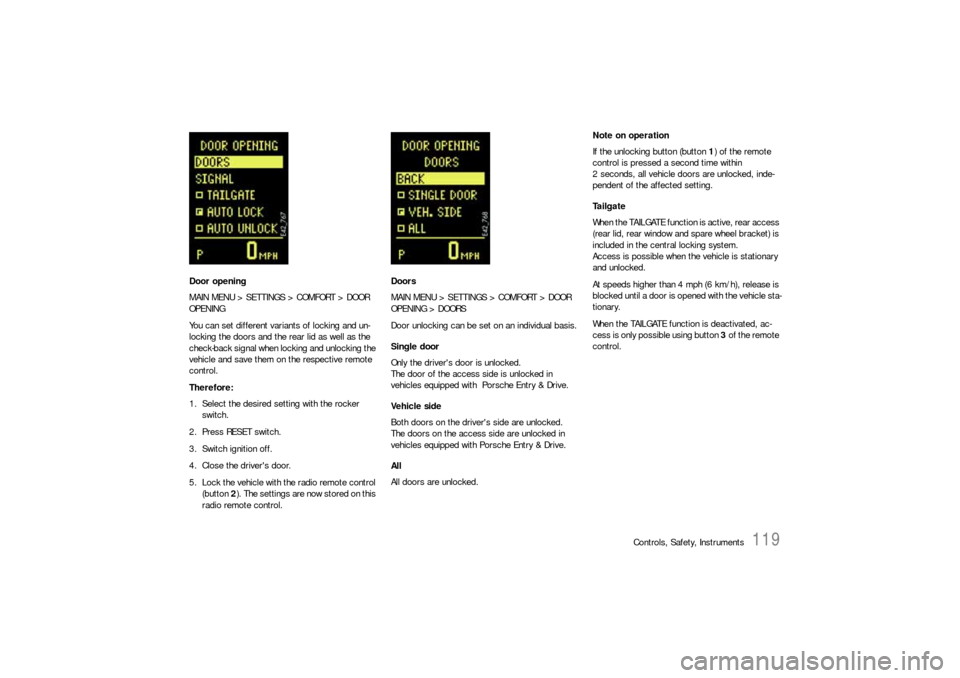
Door opening
MAIN MENU > SETTINGS > COMFORT > DOOR
OPENING
You can set different variants of locking and un-
locking the doors and the rear lid as well as the
check-back signal when locking and unlocking the
vehicle and save them on the respective remote
control.
Therefore:
1. Select the desired setting with the rocker
switch.
2. Press RESET switch.
3. Switch ignition off.
4. Close the driver's door.
5. Lock the vehicle with the radio remote control
(button 2). The settings are now stored on this
radio remote control.Doors
MAIN MENU > SETTINGS > COMFORT > DOOR
OPENING > DOORS
Door unlocking can be set on an individual basis.
Single door
Only the driver's door is unlocked.
The door of the access side is unlocked in
vehicles equipped with Porsche Entry & Drive.
Vehicle side
Both doors on the driver's side are unlocked.
The doors on the access side are unlocked in
vehicles equipped with Porsche Entry & Drive.
All
All doors are unlocked.Note on operation
If the unlocking button (button 1) of the remote
control is pressed a second time within
2 seconds, all vehicle doors are unlocked, inde-
pendent of the affected setting.
Ta i l g a t e
When the TAILGATE function is active, rear access
(rear lid, rear window and spare wheel bracket) is
included in the central locking system.
Access is possible when the vehicle is stationary
and unlocked.
At speeds higher than 4 mph (6 km/h), release is
blocked until a door is opened with the vehicle sta-
tionary.
When the TAILGATE function is deactivated, ac-
cess is only possible using button 3 of the remote
control.
Page 120 of 420

120
Controls, Safety, Instruments AUTO LOCK (automatic door locking) and
AUTO UNLOCK (automatic door unlocking)
You can set diverse variants of automatic door
locking (AUTO LOCK) and automatic door
unlocking (AUTO UNLOCK).
Note on operation
Doors locked using AUTOLOCK can always be
opened by pulling the inner door handle twice
independent of the setting for door unlocking.
Option 1:
AUTO LOCK off and AUTO UNLOCK off
The doors do not lock and unlock automatically.Option 2:
AUTO LOCK on and AUTO UNLOCK off
Doors lock automatically when a speed of
approx. 6 km/h (4 mph) is exceeded.
The automatically locked doors can be opened by
pulling the inner door handle twice.
Option 3:
AUTO LOCK on and AUTO UNLOCK on
Doors lock automatically when a speed of approx.
6 km/h (4 mph) is exceeded.
On vehicles without Porsche Entry & Drive, the
doors are unlocked automatically when the
ignition key is withdrawn.
On vehicles with Porsche Entry & Drive, the doors
are unlocked when the ignition is switched off
twice.Option 4:
AUTO LOCK off and AUTO UNLOCK on
The doors do not lock automatically.
If the doors are locked with the central locking
system button:
On vehicles without Porsche Entry & Drive, the
doors are unlocked automatically when the
ignition key is withdrawn.
On vehicles with Porsche Entry & Drive, the doors
are unlocked when the ignition is switched off
twice.