warning light PORSCHE CAYNNE TURBO 2005 1.G Owner's Manual
[x] Cancel search | Manufacturer: PORSCHE, Model Year: 2005, Model line: CAYENNE TURBO, Model: PORSCHE CAYENNE TURBO 2005 1.GPages: 369, PDF Size: 3.17 MB
Page 83 of 369
Controls, Safety, Instruments
83
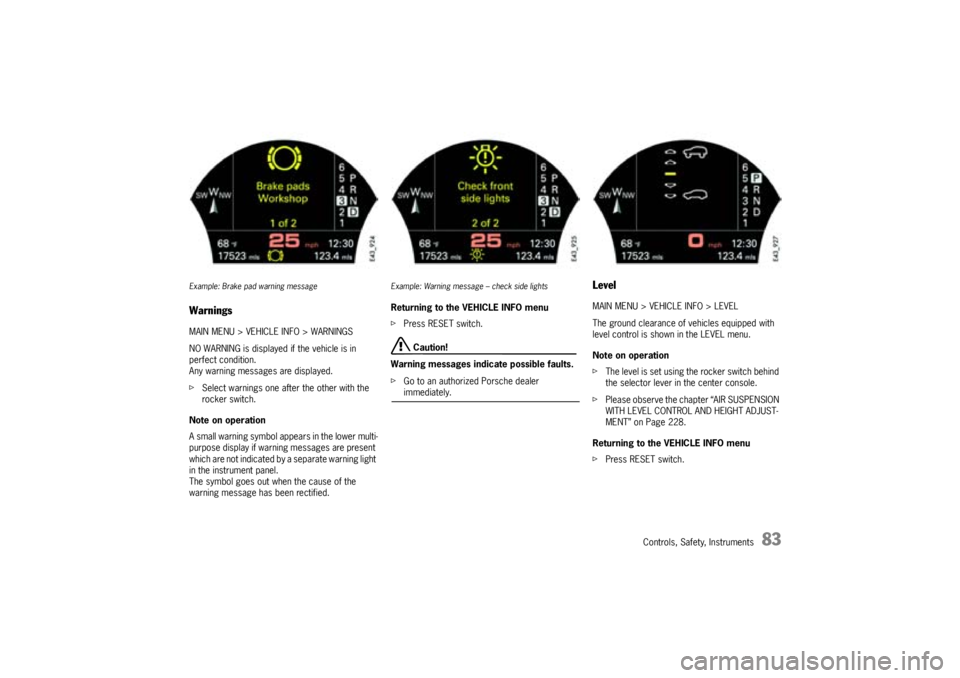
Example: Brake pad warning messageWarningsMAIN MENU > VEHICLE INFO > WARNINGS
NO WARNING is displayed if the vehicle is in
perfect condition.
Any warning messages are displayed.
fSelect warnings one after the other with the
rocker switch.
Note on operation
A small warning symbol appears in the lower multi-
purpose display if warning messages are present
which are not indicated by a separate warning light
in the instrument panel.
The symbol goes out when the cause of the
warning message has been rectified.
Example: Warning message – check side lightsReturning to the VEHICLE INFO menu
fPress RESET switch.
Caution!
Warning messages indicate possible faults.
fGo to an authorized Porsche dealer immediately.
LevelMAIN MENU > VEHICLE INFO > LEVEL
The ground clearance of vehicles equipped with
level control is shown in the LEVEL menu.
Note on operation
fThe level is set using the rocker switch behind
the selector lever in the center console.
fPlease observe the chapter “AIR SUSPENSION
WITH LEVEL CONTROL AND HEIGHT ADJUST-
MENT” on Page 228.
Returning to the VEHICLE INFO menu
fPress RESET switch.
Page 97 of 369

Controls, Safety, Instruments
97
Ye s :
– In case of sealing-set operation, the menu
changes directly to the basic screen. All
settings are retained.
– If the vehicle is operated with a collapsible
spare wheel or spare wheel, the warning mes-
sage “SYSTEM NOT ACTIVE, WORKSHOP” is
initially displayed for 10 seconds. The system
then returns to the basic screen.
No:
The display automatically returns to the menu
TYRE PRESSURE > SETTINGS.
fSet the mounted tire set with tire type and tire
size. The system will re-learn the tires.
No monitoringIn the event of faults the tire pressure monitoring
cannot monitor the tire pressure.
The warning light on the instrument panel and a
message on the multi-purpose display light up.
Monitoring is not active when:
– the tire pressure monitoring system is faulty,
– wheel transmitters for the tire pressure
monitoring system are not present,
– temporarily after changing a wheel,
– has detected too many wheel transmitters,
– there is external interference by other radio
sources, e.g., wireless headphones,
– Tire temperatures are too high.
fPlease observe the chapter “WARNING LIGHTS
AND WARNING MESSAGES” on Page 106.All warnings and messages in the tire pressure
monitoring system are also indicated by the
warning light in the instrument panel.
The warning light goes out as soon as all faults are
remedied.
Tire pressure monitoring warning
light
Page 106 of 369

106
Controls, Safety, Instruments
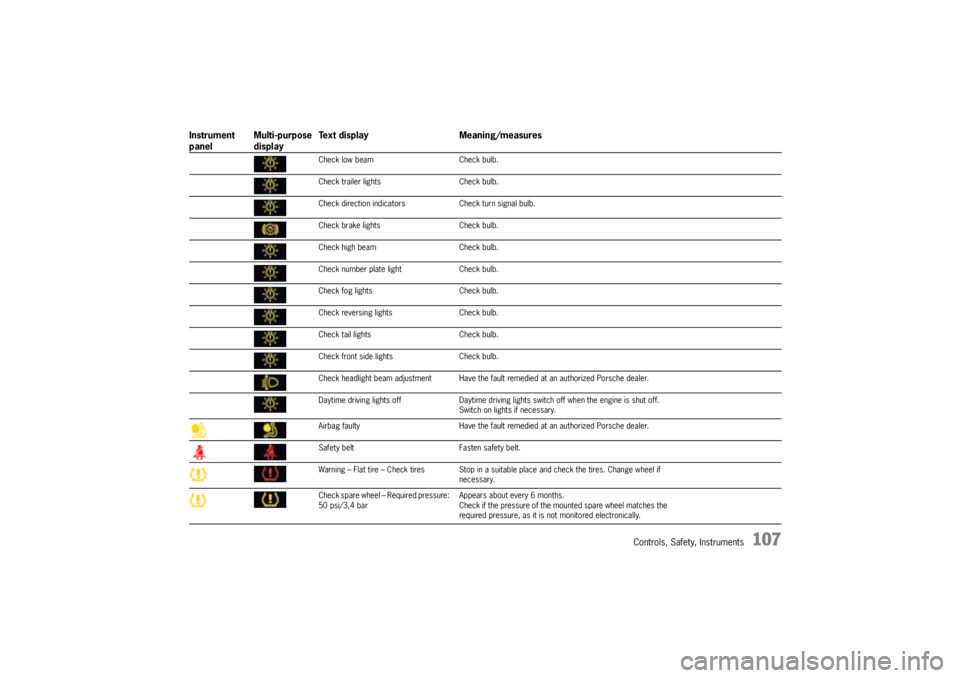
Warning Lights and Warning MessagesIf a warning message appears, always refer to the corresponding chapters in this Owner's Manual.
Instrument
panelMulti-purpose
displayText display Meaning/measures
Steering faulty Steering lock engaged.
Have the fault remedied at an authorized Porsche dealer.
Ignition lock faulty Do not continue driving.
Have the fault remedied at an authorized Porsche dealer.
System fault – Workshop Have the fault remedied at an authorized Porsche dealer.
Key not recognised in vehicle Make sure that you have the remote control with you.
Turn ignition key to left for
2 secondsEngage the steering lock.
Key: replace battery Replace the remote-control battery.
Move the steering wheel Turn the steering wheel so that the steering wheel lock can
engage/disengage.
Key not found Make sure that you have the remote control with you.
Switch selector lever to position “P”.The vehicle could roll away. The ignition key can be withdrawn
only in selector lever position P.
Apply the brake Apply the brake when starting.
Move selector lever to position
“P” or “N”The vehicle can be started only in position “P” or “N”.
Immobiliser active Have the fault remedied at an authorized Porsche dealer.
Check left cornering light Check bulb.
Check right cornering light Check bulb.
Page 107 of 369
Controls, Safety, Instruments
107
Check low beam Check bulb.
Check trailer lights Check bulb.
Check direction indicators Check turn signal bulb.
Check brake lights Check bulb.
Check high beam Check bulb.
Check number plate light Check bulb.
Check fog lights Check bulb.
Check reversing lights Check bulb.
Check tail lights Check bulb.
Check front side lights Check bulb.
Check headlight beam adjustment Have the fault remedied at an authorized Porsche dealer.
Daytime driving lights off Daytime driving lights switch off when the engine is shut off.
Switch on lights if necessary.
Airbag faulty Have the fault remedied at an authorized Porsche dealer.
Safety belt Fasten safety belt.
Warning – Flat tire – Check tires Stop in a suitable place and check the tires. Change wheel if
necessary.
Check spare wheel – Required pressure:
50 psi/3,4 barAppears about every 6 months.
Check if the pressure of the mounted spare wheel matches the
required pressure, as it is not monitored electronically.
Instrument
panelMulti-purpose
displayText display Meaning/measures
Page 109 of 369

Controls, Safety, Instruments
109
Engine temperature too high Switch engine off and let it cool.
Check coolant level. Add coolant if necessary.
Check coolant level Switch engine off and let it cool.
Check coolant level. Add coolant if necessary.
Battery/generator warning Stop in a suitable place and switch engine off. Do not continue
driving.
Have the fault remedied at an authorized Porsche dealer.
Starting engine The battery discharges if the engine is not running and loads are
switched on.
Start the vehicle or switch the loads off.
Electrics – Loads – Switch-off Vehicle electrical system is overloaded. Certain loads (e.g.
heated rear window, seat heating) will be switched off.
Please refuel
Topping up washer fluid
Oil level monitoring – Failure – Workshop Have the fault remedied at an authorized Porsche dealer.
Checking the oil level
Oil pressure too low Immediately stop in a suitable place and switch engine off.
Do not continue driving.
Check engine oil level. Add oil if necessary.
Do not continue driving if the warning light comes on even when
the oil level is correct. Have the fault remedied at an authorized
Porsche dealer.
Service in 1864 mls (3000 km)Service indicator
Bring the vehicle in for service no later than after the distance
shown has been covered.
Service nowService indicator
Have your vehicle serviced at an authorized Porsche dealer.
Instrument
panelMulti-purpose
displayText display Meaning/measures
Page 115 of 369

Controls, Safety, Instruments
115
Automatic driving light assistantThe driving light assistant is a comfort function.
Your Porsche’s driving light (low beam) is switched
on and off automatically, irrespective of the ambi-
ent brightness.
Despite possible support by the driving light assis-
tant, it is the responsibility of the driver to switch
on the driving light using the conventional light
switch in accordance with the relevant national
regulations.
Activating the headlights using the driving light as-
sistant does not therefore absolve the driver
of responsibility for the correct operation of the
driving light.
The low beam is switched on automatically in the
following situations:
–Dusk
–Darkness
– Travelling through tunnels
– Rain
– Highway driving
Note on operation
Fog is not recognised.
fIn the event of fog, the driving light must be
switched on manually.
Warning!
Risk of accident due to driving without lights.
fAlways carefully monitor the automatic driving light control.
Highway function
The light is switched on at speeds of over 87 mph
(140 km/h). If you are travelling slower than 40
mph (65 km/h), the driving light is switched off af-
ter a delay of approx. 2 minutes, if the external
lighting conditions permit.
Rain function
The driving light is switched on after five seconds
of continuous wiper operation.
The driving light is switched off approx. 4 minutes
after the wipers have stopped.
Bi-Xenon main headlights with
dynamically controlled cornering lightThe Bi-Xenon main headlights are equipped with
an additional light in vehicles with a cornering
light. As a result of its particular positioning, the
additional light provides significantly better lane
lighting to the left and right of the main light beam.
Page 118 of 369
118
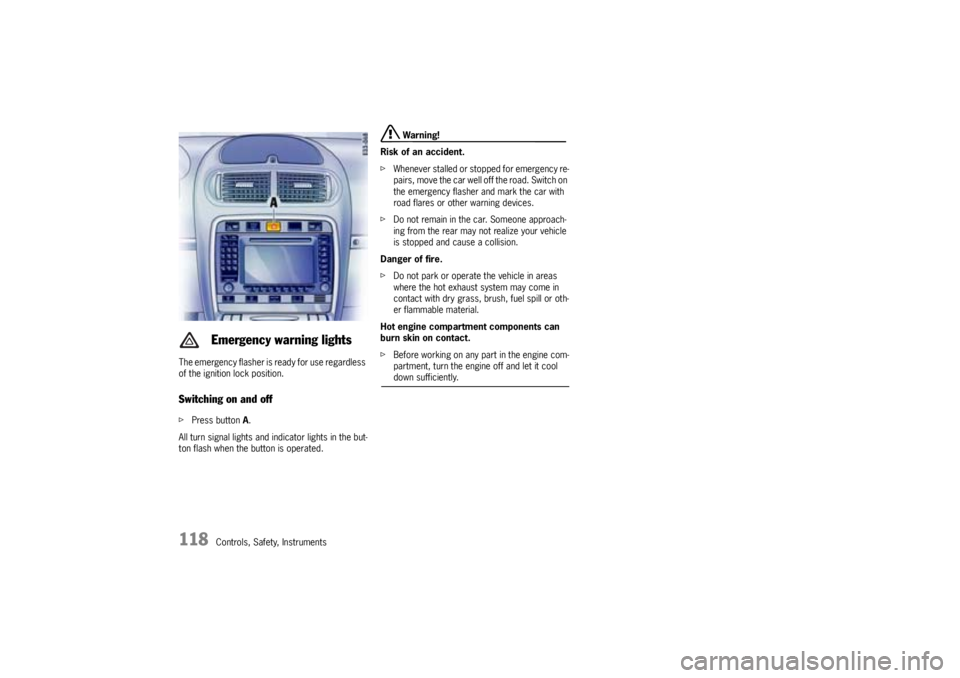
Controls, Safety, Instruments The emergency flasher is ready for use regardless
of the ignition lock position.
Switching on and offfPress button A.
All turn signal lights and indicator lights in the but-
ton flash when the button is operated.
Warning!
Risk of an accident.
fWhenever stalled or stopped for emergency re-
pairs, move the car well off the road. Switch on
the emergency flasher and mark the car with
road flares or other warning devices.
fDo not remain in the car. Someone approach-
ing from the rear may not realize your vehicle
is stopped and cause a collision.
Danger of fire.
fDo not park or operate the vehicle in areas
where the hot exhaust system may come in
contact with dry grass, brush, fuel spill or oth-
er flammable material.
Hot engine compartment components can
burn skin on contact.
fBefore working on any part in the engine com-
partment, turn the engine off and let it cool down sufficiently.
Emergency warning lights
Page 119 of 369
Controls, Safety, Instruments
119
Windshield Wiper/Washer Stalk
Warning!
Danger of injury when the windshield wipers
operate unintentionally.
Risk of damage to the engine compartment
lid, windshield and wiper system.
fOnly wipe the windshield when sufficiently wet,
otherwise it could be scratched.
fLoosen frozen wiper blades before driving off.
fDo not operate headlight washer when it is
frozen.
fAlways switch off windshield wipers in car
wash to prevent them wiping unintentionally
(rain sensor operation).
fDo not operate headlight washer in car wash-
es.
fAlways switch off windshield wipers before
cleaning the windshield to avoid unintentional
operation (rain sensor operation).
fAlways hold the wiper arm securely when re-
placing the wiper blade.fAlways switch the windscreen wipers off (posi-
tion 0) before opening the engine compart-
ment lid. If the wiper arms are not in position
0, they will automatically move to this position
when the engine compartment lid is opened.
This will happen even if the ignition is off.
The wiper arms remain in this position until the
lid is closed and the wiper system is switched.
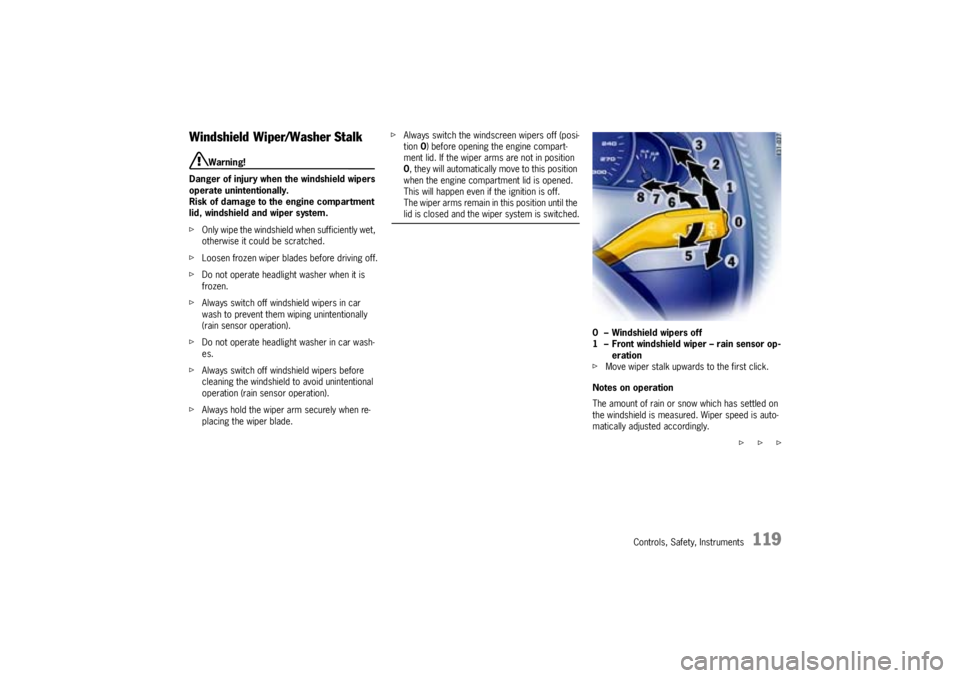
0 – Windshield wipers off
1 – Front windshield wiper – rain sensor op-
eration
fMove wiper stalk upwards to the first click.
Notes on operation
The amount of rain or snow which has settled on
the windshield is measured. Wiper speed is auto-
matically adjusted accordingly.
f f f
Page 122 of 369
122
Controls, Safety, Instruments
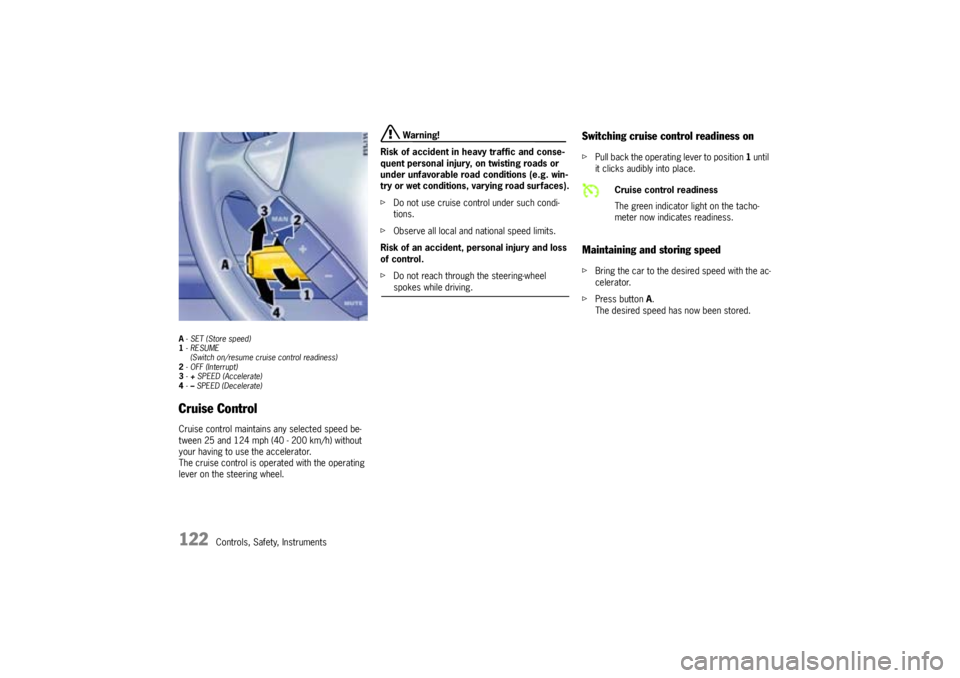
A- SET (Store speed)
1- RESUME
(Switch on/resume cruise control readiness)
2- OFF (Interrupt)
3-+ SPEED (Accelerate)
4-– SPEED (Decelerate)Cruise ControlCruise control maintains any selected speed be-
tween 25 and 124 mph (40 - 200 km/h) without
your having to use the accelerator.
The cruise control is operated with the operating
lever on the steering wheel.
Warning!
Risk of accident in heavy traffic and conse-
quent personal injury, on twisting roads or
under unfavorable road conditions (e.g. win-
try or wet conditions, varying road surfaces).
fDo not use cruise control under such condi-
tions.
fObserve all local and national speed limits.
Risk of an accident, personal injury and loss
of control.
fDo not reach through the steering-wheel spokes while driving.
Switching cruise control readiness onfPull back the operating lever to position 1 until
it clicks audibly into place.Maintaining and storing speedfBring the car to the desired speed with the ac-
celerator.
fPress button A.
The desired speed has now been stored.
Cruise control readiness
The green indicator light on the tacho-
meter now indicates readiness.
Page 128 of 369

128
Controls, Safety, Instruments
Automatic modefPress AUTO button C.
Indicator light in button lights up.
Air quantity and distribution are automatically
controlled and variations are compensated.
Note on operation
If necessary, the automatic system can be manu-
ally influenced.
This manual setting is retained until the appropri-
ate function button is pressed again or the AUTO
button C is pressed.
Switching MONO function on
The temperature settings for the driver’s side can
be accepted for the entire vehicle.
fPress AUTO button Cfor 2 seconds.
The MONO logo appears on the air-condition-
ing display panel.
Ending MONO function
fPress AUTO button Cfor 2 seconds or
fChange the settings in the air-conditioned ar-
eas.
Setting temperatureTo suit personal comfort, the interior temperature
can be adjusted between 61°F and 85°F (16°C
and 29.5°C).
Recommendation: 72°F (22°C)
fPush temperature button up or down.
ButtonH: left side of vehicle
ButtonO: right side of vehicle
The selected temperature is shown on the
display above the button.
If “LO” or “HI” appears on the display, the system
is operating at maximum cooling or heating pow-
er. Automatic mode is switched off.
If the preselected temperature is changed, the air
quantity blowing out can adjust automatically in au-
tomatic mode.
The desired temperature is reached more quickly
this way.fPush button G up or down to adjust the air
quantity.
The selected air quantity is shown in a bar
display on the display above the button.
fPress AUTO button C to return to automatic
mode.
If the air quantity was reduced so much that “OFF”
appears on the display, the outside-air supply is in-
terrupted.
Warning!
Risk of accident due to impaired vision. If the
air quantity is “OFF”, the windows may mist
up.
fOnly select recirculating-air setting for short
periods.
fIf windows mist up, turn off the recirculating-air
setting by pressing the circulating-air button
briefly and select the function “Defrost wind-
shield“.
fPush button G up (to increase air quantity). Setting air quantity