heater PORSCHE CAYNNE TURBO 2006 1.G Owners Manual
[x] Cancel search | Manufacturer: PORSCHE, Model Year: 2006, Model line: CAYENNE TURBO, Model: PORSCHE CAYENNE TURBO 2006 1.GPages: 387, PDF Size: 8.44 MB
Page 11 of 387

Controls, Safety, Instruments
11 Controls, Safety, Instruments
Never invite car theft! .................................... 16
Keys ............................................................ 17
Remote Control ............................................ 20
Porsche Entry & Drive ................................... 22
Central Locking System................................ 24
Doors .......................................................... 27
Alarm System,
Passenger Compartment Monitoring, Inclination
Sensor ......................................................... 28
Power Windows ............................................ 33
Front seats................................................... 36
Front seat with memory................................. 37
Easy Entry Function ...................................... 39
Headrests .................................................... 40
Rear Seats ................................................... 41
Heated Seats – Front and Rear ...................... 44
Safety Belts.................................................. 46
Airbag Systems ............................................ 50
Child Restraint Systems ................................ 55
Child Restraint Anchorages ............................ 61
Steering Wheel ............................................. 62
Multi-Functional Steering Wheel ...................... 64
Interior Mirror ............................................... 66
Door Mirrors................................................. 67
Automatic Anti-Dazzle Mirror .......................... 69
Ignition Lock/Steering Lock ........................... 70
Starting and Stopping the Engine ................... 72
Parking Brake ............................................... 74
Brakes ......................................................... 75
Instrument Panel USA Models ........................ 80
Instrument Panel Canada Models.................... 82
Oil Temperature Gauge................................. 84Speedometer ............................................... 84
Cooling System ............................................ 85
Fuel ............................................................. 86
Odometer..................................................... 87
Emission Control........................................... 88
Multi-Purpose Display.................................... 90
Warning Lights and Warning Messages ......... 122
Light Switch ............................................... 130
Instrument Illumination ................................. 132
Automatic Headlight Beam Adjustment ......... 132
Turn signal/High Beam/Headlight Flasher Stalk ...
133
Emergency flasher ...................................... 134
Windshield Wiper/Washer Stalk .................... 135
Cruise Control ............................................ 138
Vents ......................................................... 141
Fresh-air intake ........................................... 141
Heated Rear Window ................................... 142
Automatically Controlled Two-Zone Air Condi-
tioning ....................................................... 143
Automatically Controlled Four-Zone Air Condi-
tioning ....................................................... 147
Parking Heater............................................ 153
Sun Visors .................................................. 158
Sun Blinds, Rear Side Windows .................... 159
Interior Lighting .......................................... 160
Door-Surrounding Lighting ........................... 162
Coming Home Function (Auto Shut Off Delay) 162
Sliding/Lifting Roof ..................................... 163
Parking Aids ............................................... 173
Garage Door Opener ................................... 178
Ashtray ...................................................... 181Cigarette Lighter ......................................... 182
Car Audio Operation/Tips ............................ 183
Porsche Communication Management (PCM). 186
Fire Extinguisher ......................................... 187
Storage...................................................... 188
Cupholder .................................................. 192
Rear Lid ..................................................... 194
Rear Window .............................................. 196
Loadspace ................................................. 197
Luggage Compartment Cover ...................... 198
Engine Compartment Lid ............................. 199
Luggage Safety Net ....................................201
Ski Bag ...................................................... 203
Roof Transport System................................ 205
Trailer Coupling .......................................... 206
Loading Information ....................................207
Page 12 of 387

12
Controls, Safety, Instruments
Dear Porsche OwnerA lot has gone into the manufacture of your
Porsche, including advanced engineering, rigid
quality control and demanding inspections. These
engineering and safety features will be enhanced
by you...the safe driver...– who knows his car and all controls,
– who maintains the vehicle properly,
– who uses driving skills wisely and always
drives within her/his own capabilities and the
level of familiarity with the vehicle.
You will find helpful hints in this manual on how to
perform most of the checks listed on the following
pages. If in doubt, have these checks performed
by your authorized Porsche dealer.
Before driving off...Check the following items firstfTurn the engine off before you attempt any
checks or repairs on the vehicle.
fBe sure the tires are inflated correctly.
Check tires for damage and tire wear.
fSee that wheel bolts are properly tightened
and not loose or missing.
fCheck engine oil level, add if necessary. Make
it a habit to have engine oil checked with every
fuel filling.
fCheck all fluid levels such as windshield wash-
er and brake fluid levels.
fBe sure the vehicle battery is well charged and
cranks the engine properly.
fCheck all doors and lids for proper operation
and latch them properly.
fCheck and if necessary replace worn or
cracked wiper blades.
fSee that all windows are clear and unobstruct-
ed.
fCheck air intake slots and area between en-
gine compartment lid and windshield are free
of snow and ice, so the heater and the wind-
shield wipers work properly.fIf a child will be riding in the vehicle, check
child seat/child seat restraint system to ensure
that restraints are properly adjusted.
fCheck all exterior and interior lights for opera-
tion and that the lenses are clean.
fCheck the headlights for proper aim, and if
necessary, have them adjusted.
fCheck under the vehicle for leaks.
fBe sure all luggage is stowed securely.
Emergency equipmentIt is good practice to carry emergency equipment
in your vehicle.
Some of the items you should have are: window
scraper, snow brush, container or bag of sand or
salt, emergency light, small shovel, first-aid kit,
etc.
Page 68 of 387

68
Controls, Safety, Instruments
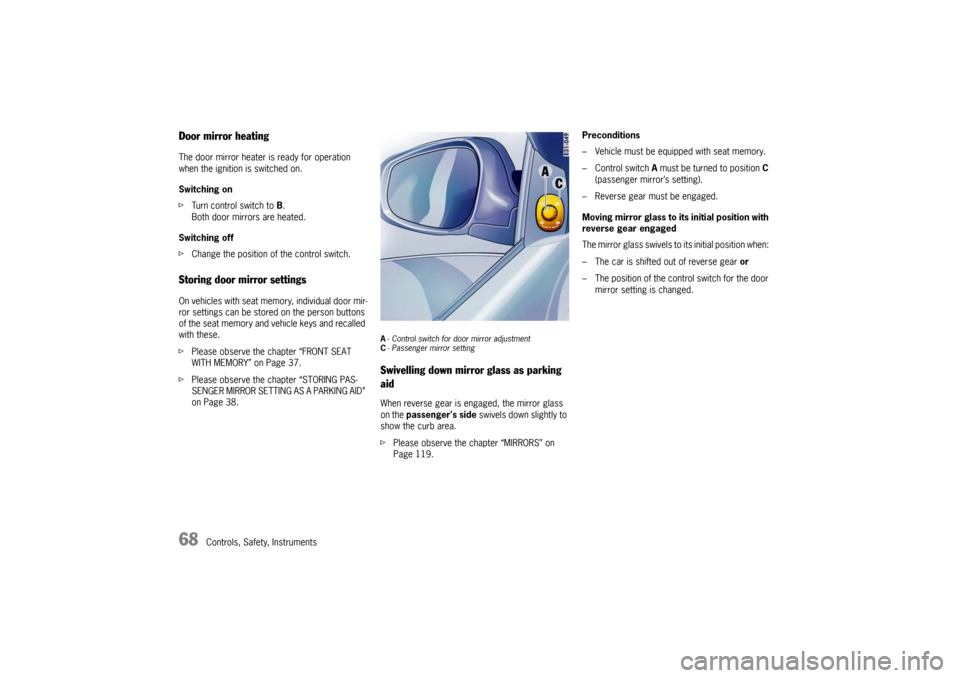
Door mirror heatingThe door mirror heater is ready for operation
when the ignition is switched on.
Switching on
fTurn control switch to B.
Both door mirrors are heated.
Switching off
fChange the position of the control switch.Storing door mirror settingsOn vehicles with seat memory, individual door mir-
ror settings can be stored on the person buttons
of the seat memory and vehicle keys and recalled
with these.
fPlease observe the chapter “FRONT SEAT
WITH MEMORY” on Page 37.
fPlease observe the chapter “STORING PAS-
SENGER MIRROR SETTING AS A PARKING AID”
on Page 38.
A-Control switch for door mirror adjustment
C- Passenger mirror settingSwivelling down mirror glass as parking
aidWhen reverse gear is engaged, the mirror glass
on the passenger's side swivels down slightly to
show the curb area.
fPlease observe the chapter “MIRRORS” on
Page 119.Preconditions
– Vehicle must be equipped with seat memory.
– Control switch A must be turned to position C
(passenger mirror’s setting).
– Reverse gear must be engaged.
Moving mirror glass to its initial position with
reverse gear engaged
The mirror glass swivels to its initial position when:
– The car is shifted out of reverse gear or
– The position of the control switch for the door
mirror setting is changed.
Page 153 of 387

Controls, Safety, Instruments
153
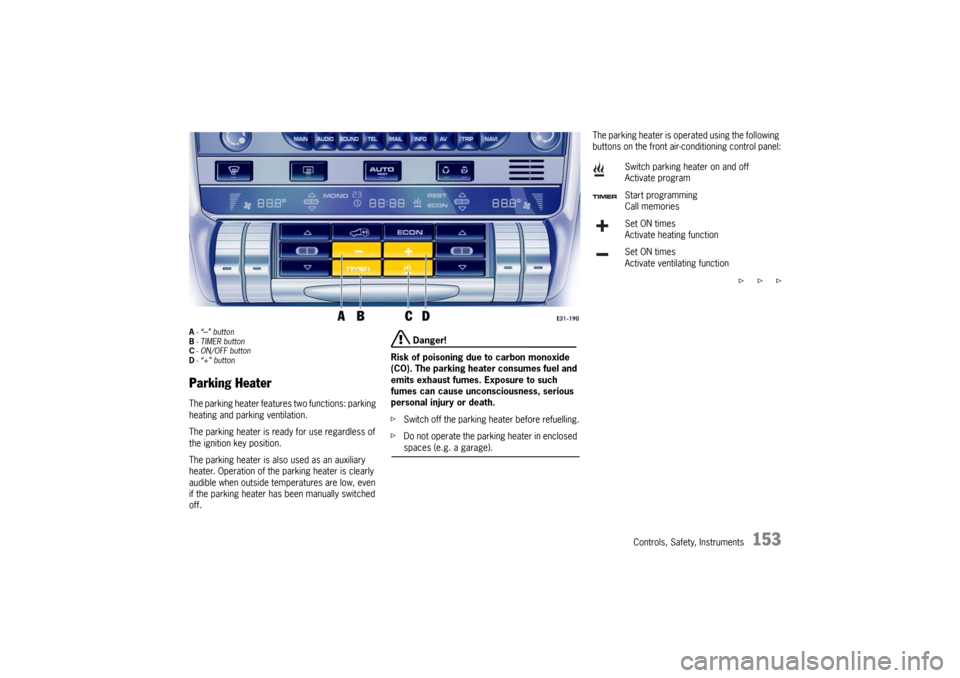
A-“
–” button
B-TIMER button
C- ON/OFF button
D-“+” button
Parking HeaterThe parking heater features two functions: parking
heating and parking ventilation.
The parking heater is ready for use regardless of
the ignition key position.
The parking heater is also used as an auxiliary
heater. Operation of the parking heater is clearly
audible when outside temperatures are low, even
if the parking heater has been manually switched
off.
Danger!
Risk of poisoning due to carbon monoxide
(CO). The parking heater consumes fuel and
emits exhaust fumes. Exposure to such
fumes can cause unconsciousness, serious
personal injury or death.
fSwitch off the parking heater before refuelling.
fDo not operate the parking heater in enclosed spaces (e.g. a garage).
The parking heater is operated using the following
buttons on the front air-conditioning control panel:
f f f Switch parking heater on and off
Activate program
Start programming
Call memories
Set ON times
Activate heating function
Set ON times
Activate ventilating function
Page 154 of 387

154
Controls, Safety, Instruments Notes on operation
The parking heater runs on fuel, and it therefore
cannot be switched on after the reserve warning
lights up.
fPlease observe the chapter “FUEL RESERVE
WARNING” on Page 86.
The parking heater must be operated at least
once per month, with the engine cold and the
blower at its lowest setting.
Ignition off: When the parking heater is running,
the remaining running time is shown on the display
panel.
Operation of the parking heater is clearly audible
when outside temperatures are low and the engine
is cold.Switching on
fPress ON/OFF button C.
The programed parking heating or parking ven-
tilation function is switched on.
Switching off
fPress ON/OFF button C again.
Note on operation
fAfter switching off the parking heater using
ON/OFF button C wait for at least 2 minutes
before you press the button again.
The combusion chamber is cleaned.
Switching parking heater on and
off
Page 155 of 387

Controls, Safety, Instruments
155
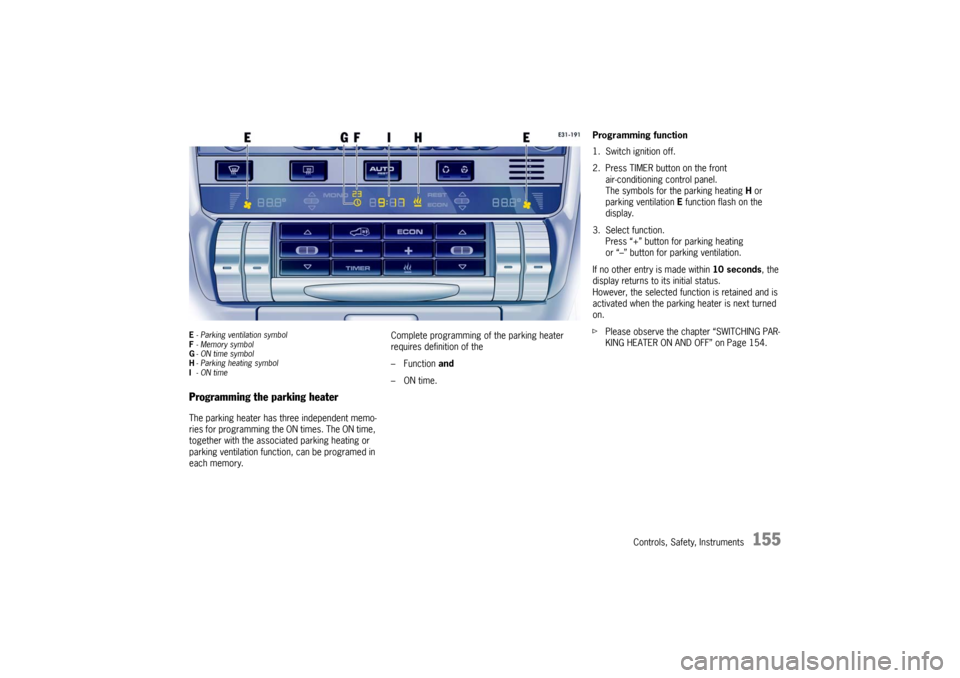
E- Parking ventilation symbol
F-Memory symbol
G- ON time symbol
H-Parking heating symbol
I-ON timeProgramming the parking heaterThe parking heater has three independent memo-
ries for programming the ON times. The ON time,
together with the associated parking heating or
parking ventilation function, can be programed in
each memory.Complete programming of the parking heater
requires definition of the
– Function and
–ON time.
Programming function
1. Switch ignition off.
2. Press TIMER button on the front
air-conditioning control panel.
The symbols for the parking heating H or
parking ventilation E function flash on the
display.
3. Select function.
Press “+” button for parking heating
or “–” button for parking ventilation.
If no other entry is made within 10 seconds, the
display returns to its initial status.
However, the selected function is retained and is
activated when the parking heater is next turned
on.
fPlease observe the chapter “SWITCHING PAR-
KING HEATER ON AND OFF” on Page 154.
Page 156 of 387

156
Controls, Safety, Instruments Programming ON times
1. Switch ignition off.
2. Press TIMER button.
3. Select function (parking heating or parking
ventilation).
4. Select the memory using TIMER button B.
The desired memory can be selected by
pressing button B several times.
5. Set ON time using the “+” and “–” buttons A
und D.
Pressing the buttons adjusts the time on a
minute-by-minute basis. If the button is kept
depressed, the time is adjusted faster.
ON times are only valid for 24 hours.
6. Press ON/OFF button C.
Displays F and G flash for approx. 10 seconds.
The button C can be pressed again to switch
off the displays before this time has elapsed.
ON time I, clock symbol F and memory G are
displayed for 2 minutes after ON/OFF button C
has been pressed.
The display then goes out.
The parking heater has now been programed
and the selected memory is active (symbol G
is lit).
Note on operation
Only one memory can be active at any one time.Activating the memory
The parking heater runs for 30 minutes. It then
switches itself off automatically.
The program must be reactivated for every subse-
quent run.
To do this:
1. Switch ignition off.
2. Press TIMER button B.
3. Select function (parking heating or parking
ventilation).
4. Select the memory using TIMER button B. The
ON time that was last saved is displayed.
5. Press ON/OFF button C.
The program is reactivated.
Displays F and G flash for approx. 10 seconds.
The ON/OFF button can be pressed again to
switch off the displays before this time has
elapsed.
After the ON/OFF button has been pressed,
the ON time I, clock symbol F and memory G
are displayed for 2 minutes.
The display then goes out.
The parking heater has now been programed
and the selected memory is active (symbol G
is lit).
Note on operation
Only one memory can be active at any one time.Example:
The parking heater is to activate the parking
heating function at 9:48 a.m.
To do this:
1. Switch ignition off.
2. Press TIMER button B on the front air-condi-
tioning control panel.
The symbols for the parking heating or parking
ventilation function flash on the display.
3. Press “+” button D
.
This selects the parking heating function.
4. Select the memory using TIMER button B.
5. Set ON time to 9:48 a.m. using the “+” and
“–” buttons (A and D).
6. Press ON/OFF button C.
The parking heater has now been programed
and the selected memory is active.
Note on operation
If the parking heater is switched on manually prior
to program start of an active memory, this will
delete the programming.
The memory must be reactivated if it is needed.
If the memory is not reactivated, the parking
heater will not switch on.
Page 157 of 387

Controls, Safety, Instruments
157
Parking heater faultsIn the event of faults in the parking heater, no
function symbol appears on the display – only the
remaining running time is shown. The display
flashes on briefly and then goes completely dark.
fHave the parking heater checked at an
authorized Porsche dealer.
In the event of a serious accident, the parking
heater switches off automatically for safety
reasons.
The parking heater is not ready for operation.
fPlease consult an authorized Porsche dealer.
If the temperature rises, the overheating protec-
tion switches the parking heater off automatically.
The parking heater is not ready for operation.
fPlease consult an authorized Porsche dealer.
The parking heater is switched off automatically if
the voltage is too low. The parking heater is
temporarily unavailable.
Page 325 of 387

Practical Tips, Minor Repairs
325
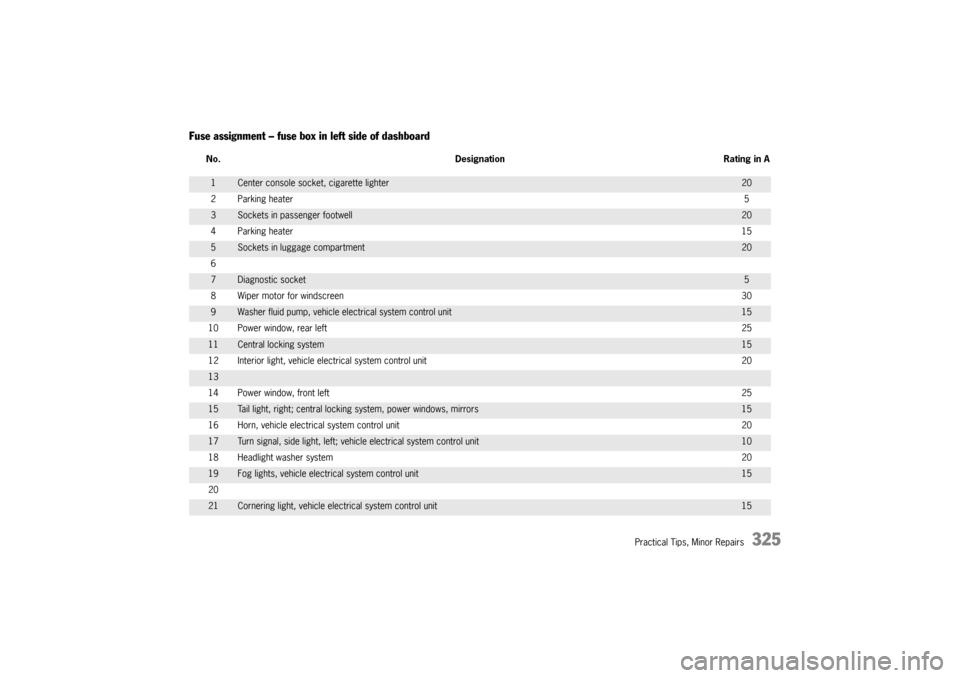
Fuse assignment – fuse box in left side of dashboard
No. Designation Rating in A1
Center console socket, cigarette lighter
20
2 Parking heater5
3
Sockets in passenger footwell
20
4 Parking heater15
5
Sockets in luggage compartment
20
6
7
Diagnostic socket
5
8 Wiper motor for windscreen30
9
Washer fluid pump, vehicle electrical system control unit
15
10 Power window, rear left25
11
Central locking system
15
12 Interior light, vehicle electrical system control unit20
1314 Power window, front left2515
Tail light, right; central locking system, power windows, mirrors
15
16 Horn, vehicle electrical system control unit20
17
Turn signal, side light, left; vehicle electrical system control unit
10
18 Headlight washer system20
19
Fog lights, vehicle electrical system control unit
15
20
21
Cornering light, vehicle electrical system control unit
15
Page 333 of 387

Practical Tips, Minor Repairs
333
Winter operationDuring the winter months, battery capacity tends
to decrease as temperatures drop. Additionally,
more power is consumed while starting, and the
headlights, heater, rear window defogger, etc.,
are used more frequently.
Let your Porsche dealer test the battery's capaci-
ty before winter sets in.Vehicle storageIf the car stands for long periods in the garage or
workshop, the doors and lids should be closed.
fRemove the ignition key and, if necessary, dis-
connect the battery.
Notes on operation
fWhen the battery is disconnected, the alarm
system ceases to function.
If the vehicle was locked before the battery
was disconnected, the alarm will be triggered
when the battery is reconnected.
To deactivate the alarm system:
fLock the vehicle and unlock it again.Maintenance note
Even if you put your vehicle out of operation, the
battery still discharges.
The battery will discharge more quickly if your ve-
hicle is not driven on a daily basis over a distance
of several miles. The more often you drive your ve-
hicle, and the longer the distance driven on each
trip, the more opportunity the vehicle‘s charging
system will have to recharge the batteries.
fTo preserve its efficiency, charge the battery
about every 6 weeks.
fCheck the battery acid level and top off with
distilled water if necessary.
fStore a battery that has been removed in a
dark, cool place, but not subject to freezing.
Putting vehicle into operationAfter the battery is connected or charged, the
PSM warning light lights up on the instrument pan-
el and a message appears on the multi-purpose
display of the instrument panel to indicate a fault.
This fault can be remedied with a few simple
steps:
1. Start the engine.
To do this, turn the ignition key or the control
unit (on vehicles that have Porsche Entry &
Drive) to ignition lock position 2 twice.2. Perform a few steering movements and drive
a short distance in a straight line until the PSM
warning light goes out and the message is
erased from the memory of the multi-purpose
display of the instrument panel.
3. If the warnings does not go out, then:
Drive carefully to the nearest authorized
Porsche dealer.
Have the fault remedied by an authorized
Porsche dealer.
4. After the warnings disappear:
Stop the vehicle in a suitable place.
5. Perform adaptation of the power windows:
Please observe the chapter “STORING FINAL
POSITION OF THE DOOR WINDOWS” on
Page 35.
6. On vehicles with tire pressure monitoring:
Please observe the chapter “TIRE PRESSURE
MONITORING LEARNING PROCESS” on
Page 102.