change wheel PORSCHE PANAMERA 2009 1.G Information Manual
[x] Cancel search | Manufacturer: PORSCHE, Model Year: 2009, Model line: PANAMERA, Model: PORSCHE PANAMERA 2009 1.GPages: 343, PDF Size: 7.96 MB
Page 153 of 343
Instrument Panel and Multi-Function Display
151
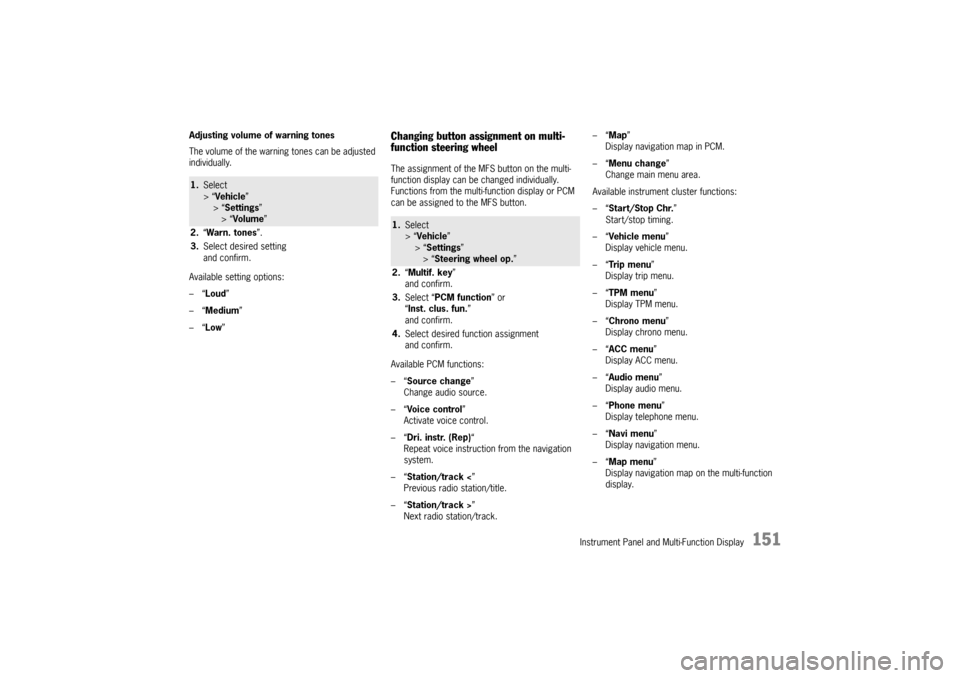
Adjusting volume of warning tones
The volume of the warning tones can be adjusted
individually.
Available setting options:
–“Loud ”
–“ Medium”
–“ Low ”
Changing button assignment on multi-
function steering wheelThe assignment of the MFS button on the multi-
function display can be changed individually.
Functions from the multi-function display or PCM
can be assigned to the MFS button.
Available PCM functions:
–“Source change ”
Change audio source.
–“ Voice control ”
Activate voice control.
–“ Dri. instr. (Rep) “
Repeat voice instruction from the navigation
system.
–“ Station/track < ”
Previous radio station/title.
–“ Station/track > ”
Next radio station/track. –“
Map ”
Display navigation map in PCM.
–“ Menu change ”
Change main menu area.
Available instrument cluster functions:
–“ Start/Stop Chr. ”
Start/stop timing.
–“ Vehicle menu ”
Display vehicle menu.
–“ Tr i p m e n u ”
Display trip menu.
–“ TPM menu ”
Display TPM menu.
–“ Chrono menu”
Display chrono menu.
–“ ACC menu ”
Display ACC menu.
–“ Audio menu ”
Display audio menu.
–“ Phone menu ”
Display telephone menu.
–“ Navi menu ”
Display navigation menu.
–“ Map menu ”
Display navigation map on the multi-function
display.
1. Select
> “Vehicle ”
> “ Settings ”
> “Volume ”
2. “Warn. tones ”.
3. Select desired setting
and confirm.
1.Select
> “Vehicle ”
> “Settings ”
> “ Steering wheel op. ”
2. “Multif. key ”
and confirm.
3. Select “PCM function” or
“ Inst. clus. fun. ”
and confirm.
4. Select desired function assignment
and confirm.
Page 160 of 343
158
Instrument Panel and Multi-Function Display
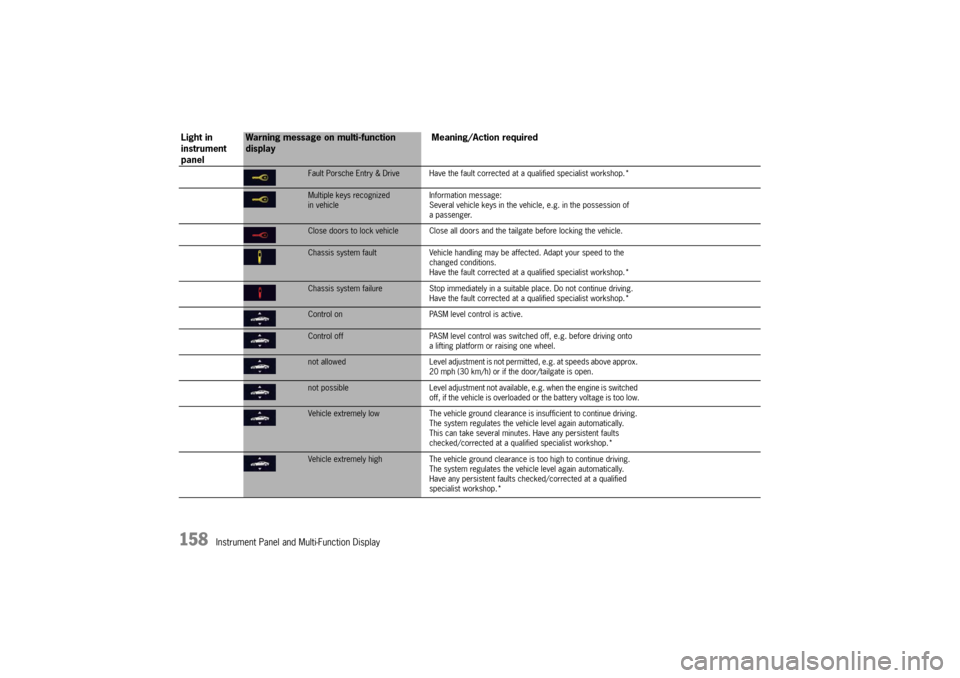
Fault Porsche Entry & Drive Have the fault corrected at a qualified specialist workshop.*Multiple keys recognized
in vehicleInformation message:
Several vehicle keys in the vehicle, e.g. in the possession of
a passenger.Close doors to lock vehicle Close all doors
and the tailgate before locking the vehicle.Chassis system faultVehicle handling may be affected. Adapt your speed to the
changed conditions.
Have the fault corrected at a qualified specialist workshop.*Chassis system failure Stop immediately in a suitable place. Do not continue driving.
Have the fault corrected at a qualified specialist workshop.*Control on PASM level control is active.Control offPASM level control was switched off, e.g. before driving onto
a lifting platform or raising one wheel. not allowed Level adjustment is not permitted, e.g. at speeds above approx.
20 mph (30 km/h) or if the door/tailgate is open.not possible Level adjustment not available, e.g. when the engine is switched
off, if the vehicle is overloaded or the battery voltage is too low.Vehicle extremely low The vehicle ground clearance is insufficient to continue driving.
The system regulates the vehi cle level again automatically.
This can take several minutes. Have any persistent faults
checked/corrected at a qualif ied specialist workshop.*Vehicle extremely high The vehicle ground clearance is too high to continue driving.
The system regulates the vehicl e level again automatically.
Have any persistent faults ch ecked/corrected at a qualified
specialist workshop.*
Light in
instrument
panel
Warning message on multi-function
display Meaning/Action required
Page 161 of 343
Instrument Panel and Multi-Function Display
159
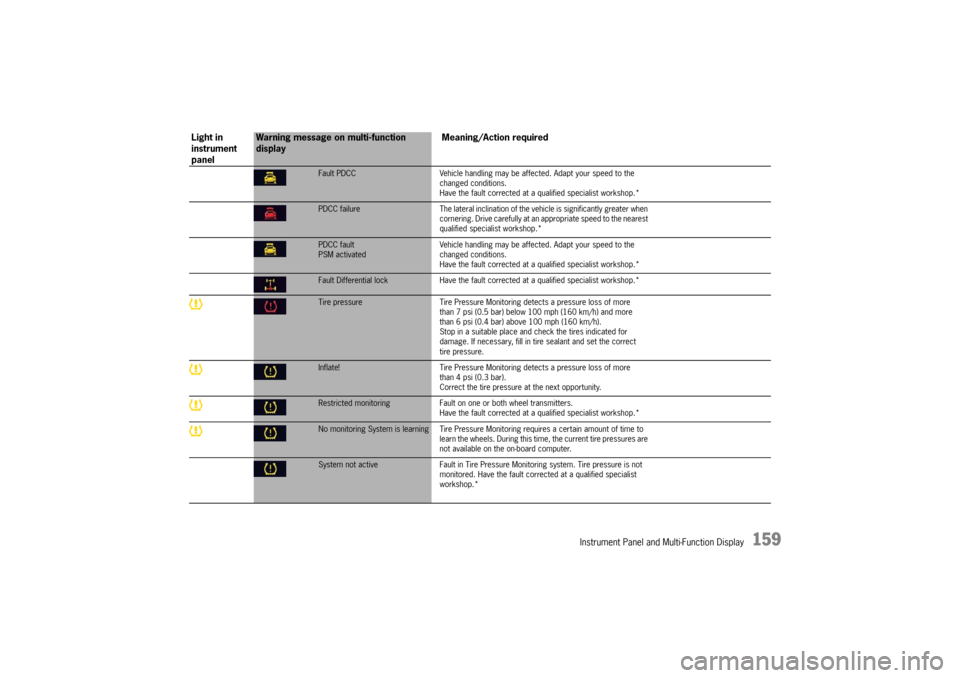
Fault PDCCVehicle handling may be affected. Adapt your speed to the
changed conditions.
Have the fault corrected at a q ualified specialist workshop.*PDCC failure The lateral inclination of the vehicle is significantly greater when
cornering. Drive carefully at an appropriate speed to the nearest
qualified specialist workshop.*PDCC fault
PSM activated Vehicle handling may be affect
ed. Adapt your speed to the
changed conditions.
Have the fault corrected at a q ualified specialist workshop.*Fault Differential lock Have the fault corrected at a qualified sp ecialist workshop.*Tire pressure Tire Pressure Monitoring detects a pressure loss of more
than 7 psi (0.5 bar) below 100 mph (160 km/h) and more
than 6 psi (0.4 bar) above 100 mph (160 km/h).
Stop in a suitable place and check the tires indicated for
damage. If necessary, fill in ti re sealant and set the correct
tire pressure.Inflate! Tire Pressure Monitoring detects a pressure loss of more
than 4 psi (0.3 bar).
Correct the tire pressure at the next opportunity.Restricted monitoring Fault on one or both wheel transmitters.
Have the fault corrected at a q ualified specialist workshop.*No monitoring System is learning Tire Pressure Mo nitoring requires a certain amount of time to
learn the wheels. During this time , the current tire pressures are
not available on the on-board computer.System not active Fault in Tire Pressure Monitoring system. Tire pressure is not
monitored. Have the fault corrected at a qualified specialist
workshop.*
Light in
instrument
panel
Warning message on multi-function
display Meaning/Action required
Page 162 of 343
160
Instrument Panel and Multi-Function Display
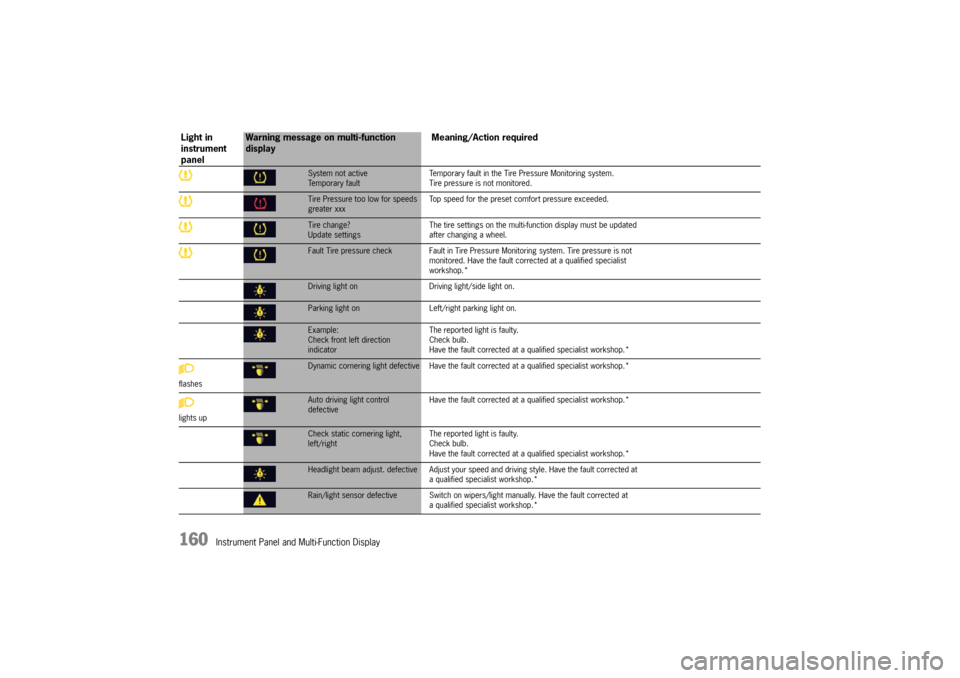
System not active
Temporary faultTemporary fault in the Tire Pressure Monitoring system.
Tire pressure is not monitored.Tire Pressure too low for speeds
greater xxx
Top speed for the preset co
mfort pressure exceeded.Tire change?
Update settings The tire settings on the multi-f
unction display must be updated
after changing a wheel.Fault Tire pressure check Fault in Tire Pressu re Monitoring system. Tire pressure is not
monitored. Have the fault corrected at a qualified specialist
workshop.*Driving light on Driving light/side light on.Parking light on Left/right parking light on.Example:
Check front left direction
indicator The reported light is faulty.
Check bulb.
Have the fault corrected at
a qualified specialist workshop.*
flashesDynamic cornering light defective Have the faul t corrected at a qualified specialist workshop.*
lights upAuto driving light control
defective Have the fault corrected at
a qualified specialist workshop.*Check static cornering light,
left/right The reported light is faulty.
Check bulb.
Have the fault corrected at
a qualified specialist workshop.*Headlight beam adjust. defective Adjust your speed and driving style. Have the fault corrected at
a qualified specialist workshop.*Rain/light sensor defective Switch on wipers/ light manually. Have the fault corrected at
a qualified specialist workshop.*
Light in
instrument
panel
Warning message on multi-function
display Meaning/Action required
Page 186 of 343

184
Driving and Driving Safety
Possible distance settings
Automatic braking to a stopIf the vehicle in front stops, adaptive cruise control
will slow your vehicle down
to a stop provided this
is possible within the control limits of the system.
The display lights up on the instrument panel.
The vehicle is actively held at a stop.
For information on the HOLD function:
f Please see the chapter “HOLD FUNCTION:
DRIVE-OFF ASSISTANT AND STANDSTILL
MANAGEMENT” on page 206.
Note
Depending on the traffic flow, e.g. slow moving
traffic, stopping is initiated by a slow crawling
phase which ends in vehicle standstill.
Caution!
Brake pedal feels different. When adaptive
cruise control is operating normally or when
the HOLD function is active, the brake pedal
may feel different and you may hear
hydraulic noises.
This behavior is no rmal for the system.
It is not a fault.
Driving off againThe vehicle can be driven off again after being
stopped and speed and distance control will be
resumed, depending on the operating state of the
adaptive cruise control system.
For information on the operating states of the
adaptive cruise control system:
fPlease see the chapter “OPERATING STATES
WHEN ADAPTIVE CRUISE CONTROL IS
SWITCHED ON” on page 182.
Adaptive cruise control active
1. Press the control stalk on the steering wheel up (position 4, RESUME ).
2. Briefly press the accelerator pedal. Your vehicle drives on automatically.
Note
Your vehicle will not drive off if the vehicle
detected in front is stationary.
Adaptive cruise control is ready
Automatic speed and distance control can only
be resumed when your vehicle is moving.
1. Drive off normally.
2. Press the control stalk on the steering wheel up (position 4, RESUME ).
or
Set or change the desired speed.
Suitable for speedy driving in lines of
traffic. The time headway is 1 second.
This corresponds to 36 yd. (33 meters)
at a speed of 75 mph (120 km/h).
Suitable for driving comfortably in lines
of traffic. The time headway is
1.3 seconds. This corresponds to
47 yd. (43 meters) at a speed of
75 mph (120 km/h).
Preset distance
Corresponds to the general
recommendation of the road traffic
safety regulation (“two seconds time
headway”). The time headway is
1.8 seconds. This corresponds to
66 yd. (60 meters) at a speed of
75 mph (120 km/h).
Suitable for driving on country roads.
The time headway is 2.3 seconds.
This corresponds to 63 yd. (58 meters)
at a speed of 56 mph (90 km/h).
Page 187 of 343
Driving and Driving Safety
185
Interrupting and resuming cruise control
and distance controlInterrupting cruise control and distance
control – OFF
fPress the brake pedal.
or
Press the control stalk on the steering wheel
down (position 3, OFF ).
Adaptive cruise control is inactive.
The desired speed that was stored and the
desired distance are retained.
Resuming cruise control and distance
control – RESUME
f Push the control stalk on the steering wheel up
(position 4, RESUME).
The vehicle accelerates to the desired speed
that was stored unless a vehicle travelling in
front is detected as driving slower than the
desired speed and the distance from this
vehicle is less than the desired distance that
was set.
The status display A changes from grey to
orange.
or
Press the control stalk on the steering wheel
up and keep it pressed (position 4, RESUME).
The vehicle accelerates in a more sporty
driving style to the desired speed that was
stored. Note on operation
If speed and distance control was interrupted
using the control stalk
3 (OFF ), it can only be
resumed again when the vehicle is moving and no
stationary objects are detected in front.
Warning messagesIf adaptive cruise control is not active, the control
system still monitors the distance from the vehicle
in front.
If the distance from the ve hicle in front is less than
the desired distance that was set last, a yellow
warning triangle appears on the multi-function
display.
Warning!
Risk of accidents. Danger of collision with the
vehicle in front.
f Drive with extreme care.
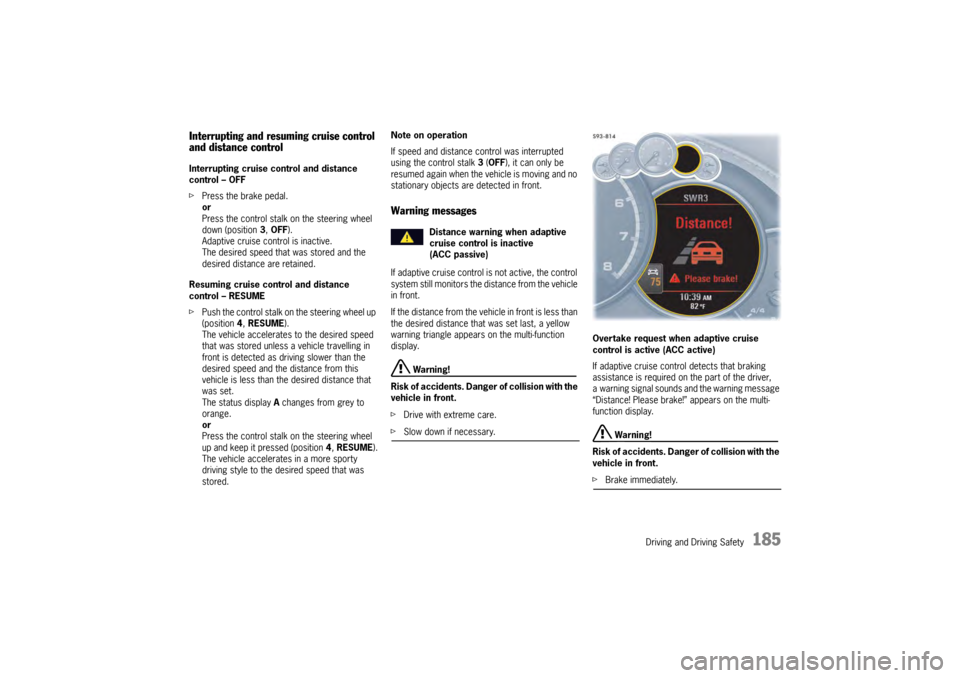
fSlow down if necessary. Overtake request when adaptive cruise
control is active (ACC active)
If adaptive cruise control detects that braking
assistance is required on the part of the driver,
a warning signal sounds and the warning message
“Distance! Please brake!” appears on the multi-
function display.
Warning!
Risk of accidents. Danger of collision with the
vehicle in front.
f Brake immediately.
Distance warning when adaptive
cruise control is inactive
(ACC passive)
Page 193 of 343

Driving and Driving Safety
191
If aftermarket systems are installed by non-
dealership technicians or outside the selling
dealer, problems may result. Installation of
aftermarket equipment is not covered under the
New Car Warranty.
fConsult your authorized Porsche dealer about
the installation of non-Porsche approved
equipment.
Reception quality
The reception quality of your car telephone will
change constantly when you are driving.
Interference caused by buildings, landscape and
weather is unavoidable. It may become particu-
larly difficult to hear when using the hands-free
function due to external noise such as engine and
wind noise.
Automatic car-wash
f Unscrew external antennas before using an
automatic car-wash.
Porsche Communication
Management (PCM)
Warning!
There is danger of accident if you set or
operate the on-board computer, radio,
navigation system, telephone or other
equipment when driving.
This could distract you from traffic and
cause you to lose control of the vehicle
resulting in serious personal injury or death.
f Operate the components while driving only if
the traffic situation allows you to do so safely.
f Carry out any complicated operating or setting
procedures only with the vehicle stationary.
f If it is necessary to operate these components
while the vehicle is in motion, use the function keys on the multi-functional steering wheel.
f Refer to the separate operating instructions
before putting the PCM into operation.
When put into operation for the first time, a
distance of approx. 3 miles (5 km) must be driven
in order for the navigation system to complete the
process of fine calibration. The same applies
when the tires are changed (e.g. summer/winter
tires) or new tires fitted. Full location accuracy is
not yet achieved during the fine-calibration
process. If the vehicle has been tr
ansported (e.g. ferry, car
train), the system may ta ke a few minutes after
being switched on before it determines the current
location.
Serious tire slip (e.g. spinning wheels on snow)
may result in temporarily inaccurate navigation.
When the battery has been disconnected, it may
take up to 15 minutes before the navigation
system is operational once more.
Satellite radioYou must have the satellit e radio activated before
you can put it into operation. You will need a
contract with a provider in order to use this radio.
f Refer to the separate radio operating
instructions before putting into operation.
Page 195 of 343
Driving and Driving Safety
193
Porsche Doppelkupplung (PDK)Porsche Doppelkupplung (PDK) is a seven-speed
transmission with an “automatic” and a “manual”
selection mode.
In automatic selection mode (selector-lever
position D), gear changing is automatic.
You can change temporarily from automatic to
manual mode using the shift buttons on the
steering wheel.
In manual selection mode (selector-lever
position M ), you change gear using the shift
buttons on the steering wheel or with the PDK
selector lever.
You can change between selector-lever
positions D and M as you wish while driving.
Note
f Take care not to operate the shift buttons on
the steering wheel in advertently in either
automatic or manual mode, thereby triggering
undesired gear changes.
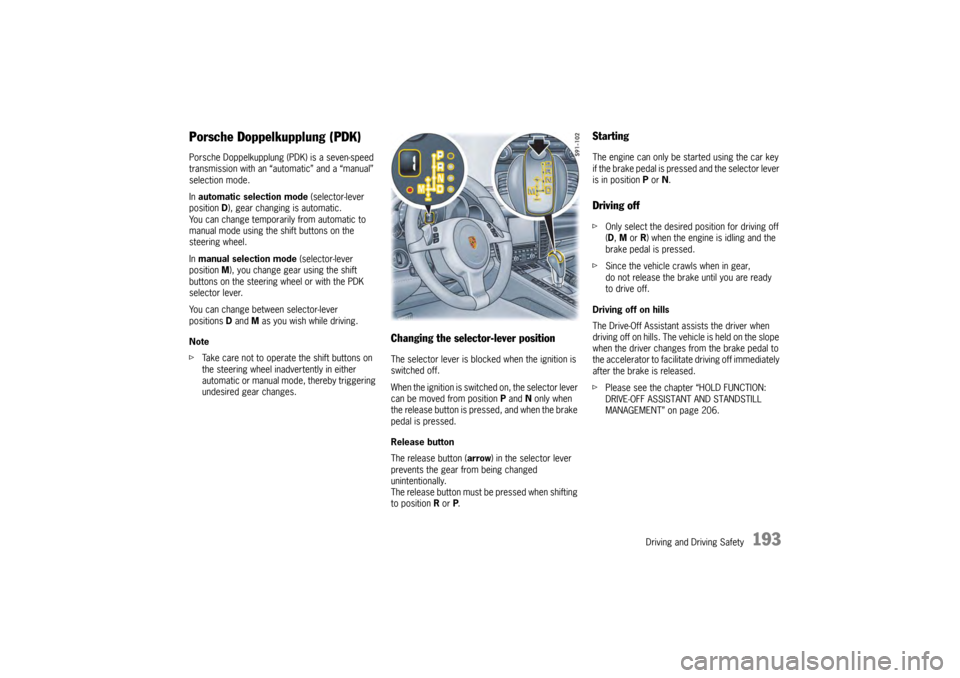
Changing the selector-lever positionThe selector lever is blocked when the ignition is
switched off.
When the ignition is switch ed on, the selector lever
can be moved from position P and N only when
the release button is pressed, and when the brake
pedal is pressed.
Release button
The release button ( arrow) in the selector lever
prevents the gear from being changed
unintentionally.
The release button must be pressed when shifting
to position R or P.
StartingThe engine can only be started using the car key
if the brake pedal is pressed and the selector lever
is in position P or N.Driving offf Only select the desired position for driving off
(D, M or R) when the engine is idling and the
brake pedal is pressed.
f Since the vehicle crawls when in gear,
do not release the brake until you are ready
to drive off.
Driving off on hills
The Drive-Off Assistant assists the driver when
driving off on hills. The vehicle is held on the slope
when the driver changes from the brake pedal to
the accelerator to facilitate driving off immediately
after the brake is released.
f Please see the chapter “HOLD FUNCTION:
DRIVE-OFF ASSISTANT AND STANDSTILL
MANAGEMENT” on page 206.
Page 198 of 343

196
Driving and Driving Safety
Driving off with Launch Control
Launch Control allows you to achieve maximum
acceleration from standstill.
Warning!
There is a risk of endangering other road
users if you use this Control in an improper
location or in a situation where other persons
might need to take evas ive action due to the
rapid acceleration that this technology
permits.
Launch Control is designed to be used in a
controlled environment on closed circuit driving
courses where no vehicle cross traffic or
pedestrian traffic is present.
f Use Launch Control only if conditions permit it
to be applied in a safe manner.
f Do not use Launch Control if there is a
possibility it could endanger other persons.
Such a possibility exists if you cannot see that
you have a clear road with no possibility of
cross traffic in your intended direction of driving.
Caution!
Stress on components increases
dramatically when starting with maximum
acceleration in comparison with “normal”
driving off. Use of Launch Control will
inevitably reduce the life of the engaged
engine and transmission components.
Preconditions:
– Launch Control should on ly be used when the
engine has reached operating temperature.
– “Sport Plus” mode must be switched on (indicator light on the button comes on and
“SPORT PLUS” appears on the multi-function
display).
1. Press the brake with your left foot.
2. Quickly press the accelerator down fully (kickdown activated) and hold it.
The engine speed will level off at
around 5,000 rpm on the Panamera S,
around 5,500 rpm on the Panamera 4S,
around 4,550 rpm on the Panamera Turbo.
“Launch Control active” appears on the
multi-function display.
3. Release the brake within a few seconds. Remaining stationary for a long time with
“Launch Control active” can lead to
overloading of the transmission.
To protect the transmi ssion, the engine power
is then reduced and the “Launch Control
active” process is cancelled. Shifting gears on the steering wheel
With the shift buttons on the steering wheel, you
can change temporarily from automatic selection
mode D to manual mode
M.
For example:
– Shifting down before bends and on entering built-up areas.
– Shifting down on downward slopes (engine braking).
– Shifting down for brief spurts of acceleration.
The manual selection mode remains engaged:
– For cornering (depending on the lateral acceleration) and overrunning.
– When the vehicle is stationary (e.g. at a junction).
The system leaves manual selection mode:
– automatically after around 8 seconds (unless cornering or overrunning),
– after driving off.
Page 199 of 343
Driving and Driving Safety
197
Kickdown
The kickdown function is active in selector-lever
positions D and M.
f For optimum acceleration, e.g. when
overtaking, press the accelerator pedal
beyond the full-throttle point (kickdown).
The transmission shifts down depending on
the speed of travel and engine speed.
Upshifts occur at the highest possible engine
speeds.
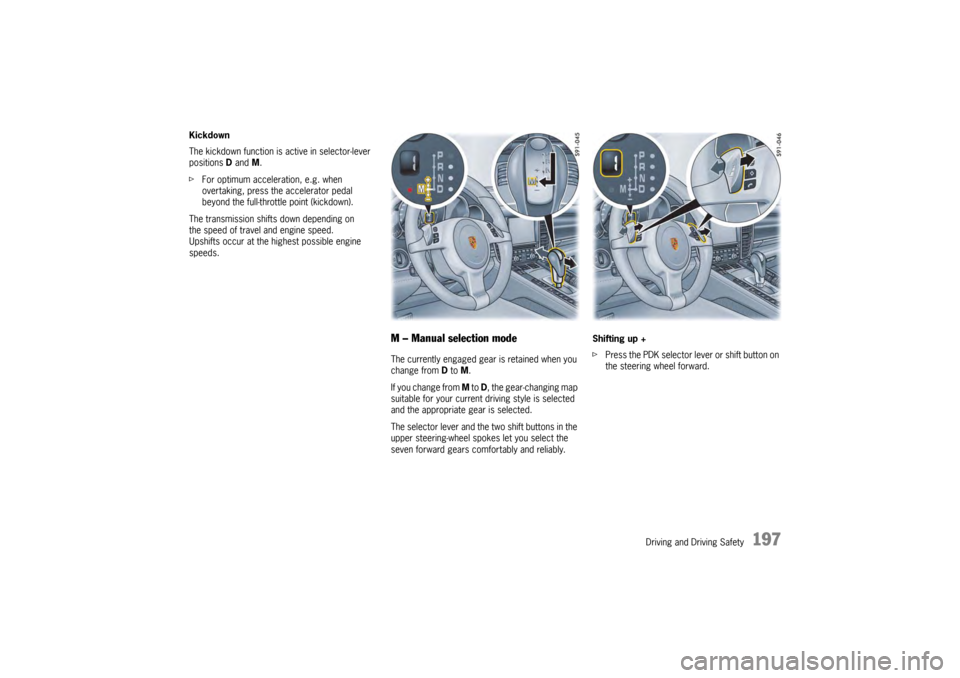
M – Manual selection modeThe currently engaged gear is retained when you
change from D to M.
If you change from M to D, the gear-changing map
suitable for your current driving style is selected
and the appropriate gear is selected.
The selector lever and the two shift buttons in the
upper steering-wheel spokes let you select the
seven forward gears comfortably and reliably. Shifting up +
f
Press the PDK selector lever or shift button on
the steering wheel forward.