PORSCHE PANAMERA 2009 1.G Information Manual
Manufacturer: PORSCHE, Model Year: 2009, Model line: PANAMERA, Model: PORSCHE PANAMERA 2009 1.GPages: 343, PDF Size: 7.96 MB
Page 231 of 343
Storage, Luggage Compartment and Roof Transport System
229
Luggage Compartment Cover
Warning!
Risk of injury. In the event of braking,
direction changes or in an accident, objects
can slide into the passenger compartment
and endanger the occupants.
f Do not place objects on the retractable
luggage compartment cover or on the fixed luggage compartment cover.
Retractable luggage compartment coverLuggage can be protected against prying eyes
with the retractable luggage compartment cover.
fAlways pull out the retractable luggage
compartment cover when transporting objects
in the luggage compartment.
The retractable luggage compartment cover is
not designed to carry objects.
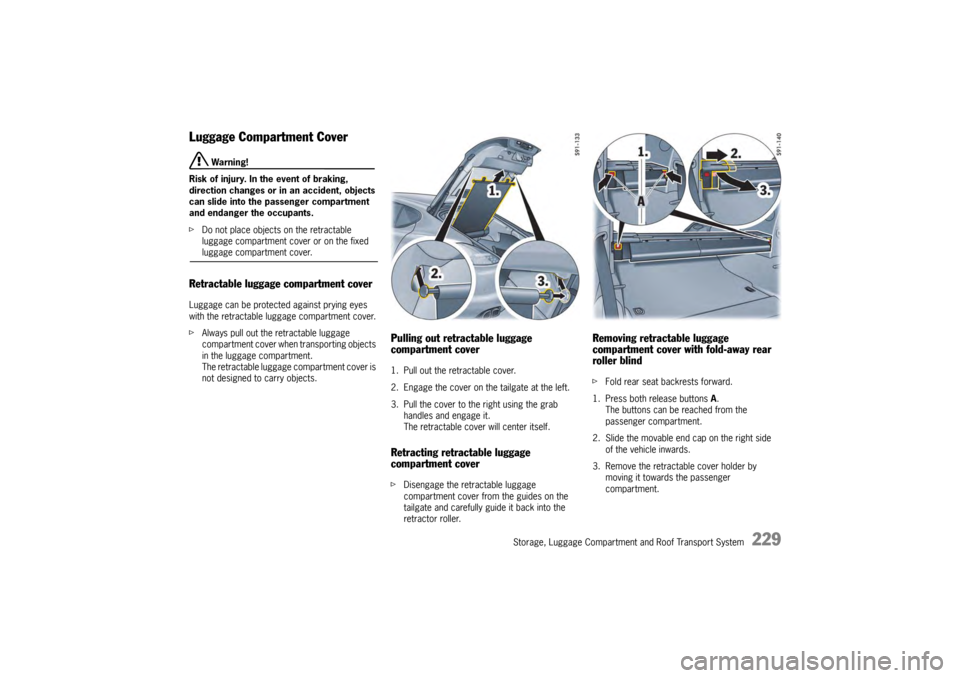
Pulling out retractable luggage
compartment cover1. Pull out the retractable cover.
2. Engage the cover on the tailgate at the left.
3. Pull the cover to the right using the grab
handles and engage it.
The retractable cove r will center itself.Retracting retractable luggage
compartment coverfDisengage the retractable luggage
compartment cover from the guides on the
tailgate and carefully guide it back into the
retractor roller.
Removing retractable luggage
compartment cover with fold-away rear
roller blindf Fold rear seat backrests forward.
1. Press both release buttons A.
The buttons can be reached from the
passenger compartment.
2. Slide the movable end cap on the right side of the vehicle inwards.
3. Remove the retractable cover holder by moving it towards the passenger
compartment.
Page 232 of 343
230
Storage, Luggage Compartment and Roof Transport System
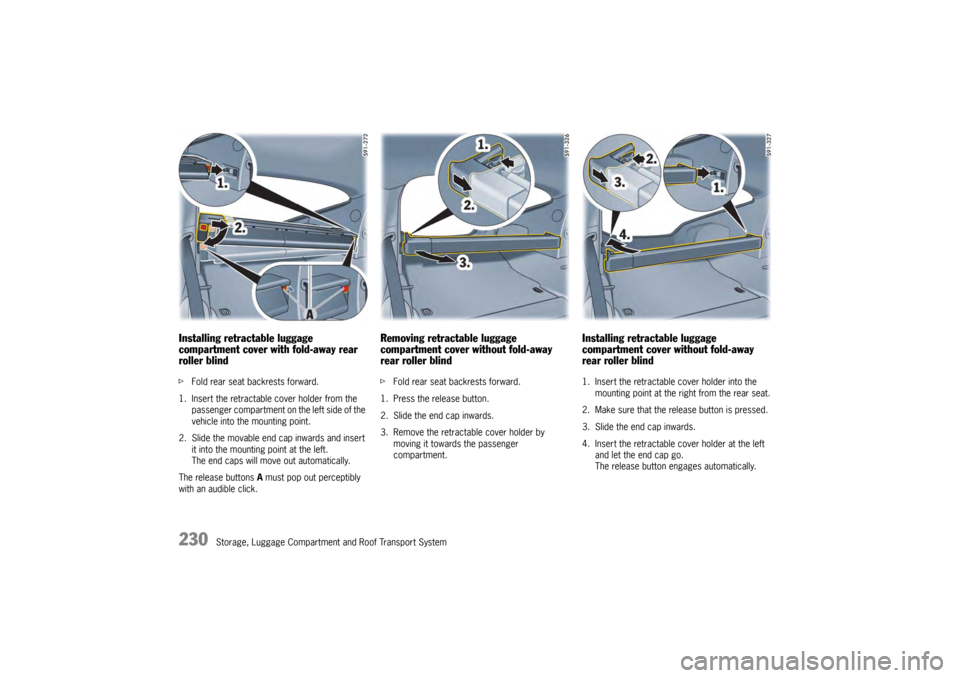
Installing retractable luggage
compartment cover with fold-away rear
roller blindfFold rear seat backrests forward.
1. Insert the retractable cover holder from the passenger compartment on the left side of the
vehicle into the mounting point.
2. Slide the movable end cap inwards and insert it into the mounting point at the left.
The end caps will move out automatically.
The release buttons A must pop out perceptibly
with an audible click.
Removing retractable luggage
compartment cover without fold-away
rear roller blindf Fold rear seat backrests forward.
1. Press the release button.
2. Slide the end cap inwards.
3. Remove the retractable cover holder by moving it towards the passenger
compartment.
Installing retractable luggage
compartment cover without fold-away
rear roller blind1. Insert the retractable cover holder into the mounting point at the right from the rear seat.
2. Make sure that the release button is pressed.
3. Slide the end cap inwards.
4. Insert the retractable cover holder at the left and let the end cap go.
The release button engages automatically.
Page 233 of 343
Storage, Luggage Compartment and Roof Transport System
231
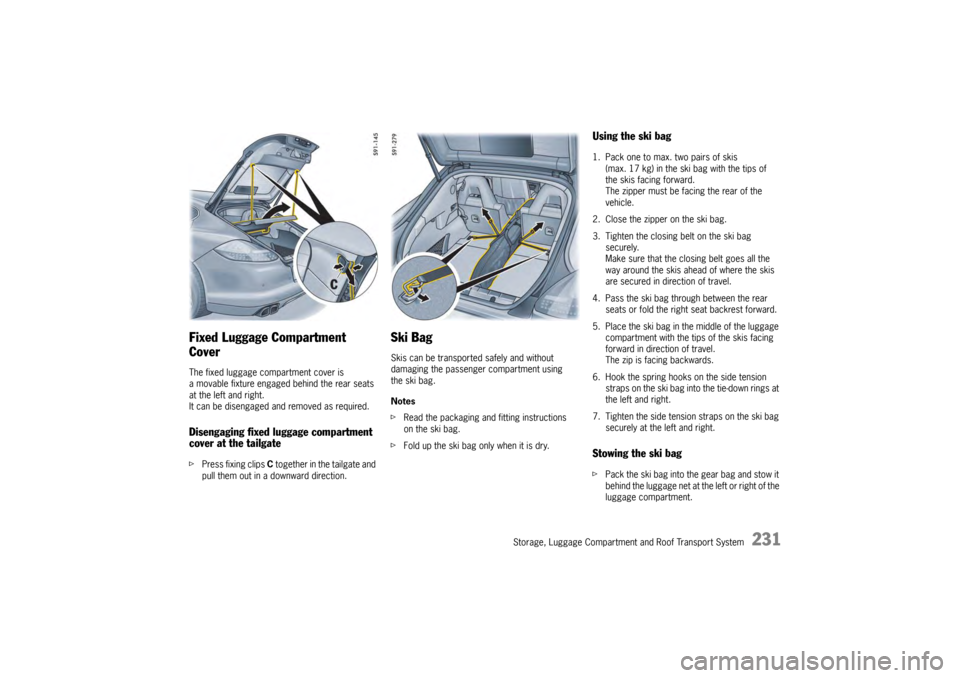
Fixed Luggage Compartment
CoverThe fixed luggage compartment cover is
a movable fixture engaged behind the rear seats
at the left and right.
It can be disengaged and removed as required.Disengaging fixed luggage compartment
cover at the tailgatefPress fixing clips C together in the tailgate and
pull them out in a downward direction.
Ski BagSkis can be transported safely and without
damaging the passenger compartment using
the ski bag.
Notes
f Read the packaging and fitting instructions
on the ski bag.
f Fold up the ski bag only when it is dry.
Using the ski bag1. Pack one to max. two pairs of skis
(max. 17 kg) in the ski bag with the tips of
the skis facing forward.
The zipper must be facing the rear of the
vehicle.
2. Close the zipper on the ski bag.
3. Tighten the closing belt on the ski bag securely.
Make sure that the closing belt goes all the
way around the skis ahead of where the skis
are secured in direction of travel.
4. Pass the ski bag through between the rear seats or fold the right seat backrest forward.
5. Place the ski bag in the middle of the luggage compartment with the tips of the skis facing
forward in direction of travel.
The zip is facing backwards.
6. Hook the spring hooks on the side tension straps on the ski bag into the tie-down rings at
the left and right.
7. Tighten the side tension straps on the ski bag securely at the left and right.Stowing the ski bagfPack the ski bag into the gear bag and stow it
behind the luggage net at the left or right of the
luggage compartment.
Page 234 of 343

232
Storage, Luggage Compartment and Roof Transport System
Roof Transport SystemA roof transport system can be fitted on the
vehicle for transporting awkward objects.
Various objects can be transported safely and
securely using the roof transport system and
additional attachments, e.g. ski rack, bicycle rack,
surfboard rack, roof box or snowboard holder.
fOnly use roof transport systems that have
been tested and approved by Porsche. It is not
possible to fit commercially available roof rack
systems.
Danger!
Risk of accidents if th e vehicle loses its roof
transport system due to excessive speed or
improper loading.
f Check the roof transport system and
attachments before every journey and at
regular intervals during a long journey to
ensure that they are fitted correctly and
securely. Tighten all fa stening screws again.
f Adjust your driving style accordingly by
maintaining a reasonable speed and slowing
hour vehicle turns.
f Do not drive at a speed of more than
80 mph (130 km/h) when the roof transport
system is fitted and loaded.
f Do not drive at a speed of more than
110 mph (180 km/h) when the roof transport
system is fitted but not loaded. Obey all traffic
laws.
f Load the roof transport system so that the
load does not protrude over the sides of the
roof transport system.
Never load the roof transport system wider
than the width of the vehicle.
f Position the center of gravity of the load as low
as possible with respect to the roof transport
system and distribute the load evenly over the
load area.
f Secure the load so that it will not move during
the journey.Do not use elastic rubber tensioners.
Caution!
Washing the vehicle in a car wash or failure
to observe the overall vehicle height or the
maximum permitted gross weight can
damage the vehicle or roof transport system.
f Remove the complete roof transport system
before washing the vehicle in a car wash.
f Check the overall vehicl e height with the roof
transport system fitted before driving into
multi-storey car parks, garages, underground
garages and tunnels.
f Do not exceed the maximum roof load,
maximum vehicle weight and maximum
axle loads.
For information on maxi mum permitted loads and
weights:
f Please see the chapter “WEIGHTS” on
page 328.
f Do not exceed the maximum permitted roof
transport system load of 70 kg.
f If you are not using the roof transport system,
remove it completely from the vehicle in order to save fuel and reduce noise.
Page 235 of 343
Storage, Luggage Compartment and Roof Transport System
233
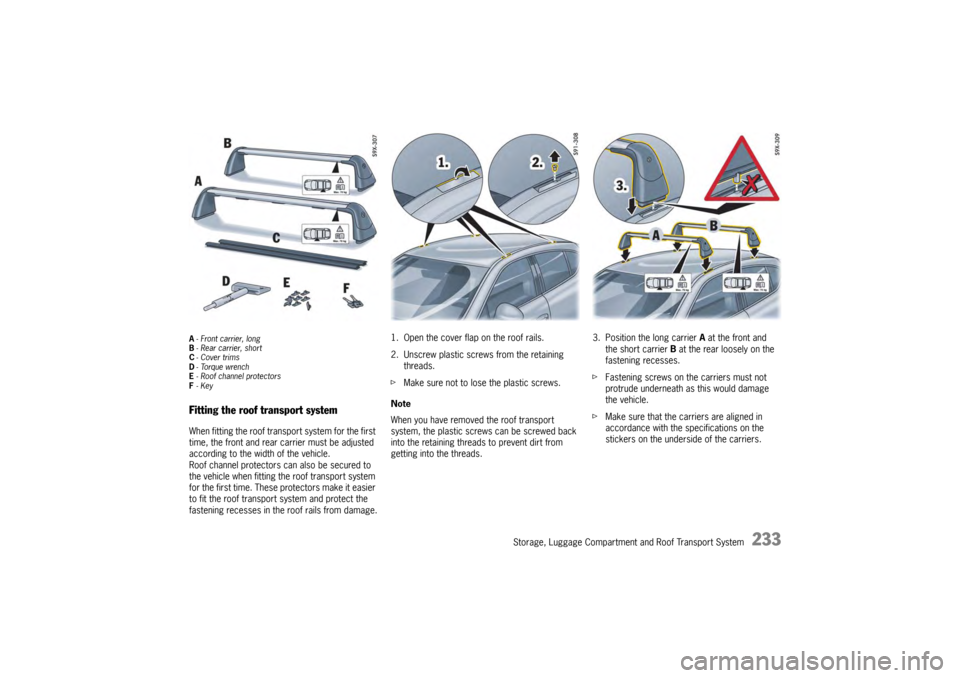
A- Front carrier, long
B -Rear carrier, short
C -Cover trims
D - Torque wrench
E - Roof channel protectors
F -KeyFitting the roof transport systemWhen fitting the roof transport system for the first
time, the front and rear carrier must be adjusted
according to the width of the vehicle.
Roof channel protectors can also be secured to
the vehicle when fitting the roof transport system
for the first time. These protectors make it easier
to fit the roof transport system and protect the
fastening recesses in the roof rails from damage. 1. Open the cover flap on the roof rails.
2. Unscrew plastic screws from the retaining
threads.
f Make sure not to lose the plastic screws.
Note
When you have removed the roof transport
system, the plastic screws can be screwed back
into the retaining threads to prevent dirt from
getting into the threads. 3. Position the long carrier
A at the front and
the short carrier B at the rear loosely on the
fastening recesses.
f Fastening screws on the carriers must not
protrude underneath as this would damage
the vehicle.
f Make sure that the carriers are aligned in
accordance with the specifications on the
stickers on the underside of the carriers.
Page 236 of 343
234
Storage, Luggage Compartment and Roof Transport System
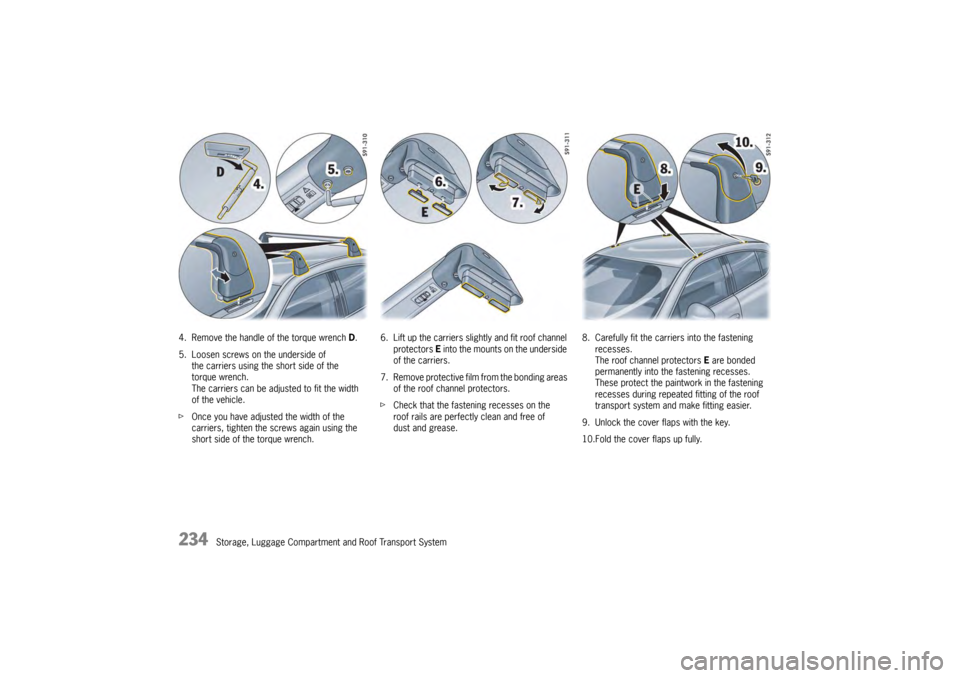
4. Remove the handle of the torque wrench D.
5. Loosen screws on the underside of
the carriers using the short side of the
torque wrench.
The carriers can be adjusted to fit the width
of the vehicle.
f Once you have adjusted the width of the
carriers, tighten the screws again using the
short side of the torque wrench. 6. Lift up the carriers slig
htly and fit roof channel
protectors E into the mounts on the underside
of the carriers.
7. Remove protective film from the bonding areas of the roof channel protectors.
f Check that the fastening recesses on the
roof rails are perfectly clean and free of
dust and grease. 8. Carefully fit the carriers into the fastening
recesses.
The roof channel protectors E are bonded
permanently into the fastening recesses.
These protect the paintwork in the fastening
recesses during repeated fitting of the roof
transport system and make fitting easier.
9. Unlock the cover flaps with the key.
10.Fold the cover flaps up fully.
Page 237 of 343
Storage, Luggage Compartment and Roof Transport System
235
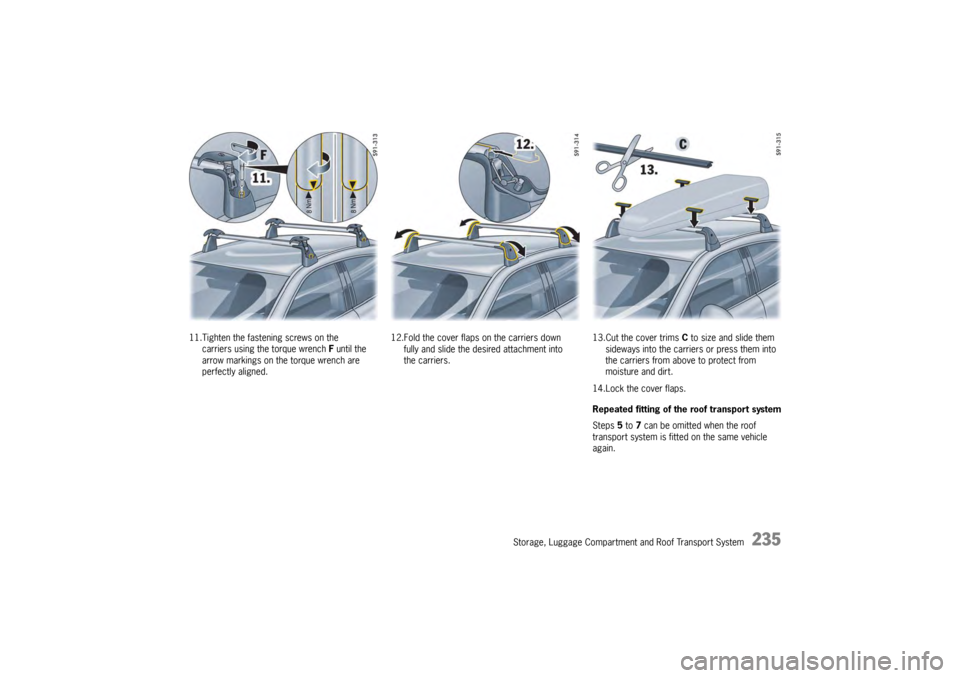
11.Tighten the fastening screws on the
carriers using the torque wrench F until the
arrow markings on the torque wrench are
perfectly aligned. 12.Fold the cover flaps on the carriers down
fully and slide the desired attachment into
the carriers. 13.Cut the cover trims
C to size and slide them
sideways into the carriers or press them into
the carriers from above to protect from
moisture and dirt.
14.Lock the cover flaps.
Repeated fitting of the roof transport system
Steps 5 to 7 can be omitted when the roof
transport system is fitted on the same vehicle
again.
Page 238 of 343

236
Storage, Luggage Compartment and Roof Transport System
Loading InformationDefinitionsThe rear-axle load is the vehicle weight on the
rear axle plus the weight of the transported load.
The Curb weight - actual weight of your vehicle -
vehicle weight including standard and optional
equipment, fluids, and emergency tools. This
weight does not include passengers and cargo.
The Gross Vehicle Weight is the sum of the curb
weight and the weight of passengers and cargo
combined.
The Gross Vehicle Weight Rating is the
maximum total weight of vehicle, passengers,
luggage, hitch, trailer tongue load and optional
equipment.
The Gross Axle Weight Rating is the maximum
load limit for the front or the rear axle. This
information is located on the safety comliance
sticker located in the dr iver’s side door jamb.
For determining the compat ibility of the tire and
vehicle load capabilities:
f Please see the chapter “TIRES AND WHEELS”
on page 280. The load capacity coefficient (e.g. “106”) is a
minimum requirement. For more information:
f
Please see the chapter “INSCRIPTION ON
RADIAL TIRE” on page 288.
The Gross Combined Weight Rating is the
maximum total weight rating of vehicle,
passengers and cargo.
The Vehicle Capacity Weight - Load Limit - is
the maximum total weight limit specified of the
load (passengers and cargo) for the vehicle. This
is the maximum weight of passengers and cargo
that can be loaded into the vehicle. This infor-
mation can be found on the tire pressure plate.
The maximum loaded vehicle weight is the
sum of curb weight, acce ssory weight, vehicle
capacity weight and production options weight.
The load rating is the maximum load that a tire
is rated to carry for a given inflation pressure.
The maximum load rating is the load rating for
a tire at the maximum permissible inflation
pressure.
The cargo capacity is the permissible weight of
cargo, the subtracted weight of passengers from
the load limit.
f Never exceed the permissible limits.
Danger!
Risk of personal injury or death.
Injuries are much more likely in an accident
if persons ride in the cargo area.
f Persons must ride only on the seats provided
for this purpose.
f Make sure that everybody fastens their safety
belts.
Risk of loss of control, damage to the vehicle
and serious personal injury or death.
f Never exceed the specified axle loads.
Overloading can shorten the service life of the
tires and car, as well as lead to dangerous
vehicle reactions and long braking distances.
Damage due to overloading is not covered by the vehicle warranty.
Page 239 of 343
Storage, Luggage Compartment and Roof Transport System
237
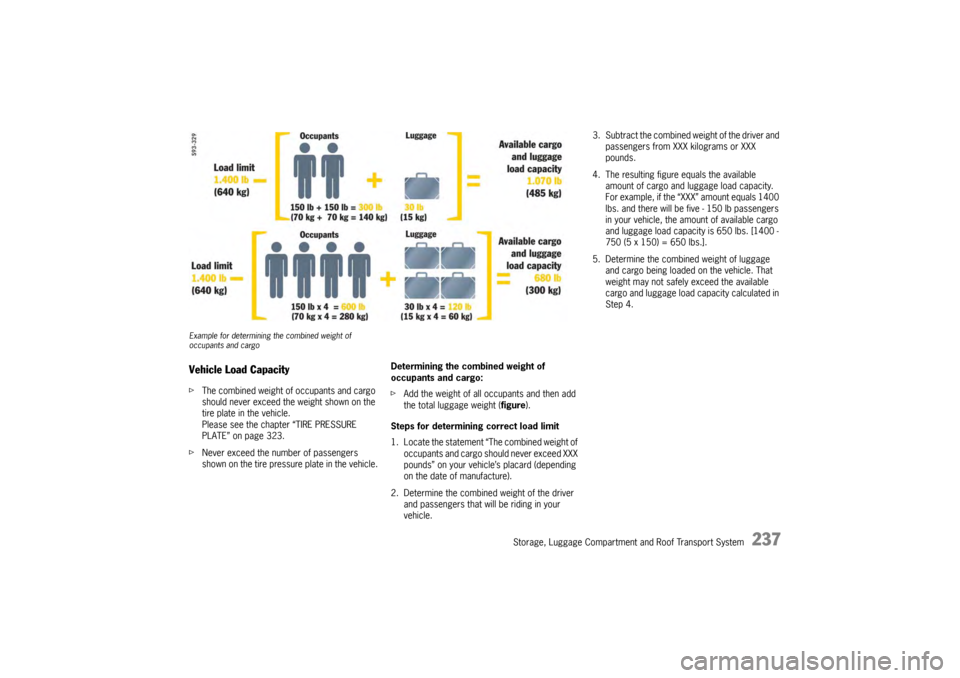
Example for determining the combined weight of
occupants and cargoVehicle Load CapacityfThe combined weight of occupants and cargo
should never exceed the weight shown on the
tire plate in the vehicle.
Please see the chapter “TIRE PRESSURE
PLATE” on page 323.
f Never exceed the number of passengers
shown on the tire pressure plate in the vehicle. Determining the combined weight of
occupants and cargo:
f
Add the weight of all occupants and then add
the total luggage weight ( figure).
Steps for determining correct load limit
1. Locate the statement “The combined weight of occupants and cargo should never exceed XXX
pounds” on your vehicle’s placard (depending
on the date of manufacture).
2. Determine the combined weight of the driver and passengers that will be riding in your
vehicle.
3. Subtract the combined weight of the driver and passengers from XXX kilograms or XXX
pounds.
4. The resulting figure equals the available amount of cargo and luggage load capacity.
For example, if the “XXX” amount equals 1400
lbs. and there will be five - 150 lb passengers
in your vehicle, the am ount of available cargo
and luggage load capacity is 650 lbs. [1400 -
750 (5 x 150) = 650 lbs.].
5. Determine the combined weight of luggage and cargo being loaded on the vehicle. That
weight may not safely exceed the available
cargo and luggage load ca pacity calculated in
Step 4.
Page 240 of 343

238
Parking
ParkingParkAssist .................................................. 239
Rearview Camera........................................ 241
Swivelling Down Mirror Glass as
Parking Aid ................. ................................ 242
Garage Door Opener ... ................................ 243