height PORSCHE PANAMERA 2009 1.G Information Manual
[x] Cancel search | Manufacturer: PORSCHE, Model Year: 2009, Model line: PANAMERA, Model: PORSCHE PANAMERA 2009 1.GPages: 343, PDF Size: 7.96 MB
Page 32 of 343

30
Opening and Locking
Detection of obstacles during closing Warning!
Danger of crushing.
f Despite the presence of this detection system,
you are still responsible for keeping yourself
and others entirely out of the way of the door as it is closing.
The closing operation is interrupted if closing
of the tailgate is blocked by an obstacle.
A warning signal sounds and the tailgate opens
again.
When the obstacle has been removed, the tailgate
can be closed by pressing the button in the
tailgate trim panel.
Automatic stop in the event of unintentional
tailgate movement
If the tailgate is moved too abruptly or lowers
unaided immediately after opening, e.g. due to
the weight of snow, an electrical mechanism
brakes the tailgate and a series of brief warning
signals sounds until the tailgate stops moving.
f Bring the tailgate to rest for approx. 1 second.
The braking function is deactivated. Adjusting the opening height of the tailgate
The opening height of the tailgate can be
individually adjusted so
that the tailgate does not
collide with the garage ceiling, for example.
On vehicles with level control, the vehicle height
changes according to the level control setting.
f Always adjust the opening height with the
vehicle at the highest level setting so that the
tailgate cannot accidentally collide with the
garage ceiling, for example.
Caution!
Risk of damage to the tailgate. If the luggage
compartment cover is not attached to the
tailgate, the tailgate continues to move
slowly upwards beyond the automatic stop.
f Only use the powerlift tailgate with the luggage compartment cover attached.
1. Stand behind the vehicl e and open the tailgate.
2. Press button on the key to stop the automatic opening operation at around 2/3
of the opening height.
3. Now move the tailgate up by hand until the desired opening height is reached. Make sure
that there is a sufficient minimum clearance
from any obstacle. 4. Press the button
A in the trim panel on the
tailgate for approximately 3 seconds.
An acknowledgement signal sounds.
The opening height of the tailgate has now
been programmed.
The tailgate can now be closed by briefly
pressing the button.
This setting cannot be deleted. If a different
setting is required, repeat steps 1 to 4.
Malfunctions of the tailgate drive
The automatic function is not active if the battery
voltage is too low.
If a button is pressed, th e tailgate lock is unlocked
and three brief warning sign als sound. The tailgate
can now be opened by hand.
f Charge the vehicle battery.
Emergency operation of tailgate
If the automatic opening or closing operation is
interrupted by a fault:
f Slowly open or close the tailgate by hand.
Overload protection
If overloading of the tailgate drive is detected,
three brief warning signals sound.
The tailgate cannot be operated automatically
for approx. 30 seconds.
Page 40 of 343

38
Seats, Mirrors and Steering Wheel
Seat Adjustment and Head
Restraints
Danger!
The seat may move unexpectedly if you
attempt to adjust while driving. This could
cause sudden loss of control, resulting in
serious personal injury or death.
f Do not adjust seats while the vehicle is in mo-
tion.The backrest locks must be engaged at all
times while the vehicle is in motion.
Safety belts only offer protection when the
backrest is upright and the belts are properly
positioned on the body.
Improperly positioned sa fety belts or safety
belts worn by passengers in an excessively
reclined position can cause serious personal
injury or death in an accident.
f Do not operate the car with the driver or
passenger backrests excessively reclined.
f Please see the chapter “SEAT POSITION” on
page 38.
Danger of injury if pe rsons or animals are in
the movement range of the seat during seat
adjustment.
f Adjust the seat so that no-one is put at risk.
f Do not activate the comf ort memory button if
there is any risk of the seat crushing the
occupant. f
Cancel automatic adjustment by pressing any
of the seat adjustment buttons.
f Do not leave children in the vehicle unattended,
since they may depress the comfort setting
button and crush themselves or another
occupant. Caution!
Risk of damage to wi ndshield, sun visor,
windstop, etc. when the seat is adjusted or
folded back or forward.
f Adjust the seat so that the s e a t b a c k re s t i s n o t in contact with any other object.
The driver, front, and back passenger seats
provide integrated head restraints in the
backrests. The head restraints are not adjustable. Warning!
All occupants, including the driver, should not
operate a vehicle or sit in a vehicle’s seat until the
head restraints and backrests, respectively, are
placed in their proper posi tions so that the risk of
neck injuries is minimize d in the event of a crash.
For a proper positioning of the head restraint, the
seatback’s inclination should be adjusted such
that the head restraint is in an upright position.
Driver and passengers should be seated upright
and in the center of their seats.
Seat positionAn ergonomically correct sitting position is
important for safe and fatigue-free driving. We
recommend the following procedure for adjusting
the driver’s seat to suit individual requirements:
1. Adjust the seat until, with your left foot on the footrest, your left leg remains at a slight angle.
2. Rest your outstretched arm on the steering wheel. Set the backrest angle and the steering-
wheel position so that your wrist rests on the
outer rim of the steering wheel. At the same
time, the shoulders must still be in noticeable
contact with the backrest.
3. Adjust the seat height to give yourself enough headroom and a good overview of the vehicle.
4. Electrically adjustable seat: Adjust the seat angle until your thighs rest
lightly on the seat cushion.
Page 41 of 343

Seats, Mirrors and Steering Wheel
39
Adjusting Front SeatsAdjusting the seat
Warning!
Risk of accidents. The seat may move further
than desired if you atte mpt to adjust it when
driving. You may lose control of the vehicle.
f Do not adjust the seat when driving.
Danger of injury if persons or animals are in
the movement range of the seat during seat
adjustment.
f Adjust the seat so that no-one is put at risk.
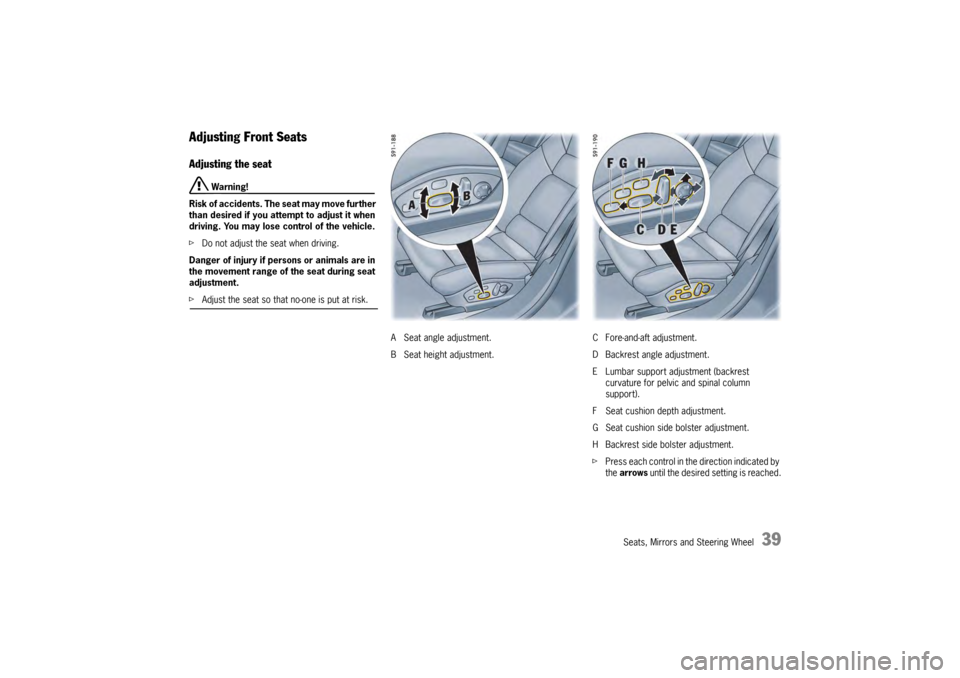
A Seat angle adjustment.
B Seat height adjustment. C Fore-and-aft adjustment.
D Backrest angle adjustment.
E Lumbar support adjustment (backrest
curvature for pelvic and spinal column
support).
F Seat cushion depth adjustment.
G Seat cushion side bolster adjustment.
H Backrest side bolster adjustment.
f Press each control in the direction indicated by
the arrows until the desired setting is reached.
Page 49 of 343

Seats, Mirrors and Steering Wheel
47
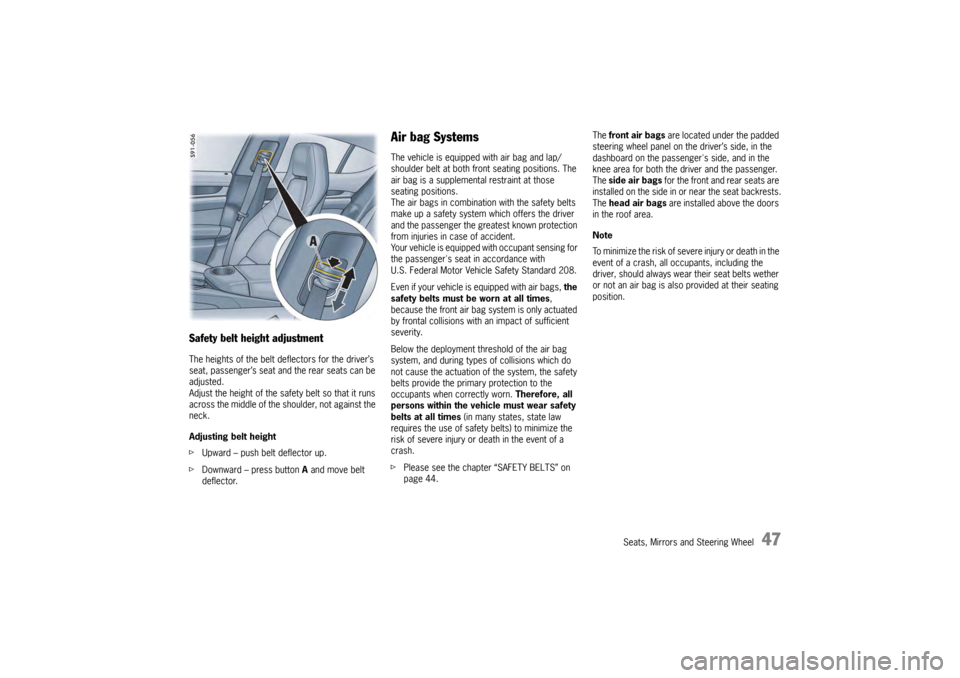
Safety belt height adjustmentThe heights of the belt deflectors for the driver’s
seat, passenger’s seat and the rear seats can be
adjusted.
Adjust the height of the safe ty belt so that it runs
across the middle of the shoulder, not against the
neck.
Adjusting belt height
f Upward – push belt deflector up.
f Downward – press button A and move belt
deflector.
Air bag SystemsThe vehicle is equipped with air bag and lap/
shoulder belt at both front seating positions. The
air bag is a supplemental restraint at those
seating positions.
The air bags in combinatio n with the safety belts
make up a safety system which offers the driver
and the passenger the greatest known protection
from injuries in case of accident.
Your vehicle is equipped with occupant sensing for
the passenger's seat in accordance with
U.S. Federal Motor Vehicle Safety Standard 208.
Even if your vehicle is equipped with air bags, the
safety belts must be worn at all times ,
because the front air bag system is only actuated
by frontal collisions with an impact of sufficient
severity.
Below the deployment threshold of the air bag
system, and during types of collisions which do
not cause the actuation of the system, the safety
belts provide the primary protection to the
occupants when correctly worn. Therefore, all
persons within the vehicle must wear safety
belts at all times (in many states, state law
requires the use of safety belts) to minimize the
risk of severe injury or death in the event of a
crash.
f Please see the chapter “SAFETY BELTS” on
page 44. The
front air bags are located under the padded
steering wheel panel on the driver’s side, in the
dashboard on the passenger's side, and in the
knee area for both the driver and the passenger.
The side air bags for the front and rear seats are
installed on the side in or near the seat backrests.
The head air bags are installed above the doors
in the roof area.
Note
To minimize the risk of seve re injury or death in the
event of a crash, all occupants, including the
driver, should always wear their seat belts wether
or not an air bag is also provided at their seating
position.
Page 203 of 343

Driving and Driving Safety
201
Transmission and Chassis Control SystemsYour Porsche features a complex integrated system made up of all control systems acting in power transmission and in the chassis.
All control systems are networked with the aim of combining the best possible driving performance with maximum safety.
The following systems are invo lved, depending on equipment:
System/designation Scope
PTM
Porsche Traction Management – Active all-wheel drive with electronically
regulated map-controlled multiple-disc clutch
PSM
Porsche Stability Management – Driving stability control
– Anti-lock brake system (ABS)
– Brake system prefilling
– Brake booster (Hydraulic Brake Assist)
– Automatic brake differential (ABD)
– Anti-slip control (ASR)
– Engine drag torque control (MSR)
– HOLD function: standstill management
Air suspension
with level control and height adjustment – Full load-bearing air-spring stru
ts with integrated shock absorbers
– Height adjustment with Low Level setting in “S port Plus” mode and High Level setting for
maneuvering
PAS M
Porsche Active Suspension Management – Shock absorber system with adaptive, continuous shock absorber control
PDCC
Porsche Dynamic Chassis Control – Active chassis control system to stabilise
roll tendency of vehicle body when driving
– Controlled rear differential lock
Page 211 of 343

Driving and Driving Safety
209
Porsche Active Suspension
Management (PASM) with Air
Suspension and Level ControlPASM with air suspension is an active shock
absorber adjustment and ride height balancing
system. The adjustable damper system selects
the appropriate damping level for each wheel
according to the driving situation and driving
conditions. The level control system automatically
balances load changes and maintains a constant
ride height. Driving safety , agility and comfort are
optimised.
Three different chassis setups can be selected at
the push of a button:
– “PASM Comfort”
– “PASM Sport”
– “PASM Sport Plus”
Comfort mode ensures comfortable chassis
tuning.
The “PASM Sport” chassis setup offers very
sporty shock absorber tuning.
“PASM Sport Plus” mode offers particularly sporty
shock absorber tuning (e.g. for driving on the race
circuit). The vehicle is also lowered by
approx. 1 in. (25 mm) compared with the normal
level and the spring rate is increased.
In addition to manual mode selection, PASM also
adjusts shock absorber tuning for either sporty
or comfort driving, depending on the driving
situation.
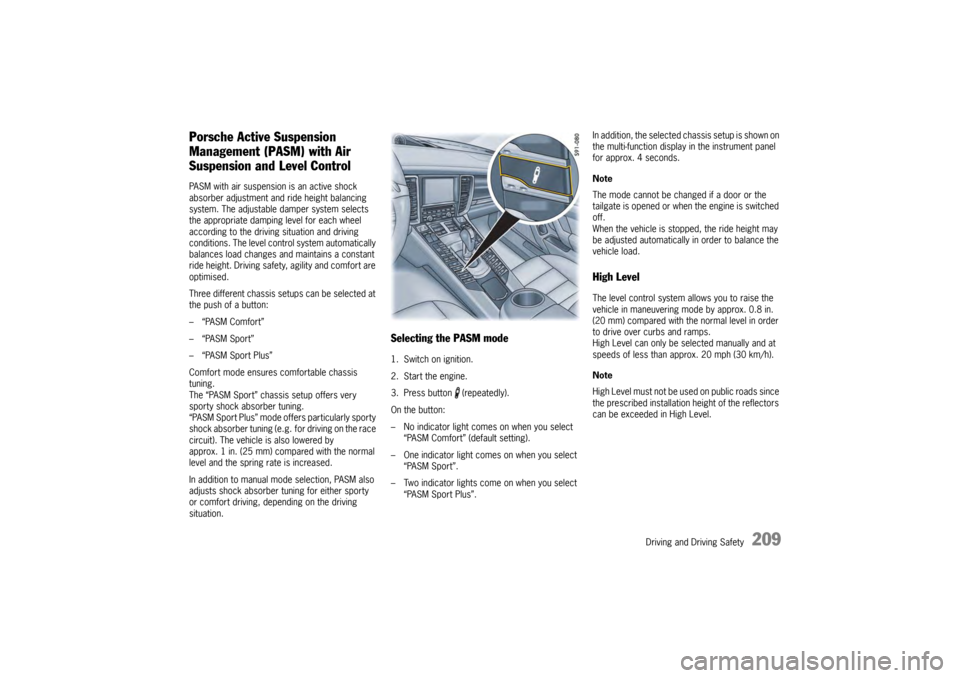
Selecting the PASM mode1. Switch on ignition.
2. Start the engine.
3. Press button (repeatedly).
On the button:
– No indicator light come s on when you select
“PASM Comfort” (default setting).
– One indicator light comes on when you select “PASM Sport”.
– Two indicator lights come on when you select
“PASM Sport Plus”. In addition, the selected chassis setup is shown on
the multi-function display in the instrument panel
for approx. 4 seconds.
Note
The mode cannot be changed if a door or the
tailgate is opened or when the engine is switched
off.
When the vehicle is stopped, the ride height may
be adjusted automatically
in order to balance the
vehicle load.
High LevelThe level control system al lows you to raise the
vehicle in maneuvering mode by approx. 0.8 in.
(20 mm) compared with the normal level in order
to drive over curbs and ramps.
High Level can only be selected manually and at
speeds of less than approx. 20 mph (30 km/h).
Note
High Level must not be us ed on public roads since
the prescribed installation height of the reflectors
can be exceeded in High Level.
Page 212 of 343

210
Driving and Driving Safety
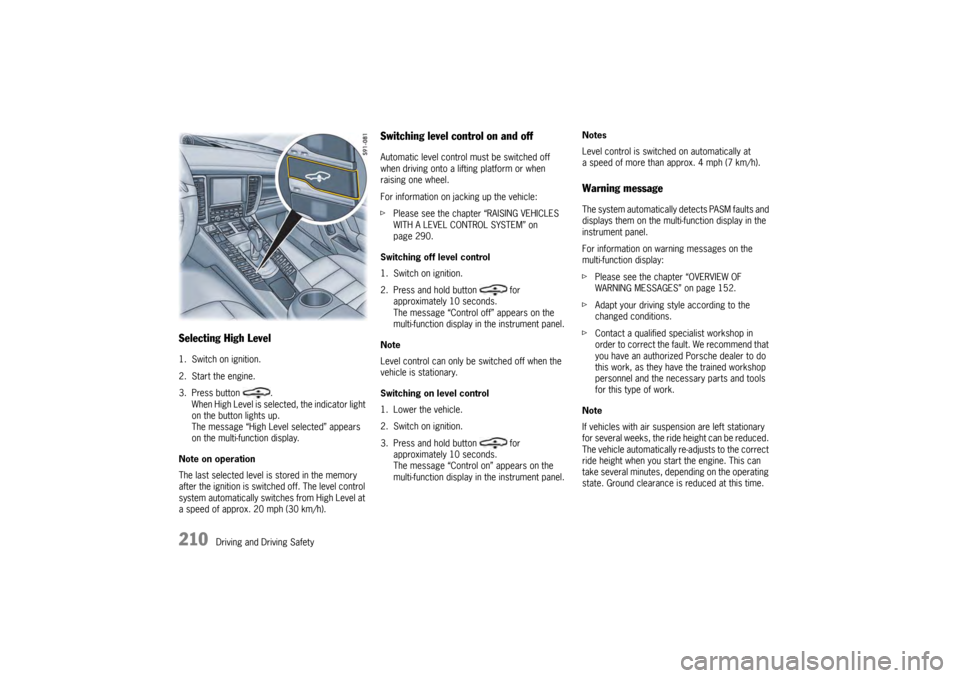
Selecting High Level1. Switch on ignition.
2. Start the engine.
3. Press button .When High Level is selected, the indicator light
on the button lights up.
The message “High Level selected” appears
on the multi-function display.
Note on operation
The last selected level is stored in the memory
after the ignition is switched off. The level control
system automatically switches from High Level at
a speed of approx. 20 mph (30 km/h).
Switching level control on and offAutomatic level control must be switched off
when driving onto a lifting platform or when
raising one wheel.
For information on ja cking up the vehicle:
f Please see the chapter “RAISING VEHICLES
WITH A LEVEL CONTROL SYSTEM” on
page 290.
Switching off level control
1. Switch on ignition.
2. Press and hold button for approximately 10 seconds.
The message “Control off” appears on the
multi-function display in the instrument panel.
Note
Level control can only be switched off when the
vehicle is stationary.
Switching on level control
1. Lower the vehicle.
2. Switch on ignition.
3. Press and hold button for approximately 10 seconds.
The message “Control on” appears on the
multi-function display in the instrument panel. Notes
Level control is switched on automatically at
a speed of more than approx. 4 mph (7 km/h).
Warning messageThe system automatically
detects PASM faults and
displays them on the multi-function display in the
instrument panel.
For information on warning messages on the
multi-function display:
f Please see the chapter “OVERVIEW OF
WARNING MESSAGES” on page 152.
f Adapt your driving style according to the
changed conditions.
f Contact a qualified specialist workshop in
order to correct the fault. We recommend that
you have an authorized Porsche dealer to do
this work, as they have the trained workshop
personnel and the necessary parts and tools
for this type of work.
Note
If vehicles with air suspension are left stationary
for several weeks, the ride height can be reduced.
The vehicle automatically re-adjusts to the correct
ride height when you start the engine. This can
take several minutes, depending on the operating
state. Ground clearance is reduced at this time.
Page 234 of 343

232
Storage, Luggage Compartment and Roof Transport System
Roof Transport SystemA roof transport system can be fitted on the
vehicle for transporting awkward objects.
Various objects can be transported safely and
securely using the roof transport system and
additional attachments, e.g. ski rack, bicycle rack,
surfboard rack, roof box or snowboard holder.
fOnly use roof transport systems that have
been tested and approved by Porsche. It is not
possible to fit commercially available roof rack
systems.
Danger!
Risk of accidents if th e vehicle loses its roof
transport system due to excessive speed or
improper loading.
f Check the roof transport system and
attachments before every journey and at
regular intervals during a long journey to
ensure that they are fitted correctly and
securely. Tighten all fa stening screws again.
f Adjust your driving style accordingly by
maintaining a reasonable speed and slowing
hour vehicle turns.
f Do not drive at a speed of more than
80 mph (130 km/h) when the roof transport
system is fitted and loaded.
f Do not drive at a speed of more than
110 mph (180 km/h) when the roof transport
system is fitted but not loaded. Obey all traffic
laws.
f Load the roof transport system so that the
load does not protrude over the sides of the
roof transport system.
Never load the roof transport system wider
than the width of the vehicle.
f Position the center of gravity of the load as low
as possible with respect to the roof transport
system and distribute the load evenly over the
load area.
f Secure the load so that it will not move during
the journey.Do not use elastic rubber tensioners.
Caution!
Washing the vehicle in a car wash or failure
to observe the overall vehicle height or the
maximum permitted gross weight can
damage the vehicle or roof transport system.
f Remove the complete roof transport system
before washing the vehicle in a car wash.
f Check the overall vehicl e height with the roof
transport system fitted before driving into
multi-storey car parks, garages, underground
garages and tunnels.
f Do not exceed the maximum roof load,
maximum vehicle weight and maximum
axle loads.
For information on maxi mum permitted loads and
weights:
f Please see the chapter “WEIGHTS” on
page 328.
f Do not exceed the maximum permitted roof
transport system load of 70 kg.
f If you are not using the roof transport system,
remove it completely from the vehicle in order to save fuel and reduce noise.
Page 254 of 343

252
Maintenance and Car Care
Exercise Extreme Caution when
Working on your vehicle
Danger!
Ignoring the following instructions may
cause serious personal injury or death.
f The engine compartment of any motor vehicle
is a potentially hazardou s area. If you are not
fully familiar with proper repair procedures, do
not attempt the adjustments described on the
following pages.
f O n l y w o r k o n y o u r v e h i c l e o u t d o o r s o r i n a w e l l
ventilated area.
f Ensure that there are no open flames in the
area of your vehicle at any time when fuel
fumes might be present. Be especially
cautious of devices such as hot water heaters
which ignite a flame intermittently.
f Before working on any part in the engine
compartment, turn the engine off and let it cool
down sufficiently. Hot engine compartment
components can burn skin on contact.
f Be alert and cautious around the engine at all
times while it is running. If you have to work on
the engine while it is running, always put the
parking brake on and put the PDK selector
lever in position P or N.
f In particular, be very careful to ensure that
items of clothing (ties, shirt, sleeves etc.),
jewelry, long hair, hand or fingers cannot get caught in the fan, belts or other moving parts.
The radiator and radiator fans are in the front
of the car.
The fans can start or continue running as a
function of temperature,
even with the engine
switched off.
Carry out work in these areas only with the
engine off and exercise extreme caution.
f Your Porsche is equipped with an electronic
ignition system. When the ignition is on, high
voltage is present in all wires connected with
the ignition system; therefore, exercise
extreme caution when working on any part of
the engine while the ignition is on or the engine
is running.
f Always support your car with safety stands if it
is necessary to work under the car. The jack
supplied with the car is not adequate for this
purpose.
Switch off level control of air suspension and
height adjustment.
Please see the chapter “RAISING THE VEHICLE
WITH A LIFTING PLATFORM, TROLLEY JACK
OR STANDARD JACK” on page 290.
f When working under the car without safety
stands but with the wheels on the ground,
make sure the car is on level ground, the
wheels are blocked, and that the engine
cannot be started.
Withdraw ignition keys (switch ignition off in
vehicles that have Porsche Entry & Drive). f
Do not smoke or allow an open flame around
the battery or fuel.
Keep a fire extinguisher close at hand.
f Incomplete or improper servicing may cause
problems in the operation of the car. If in doubt
about any servicing, have it done by your
authorized Porsche dealer.
Improper maintenance during the warranty
period may affect your Porsche warranty
coverage.
f Supplies of fluids, e.g. engine oil, washer fluid,
brake fluid or coolant, are hazardous to your
health.
Keep these fluids out of children's reach and
dispose of them in accordance with the
appropriate regulations.
f Some countries require additional tools and
special spare parts to be carried in your
vehicle. Please make enquiries before driving
abroad.
Page 273 of 343

Maintenance and Car Care
271
fStart washing the vehicle by thoroughly
wetting the paintwork and rinsing the heavy
dirt off.
f After washing the vehicle, rinse it thoroughly
with water and rub it dry with chamois-leather.
Do not use the same chamois for rubbing
dry as you use for cleaning the windshield
and windows.
Warning!
Risk of accidents! Reduced or uneven
braking action may be caused by wet
brakes.
f After washing the vehicle, test the brakes
and steering and briefly brake the discs dry.
When doing so, make sure that vehicles travelling behind you are not affected. Cleaning in car washes
Optional add-on parts or parts that project beyond
the contours of the vehi
cle may be damaged by
design features of car washes.
The following parts are particularly at risk:
– Windshield wipers and rear wiper (always switch them off – wiper stalk in
position 0 – to prevent them wiping
unintentionally in intermittent or sensor
operation).
– Exterior mirrors (always fold in).
– External antenna (always unscrew).
– Roof transport system (always remove completely).
– Spoiler.
– Wheels (the wider the rim and the lower the tire height, the greater the risk of damage).
f Please consult the operator before using
automatic car washes.
f All parts not reached by a car wash, such
as door and lid seams or door sills, must
be washed and polished by hand.
Paint careIn order to protect the pa int on your vehicle in
the best possible way against mechanical and
chemical damage, you should
– preserve it regularly,
– polish it if necessary,
– remove spots and stains, and
– repair damaged paintwork.
General Notes
f Never rub a dusty vehicle with a dry cloth,
because the grains of dirt will damage
the paintwork.
f Do not treat matt-painted components with
preservatives or polishes as these remove
the matt effect.
Preservation
The paint surface becomes dull over time due
to weathering.
f Preserve paint regularly.
f Apply paint preservative after washing the
vehicle and polish it smooth to preserve
the paintwork.
This keeps the paint shin y and elastic. Dirt is
prevented from adhering to the paint surface and
industrial dust is prevented from penetrating
the paint.