DID Ram 1500 2015 Owner's Guide
[x] Cancel search | Manufacturer: RAM, Model Year: 2015, Model line: 1500, Model: Ram 1500 2015Pages: 871, PDF Size: 24.83 MB
Page 223 of 871
5. Push and hold the programmed HomeLink® button.
The EVIC/DID will display “CHANNEL # TRANS-
MIT.” If the device is plugged in and activates, pro-
gramming is complete.
If you unplugged the garage door opener/device for
programming, plug it back in at this time.
Reprogramming A Single HomeLink® Button
(Canadian/Gate Operator)
To reprogram a channel that has been previously trained,
follow these steps:
1. Turn the ignition switch to the ON/RUN position.
For vehicle’s equipped with Keyless Enter-N-Go™, place
the ignition in the RUN position with the Engine ON.
2. Push and hold the desired HomeLink® button until
the EVIC/DID displays “CHANNEL # TRAINING”
Do not release the button.
3.Without releasing the buttonproceed with
“Canadian/Gate Operator Programming” Step 2 and
follow all remaining steps.
Using HomeLink®
To operate, push and release the programmed
HomeLink® button. Activation will now occur for the
programmed device (i.e., garage door opener, gate opera-
tor, security system, entry door lock, home/office light-
ing, etc.,). The hand-held transmitter of the device may
also be used at any time.
Security
It is advised to erase all channels before you sell or turn
in your vehicle.
To erase the channels press and hold the two outside
HomeLink® buttons (I and III) for up 20 seconds. The
Electronic Vehicle Information Center (EVIC) or Driver
3
UNDERSTANDING THE FEATURES OF YOUR VEHICLE 221
Page 224 of 871
Interactive Display (DID) will display “CLEARING
CHANNELS.” Release the buttons when the EVIC/DID
displays “CHANNELS CLEARED.”
The HomeLink® Universal Transceiver is disabled when
the Vehicle Security Alarm is active.
Troubleshooting Tips
If you are having trouble programming HomeLink®,
here are some of the most common solutions:
•Replace the battery in the original hand-held transmitter.
•Push the LEARN button on the Garage Door Opener
to complete the training for a Rolling Code.
•Did you unplug the device for programming and
remember to plug it back in?
If you have any problems, or require assistance, please
call toll-free 1-800-355-3515 or, on the Internet at
HomeLink.com for information or assistance.
WARNING!
Vehicle exhaust contains carbon monoxide, a danger-
ous gas. Do not run your vehicle in the garage while
programming the transceiver. Exhaust gas can cause
serious injury or death.
WARNING!
Your motorized door or gate will open and close
while you are programming the universal trans-
ceiver. Do not program the transceiver if people, pets
or other objects are in the path of the door or gate.
Only use this transceiver with a garage door opener
that has a “stop and reverse” feature as required by
Federal safety standards. This includes most garage
door opener models manufactured after 1982. Do not
(Continued)
222 UNDERSTANDING THE FEATURES OF YOUR VEHICLE
Page 285 of 871
UNDERSTANDING YOUR INSTRUMENT PANEL
CONTENTS
!INSTRUMENT PANEL FEATURES..........286
!INSTRUMENT CLUSTER — MIDLINE (EVIC) . .287
!INSTRUMENT CLUSTER — PREMIUM (DID) . .288
!INSTRUMENT CLUSTER DESCRIPTIONS.....289
!ELECTRONIC VEHICLE INFORMATION
CENTER (EVIC).......................302
▫Electronic Vehicle Information Center (EVIC)
Displays — 3.5” Display................304
▫Oil Life Reset........................306
▫EVIC Messages.......................307
▫EVIC Red Telltales.....................312
▫EVIC Yellow Telltales...................314
▫EVIC White Telltales...................316
▫EVIC Selectable Menu Items.............317
!DRIVER INFORMATION DISPLAY (DID).....331
▫Driver Information Display (DID) Displays . . .333
▫Oil Life Reset........................335
▫DID Messages........................336
▫DID Red Telltales......................341
▫DID Yellow Telltales....................343
4
Page 286 of 871
▫DID White Telltales....................345
▫DID Selectable Menu Items..............346
!Uconnect® SETTINGS...................356
▫Buttons On The Faceplate................357
▫Buttons On The Touchscreen..............358
▫Customer Programmable Features —
Uconnect® 5.0 Personal Settings...........358
▫Customer Programmable Features —
Uconnect® 8.4A/8.4AN Personal Settings . . . .375
!Uconnect® RADIOS — IF EQUIPPED........394
!iPod®/USB/MP3 CONTROL — IF EQUIPPED . .395
!STEERING WHEEL AUDIO CONTROLS — IF
EQUIPPED...........................396
▫Radio Operation......................397
▫CD Player — If Equipped................397
!CD/DVD DISC MAINTENANCE...........397
!RADIO OPERATION AND MOBILE PHONES . .398
▫Regulatory And Safety Information.........398
!CLIMATE CONTROLS...................400
▫Manual Climate Controls Without Touchscreen —
If Equipped.........................400
▫Manual Climate Controls With Touchscreen — If
Equipped...........................405
▫Automatic Climate Controls With Touchscreen —
If Equipped.........................410
▫Climate Control Functions...............416
▫Automatic Temperature Control (ATC)......418
▫Operating Tips.......................419
284 UNDERSTANDING YOUR INSTRUMENT PANEL
Page 290 of 871

INSTRUMENT CLUSTER — PREMIUM (DID)
Driver Information Display (DID)
288 UNDERSTANDING YOUR INSTRUMENT PANEL
Page 298 of 871
CAUTION!
The TPMS has been optimized for the original
equipment tires and wheels. TPMS pressures and
warning have been established for the tire size
equipped on your vehicle. Undesirable system opera-
tion or sensor damage may result when using re-
placement equipment that is not of the same size,
type, and/or style. Aftermarket wheels can cause
sensor damage. Do not use tire sealant from a can or
balance beads if your vehicle is equipped with a
TPMS, as damage to the sensors may result.
NOTE:The TPMS telltale is also accompanied by a “Low
Tire” message in the odometer (Base Cluster), or in the
Electronic Vehicle Information Center (EVIC) screen in-
dicating “Low Tire” for EVIC enabled clusters.
17. Front Fog Light Indicator — If Equipped
This indicator will illuminate when the front
fog lights are on.
18. Electronic Vehicle Information Center (EVIC)/Driver
Information Display (DID)
The EVIC/DID features a driver-interactive display that
is located in the instrument cluster. For further informa-
tion, refer to “Electronic Vehicle Information Center
(EVIC” OR “/Driver Information Display (DID)” in
“Understanding Your Instrument Panel.”
19. Shift Lever Indicator
The Shift Lever Indicator is self-contained within the
instrument cluster. It displays the gear position of the
automatic transmission.
296 UNDERSTANDING YOUR INSTRUMENT PANEL
Page 299 of 871
NOTE:The highest available transmission gear is dis-
played in the lower right corner of the EVIC/DID
whenever the Electronic Range Select (ERS) feature is
active. Use the +/- selector on the shift lever to activate
ERS. Refer to “Automatic Transmission” in “Starting And
Operating” for further information.
20. Driver Information Display (DID) Menu
The Driver Information Display (DID) features a driver-
interactive display that is located in the instrument
cluster. For further information, refer to “Driver Informa-
tion Display (DID)” in “Understanding Your Instrument
Panel.”
21. Electronic Stability Control (ESC) OFF Indicator
Light — If Equipped
This light indicates the Electronic Stability Con-
trol (ESC) is off.
22. TOW/HAUL
The TOW HAUL button is located on the center
stack upper switch bank. This light will illumi-
nate when TOW HAUL mode is selected.
23. Electronic Stability Control (ESC) Activation/
Malfunction Indicator Light — If Equipped
The “ESC Activation/Malfunction Indicator
Light” in the instrument cluster will come on
when the ignition switch is turned to the
ON/RUN position. It should go out with the
engine running. If the “ESC Activation/Malfunction In-
dicator Light” comes on continuously with the engine
running, a malfunction has been detected in the ESC
system. If this light remains on after several ignition
cycles, and the vehicle has been driven several miles
(kilometers) at speeds greater than 30 mph (48 km/h), see
your authorized dealer as soon as possible to have the
problem diagnosed and corrected.
4
UNDERSTANDING YOUR INSTRUMENT PANEL 297
Page 309 of 871
3. Press and release theRIGHTarrow button to access
the ”Oil Life” screen.
4. Press and release theDOWNarrow button to select
“Reset”, then press and release theRightarrow button
to select reset of the Oil Life to 100%.
5. Press and release theUparrow button to exit the EVIC
screen.
Vehicles Not Equipped With Passive Entry
1. Without pressing the brake pedal, press the ENGINE
START/STOP button and place the ignition to the
ON/RUN position (do not start the engine.)
2. Press and release theLEFTarrow then press and
release theDOWNarrow button to scroll downward
through the main menu to “Vehicle Info”.
3. Press and release theRIGHTarrow button to access
the “Vehicle Info” screen then scrollUPorDOWNto
select “Oil Life” .
4. Press and hold theRIGHTarrow button to select
“Reset”, then select “NO” or “YES” by pressing the
RIGHTarrow then press theRIGHTarrow button to
select reset of the Oil Life to 100%.
5. Press and release theUparrow button to exit the EVIC
screen.
NOTE:If the indicator message illuminates when you
start the vehicle, the Fuel Filter indicator system did not
reset. If necessary, repeat this procedure.
EVIC Messages
•Front Seatbelts Unbuckled
•Driver Seatbelt Unbuckled
•Passenger Seatbelt Unbuckled
4
UNDERSTANDING YOUR INSTRUMENT PANEL 307
Page 333 of 871

DRIVER INFORMATION DISPLAY (DID)
The Driver Information Display (DID) features a driver-
interactive display that is located in the instrument
cluster.
The DID Menu items consists of the following:
•Digital Speedometer
•Vehicle Info
•Fuel Economy Info
•Trip A
•Trip B
•Stop/Start Info (If Equipped)
•Trailer Tow
•Audio
•Stored Messages
•Screen Setup
•Vehicle Settings (Not Equipped with a Uconnect® 5.0
& 8.4 radio)
Driver Information Display (DID)
4
UNDERSTANDING YOUR INSTRUMENT PANEL 331
Page 334 of 871
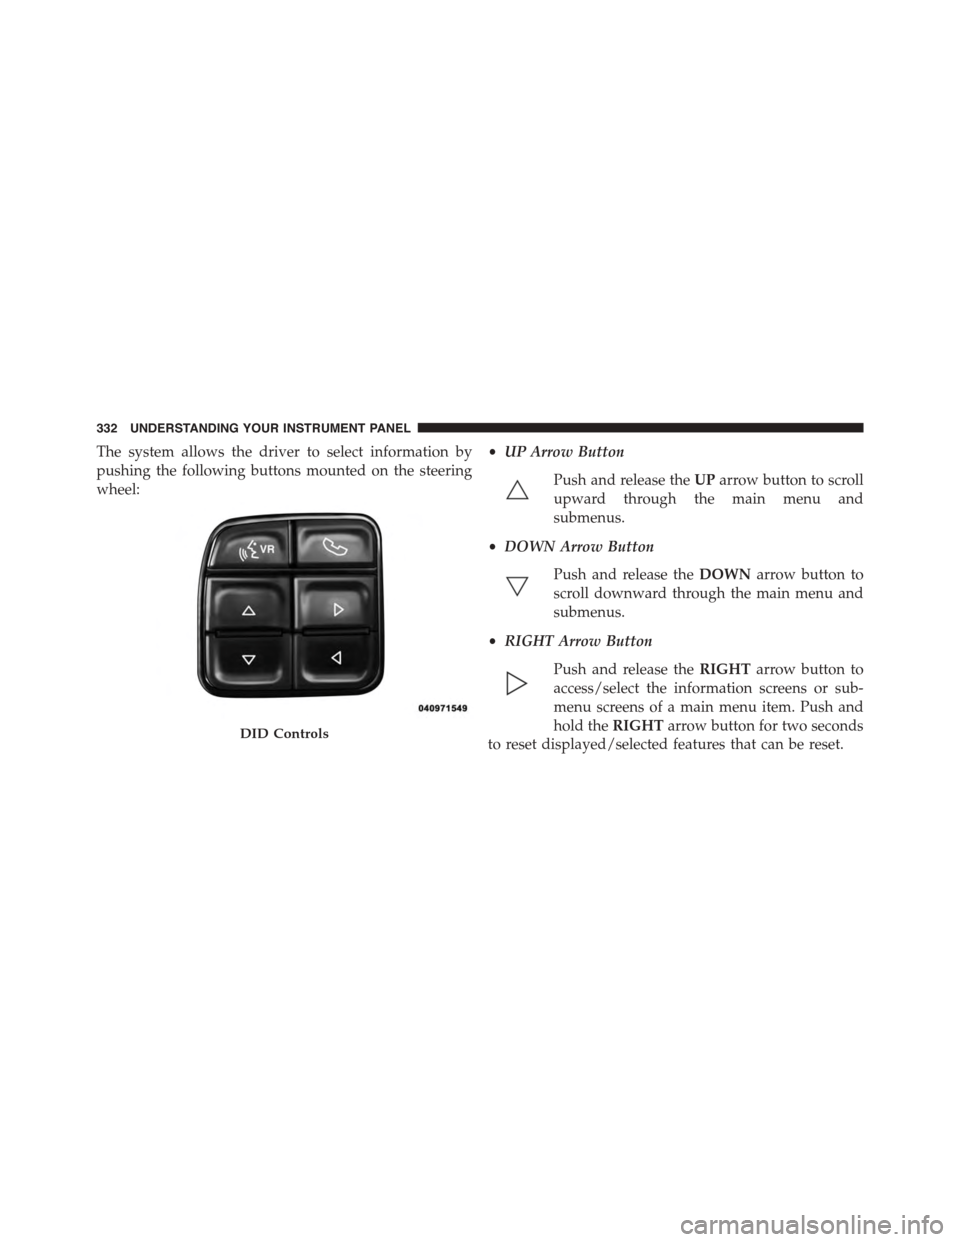
The system allows the driver to select information by
pushing the following buttons mounted on the steering
wheel:
•UP Arrow Button
Push and release theUParrow button to scroll
upward through the main menu and
submenus.
•DOWN Arrow Button
Push and release theDOWNarrow button to
scroll downward through the main menu and
submenus.
•RIGHT Arrow Button
Push and release theRIGHTarrow button to
access/select the information screens or sub-
menu screens of a main menu item. Push and
hold theRIGHTarrow button for two seconds
to reset displayed/selected features that can be reset.DID Controls
332 UNDERSTANDING YOUR INSTRUMENT PANEL