ECO mode Ram 1500 2015 Repair Manual
[x] Cancel search | Manufacturer: RAM, Model Year: 2015, Model line: 1500, Model: Ram 1500 2015Pages: 871, PDF Size: 24.83 MB
Page 657 of 871
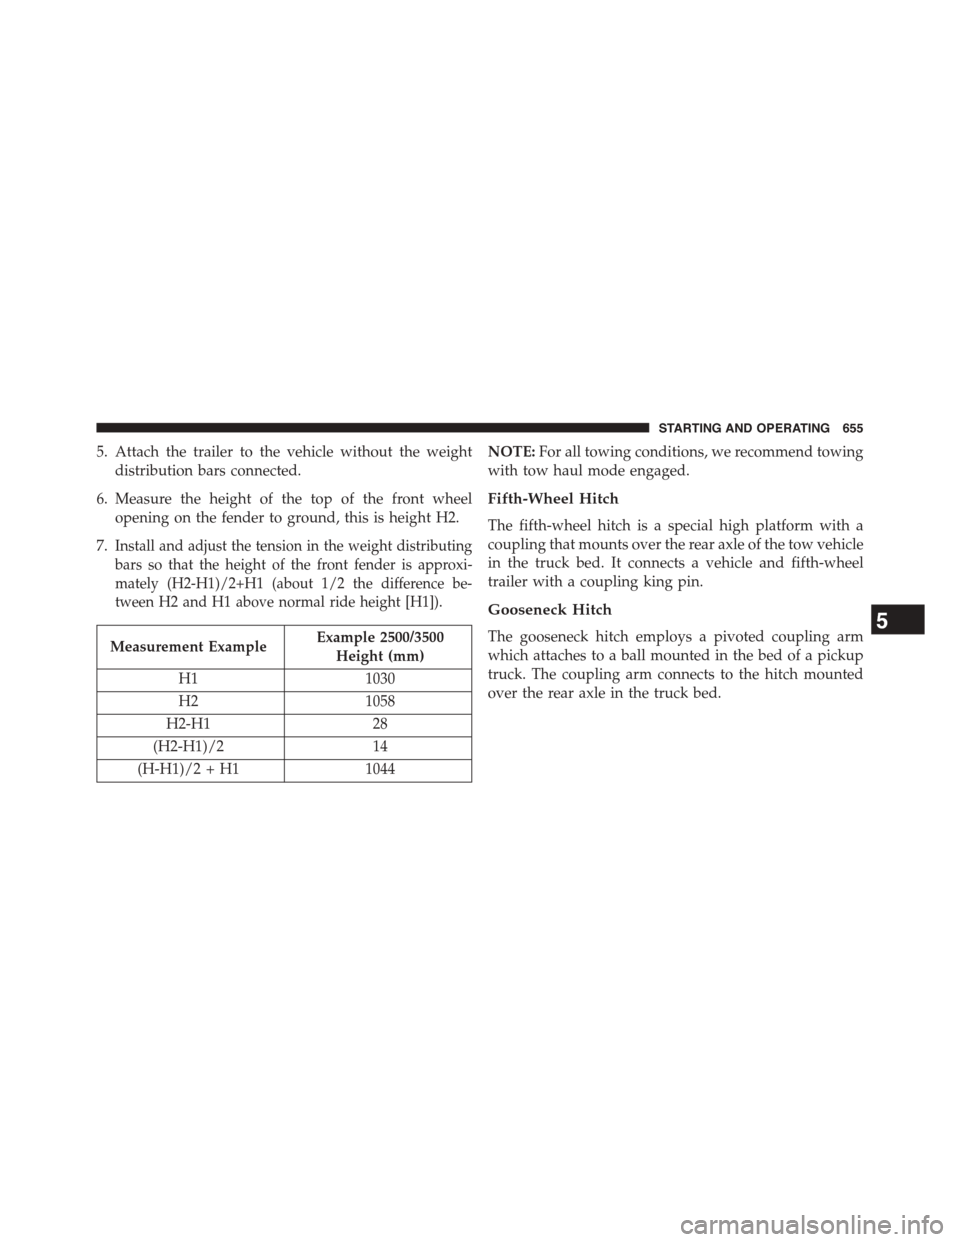
5. Attach the trailer to the vehicle without the weight
distribution bars connected.
6. Measure the height of the top of the front wheel
opening on the fender to ground, this is height H2.
7.Install and adjust the tension in the weight distributing
bars so that the height of the front fender is approxi-
mately (H2-H1)/2+H1 (about 1/2 the difference be-
tween H2 and H1 above normal ride height [H1]).
Measurement ExampleExample 2500/3500
Height (mm)
H11030
H21058
H2-H128
(H2-H1)/214
(H-H1)/2 + H11044
NOTE:For all towing conditions, we recommend towing
with tow haul mode engaged.
Fifth-Wheel Hitch
The fifth-wheel hitch is a special high platform with a
coupling that mounts over the rear axle of the tow vehicle
in the truck bed. It connects a vehicle and fifth-wheel
trailer with a coupling king pin.
Gooseneck Hitch
The gooseneck hitch employs a pivoted coupling arm
which attaches to a ball mounted in the bed of a pickup
truck. The coupling arm connects to the hitch mounted
over the rear axle in the truck bed.
5
STARTING AND OPERATING 655
Page 672 of 871
WARNING!(Continued)
Do not expect that the airbag will perform as de-
scribed earlier in this manual.
2500/3500 Models Only
Snowplow Prep Packages are available as a factory
installed option. These packages include components
necessary to equip your vehicle with a snowplow.
NOTE:Before installation of a snowplow it is highly
recommended that the owner/installer obtain and follow
the recommendations contained within the current Body
Builders Guide. See your authorized dealer, installer or
snowplow manufacturer for this information. There are
unique electrical systems that must be connected to
properly assure operator safety and prevent overloading
vehicle systems.
WARNING!
Attaching a snowplow to this vehicle could adversely
affect performance of the airbag system in a collision.
Do not expect that the airbag will perform as de-
scribed earlier in this manual.
CAUTION!
The “Lamp Out” indicator could illuminate if exte-
rior lamps are not properly installed.
Before Plowing
•Check the hydraulic system for leaks and proper fluid
level.
•Check the mounting bolts and nuts for proper tight-
ness.
670 STARTING AND OPERATING
Page 687 of 871
HAZARD WARNING FLASHERS
The Hazard Warning flasher switch is located on the
upper switch bank just below the radio.
Press the switch to turn on the Hazard Warning
flasher. When the switch is activated, all direc-
tional turn signals will flash on and off to warn oncoming
traffic of an emergency. Press the switch a second time to
turn off the Hazard Warning flashers.
This is an emergency warning system and it should not
be used when the vehicle is in motion. Use it when your
vehicle is disabled and it is creating a safety hazard for
other motorists.
When you must leave the vehicle to seek assistance, the
Hazard Warning flashers will continue to operate even
though the ignition is placed in the OFF position.
NOTE:With extended use the Hazard Warning flashers
may wear down your battery.
IF YOUR ENGINE OVERHEATS
In any of the following situations, you can reduce the
potential for overheating by taking the appropriate action.
•On the highways — slow down.
•In city traffic — while stopped, place the transmission
in NEUTRAL, but do not increase the engine idle
speed.
NOTE:There are steps that you can take to slow down
an impending overheat condition:
•If your air conditioner (A/C) is on, turn it off. The A/C
system adds heat to the engine cooling system and
turning the A/C off can help remove this heat.
•You can also turn the temperature control to maximum
heat, the mode control to floor and the blower control to
high. This allows the heater core to act as a supplement
to the radiator and aids in removing heat from the
engine cooling system.
6
WHAT TO DO IN EMERGENCIES 685
Page 729 of 871
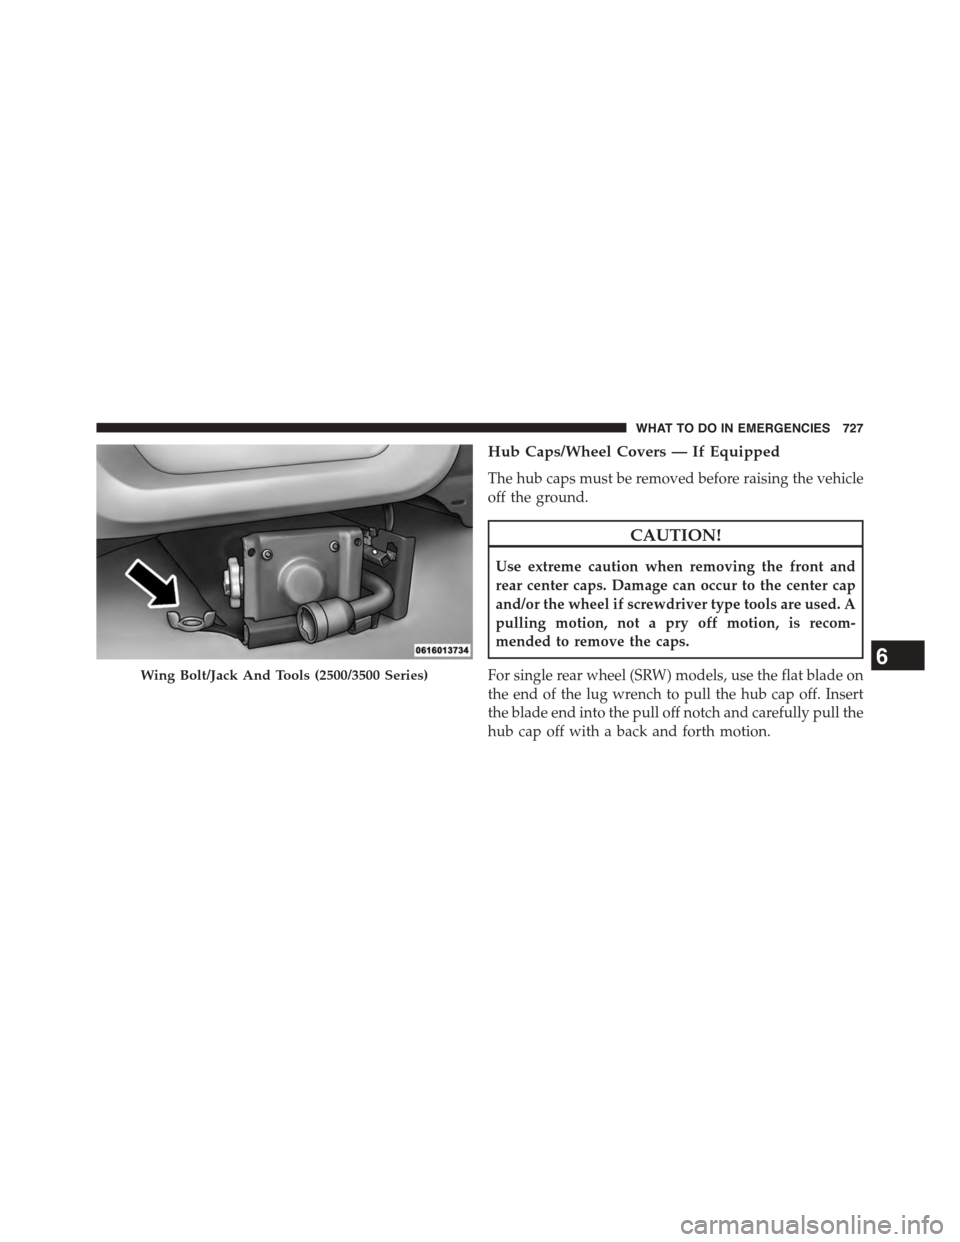
Hub Caps/Wheel Covers — If Equipped
The hub caps must be removed before raising the vehicle
off the ground.
CAUTION!
Use extreme caution when removing the front and
rear center caps. Damage can occur to the center cap
and/or the wheel if screwdriver type tools are used. A
pulling motion, not a pry off motion, is recom-
mended to remove the caps.
For single rear wheel (SRW) models, use the flat blade on
the end of the lug wrench to pull the hub cap off. Insert
the blade end into the pull off notch and carefully pull the
hub cap off with a back and forth motion.
Wing Bolt/Jack And Tools (2500/3500 Series)6
WHAT TO DO IN EMERGENCIES 727
Page 736 of 871
FREEING A STUCK VEHICLE
If your vehicle becomes stuck in mud, sand, or snow, it
can often be moved using a rocking motion. Turn the
steering wheel right and left to clear the area around the
front wheels. Then shift back and forth between DRIVE
and REVERSE (with automatic transmission) or 2nd gear
and REVERSE (with manual transmission), while gently
pressing the accelerator. Use the least amount of accel-
erator pedal pressure that will maintain the rocking
motion, without spinning the wheels or racing the en-
gine.
NOTE:For trucks equipped with 8-speed automatic
transmission: Shifts between DRIVE and REVERSE can
only be achieved at wheel speeds of 5 mph (8 km/h) or
less. Whenever the transmission remains in NEUTRAL
for more than two seconds, you must press the brake
pedal to engage DRIVE or REVERSE.
CAUTION!
Racing the engine or spinning the wheels may lead to
transmission overheating and failure. Allow the en-
gine to idle with the transmission in NEUTRAL for at
least one minute after every five rocking-motion
cycles. This will minimize overheating and reduce
the risk of transmission failure during prolonged
efforts to free a stuck vehicle.
NOTE:Press the#ESC Off#switch, to place the Electronic
Stability Control (ESC) system in#Partial Off#mode,
before rocking the vehicle. Refer to “Electronic Brake
Control” in “Starting And Operating” for further infor-
mation. Once the vehicle has been freed, press the#ESC
Off#switch again to restore#ESC On#mode.
734 WHAT TO DO IN EMERGENCIES
Page 744 of 871
If you must use the accessories (wipers, defrosters, etc.)
while being towed, the ignition must be in the ON/RUN
position, not the ACC position.
If the key fob is unavailable or the vehicle’s battery is
discharged, refer to ”Manual Park Release” or “Shift
Lever Override” in this section for instructions on shift-
ing the automatic transmission out of PARK for towing.
CAUTION!
•Do not use sling type equipment when towing.
Vehicle damage may occur.
•When securing the vehicle to a flat bed truck, do
not attach to front or rear suspension components.
Damage to your vehicle may result from improper
towing.
Two-Wheel Drive Models
The manufacturer recommends towing your vehicle with
all four wheelsOFFthe ground using a flatbed.
If flatbed equipment is not available, and the transmis-
sion is operable, this vehicle may be towed (with rear
wheels on the ground) under the following conditions:
•The transmission must be in NEUTRAL.
•The towing speed must not exceed 30 mph (48 km/h).
•The towing distance must not exceed 15 miles (24 km)
for 6-speed transmission, or 30 miles (48 km) for
8-speed transmission.
If the transmission is not operable, or the vehicle must be
towed faster than 30 mph (48 km/h) or farther than 15
miles (24 km) for 6-speed transmission, or 30 miles
(48 km) for 8-speed transmission, tow with the rear
wheelsOFFthe ground. Acceptable methods are to tow
the vehicle on a flatbed, or with the front wheels raised
742 WHAT TO DO IN EMERGENCIES
Page 745 of 871
and the rear wheels on a towing dolly, or (when using a
suitable steering wheel stabilizer to hold the front wheels
in the straight position) with the rear wheels raised and
the front wheels on the ground.
CAUTION!
Towing this vehicle in violation of the above require-
ments can cause severe engine and/or transmission
damage. Damage from improper towing is not cov-
ered under the New Vehicle Limited Warranty.
Four-Wheel Drive Models
The manufacturer recommends towing with all wheels
OFFthe ground. Acceptable methods are to tow the
vehicle on a flatbed or with one end of vehicle raised and
the opposite end on a towing dolly.
If flatbed equipment is not available, and the transfer
case is operable, the vehicle may be towed (in the
forward direction, withALLwheels on the ground),IF
the transfer case is in NEUTRAL (N) and the transmis-
sion is inPARK(for automatic transmissions) or in gear
(NOT in NEUTRAL, for manual transmissions). Refer to
“Recreational Towing” in “Starting And Operating” for
further information and detailed instructions.
CAUTION!
•Front or rear wheel lifts must not be used. Internal
damage to the transmission or transfer case will
occur if a front or rear wheel lift is used when
towing.
•Towing this vehicle in violation of the above re-
quirements can cause severe transmission and/or
transfer case damage. Damage from improper tow-
ing is not covered under the New Vehicle Limited
Warranty.
6
WHAT TO DO IN EMERGENCIES 743
Page 758 of 871
Change Engine Oil
The oil change indicator system will remind you that it is
time to take your vehicle in for scheduled maintenance.
Refer to the “Maintenance Schedule” for further informa-
tion.
NOTE: 1500 Models Only
•Under no circumstances should oil change intervals
exceed 10,000 miles (16,000 km) or twelve months on
1500 trucks, whichever comes first.
2500 – 3500 Models
•Under no circumstances should oil change intervals
exceed 8,000 miles (13,000 km) or twelve months on
2500 – 3500 trucks, whichever comes first.
Engine Oil Selection
For best performance and maximum protection under all
types of operating conditions, the manufacturer only
recommends engine oils that are API Certified and meet
the requirements of Chrysler Material Standard MS-6395.
American Petroleum Institute (API) Engine Oil
Identification Symbol
This symbol means that the oil has
been certified by the American
Petroleum Institute (API). The
manufacturer only recommends
API Certified engine oils.
756 MAINTAINING YOUR VEHICLE
Page 759 of 871
CAUTION!
Do not use chemical flushes in your engine oil as the
chemicals can damage your engine. Such damage is
not covered by the New Vehicle Limited Warranty.
Engine Oil Viscosity — 3.6L Engines (1500 Models
Only)
MOPAR® SAE 5W-20 engine oil approved to Chrysler
Material Standard MS-6395 or equivalent Pennzoil® or
Shell Helix® is recommended for all operating tempera-
tures. This engine oil improves low temperature starting
and vehicle fuel economy.
The engine oil filler cap also shows the recommended
engine oil viscosity for your vehicle. For information on
engine oil filler cap location, refer to “Engine Compart-
ment” in “Maintaining Your Vehicle” for further informa-
tion.
NOTE:MOPAR® SAE 5W-30 engine oil approved to
Chrysler Material Standard MS-6395 may be used when
SAE 5W-20 engine oil meeting MS-6395 is not available.
Engine Oil Viscosity — 5.7L Engine (1500/2500/3500
Models)
MOPAR SAE 5W-20 engine oil or equivalent Pennzoil®
or Shell Helix® is recommended for all operating tem-
peratures. This engine oil improves low temperature
starting and vehicle fuel economy. The engine oil filler
cap also shows the recommended engine oil viscosity for
your engine. For information on engine oil filler cap
location, refer to “Engine Compartment” in “Maintaining
Your Vehicle” for further information.
NOTE:
•Lubricants which do not have both the engine oil
certification mark and the correct SAE viscosity grade
number should not be used.
7
MAINTAINING YOUR VEHICLE 757
Page 765 of 871
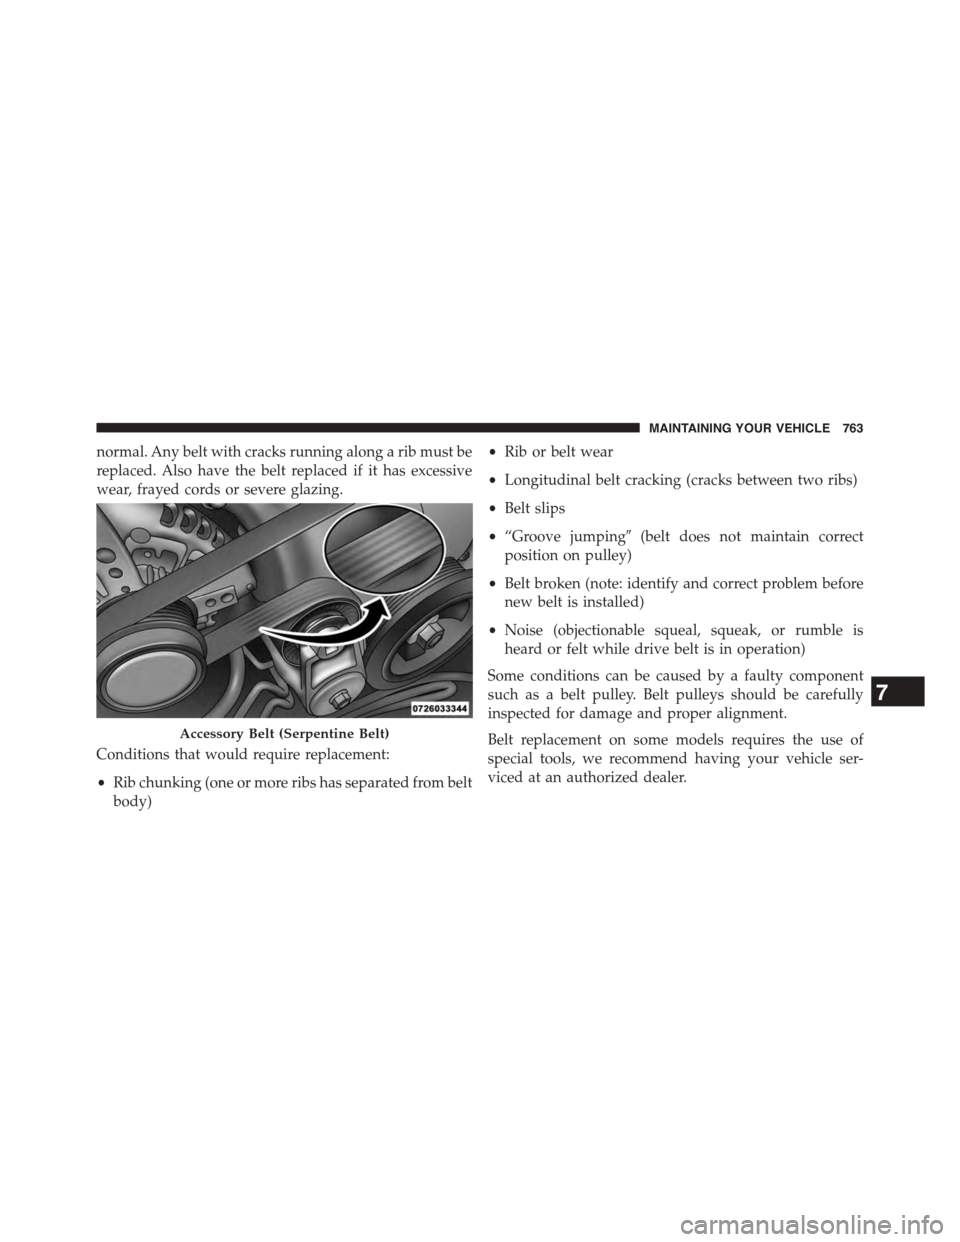
normal. Any belt with cracks running along a rib must be
replaced. Also have the belt replaced if it has excessive
wear, frayed cords or severe glazing.
Conditions that would require replacement:
•Rib chunking (one or more ribs has separated from belt
body)
•Rib or belt wear
•Longitudinal belt cracking (cracks between two ribs)
•Belt slips
•“Groove jumping#(belt does not maintain correct
position on pulley)
•Belt broken (note: identify and correct problem before
new belt is installed)
•Noise (objectionable squeal, squeak, or rumble is
heard or felt while drive belt is in operation)
Some conditions can be caused by a faulty component
such as a belt pulley. Belt pulleys should be carefully
inspected for damage and proper alignment.
Belt replacement on some models requires the use of
special tools, we recommend having your vehicle ser-
viced at an authorized dealer.
Accessory Belt (Serpentine Belt)
7
MAINTAINING YOUR VEHICLE 763