System settings Ram 1500 2016 User Guide
[x] Cancel search | Manufacturer: RAM, Model Year: 2016, Model line: 1500, Model: Ram 1500 2016Pages: 916, PDF Size: 7.55 MB
Page 189 of 916
NOTE:The mist feature does not activate the washer
pump; therefore, no washer fluid will be sprayed on the
windshield. The wash function must be used in order to
spray the windshield with washer fluid.
Rain Sensing Wipers — If Equipped
This feature senses moisture on the windshield and
automatically activates the wipers for the driver. The
feature is especially useful for road splash or overspray
from the windshield washers of the vehicle ahead. Rotate
the end of the multifunction lever to one of five settings
to activate this feature.
NOTE:If your vehicle is equipped with a touchscreen,
this feature can be programmed through the Uconnect
system. Refer to “Uconnect Settings” in “Understanding
Your Instrument Panel” for further information.If your vehicle is not equipped with a touchscreen, this
feature can be programmed through the Electronic Ve-
hicle Information Center (EVIC) or Driver Information
Display (DID). Refer to “Electronic Vehicle Information
Center (EVIC)” or “Driver Information Display (DID)” in
“Understanding Your Instrument Panel” for further in-
formation.
The sensitivity of the system can be adjusted with the
multifunction lever. Wiper delay position 1 is the least
sensitive, and wiper delay position 5 is the most sensi-
tive. Setting 3 should be used for normal rain conditions.
Settings 1 and 2 can be used if the driver desires less
wiper sensitivity. Setting 4 and 5 can be used if the driver
desires more sensitivity. Place the wiper switch in the
OFF position when not using the system.
3
UNDERSTANDING THE FEATURES OF YOUR VEHICLE 187
Page 197 of 916
The drivers preferred units can be selected through the
instrument panel settings if equipped. Refer to “Under-
standing Your Instrument Panel” for more information.
The speed increment shown is dependant on the chosen
speed unit of U.S. (mph) or Metric (km/h):
To Decrease Speed
When the Electronic Speed Control is set, you can de-
crease speed by pushing the SET (-) button.
The drivers preferred units can be selected through the
instrument panel settings if equipped. Refer to “Under-
standing Your Instrument Panel” for more information.
The speed increment shown is dependant on the chosen
speed unit of U.S. (mph) or Metric (km/h):
To Accelerate For Passing
Press the accelerator as you would normally. When the
pedal is released, the vehicle will return to the set speed.
Using Electronic Speed Control On Hills
The transmission may downshift on hills to maintain the
vehicle set speed.
NOTE:The Electronic Speed Control system maintains
speed up and down hills. A slight speed change on
moderate hills is normal.
On steep hills, a greater speed loss or gain may occur so it
may be preferable to drive without Electronic Speed Control.
WARNING!
Electronic Speed Control can be dangerous where the
system cannot maintain a constant speed. Your ve-
hicle could go too fast for the conditions, and you
could lose control and have an accident. Do not use
Electronic Speed Control in heavy traffic or on roads
that are winding, icy, snow-covered or slippery.
3
UNDERSTANDING THE FEATURES OF YOUR VEHICLE 195
Page 199 of 916

Information Center (EVIC) or Driver Information Display
(DID) Settings” in Understanding Your Instrument
Panel” for further information.
The ParkSense Warning screen will only be displayed if
Sound and Display is selected.
NOTE:If your vehicle is equipped with a touchscreen,
this feature can be programmed through the Uconnect
system. Refer to “Uconnect Settings” in “Understanding
Your Instrument Panel” for further information.
If your vehicle is not equipped with a touchscreen, this
feature can be programmed through the Electronic Ve-
hicle Information Center (EVIC) or Driver Information
Display (DID). Refer to “Electronic Vehicle Information
Center (EVIC) or Driver Information Display (DID)” in
“Understanding Your Instrument Panel” for further in-
formation.ParkSense Display
When the vehicle is in REVERSE, the warning display
will turn ON indicating the system status.
The system will indicate a detected obstacle by showing
a single arc in the left and/or right rear regions based on
the object’s distance and location relative to the vehicle.
If an object is detected in the left and/or right rear region,
the display will show a single solid arc in the left and/or
right rear region and the system will produce a tone. As
the vehicle moves closer to the object, the display will
show the single arc moving closer to the vehicle and the
tone will change from a single 1/2 second tone to slow, to
fast, to continuous.
3
UNDERSTANDING THE FEATURES OF YOUR VEHICLE 197
Page 203 of 916
Adjustable Chime Volume Settings
The Rear chime volume settings are programmable.
•If your vehicle is equipped with a touchscreen, the
settings may be programmed through the Uconnect
System. Refer to “Uconnect Settings ” in “Understand-
ing Your Instrument Panel” for further information.
•If your vehicle is not equipped with a touchscreen, the
settings may be programmed through the Electronic
Vehicle Information Center (EVIC) or Driver Informa-
tion Display (DID). Refer to “Electronic Vehicle Infor-
mation Center (EVIC)” or “Driver Information Display
(DID)” in “Understanding Your Instrument Panel” for
further information.Enabling And Disabling ParkSense
ParkSense can be enabled and disabled with the
ParkSense switch.
When the ParkSense switch is pushed to dis-
able the system, the instrument cluster will
display the “PARKSENSE OFF” message for
approximately five seconds. Refer to “Elec-
tronic Vehicle Information Center (EVIC) or Driver Infor-
mation Display (DID)” in “Understanding Your Instru-
ment Panel” for further information. When the shift lever
is moved to REVERSE and the system is disabled, the
EVIC/DID will display the “PARKSENSE OFF” message
for as long as the vehicle is in REVERSE.
NOTE:The ParkSense system will automatically disable
when the system detects that a trailer with trailer brakes
has been connected to the Integrated Trailer Brake Mod-
ule. The EVIC/DID will display “PARKSENSE OFF”
message for as long as the vehicle is in reverse.
3
UNDERSTANDING THE FEATURES OF YOUR VEHICLE 201
Page 208 of 916

ParkSense Sensors
The four ParkSense sensors, located in the rear fascia/
bumper, monitor the area behind the vehicle that is
within the sensors’ field of view. The sensors can detect
obstacles from approximately 18 in (45 cm) up to 79 in
(200 cm) from the rear fascia/bumper in the horizontal
direction, depending on the location, type and orienta-
tion of the obstacle.
The six ParkSense sensors, located in the front fascia/
bumper, monitor the area in front of the vehicle that is
within the sensors’ field of view. The sensors can detect
obstacles from approximately 12 in (30 cm) up to 47 in
(120 cm) from the front fascia/bumper in the horizontal
direction, depending on the location, type and orienta-
tion of the obstacle.
ParkSense Warning Display
The ParkSense Warning screen is located within the
Electronic Vehicle Information Center (EVIC) or Driver
Information Display (DID). It provides visual warnings
to indicate the distance between the rear fascia/bumper
and/or front fascia/bumper and the detected obstacle.
Refer to “Electronic Vehicle Information Center (EVIC) or
Driver Information Display (DID) Settings” in Under-
standing Your Instrument Panel” for further information.
The ParkSense Warning screen will only be displayed if
Sound and Display is selected.
NOTE:If your vehicle is equipped with a touchscreen,
this feature can be programmed through the Uconnect
system. Refer to “Uconnect Settings” in “Understanding
Your Instrument Panel” for further information.
206 UNDERSTANDING THE FEATURES OF YOUR VEHICLE
Page 211 of 916
Front Park Assist Audible Alerts
ParkSense will turn off the Front Park Assist audible alert
(chime) after approximately three seconds when an ob-
stacle has been detected, the vehicle is stationary, and
brake pedal is applied.
Adjustable Chime Volume Settings
The Front and Rear chime volume settings are program-
mable.
•If your vehicle is equipped with a touchscreen, the
settings may be programmed through the Uconnect
System. Refer to “Uconnect Settings ” in “Understand-
ing Your Instrument Panel” for further information.
•If your vehicle is not equipped with a touchscreen, the
settings may be programmed through the ElectronicVehicle Information Center (EVIC) or Driver Informa-
tion Display (DID). Refer to “Electronic Vehicle Infor-
mation Center (EVIC)” or “Driver Information Display
(DID)” in “Understanding Your Instrument Panel” for
further information.
Enabling And Disabling Front And/Or Rear
ParkSense
Front ParkSense can be enabled and disabled with the
Front ParkSense switch.
Rear ParkSense can be enabled and disabled with the
Rear ParkSense switch.
When the Front or Rear ParkSense switch is
pushed to disable the system, the Electronic
Vehicle Information Center (EVIC) or Driver
Information Display (DID) will display the
“PARKSENSE OFF” message for approximately five sec-
onds. Refer to “Electronic Vehicle Information Center
3
UNDERSTANDING THE FEATURES OF YOUR VEHICLE 209
Page 234 of 916
Ignition Off Operation
The power sunroof switch will remain active for up to
approximately ten minutes after the ignition switch is
turned to the LOCK position. Opening either front door
will cancel this feature.
NOTE:Ignition Off time is programmable through the
Uconnect System. Refer to “Uconnect Settings/Customer
Programmable Features” in “Understanding Your Instru-
ment Panel” for further information.
ELECTRICAL POWER OUTLETS
The auxiliary 12 Volt (13 Amp) power outlets can provide
power for in-cab accessories designed for use with the
standard “cigar lighter” plug. The 12 Volt power outlets
and USB Port (Charge Only) have a cap attached to the
outlet indicating “12V DC,” together with either a key
symbol, battery symbol, or USB symbol.
A key symbol indicates that the key must be in the
ON/RUN or ACC positions for the outlet to provide
power. The battery symbol indicates that the outlet is
connected to the battery, and can provide power at all
times.
NOTE:To ensure proper operation, a MOPAR knob and
element must be used.
232 UNDERSTANDING THE FEATURES OF YOUR VEHICLE
Page 378 of 916
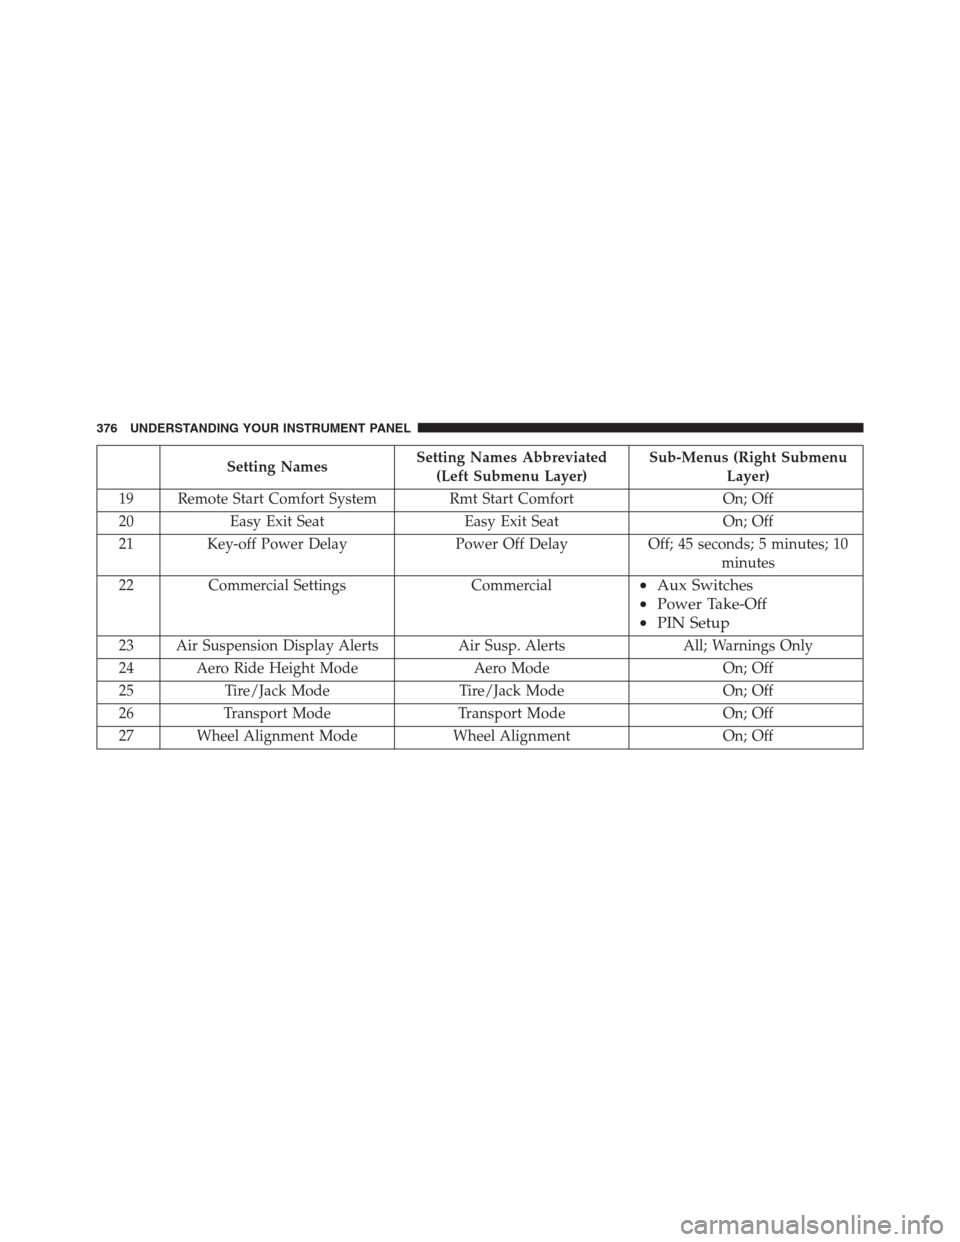
Setting NamesSetting Names Abbreviated
(Left Submenu Layer)Sub-Menus (Right Submenu
Layer)
19 Remote Start Comfort System Rmt Start Comfort On; Off
20 Easy Exit Seat Easy Exit Seat On; Off
21 Key-off Power Delay Power Off Delay Off; 45 seconds; 5 minutes; 10
minutes
22 Commercial Settings Commercial
•Aux Switches
•Power Take-Off
•PIN Setup
23 Air Suspension Display Alerts Air Susp. Alerts All; Warnings Only
24 Aero Ride Height Mode Aero Mode On; Off
25 Tire/Jack Mode Tire/Jack Mode On; Off
26 Transport Mode Transport Mode On; Off
27 Wheel Alignment Mode Wheel Alignment On; Off
376 UNDERSTANDING YOUR INSTRUMENT PANEL
Page 381 of 916
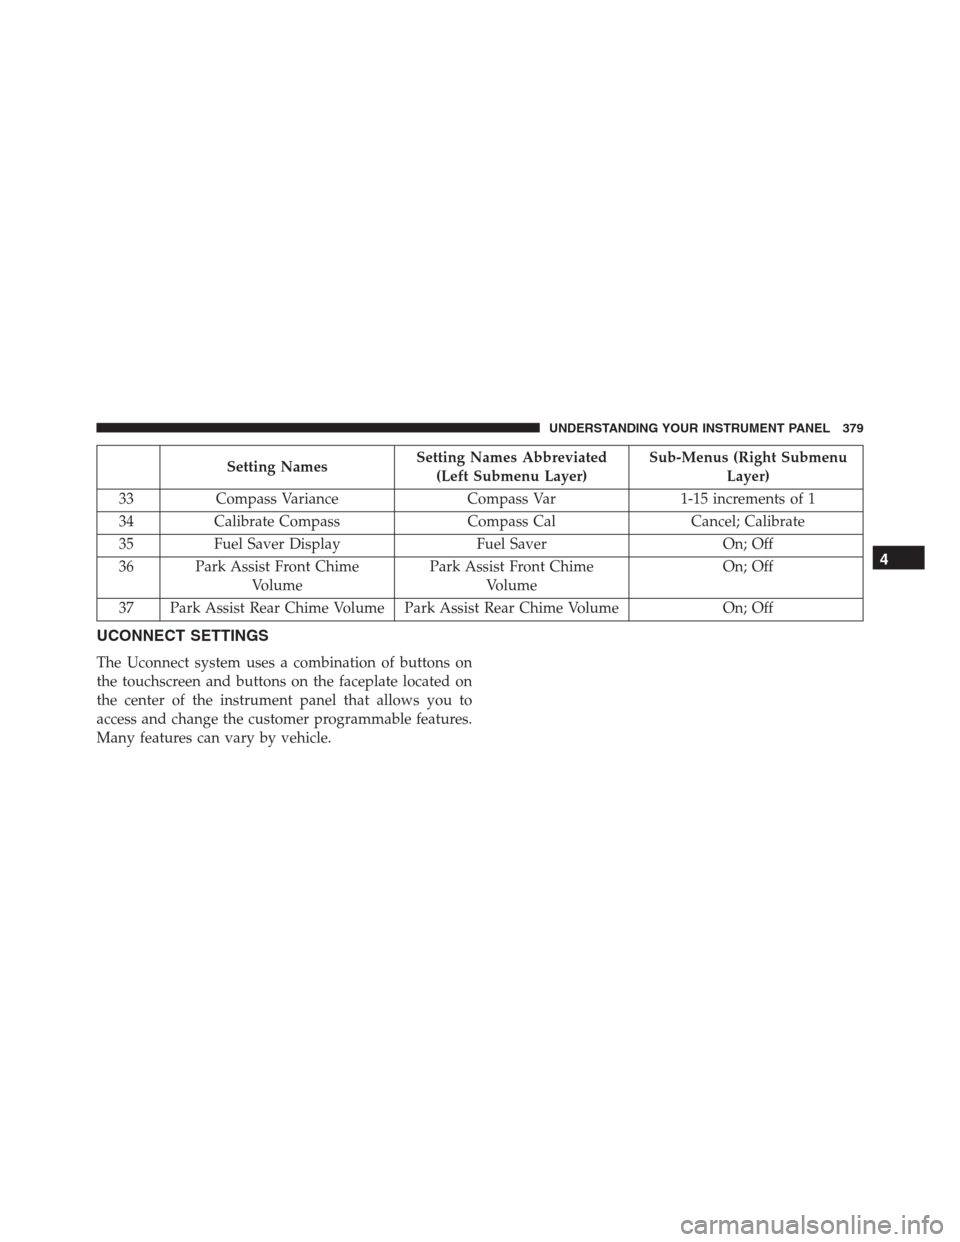
Setting NamesSetting Names Abbreviated
(Left Submenu Layer)Sub-Menus (Right Submenu
Layer)
33 Compass Variance Compass Var 1-15 increments of 1
34 Calibrate Compass Compass Cal Cancel; Calibrate
35 Fuel Saver Display Fuel Saver On; Off
36 Park Assist Front Chime
VolumePark Assist Front Chime
VolumeOn; Off
37 Park Assist Rear Chime Volume Park Assist Rear Chime Volume On; Off
UCONNECT SETTINGS
The Uconnect system uses a combination of buttons on
the touchscreen and buttons on the faceplate located on
the center of the instrument panel that allows you to
access and change the customer programmable features.
Many features can vary by vehicle.
4
UNDERSTANDING YOUR INSTRUMENT PANEL 379
Page 383 of 916
Buttons On The Faceplate
Buttons on the faceplate are located below the Uconnect
system in the center of the instrument panel. In addition,
there is a Scroll/Enter control knob located on the right
side of the Climate Controls in the center of the instru-
ment panel. Turn the control knob to scroll through
menus and change settings (i.e., 30, 60, 90), push the
center of the control knob one or more times to select or
change a setting (i.e., ON, OFF).
Your Uconnect system may also have Screen Off and
Back buttons located below the Uconnect system.
Push the Screen Off button to turn off the Uconnect
touchscreen. Push the Screen Off button a second time to
turn the touchscreen on.
Push the Back button to exit out of a Menu or certain
option on the Uconnect system.
Buttons On The Touchscreen
Buttons on the touchscreen are accessible on the
Uconnect display.
Customer Programmable Features — Uconnect
5.0 Personal Settings
Push the MORE or SETTINGS button on the faceplate,
then press the “Settings” button on the touchscreen (if
equipped) to display the settings menu screen. In this
mode the Uconnect system allows you to access pro-
grammable features that may be equipped such as Dis-
play, Units, Voice, Clock, Safety & Driving Assistance,
Lights, Doors & Locks, Auto-On Comfort (if equipped),
Engine Off Options, Suspension, Trailer Brake, Audio,
Compass Settings, Phone/Bluetooth, SiriusXM Setup (if
equipped), Restore Settings, Clear Personal Data and
System Information.
NOTE:Only one category may be selected at a time.4
UNDERSTANDING YOUR INSTRUMENT PANEL 381