AIR Ram 1500 2017 Owner's Manual
[x] Cancel search | Manufacturer: RAM, Model Year: 2017, Model line: 1500, Model: Ram 1500 2017Pages: 734, PDF Size: 7.3 MB
Page 676 of 734
Special Care
•If you drive on salted or dusty roads, or if you drive near
the ocean, hose off the undercarriage at least once a
month.
• It is important that the drain holes in the lower edges of
the doors, rocker panels, and trunk be kept clear and
open.
• If you detect any stone chips or scratches in the paint,
touch them up immediately. The cost of such repairs is
considered the responsibility of the owner.
• If your vehicle is damaged due to a collision or similar
cause that destroys the paint and protective coating,
have your vehicle repaired as soon as possible. The cost
of such repairs is considered the responsibility of the
owner.
• If you carry special cargo such as chemicals, fertilizers,
de-icer salt, etc., be sure that such materials are well
packaged and sealed.
• If a lot of driving is done on gravel roads, consider mud
or stone shields behind each wheel.
• Use MOPAR Touch Up Paint on scratches as soon as
possible. Your authorized dealer has touch up paint to
match the color of your vehicle.
Wheel And Wheel Trim Care
All wheels and wheel trim, especially aluminum and
chrome plated wheels, should be cleaned regularly using
mild (neutral Ph) soap and water to maintain their luster
and to prevent corrosion. Wash wheels with the same soap
solution recommended for the body of the vehicle.
Your wheels are susceptible to deterioration caused by salt,
sodium chloride, magnesium chloride, calcium chloride,
etc., and other road chemicals used to melt ice or control
dust on dirt roads. Use a soft cloth or sponge and mild soap
to wipe away promptly. Do not use harsh chemicals or a
stiff brush. They can damage the wheel’s protective coating
that helps keep them from corroding and tarnishing.
NOTE: Many aftermarket wheel cleaners contain strong
acids or strong alkaline additives that can harm the wheel
surface.
CAUTION!
Avoid products or automatic car washes that use acidic
solutions or strong alkaline additives or harsh brushes.
These products and automatic car washes may damage
(Continued)
674 MAINTAINING YOUR VEHICLE
Page 678 of 734
•For tough stains, apply MOPAR Total Clean, or a mild
soap solution to a clean, damp cloth and remove stain.
Use a fresh, damp towel to remove soap residue.
• For grease stains, apply MOPAR Multi-Purpose Cleaner
to a clean, damp cloth and remove stain. Use a fresh,
damp towel to remove soap residue.
• Do not use any harsh solvents or any other form of
protectants on Stain Repel products.
Interior Care
Use MOPAR Total Clean to clean fabric upholstery and
carpeting.
Use MOPAR Total Clean to clean vinyl upholstery.
MOPAR Total Clean is specifically recommended for
leather upholstery.
Your leather upholstery can be best preserved by regular
cleaning with a damp soft cloth. Small particles of dirt can
act as an abrasive and damage the leather upholstery and
should be removed promptly with a damp cloth. Stubborn
soils can be removed easily with a soft cloth and MOPAR
Total Clean. Care should be taken to avoid soaking your
leather upholstery with any liquid. Please do not use
polishes, oils, cleaning fluids, solvents, detergents, or ammonia-based cleaners to clean your leather upholstery.
Application of a leather conditioner is not required to
maintain the original condition.
WARNING!
Do not use volatile solvents for cleaning purposes.
Many are potentially flammable, and if used in closed
areas they may cause respiratory harm.
CAUTION!
Direct contact of air fresheners, insect repellents, sun-
tan lotions, or hand sanitizers to the plastic, painted, or
decorated surfaces of the interior may cause permanent
damage. Wipe away immediately.
CAUTION!
Damage caused by these type of products may not be
covered by your New Vehicle Limited Warranty.
676 MAINTAINING YOUR VEHICLE
Page 681 of 734

WARNING!
Do not use silicon-based protection products to clean
your bedliner. Silicon-based products can become slip-
pery and may result in personal injury.
Spray-On Bedliners are chemically-resistant to many dif-
ferent types of chemicals (including gasoline, oil, hydraulic
fluids) for short periods of time. If a spill occurs on your
Spray-On Bedliner, rinse the truck out as soon as possible
to avoid permanent damage.
Repairing The Spray-On Bedliner
While extremely tough, it is possible to damage a Spray-On
Bedliner. One common condition is when loading a heavy
pallet and dragging that pallet across the floor of the bed.
If a nail or sharp point is exposed under the weight of the
pallet a scratch or tear is possible. While not covered by
your new vehicle warranty, a cosmetic fix to cover the
metal exposed by the scratch is required. To repair a tear or
gouge, follow the directions provided in the MOPAR Quick
Repair Kit.
FUSES
WARNING!
• When replacing a blown fuse, always use an appro-
priate replacement fuse with the same amp rating as
the original fuse. Never replace a fuse with another
fuse of higher amp rating. Never replace a blown
fuse with metal wires or any other material. Failure
to use proper fuses may result in serious personal
injury, fire and/or property damage.
• Before replacing a fuse, make sure that the ignition is
off and that all the other services are switched off
and/or disengaged.
• If the replaced fuse blows again, contact an autho-
rized dealer.
• If a general protection fuse for safety systems (air
bag system, braking system), power unit systems
(engine system, gearbox system) or steering system
blows, contact an authorized dealer.
7
MAINTAINING YOUR VEHICLE 679
Page 683 of 734
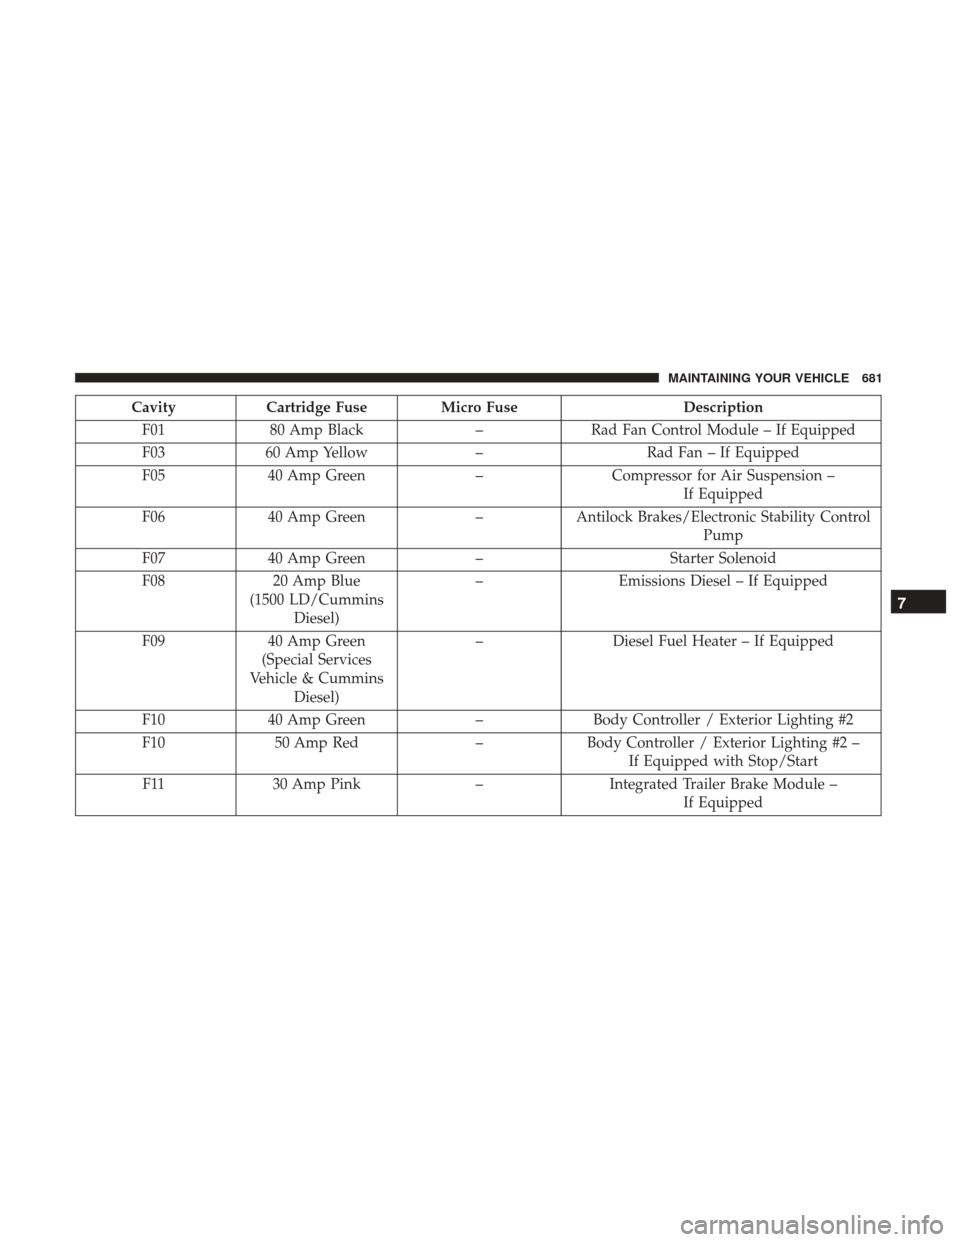
CavityCartridge Fuse Micro Fuse Description
F01 80 Amp Black –Rad Fan Control Module – If Equipped
F03 60 Amp Yellow –Rad Fan – If Equipped
F05 40 Amp Green –Compressor for Air Suspension –
If Equipped
F06 40 Amp Green –Antilock Brakes/Electronic Stability Control
Pump
F07 40 Amp Green –Starter Solenoid
F08 20 Amp Blue
(1500 LD/Cummins Diesel) –
Emissions Diesel – If Equipped
F09 40 Amp Green
(Special Services
Vehicle & Cummins Diesel) –
Diesel Fuel Heater – If Equipped
F10 40 Amp Green –Body Controller / Exterior Lighting #2
F10 50 Amp Red –Body Controller / Exterior Lighting #2 –
If Equipped with Stop/Start
F11 30 Amp Pink –Integrated Trailer Brake Module –
If Equipped
7
MAINTAINING YOUR VEHICLE 681
Page 686 of 734

CavityCartridge Fuse Micro Fuse Description
F46 –10 Amp Red Upfitter – If Equipped
F49 –10 Amp Red Instrument Panel Cluster
(Except Fleet Vehicles)
F50 –20 Amp Yellow Air Suspension Control Module –
If Equipped
F51 –10 Amp Red Ignition Node Module / Keyless Ignition
(Instrument Panel Cluster –Fleet Vehicles Only)
F52 –5 Amp Tan Battery Sensor
F53 –20 Amp Yellow Trailer Tow – Left Turn/Stop Lights
F54 –20 Amp Yellow Adjustable Pedals
F56 –15 Amp Blue Additional Diesel Content – If Equipped
F57 –20 Amp Yellow Transmission
F58 –20 Amp Yellow Spare Fuse
F59 –10 Amp Red SCR Relay – If Equipped
F60 –15 Amp Blue Underhood Lamp
F61 –10 Amp Red (1500
LD Diesel &
Cummins Diesel) PM Sensor – If Equipped
684 MAINTAINING YOUR VEHICLE
Page 687 of 734
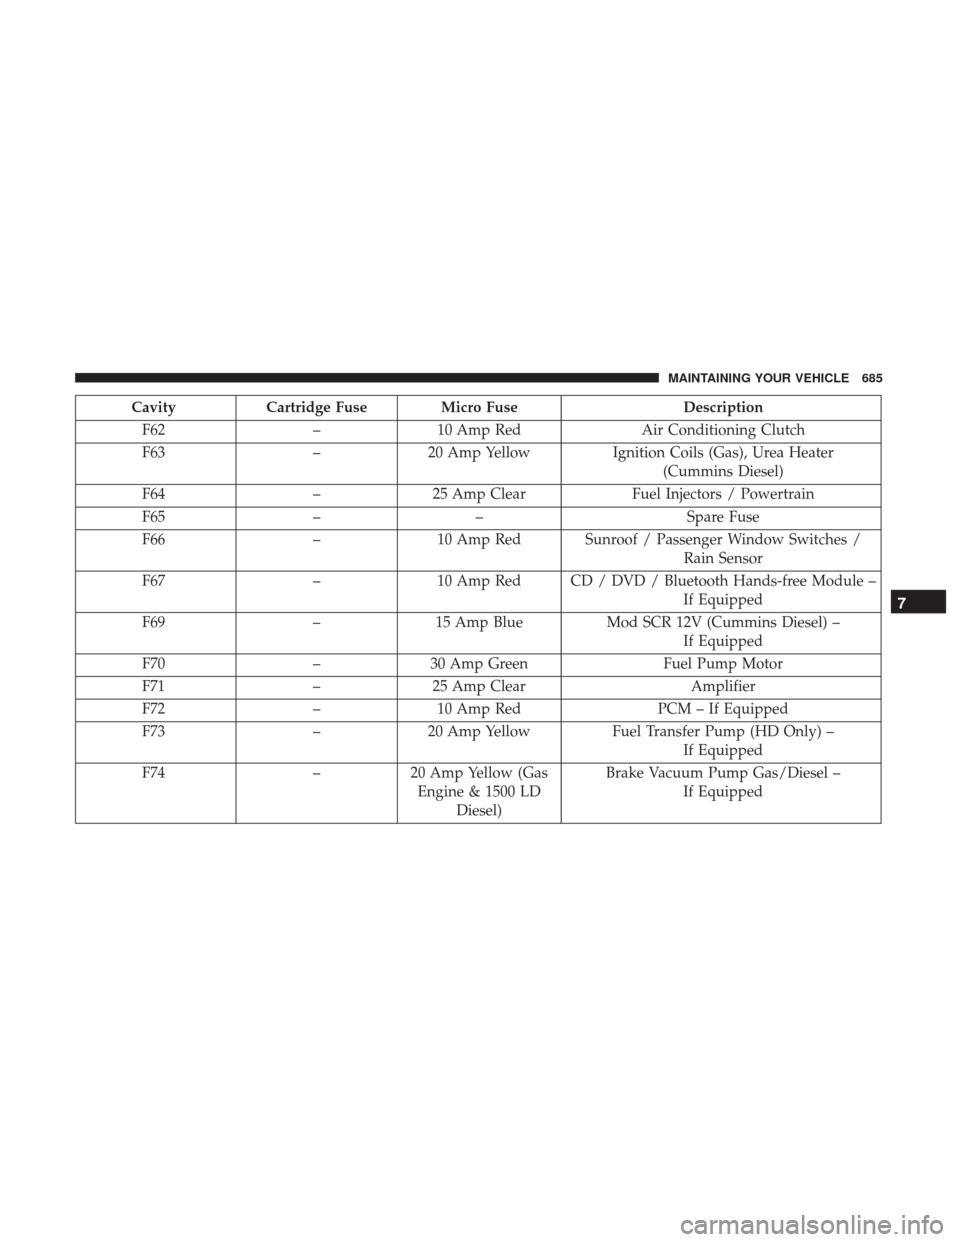
CavityCartridge Fuse Micro Fuse Description
F62 –10 Amp Red Air Conditioning Clutch
F63 –20 Amp Yellow Ignition Coils (Gas), Urea Heater
(Cummins Diesel)
F64 –25 Amp Clear Fuel Injectors / Powertrain
F65 –– Spare Fuse
F66 –10 Amp Red Sunroof / Passenger Window Switches /
Rain Sensor
F67 –10 Amp Red CD / DVD / Bluetooth Hands-free Module –
If Equipped
F69 –15 Amp Blue Mod SCR 12V (Cummins Diesel) –
If Equipped
F70 –30 Amp Green Fuel Pump Motor
F71 –25 Amp Clear Amplifier
F72 –10 Amp Red PCM – If Equipped
F73 –20 Amp Yellow Fuel Transfer Pump (HD Only) –
If Equipped
F74 –20 Amp Yellow (Gas
Engine & 1500 LD Diesel) Brake Vacuum Pump Gas/Diesel –
If Equipped
7
MAINTAINING YOUR VEHICLE 685
Page 688 of 734
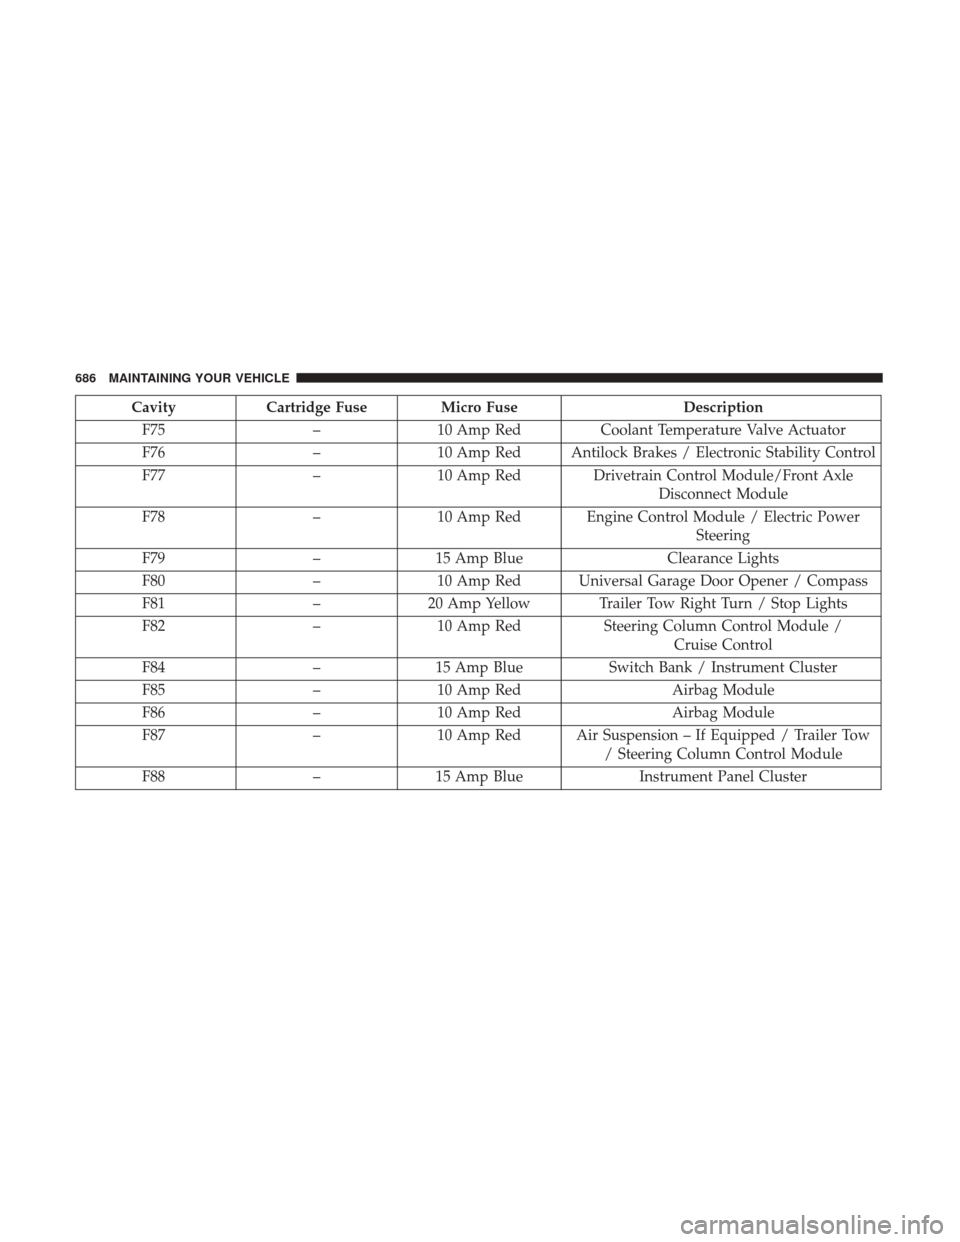
CavityCartridge Fuse Micro Fuse Description
F75 –10 Amp Red Coolant Temperature Valve Actuator
F76 –10 Amp Red Antilock Brakes / Electronic Stability Control
F77 –10 Amp Red Drivetrain Control Module/Front Axle
Disconnect Module
F78 –10 Amp Red Engine Control Module / Electric Power
Steering
F79 –15 Amp Blue Clearance Lights
F80 –10 Amp Red Universal Garage Door Opener / Compass
F81 –20 Amp Yellow Trailer Tow Right Turn / Stop Lights
F82 –10 Amp Red Steering Column Control Module /
Cruise Control
F84 –15 Amp Blue Switch Bank / Instrument Cluster
F85 –10 Amp Red Airbag Module
F86 –10 Amp Red Airbag Module
F87 –10 Amp Red Air Suspension – If Equipped / Trailer Tow
/ Steering Column Control Module
F88 –15 Amp Blue Instrument Panel Cluster
686 MAINTAINING YOUR VEHICLE
Page 690 of 734
CAUTION!
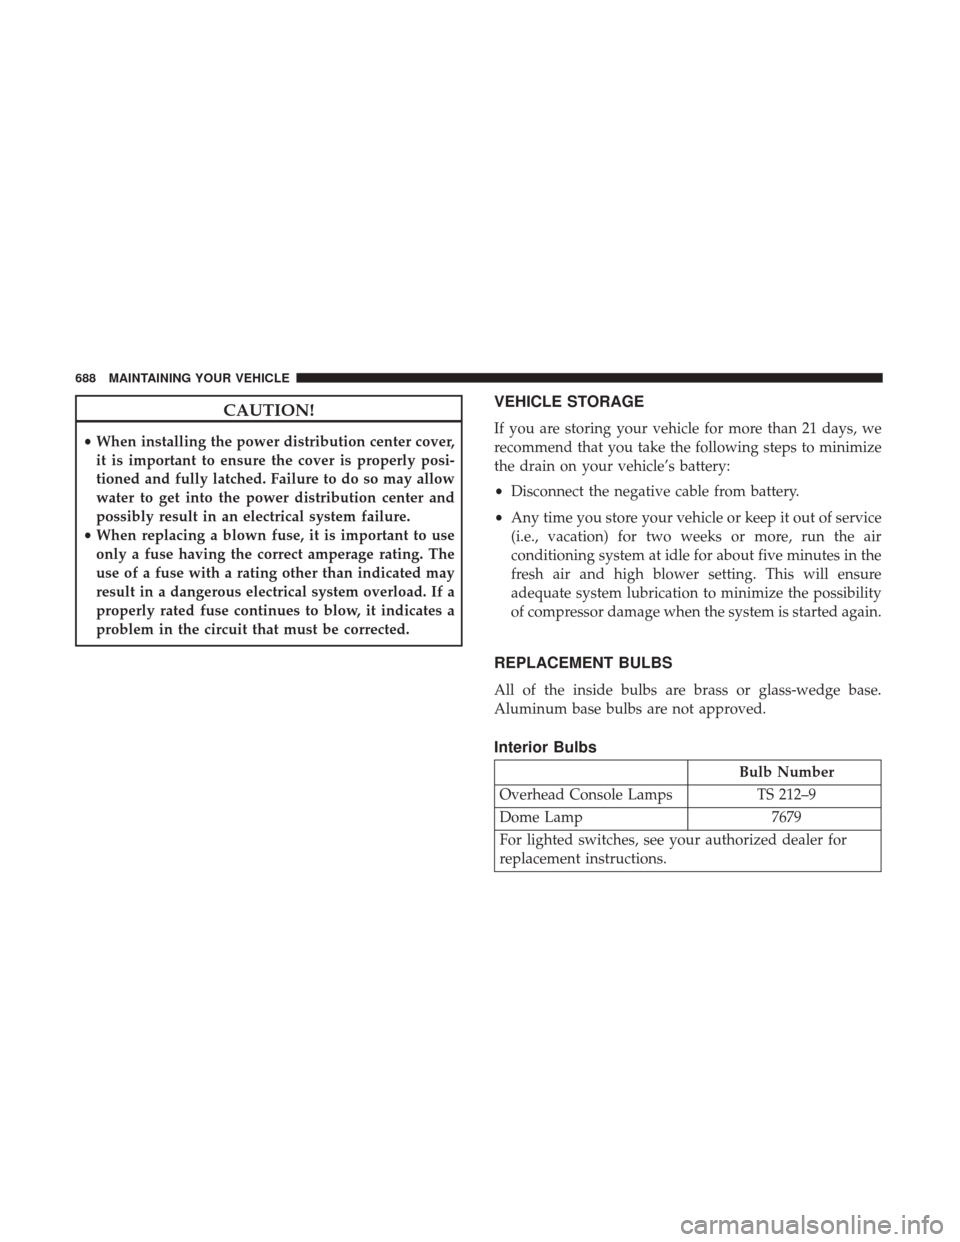
•When installing the power distribution center cover,
it is important to ensure the cover is properly posi-
tioned and fully latched. Failure to do so may allow
water to get into the power distribution center and
possibly result in an electrical system failure.
• When replacing a blown fuse, it is important to use
only a fuse having the correct amperage rating. The
use of a fuse with a rating other than indicated may
result in a dangerous electrical system overload. If a
properly rated fuse continues to blow, it indicates a
problem in the circuit that must be corrected.
VEHICLE STORAGE
If you are storing your vehicle for more than 21 days, we
recommend that you take the following steps to minimize
the drain on your vehicle’s battery:
• Disconnect the negative cable from battery.
• Any time you store your vehicle or keep it out of service
(i.e., vacation) for two weeks or more, run the air
conditioning system at idle for about five minutes in the
fresh air and high blower setting. This will ensure
adequate system lubrication to minimize the possibility
of compressor damage when the system is started again.
REPLACEMENT BULBS
All of the inside bulbs are brass or glass-wedge base.
Aluminum base bulbs are not approved.
Interior Bulbs
Bulb Number
Overhead Console Lamps TS 212–9
Dome Lamp 7679
For lighted switches, see your authorized dealer for
replacement instructions.
688 MAINTAINING YOUR VEHICLE
Page 707 of 734
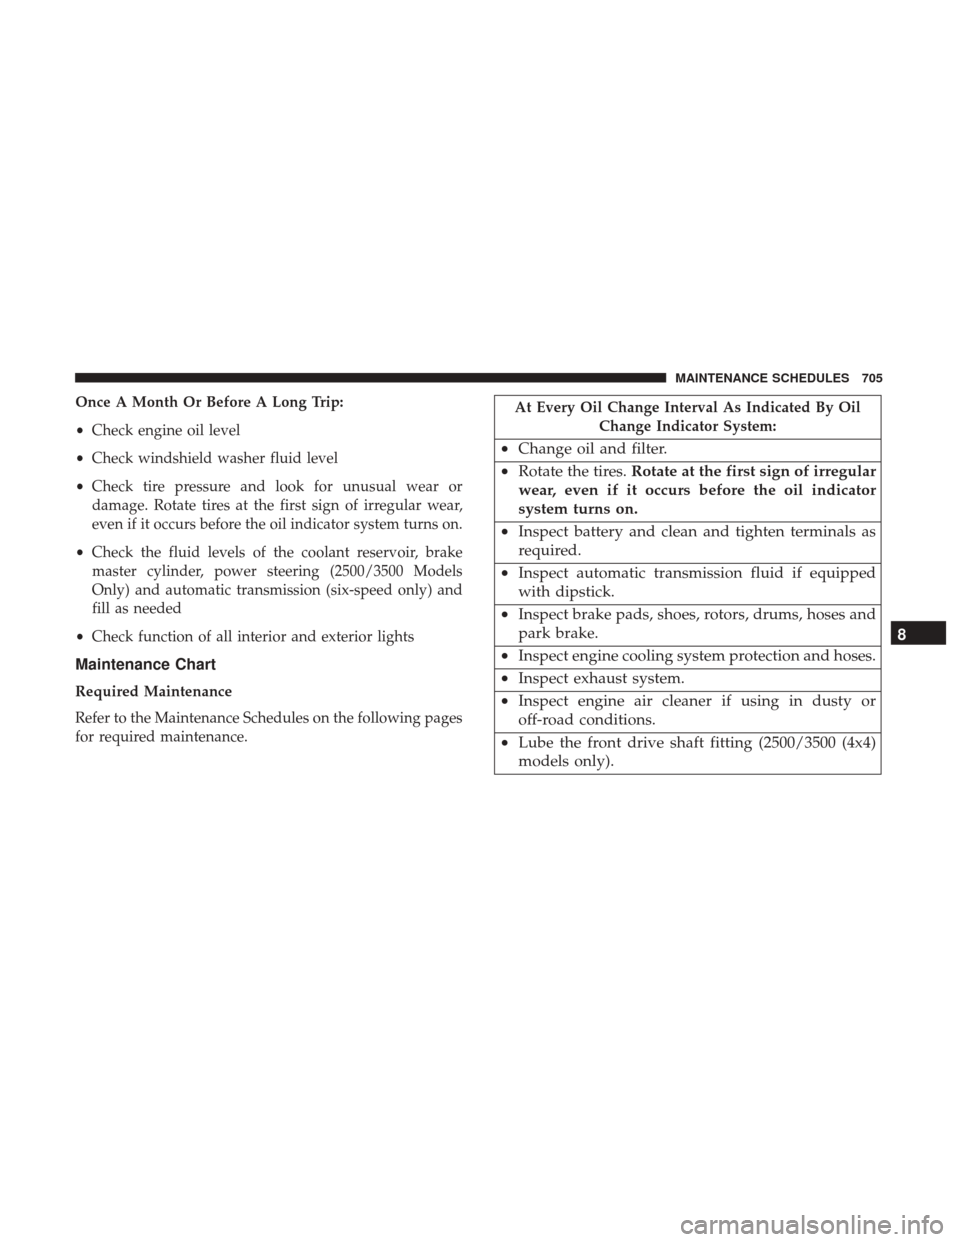
Once A Month Or Before A Long Trip:
•Check engine oil level
• Check windshield washer fluid level
• Check tire pressure and look for unusual wear or
damage. Rotate tires at the first sign of irregular wear,
even if it occurs before the oil indicator system turns on.
• Check the fluid levels of the coolant reservoir, brake
master cylinder, power steering (2500/3500 Models
Only) and automatic transmission (six-speed only) and
fill as needed
• Check function of all interior and exterior lights
Maintenance Chart
Required Maintenance
Refer to the Maintenance Schedules on the following pages
for required maintenance.
At Every Oil Change Interval As Indicated By Oil
Change Indicator System:
•Change oil and filter.
• Rotate the tires. Rotate at the first sign of irregular
wear, even if it occurs before the oil indicator
system turns on.
• Inspect battery and clean and tighten terminals as
required.
• Inspect automatic transmission fluid if equipped
with dipstick.
• Inspect brake pads, shoes, rotors, drums, hoses and
park brake.
• Inspect engine cooling system protection and hoses.
• Inspect exhaust system.
• Inspect engine air cleaner if using in dusty or
off-road conditions.
• Lube the front drive shaft fitting (2500/3500 (4x4)
models only). 8
MAINTENANCE SCHEDULES 705
Page 709 of 734
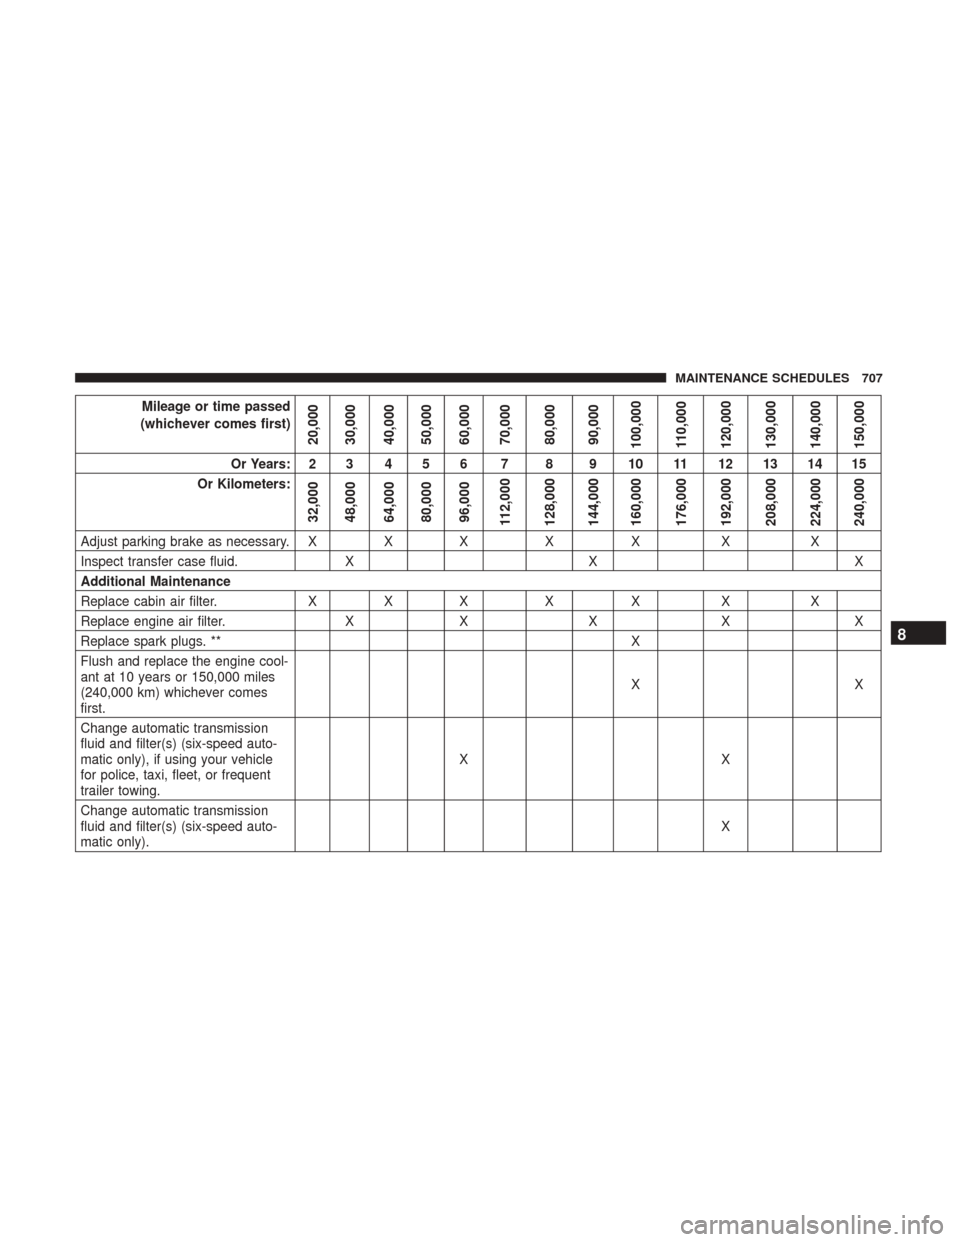
Mileage or time passed
(whichever comes first)
20,000
30,000
40,000
50,000
60,000
70,000
80,000
90,000
100,000
110,000
120,000
130,000
140,000
150,000
Or Years: 2 3 4 5 6 7 8 9 10 11 12 13 14 15
Or Kilometers:
32,000
48,000
64,000
80,000
96,000
112,000
128,000
144,000
160,000
176,000
192,000
208,000
224,000
240,000
Adjust parking brake as necessary. X X XXX XX
Inspect transfer case fluid. XX X
Additional Maintenance
Replace cabin air filter. XX X XX XX
Replace engine air filter. XX X X X
Replace spark plugs. ** X
Flush and replace the engine cool-
ant at 10 years or 150,000 miles
(240,000 km) whichever comes
first. XX
Change automatic transmission
fluid and filter(s) (six-speed auto-
matic only), if using your vehicle
for police, taxi, fleet, or frequent
trailer towing. XX
Change automatic transmission
fluid and filter(s) (six-speed auto-
matic only). X
8
MAINTENANCE SCHEDULES 707