start stop button RAM 1500 2021 Owner's Manual
[x] Cancel search | Manufacturer: RAM, Model Year: 2021, Model line: 1500, Model: RAM 1500 2021Pages: 496, PDF Size: 20.89 MB
Page 187 of 496
STARTING AND OPERATING185
The maximum braking applied by ACC is limited;
however, the driver can always apply the brakes
manually, if necessary.
NOTE:
The brake lights will illuminate whenever the
ACC system applies the brakes.
A Proximity Warning will alert the driver if ACC
predicts that its maximum braking level is not
sufficient to maintain the set distance. If this
occurs, a visual alert “BRAKE” will flash in the
instrument cluster display and a chime will
sound while ACC continues to apply its
maximum braking capacity.
NOTE:
The “BRAKE!” Screen in the instrument cluster
display is a warning for the driver to take action
and does not necessarily mean that the
Forward Collision Warning system is applying
the brakes autonomously.
Overtake Aid
When driving with Adaptive Cruise Control (ACC)
engaged, and following a vehicle, the system
will provide an additional acceleration up to the
ACC set speed to assist in passing the vehicle. This additional acceleration is triggered when
the driver utilizes the left turn signal and will
only be active when passing on the left hand
side.
ACC Operation At Stop
If the ACC system brings your vehicle to a
standstill while following the vehicle in front,
your vehicle will resume motion without any
diver intervention if the vehicle in front starts
moving within two seconds.
If the vehicle in front does not start moving
within two seconds of your vehicle coming to a
standstill, the driver will either have to push the
RES (resume) button, or apply the accelerator
pedal to reengage the ACC to the existing set
speed.
NOTE:
After the ACC system holds your vehicle at a
standstill for approximately three consecutive
minutes, the parking brake will be activated,
and the ACC system will be cancelled.
While ACC is holding your vehicle at a standstill,
if the driver seat belt is unbuckled or the driver
door is opened, the parking brake will be
activated, and the ACC system will be cancelled.
Display Warnings And Maintenance
“Wipe Front Radar Sensor In Front Of Vehicle”
Warning
The “ACC/FCW Unavailable Wipe Front Radar
Sensor” warning will display and also a chime
will indicate when conditions temporarily limit
system performance.
This most often occurs at times of poor visibility,
such as in snow or heavy rain. The ACC system
may also become temporarily blinded due to
obstructions, such as mud, dirt or ice. In these
cases, the instrument cluster display will display
“ACC/FCW Unavailable Wipe Front Radar
Sensor” and the system will deactivate.
The “ACC/FCW Unavailable Wipe Front Radar
Sensor” message can sometimes be displayed
while driving in highly reflective areas (i.e. ice
WARNING!
When the ACC system is resumed, the driver
must ensure that there are no pedestrians,
vehicles or objects in the path of the vehicle.
Failure to follow these warnings can result in
a collision and death or serious personal
injury.
4
21_DT_OM_EN_USC_t.book Page 185
Page 210 of 496
208STARTING AND OPERATING
AUX CAMERA — IF EQUIPPED
Your vehicle may be equipped with one or two
AUX Cameras, which display images from the
trailer on the touchscreen.
Activation
The AUX Camera is activated any of the
following ways:
By first pressing the Backup Camera or
Surround View Camera (if equipped) button
on the touchscreen, followed by the AUX
button located in the upper left corner of the
rearview display
Pressing the AUX button in the Apps menu
Pressing the AUX button when the vehicle is
in REVERSE
If equipped with two AUX Cameras, you can
switch between each camera by pressing the
AUX1 or AUX2 buttons on the Trailer Camera
display. AUX1 Camera Button
AUX2 Camera Button
Deactivation
The AUX Camera is deactivated when the
following situations occur:
The “X” in the upper right corner of the touch -
screen is pressed. This will return the display
back to the previously displayed screen.
The vehicle speed exceeds 8 mph (13 km/h)
for 10 seconds.
The vehicle is shifted into PARK.
The ignition is placed in the OFF position. NOTE:
If the AUX button is pressed and no AUX
Camera is connected, the touchscreen will
display a blue screen along with the message
“Camera System Unavailable.” The screen
can be exited out by pressing the “X” in the
upper right hand corner. This will return the
display back to the previously displayed
screen.
Zoom View is not available with the AUX
Camera feature.
The display will always default to the Trailer
Camera display (AUX 1).
REFUELING THE VEHICLE — GASOLINE
ENGINE
The capless fuel filler is located on the left side
of the vehicle.
The capless system is sealed by two flapper
doors.
CAUTION!
To avoid vehicle damage, Surround View
should only be used as a parking aid. The
Surround View camera is unable to view
every obstacle or object in your drive path.
To avoid vehicle damage, the vehicle must
be driven slowly when using Surround View
to be able to stop in time when an obstacle
is seen. It is recommended that the driver
look frequently over his/her shoulder when
using Surround View.
21_DT_OM_EN_USC_t.book Page 208
Page 221 of 496
STARTING AND OPERATING219
TRAILER AND TONGUE WEIGHT
Weight Distribution
Consider the following items when computing
the weight on the rear axle of the vehicle:
The tongue weight of the trailer.
The weight of any other type of cargo or
equipment put in or on your vehicle.
The weight of the driver and all passengers.
NOTE:
Remember that everything put into or on the
trailer adds to the load on your vehicle. Also,
additional factory-installed options or
dealer-installed options must be considered as
part of the total load on your vehicle. Refer to
the “Tire And Loading Information” placard for the maximum combined weight of occupants
and cargo for your vehicle.
TRAILER REVERSE STEERING CONTROL
Trailer Reverse Steering Control (TRSC) is a
feature that will allow the driver to back up a
trailer using a knob located on the center stack.
The feature works by the user first hooking up a
trailer and then performing the calibration
maneuvers.
Calibration:
First bring the vehicle and trailer to a complete
stop in a large open area, place the vehicle in
PARK and push the TRSC button located above
the knob in the center stack.
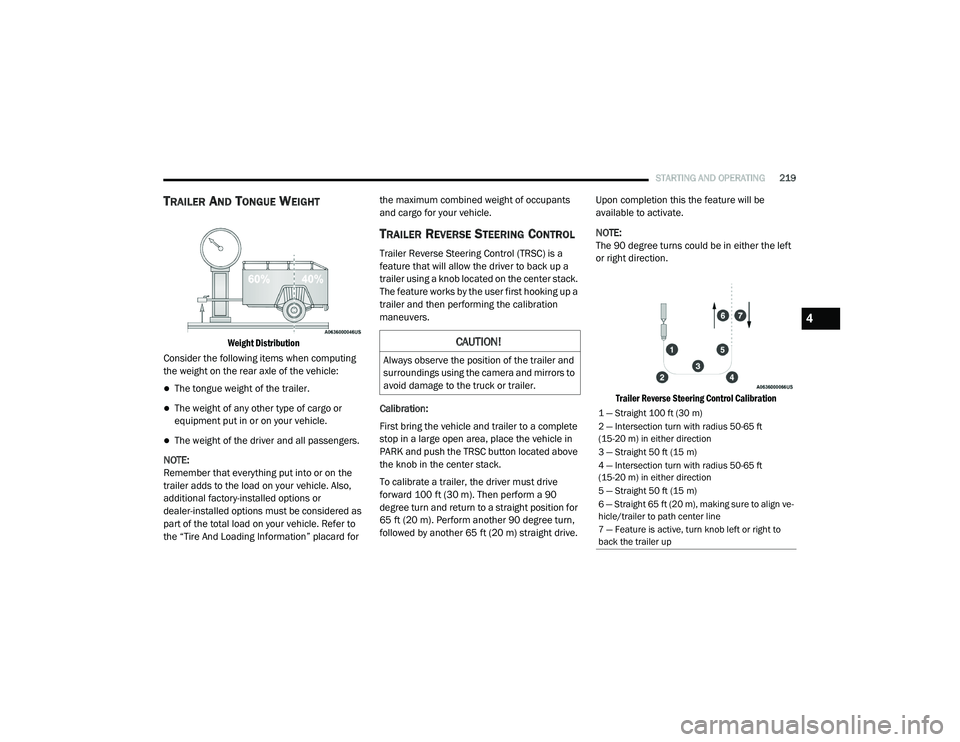
To calibrate a trailer, the driver must drive
forward 100 ft (30 m). Then perform a 90
degree turn and return to a straight position for
65 ft (20 m). Perform another 90 degree turn,
followed by another 65 ft (20 m) straight drive. Upon completion this the feature will be
available to activate.
NOTE:
The 90 degree turns could be in either the left
or right direction.
Trailer Reverse Steering Control Calibration
CAUTION!
Always observe the position of the trailer and
surroundings using the camera and mirrors to
avoid damage to the truck or trailer.
1 — Straight 100 ft (30 m)
2 — Intersection turn with radius 50-65 ft
(15-20 m) in either direction
3 — Straight 50 ft (15 m)
4 — Intersection turn with radius 50-65 ft
(15-20 m) in either direction
5 — Straight 50 ft (15 m)
6 — Straight 65 ft (20 m), making sure to align ve -
hicle/trailer to path center line
7 — Feature is active, turn knob left or right to
back the trailer up
4
21_DT_OM_EN_USC_t.book Page 219
Page 222 of 496
220STARTING AND OPERATING
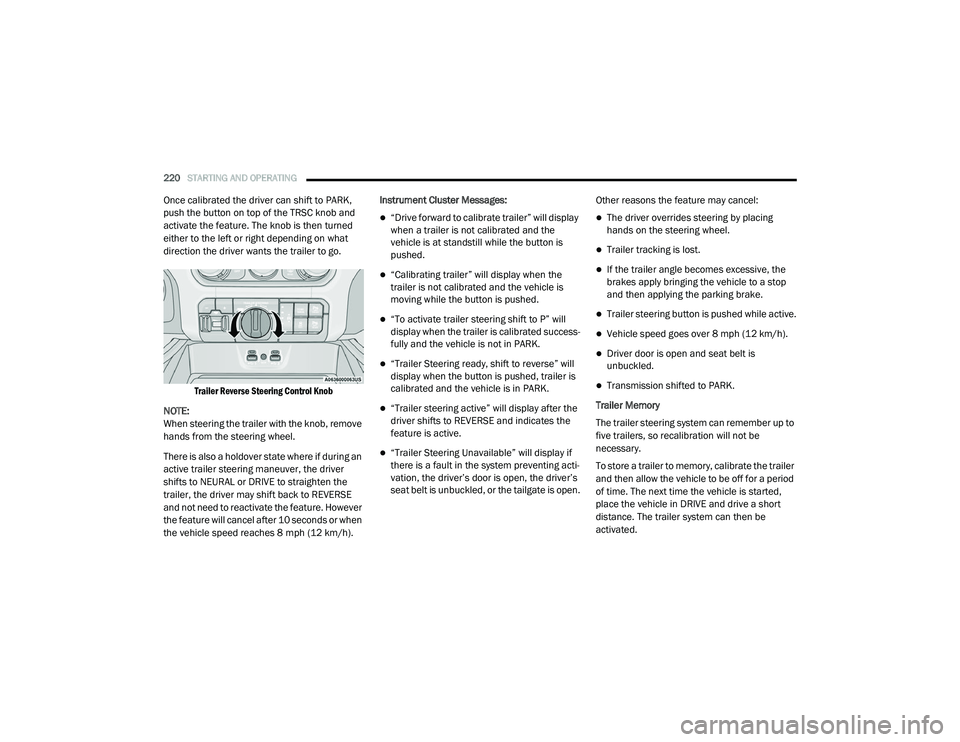
Once calibrated the driver can shift to PARK,
push the button on top of the TRSC knob and
activate the feature. The knob is then turned
either to the left or right depending on what
direction the driver wants the trailer to go.
Trailer Reverse Steering Control Knob
NOTE:
When steering the trailer with the knob, remove
hands from the steering wheel.
There is also a holdover state where if during an
active trailer steering maneuver, the driver
shifts to NEURAL or DRIVE to straighten the
trailer, the driver may shift back to REVERSE
and not need to reactivate the feature. However
the feature will cancel after 10 seconds or when
the vehicle speed reaches 8 mph (12 km/h). Instrument Cluster Messages:
“Drive forward to calibrate trailer” will display
when a trailer is not calibrated and the
vehicle is at standstill while the button is
pushed.
“Calibrating trailer” will display when the
trailer is not calibrated and the vehicle is
moving while the button is pushed.
“To activate trailer steering shift to P” will
display when the trailer is calibrated success
-
fully and the vehicle is not in PARK.
“Trailer Steering ready, shift to reverse” will
display when the button is pushed, trailer is
calibrated and the vehicle is in PARK.
“Trailer steering active” will display after the
driver shifts to REVERSE and indicates the
feature is active.
“Trailer Steering Unavailable” will display if
there is a fault in the system preventing acti -
vation, the driver’s door is open, the driver’s
seat belt is unbuckled, or the tailgate is open. Other reasons the feature may cancel:
The driver overrides steering by placing
hands on the steering wheel.
Trailer tracking is lost.
If the trailer angle becomes excessive, the
brakes apply bringing the vehicle to a stop
and then applying the parking brake.
Trailer steering button is pushed while active.
Vehicle speed goes over 8 mph (12 km/h).
Driver door is open and seat belt is
unbuckled.
Transmission shifted to PARK.
Trailer Memory
The trailer steering system can remember up to
five trailers, so recalibration will not be
necessary.
To store a trailer to memory, calibrate the trailer
and then allow the vehicle to be off for a period
of time. The next time the vehicle is started,
place the vehicle in DRIVE and drive a short
distance. The trailer system can then be
activated.
21_DT_OM_EN_USC_t.book Page 220
Page 225 of 496
STARTING AND OPERATING223
Integrated Trailer Brake Module — If
Equipped
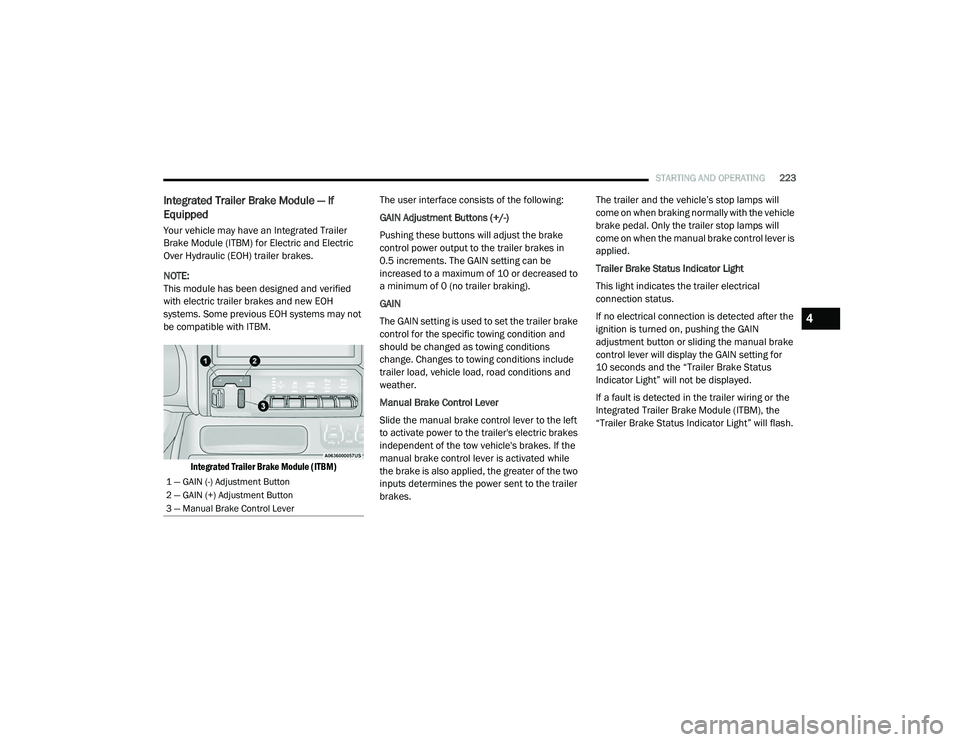
Your vehicle may have an Integrated Trailer
Brake Module (ITBM) for Electric and Electric
Over Hydraulic (EOH) trailer brakes.
NOTE:
This module has been designed and verified
with electric trailer brakes and new EOH
systems. Some previous EOH systems may not
be compatible with ITBM.
Integrated Trailer Brake Module (ITBM)
The user interface consists of the following:
GAIN Adjustment Buttons (+/-)
Pushing these buttons will adjust the brake
control power output to the trailer brakes in
0.5 increments. The GAIN setting can be
increased to a maximum of 10 or decreased to
a minimum of 0 (no trailer braking).
GAIN
The GAIN setting is used to set the trailer brake
control for the specific towing condition and
should be changed as towing conditions
change. Changes to towing conditions include
trailer load, vehicle load, road conditions and
weather.
Manual Brake Control Lever
Slide the manual brake control lever to the left
to activate power to the trailer's electric brakes
independent of the tow vehicle's brakes. If the
manual brake control lever is activated while
the brake is also applied, the greater of the two
inputs determines the power sent to the trailer
brakes. The trailer and the vehicle’s stop lamps will
come on when braking normally with the vehicle
brake pedal. Only the trailer stop lamps will
come on when the manual brake control lever is
applied.
Trailer Brake Status Indicator Light
This light indicates the trailer electrical
connection status.
If no electrical connection is detected after the
ignition is turned on, pushing the GAIN
adjustment button or sliding the manual brake
control lever will display the GAIN setting for
10 seconds and the “Trailer Brake Status
Indicator Light” will not be displayed.
If a fault is detected in the trailer wiring or the
Integrated Trailer Brake Module (ITBM), the
“Trailer Brake Status Indicator Light” will flash.
1 — GAIN (-) Adjustment Button
2 — GAIN (+) Adjustment Button
3 — Manual Brake Control Lever
4
21_DT_OM_EN_USC_t.book Page 223
Page 229 of 496
STARTING AND OPERATING227
Hazard switch is activated
Any button on the key fob is pushed
Ignition button is pushed
High Beam stalk position is changed
Sequence is canceled in the instrument
cluster
TOWING TIPS
Before towing, practice turning, stopping, and
backing up the trailer in an area located away
from heavy traffic.
Automatic Transmission
The DRIVE range can be selected when towing.
The transmission controls include a drive
strategy to avoid frequent shifting when towing.
However, if frequent shifting does occur while in
DRIVE, select TOW/HAUL mode or select a lower
gear range (using the Electronic Range Select
(ERS) shift control).
NOTE:
Using TOW/HAUL mode or selecting a lower
gear range (using the ERS shift control) while
operating the vehicle under heavy loading
conditions will improve performance and extend transmission life by reducing excessive
shifting and heat build up. This action will also
provide better engine braking.
Tow/Haul Mode
To reduce potential for automatic transmission
overheating, activate TOW/HAUL mode when
driving in hilly areas, or select a lower gear
range (using the (ERS) shift control) on more
severe grades.
Cruise Control — If Equipped
Do not use on hilly terrain or with heavy
loads.
When using the Cruise Control, if you experi
-
ence speed drops greater than 10 mph
(16 km/h), disengage until you can get back
to cruising speed.
Use Cruise Control in flat terrain and with
light loads to maximize fuel efficiency.
Air Suspension System
To aid in attaching/detaching the trailer from
the vehicle, the air suspension system can be
used Ú page 165. NOTE:
The vehicle must remain in the engine running
position while attaching a trailer for proper
leveling of the air suspension system.
SNOWPLOW
Snowplow Prep Packages are available as a
factory installed option. These packages
include components necessary to equip your
vehicle with a snowplow.
NOTE:
Before installation of a snowplow it is highly
recommended that the owner/installer obtain
and follow the recommendations contained
within the current Body Builders Guide. See an
authorized dealer, installer or snowplow manu
-
facturer for this information. There are unique
electrical systems that must be connected to
properly ensure operator safety and prevent
overloading vehicle systems.
4
21_DT_OM_EN_USC_t.book Page 227
Page 234 of 496
232STARTING AND OPERATING
Shifting Into N (Neutral)
Use the following procedure to prepare your
vehicle for recreational towing.
1. Bring the vehicle to a complete stop on
level ground, with the engine running.
Apply the parking brake.
2. Press and hold the brake pedal.
3. Shift the transmission to NEUTRAL. The driver's door must be closed (or the driver's
seat belt buckled) so that the transmission
will remain in NEUTRAL when the brake
pedal is released.
NOTE:
If vehicle is equipped with air suspension,
ensure the vehicle is set to Normal Ride Height.
4. Using a ballpoint pen or similar object, push and hold the recessed transfer case N
(Neutral) button (at the center of the
transfer case switches). The N (Neutral)
indicator light will illuminate, and remain lit,
when the shift to N (Neutral) is complete.
After the shift is completed and the N
(Neutral) light stays on, release the N
(Neutral) button.
5. Release the parking brake. 6. Shift the transmission into REVERSE.
7. Release the brake pedal for five seconds
and ensure that there is no vehicle
movement.
8. Repeat steps 6 and 7 with the transmission in DRIVE.
9. Shift the transmission to NEUTRAL. Apply the parking brake. Turn off the engine. For
vehicles with Keyless Enter-N-Go, push and
hold the ENGINE START/STOP button until
the engine shuts off. The transmission will
automatically select PARK when the engine
is turned off.
10. Turn the ignition off.
11. Attach the vehicle to the tow vehicle using a suitable tow bar.
12. Turn the ignition to the ON/RUN mode, but do not start the engine.
13. Release the parking brake.
14. Turn the ignition OFF.
WARNING!
You or others could be injured or killed if you
leave the vehicle unattended with the transfer
case in the N (Neutral) position without first
fully engaging the parking brake. The transfer
case N (Neutral) position disengages both the
front and rear driveshafts from the power -
train and will allow the vehicle to roll, even if
the transmission is in PARK. The parking
brake should always be applied when the
driver is not in the vehicle.
CAUTION!
It is necessary to follow these steps to be cer -
tain that the transfer case is fully in N (Neu -
tral) before recreational towing to prevent
damage to internal parts.
21_DT_OM_EN_USC_t.book Page 232
Page 235 of 496
STARTING AND OPERATING233
NOTE:
Steps 2 and 3 are requirements that must be
met before pushing the N (Neutral) button,
and must continue to be met until the shift has
been completed. If any of these requirements
are not met before pushing the N (Neutral)
button or are no longer met during the shift,
the N (Neutral) indicator light will flash contin -
uously until all requirements are met or until
the N (Neutral) button is released.
The ignition must be in the ON/RUN mode for
a shift to take place and for the position indi -
cator lights to be operable. If the ignition is
not in the ON/RUN mode, the shift will not
take place and no position indicator lights will
be on or flashing.
A flashing N (Neutral) position indicator light
indicates that shift requirements have not
been met.
If the vehicle is equipped with air suspension,
the engine should be started and left running
for a minimum of 60 seconds (with all the
doors closed) at least once every 24 hours.
This process allows the air suspension to
adjust the vehicle’s ride height to compen -
sate for temperature effects.
Shifting Out Of N (Neutral)
Use the following procedure to prepare your
vehicle for normal usage:
1. Bring the vehicle to a complete stop,
leaving it connected to the tow vehicle.
2. Press and hold the brake pedal.
3. Start the engine. Apply the parking brake. Shift the transmission into NEUTRAL.
4. Using a ballpoint pen or similar object, push and hold the recessed transfer case N
(Neutral) button (at the center of the
transfer case switches).
5. When the N (Neutral) indicator light turns off, release the N (Neutral) button.
6. Turn the engine off. The transmission will automatically select PARK when the engine
is turned off.
7. Release the brake pedal.
8. Disconnect vehicle from the tow vehicle.
9. Press and hold the brake pedal.
10. Start the engine. 11. Release the parking brake.
12. Shift the transmission into DRIVE, release
the brake pedal, and check that the vehicle
operates normally.
NOTE:
Steps 3 and 4 are requirements that must be
met before pushing the button to shift out of
N (Neutral), and must continue to be met
until the shift has been completed. If any of
these requirements are not met before
pushing the button or are no longer met
during the shift, the N (Neutral) indicator light
will flash continuously until all requirements
are met or until the button is released.
The ignition must be in the ON/RUN mode for
a shift to take place and for the position indi -
cator lights to be operable. If the ignition is
not in the ON/RUN mode, the shift will not
take place and no position indicator lights will
be on or flashing.
A flashing N (Neutral) position indicator light
indicates that shift requirements have not
been met.
4
21_DT_OM_EN_USC_t.book Page 233
Page 262 of 496
260MULTIMEDIA
The radio is equipped with the following modes:
AM
FM
SiriusXM® Satellite Radio (if equipped)
Press the Radio button on the touchscreen to
enter the Radio Mode. The different tuner
modes, AM, FM, and SXM, can then be selected
by pressing the corresponding buttons in Radio
Mode.
Volume & On/Off Control
Push the Volume & On/Off control knob to turn
on and off the Uconnect system.
The electronic volume control turns
continuously (360 degrees) in either direction,
without stopping. Turning the Volume & On/Off
control knob clockwise increases the volume,
and counterclockwise decreases it.
When the audio system is turned on, the sound
will be set at the same volume level as last
played.
Mute Button
Push the Mute button to mute or unmute the
system. Tune/Scroll Control
Turn the rotary Tune/Scroll control knob
clockwise to increase or counterclockwise to
decrease the radio station frequency. Push the
Enter/Browse button to choose a selection.
Seek
The Seek Up and Down functions are activated
by pressing the double arrow buttons on the
touchscreen to the right and left of the radio
station display or by pressing the left steering
wheel audio control button up or down.
Seek Up
and Seek Down
Press and release the Seek Up or Seek
Down button to tune the radio to the next
available station or channel. During a Seek Up/
Down function, if the radio reaches the starting
station after passing through the entire band
two times, the radio will stop at the station
where it began.
Fast Seek Up and Fast Seek Down
Press, hold, and then release the Seek Up or
Seek Down button to advance the radio
through the available stations or channels at a
faster rate. The radio stops at the next available station or channel when the button on the
touchscreen is released.
NOTE:
Pressing and holding either the Seek Up or
Seek Down button will scan the different
frequency bands at a slower rate.
Info — If Equipped
Press the Info button to display information
related to the currently playing song and radio
station.
Direct Tune
Press the Tune button located at the bottom of
the radio screen to directly tune to a desired
radio station or channel.
Press the available number button on the
touchscreen to begin selecting a desired
station. Once a number has been entered, any
numbers that are no longer possible (stations
that cannot be reached) will become
deactivated/grayed out.
Undo
You can backspace an entry by pressing the
Back button on the touchscreen.
21_DT_OM_EN_USC_t.book Page 260
Page 302 of 496
300MULTIMEDIA
4. A prompt will appear to link your Uconnect
account. Press “Link Uconnect to Google”.
5. Press “Sign In” and enter the email address and password you created when you
activated Uconnect services.
6. Lastly, press “Authorize” to complete the linking process.
Now, you can ask Google Assistant to help you:
Remotely start the engine, or cancel a
remote start
Send a destination to their vehicle’s built-in
Uconnect Navigation system
Monitor vehicle vitals, such as tire press, fuel
level and oil life
And more!
Family Drive Alerts — If Equipped
Description
Family Drive Alerts help promote safer driving
and give you peace of mind when your loved
ones are out on the road. You can set boundary
limits, monitor driving speed, and pinpoint your
vehicle’s location any time, any place. Use the
Uconnect app to set alerts:
Boundary Alert
Receive a notification the moment your
vehicle is driven either out of or into a
geographic boundary that you set.
Curfew Alert
Receive a notification when your car is being
driven outside of the curfew time.
Speed Alert
Receive a notification whenever your car
exceeds a speed limit you set.
Valet Alert
Receive a notification if and when your
vehicle is driven outside a quarter-mile
radius of a valet drop-off zone.
SmartWatch Integration — If Equipped
Description
SmartWatch Integration puts the Uconnect app
right on your Apple® Watch or Android™ Wear.
To get started, follow these steps:
1. Download the Uconnect app from the App Store® or Google Play.
2. Log onto the app from your smartphone
using the username and password you
created when you first set up your account.
3. Make sure your watch and smartphone are connected through Bluetooth®.
4. The Uconnect app should appear on your SmartWatch.
Once the app is downloaded on your
SmartWatch, you can enjoy these features:
Lock or unlock your vehicle by tapping the
remote lock button in the app and entering
your security PIN.
Remote start or stop your vehicle.
View important vehicle stats, such as fuel
level, vehicle location, tire pressure warning,
and more.
For help, refer to the Uconnect YouTube
channel for SmartWatch Integration.
Uconnect Market
With Uconnect Market, you can enjoy seamless
and secure transactions from the comfort of
your vehicle. Make restaurant reservations,
place food orders, or pay for other goods and
services right from the vehicle’s touchscreen.
21_DT_OM_EN_USC_t.book Page 300