navigation RAM 1500 2022 Owners Manual
[x] Cancel search | Manufacturer: RAM, Model Year: 2022, Model line: 1500, Model: RAM 1500 2022Pages: 496, PDF Size: 18.03 MB
Page 2 of 496

The driver’s primary responsibility is the safe operation of the vehicle. Driving while distracted can result in loss of vehicle control, resulting in
an accident and personal injury. FCA US LLC strongly recommends that the driver use extreme caution when using any device or feature that
may take their attention off the road. Use of any electrical devices, such as cellular telephones, computers, portable radios, vehicle navigation
or other devices, by the driver while the vehicle is moving is dangerous and could lead to a serious accident. Texting while driving is also
dangerous and should never be done while the vehicle is moving. If you find yourself unable to devote your full attention to vehicle operation, pull
off the road to a safe location and stop your vehicle. Some states or provinces prohibit the use of cellular telephones or texting while driving. It
is always the driver’s responsibility to comply with all local laws.
This Owner’s Manual has been prepared to help you get acquainted with your new Ram brand vehicle and to provide a convenient reference
for common questions.
Not all features shown in this manual may apply to your vehicle. For additional information on accessories to help personalize your vehicle,
visit mopar.com/om (U.S.), owners.mopar.ca (Canada) or your local Ram brand dealer.
DRIVING AND ALCOHOL
Drunk driving is one of the most frequent causes of accidents. Your driving ability can be seriously impaired with blood alcohol levels far
below the legal minimum. If you are drinking, don’t drive. Ride with a designated non-drinking driver, call a cab, a friend or use public
transportation.
WARNING
Driving after drinking can lead to an accident. Your perceptions are less sharp, your reflexes are slower and your judgment is impaired when
you have been drinking. Never drink and then drive.
WARNING: Operating, servicing and maintaining a passenger vehicle or off-highway motor
vehicle can expose you to chemicals including engine exhaust, carbon monoxide, phthalates, and
lead, which are known to the State of California to cause cancer and birth defects or other reproductive
harm. To minimize exposure, avoid breathing exhaust, do not idle the engine except as necessary,
service your vehicle in a well-ventilated area and wear gloves or wash your hands frequently when
servicing your vehicle. For more information go to www.P65Warnings.ca.gov/passenger-vehicle.
This Owner’s Manual illustrates and describes the operation of features and equipment that are either standard or optional on this vehicle.
This manual may also include a description of features and equipment that are no longer available or were not ordered on this vehicle.
Please disregard any features and equipment described in this manual that are not on this vehicle. FCA US LLC reserves the right to make
changes in design and specifications, and/or make additions to or improvements to its products without imposing any obligation upon itself
to install them on products previously manufactured.
With respect to any vehicles sold in Canada, the name FCA US LLC shall be deemed to be deleted and the name FCA Canada Inc. used in
substitution therefore.
This Owner’s Manual is intended to familiarize you with the important features of your vehicle. Your most up-to-date Owner’s Manual,
Navigation/Uconnect manuals and Warranty Booklet can be found by visiting the website on the back cover.
U.S. Residents: If you are the first registered retail owner of your vehicle, you may obtain a complimentary printed copy of the Warranty
Booklet by calling 1-866-726-4636 or by contacting your dealer. Replacement kits can be purchased by visiting www.techauthority.com.
Canadian Residents: If you are the first registered retail owner of your vehicle, you may obtain a complimentary printed copy of the
Warranty Booklet or purchase a replacement kit by calling 1-800-387-1143 or by contacting your dealer.
Page 46 of 496
44GETTING TO KNOW YOUR VEHICLE
5. You can interrupt the help message or system prompts by pushing the VR or Phone button
and saying a Voice Command from the current
category.
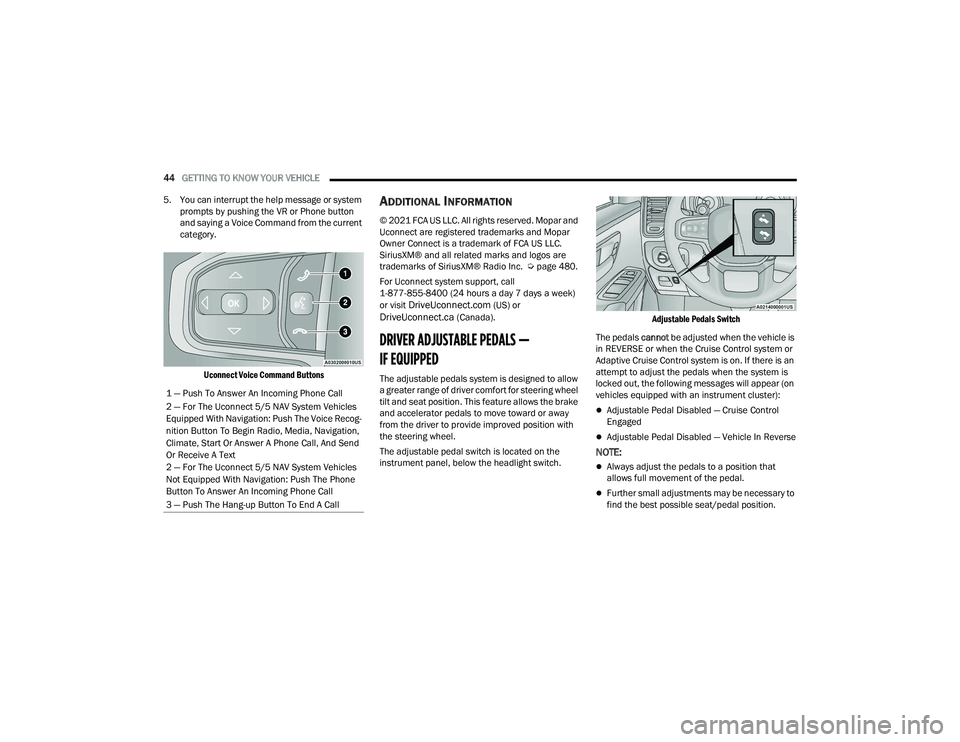
Uconnect Voice Command Buttons
ADDITIONAL INFORMATION
© 2021 FCA US LLC. All rights reserved. Mopar and
Uconnect are registered trademarks and Mopar
Owner Connect is a trademark of FCA US LLC.
SiriusXM® and all related marks and logos are
trademarks of SiriusXM® Radio Inc. Ú page 480.
For Uconnect system support, call
1-877-855-8400 (24 hours a day 7 days a week)
or visit
DriveUconnect.com (US) or DriveUconnect.ca (Canada).
DRIVER ADJUSTABLE PEDALS —
IF EQUIPPED
The adjustable pedals system is designed to allow
a greater range of driver comfort for steering wheel
tilt and seat position. This feature allows the brake
and accelerator pedals to move toward or away
from the driver to provide improved position with
the steering wheel.
The adjustable pedal switch is located on the
instrument panel, below the headlight switch.
Adjustable Pedals Switch
The pedals cannot be adjusted when the vehicle is
in REVERSE or when the Cruise Control system or
Adaptive Cruise Control system is on. If there is an
attempt to adjust the pedals when the system is
locked out, the following messages will appear (on
vehicles equipped with an instrument cluster):
Adjustable Pedal Disabled — Cruise Control
Engaged
Adjustable Pedal Disabled — Vehicle In Reverse
NOTE:
Always adjust the pedals to a position that
allows full movement of the pedal.
Further small adjustments may be necessary to
find the best possible seat/pedal position.
1 — Push To Answer An Incoming Phone Call
2 — For The Uconnect 5/5 NAV System Vehicles
Equipped With Navigation: Push The Voice Recog
-
nition Button To Begin Radio, Media, Navigation,
Climate, Start Or Answer A Phone Call, And Send
Or Receive A Text
2 — For The Uconnect 5/5 NAV System Vehicles
Not Equipped With Navigation: Push The Phone
Button To Answer An Incoming Phone Call
3 — Push The Hang-up Button To End A Call
22_DT_OM_EN_USC_t.book Page 44
Page 125 of 496

GETTING TO KNOW YOUR INSTRUMENT PANEL123
Content and Layout
When “Display On” is selected, the HUD will
display on the windshield. When it is not
selected, no display on the windshield.
HUD ON/OFF
Simple: Speed, Speed Limit
Standard : Speed, Speed Limit, Navigation When “Standard” mode is selected, the HUD
image is split into thirds with the speed limit
indicator shown to the left, vehicle speed in the
center, and turn-by-turn navigation to the right.
Advanced
: Speed, Speed Limit, Navigation,
Driver Assist (ACC/Cruise, LaneSense,
Highway Assist/Highway Assist+), Gear
Advanced Mode
When “Advanced” mode is selected, the HUD
displays the vehicle speed, turn-by-turn naviga
-
tion, speed limit, driver assist function(s), and
current gear.Custom
Custom HUD Layout
Custom 1 : Speed, Speed Limit
Custom 2: Speed, Speed Limit, Navigation
Custom 3: Speed, Speed Limit, Navigation,
Driver Assist (ACC/Cruise, LaneSense,
Highway Assist/Highway Assist+)
Custom 4 : Speed, Speed Limit, Navigation,
Driver Assist (ACC/Cruise, LaneSense,
Highway Assist/Highway Assist+), Gear
3
22_DT_OM_EN_USC_t.book Page 123
Page 201 of 496
STARTING AND OPERATING199
PARKVIEW REAR BACK UP CAMERA
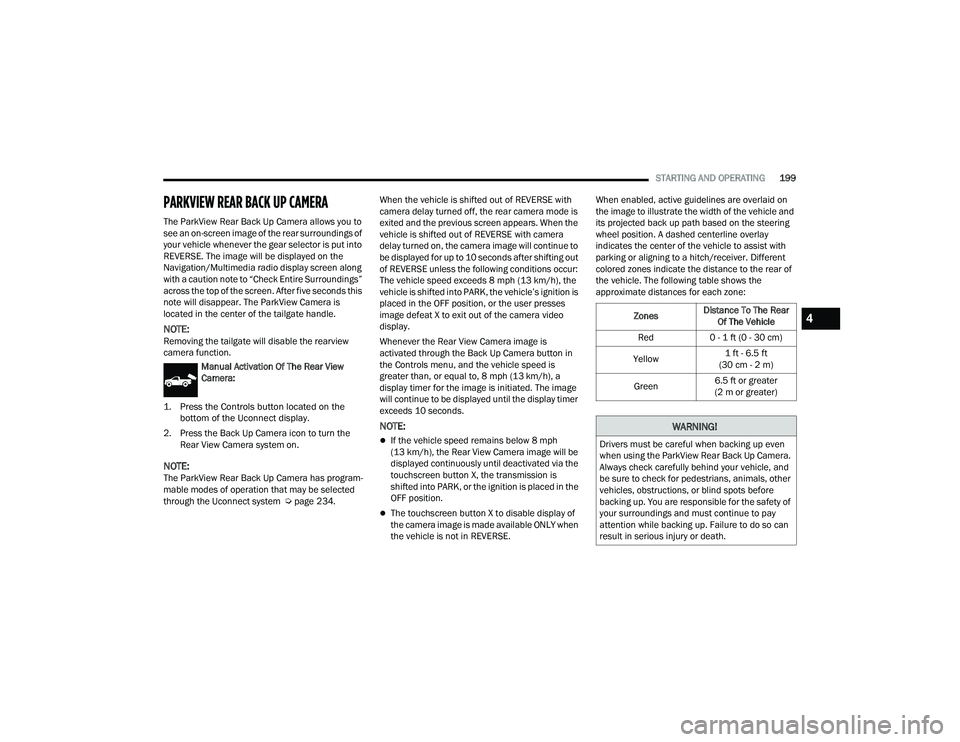
The ParkView Rear Back Up Camera allows you to
see an on-screen image of the rear surroundings of
your vehicle whenever the gear selector is put into
REVERSE. The image will be displayed on the
Navigation/Multimedia radio display screen along
with a caution note to “Check Entire Surroundings”
across the top of the screen. After five seconds this
note will disappear. The ParkView Camera is
located in the center of the tailgate handle.
NOTE:Removing the tailgate will disable the rearview
camera function.
Manual Activation Of The Rear View
Camera:
1. Press the Controls button located on the bottom of the Uconnect display.
2. Press the Back Up Camera icon to turn the Rear View Camera system on.
NOTE:The ParkView Rear Back Up Camera has program -
mable modes of operation that may be selected
through the Uconnect system Ú page 234.When the vehicle is shifted out of REVERSE with
camera delay turned off, the rear camera mode is
exited and the previous screen appears. When the
vehicle is shifted out of REVERSE with camera
delay turned on, the camera image will continue to
be displayed for up to 10 seconds after shifting out
of REVERSE unless the following conditions occur:
The vehicle speed exceeds 8 mph (13 km/h), the
vehicle is shifted into PARK, the vehicle’s ignition is
placed in the OFF position, or the user presses
image defeat X to exit out of the camera video
display.
Whenever the Rear View Camera image is
activated through the Back Up Camera button in
the Controls menu, and the vehicle speed is
greater than, or equal to, 8 mph (13 km/h), a
display timer for the image is initiated. The image
will continue to be displayed until the display timer
exceeds 10 seconds.
NOTE:
If the vehicle speed remains below 8 mph
(13 km/h), the Rear View Camera image will be
displayed continuously until deactivated via the
touchscreen button X, the transmission is
shifted into PARK, or the ignition is placed in the
OFF position.
The touchscreen button X to disable display of
the camera image is made available ONLY when
the vehicle is not in REVERSE. When enabled, active guidelines are overlaid on
the image to illustrate the width of the vehicle and
its projected back up path based on the steering
wheel position. A dashed centerline overlay
indicates the center of the vehicle to assist with
parking or aligning to a hitch/receiver. Different
colored zones indicate the distance to the rear of
the vehicle. The following table shows the
approximate distances for each zone:
Zones
Distance To The Rear
Of The Vehicle
Red 0 - 1 ft (0 - 30 cm)
Yellow 1 ft - 6.5 ft
(30 cm - 2 m)
Green 6.5 ft or greater
(2 m or greater)
WARNING!
Drivers must be careful when backing up even
when using the ParkView Rear Back Up Camera.
Always check carefully behind your vehicle, and
be sure to check for pedestrians, animals, other
vehicles, obstructions, or blind spots before
backing up. You are responsible for the safety of
your surroundings and must continue to pay
attention while backing up. Failure to do so can
result in serious injury or death.
4
22_DT_OM_EN_USC_t.book Page 199
Page 239 of 496
MULTIMEDIA237
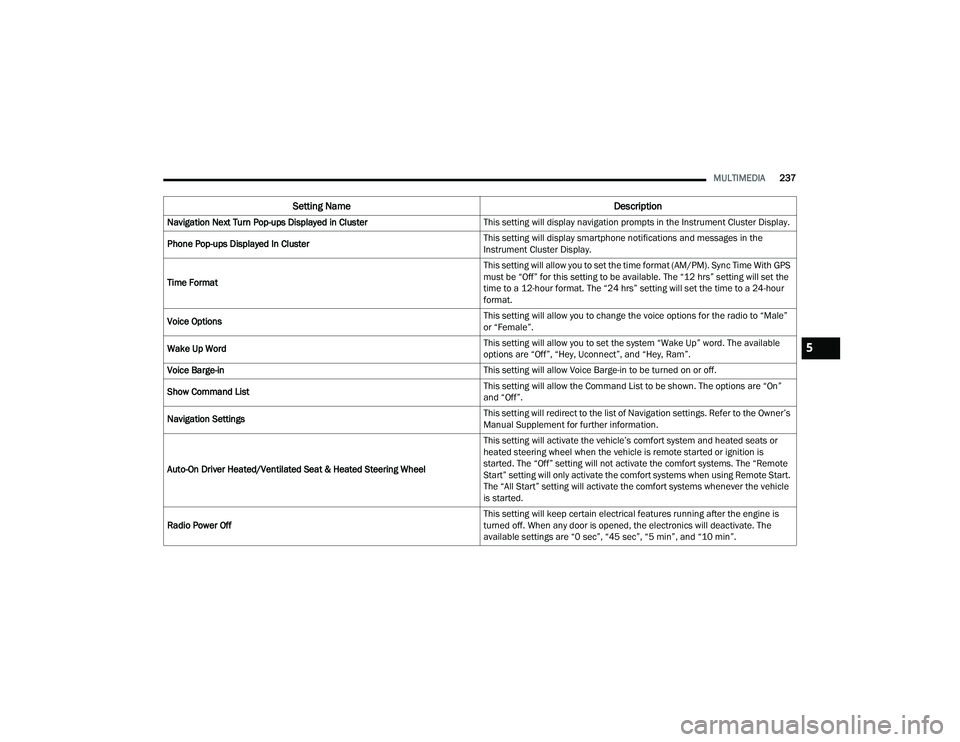
Navigation Next Turn Pop-ups Displayed in Cluster This setting will display navigation prompts in the Instrument Cluster Display.
Phone Pop-ups Displayed In Cluster This setting will display smartphone notifications and messages in the
Instrument Cluster Display.
Time Format This setting will allow you to set the time format (AM/PM). Sync Time With GPS
must be “Off” for this setting to be available. The “12 hrs” setting will set the
time to a 12-hour format. The “24 hrs” setting will set the time to a 24-hour
format.
Voice Options This setting will allow you to change the voice options for the radio to “Male”
or “Female”.
Wake Up Word This setting will allow you to set the system “Wake Up” word. The available
options are “Off”, “Hey, Uconnect”, and “Hey, Ram”.
Voice Barge-in This setting will allow Voice Barge-in to be turned on or off.
Show Command List This setting will allow the Command List to be shown. The options are “On”
and “Off”.
Navigation Settings This setting will redirect to the list of Navigation settings. Refer to the Owner’s
Manual Supplement for further information.
Auto-On Driver Heated/Ventilated Seat & Heated Steering Wheel This setting will activate the vehicle’s comfort system and heated seats or
heated steering wheel when the vehicle is remote started or ignition is
started. The “Off” setting will not activate the comfort systems. The “Remote
Start” setting will only activate the comfort systems when using Remote Start.
The “All Start” setting will activate the comfort systems whenever the vehicle
is started.
Radio Power Off This setting will keep certain electrical features running after the engine is
turned off. When any door is opened, the electronics will deactivate. The
available settings are “0 sec”, “45 sec”, “5 min”, and “10 min”.
Setting Name
Description
5
22_DT_OM_EN_USC_t.book Page 237
Page 240 of 496

238MULTIMEDIA
Radio Off With Door This setting will allow you to determine if the radio shuts off when any of the
doors are opened.
Audio Settings This setting will open the submenu, containing the audio settings
Ú
page 255.
App Drawer Favoriting Pop-ups This setting will allow you to favorite app drawer pop-ups with “On” and “Off”
options.
App Drawer Unfavoritings Pop-ups This setting will allow you to unfavorite app drawer pop-ups with “On” and
“Off” options.
New Text Message Pop-ups This setting will allow you to have pop-up notifications for new text messages.
Setting options are “On” and “Off”.
Missed Calls Message This setting will allow you to have pop-up notifications for missed calls. Setting
options are “On” and “Off”.
Navigation Pop-ups This setting will allow you to have pop-up notifications for Navigation. Setting
options are “On” and “Off”.
Reset App Drawer to Default Order This setting will reset the app drawer to its factory default layout.
Restore Settings to Default This setting will return all the previously changed settings to their factory
default.
Trip B This setting will turn the Trip B feature in the cluster on or off.
Audio Info On Cluster This setting will turn the audio info on the cluster on or off.
Digital Speed On All Cluster Screens This setting will show the digital speedometer on all cluster screens.
Consumption Bar On Cluster Screen This setting will show the digital fuel consumption bar on all cluster screens.
Custom Areas On Cluster This setting will allow you to customize the information displayed on the
cluster.
Head Up Display This setting will turn the Head Up Display (HUD) on or off.
Setting NameDescription
22_DT_OM_EN_USC_t.book Page 238
Page 242 of 496

240MULTIMEDIA
Display Brightness With Headlights OFF/Brightness This setting will allow you to set the brightness when the headlights are off. To
access this setting, Display Mode must be set to Manual. The “+” setting will
increase the brightness; the “-” will decrease the brightness.
Set Theme This setting will allow you to change the display theme.
Units This setting will allow you to change the units. The available options are
“Speed” (MPH or km/h), “Distance” (mi or km), “Fuel Consumption” (MPG
[US], MPG [UK], L/100 km, or km/L), “Pressure” (psi, kPa, or bar),
“Temperature” (°C or °F), Power” (HP [US], Gal HP [UK], or kW), and “Torque”
(lb-ft or Nm) units of measurement independently.
Touchscreen Beep This setting will allow you to turn the touchscreen beep on or off.
Control Screen Timeout This setting allows you to set the Control Screen to turn off automatically after
five seconds or stay open until manually closed.
Navigation Next Turn Pop-ups Displayed in Cluster This setting will display navigation prompts in the Instrument Cluster Display.
Phone Pop-ups Displayed In Cluster This setting will display smartphone notifications and messages in the
Instrument Cluster Display.
Fuel Saver Display This setting will enable fuel saver mode in the Instrument Cluster Display.
Ready To Drive Pop-ups This setting will enable the Ready To Drive Pop-ups in the Instrument Cluster
Display.
Setting Name
Description
22_DT_OM_EN_USC_t.book Page 240
Page 248 of 496
246MULTIMEDIA
Navigation
Trailer Brake/Trailer
When the Navigation button is pressed on the touchscreen, the system displays options related to the vehicle’s built-in Navigation system. These settings can
change which icons display on the map, how “time to arrival is calculated”, and route types.
For more information on Navigation and settings, refer to the Uconnect Owner’s Manual Supplement.
NOTE:Depending on the vehicle’s options, feature settings may vary.
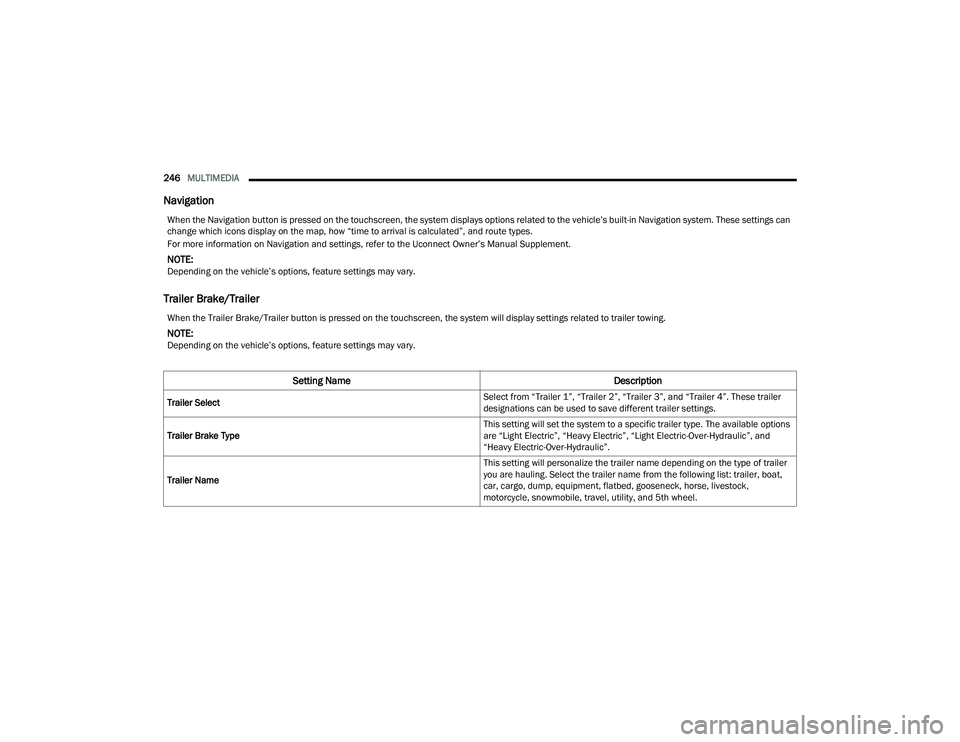
When the Trailer Brake/Trailer button is pressed on the touchscreen, the system will display settings related to trailer towing.
NOTE:Depending on the vehicle’s options, feature settings may vary.
Setting Name Description
Trailer Select Select from “Trailer 1”, “Trailer 2”, “Trailer 3”, and “Trailer 4”. These trailer
designations can be used to save different trailer settings.
Trailer Brake Type This setting will set the system to a specific trailer type. The available options
are “Light Electric”, “Heavy Electric”, “Light Electric-Over-Hydraulic”, and
“Heavy Electric-Over-Hydraulic”.
Trailer Name This setting will personalize the trailer name depending on the type of trailer
you are hauling. Select the trailer name from the following list: trailer, boat,
car, cargo, dump, equipment, flatbed, gooseneck, horse, livestock,
motorcycle, snowmobile, travel, utility, and 5th wheel.
22_DT_OM_EN_USC_t.book Page 246
Page 258 of 496
256MULTIMEDIA
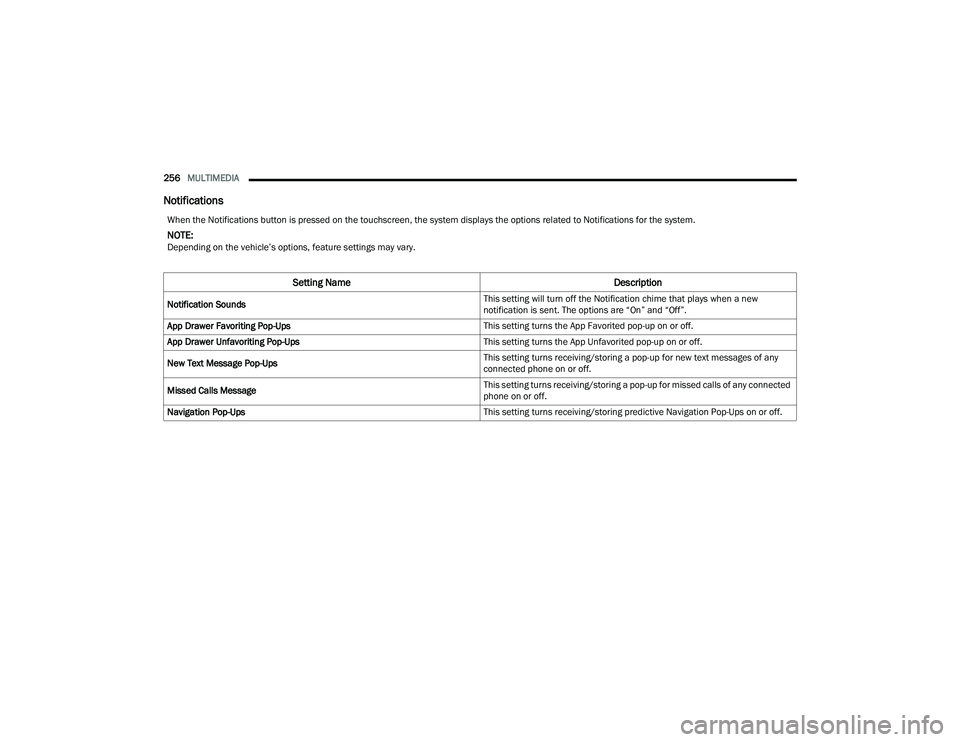
Notifications
When the Notifications button is pressed on the touchscreen, the system displays the options related to Notifications for the system.
NOTE:Depending on the vehicle’s options, feature settings may vary.
Setting Name Description
Notification Sounds This setting will turn off the Notification chime that plays when a new
notification is sent. The options are “On” and “Off”.
App Drawer Favoriting Pop-Ups This setting turns the App Favorited pop-up on or off.
App Drawer Unfavoriting Pop-Ups This setting turns the App Unfavorited pop-up on or off.
New Text Message Pop-Ups This setting turns receiving/storing a pop-up for new text messages of any
connected phone on or off.
Missed Calls Message This setting turns receiving/storing a pop-up for missed calls of any connected
phone on or off.
Navigation Pop-Ups This setting turns receiving/storing predictive Navigation Pop-Ups on or off.
22_DT_OM_EN_USC_t.book Page 256
Page 286 of 496
284MULTIMEDIA
SiriusXM Guardian™ provides:
The ability to remotely lock/unlock and remote
start your vehicle from virtually anywhere by
using the Mobile App or your computer.
If equipped — Send & Go capability with the
Mobile App. Use the Mobile App to easily search,
map and send your locations directly to your
Uconnect Navigation.
The ability to locate your vehicle, when you
forget where you parked, using the Vehicle
Finder function of the Mobile App.
Before you drive, familiarize yourself with the
easy-to-use Uconnect system and SiriusXM
Guardian™ connected services.
The ASSIST and SOS Call Buttons On Your
Rearview Mirror Or Overhead Console
If equipped, the ASSIST Button is used for
contacting Roadside Assistance, Vehicle Care,
Uconnect Care, and SiriusXM Guardian™
Customer Care. The SOS Call button connects you
directly to SiriusXM Guardian™ Customer Care for
assistance in an emergency.
Activation — If Equipped
To unlock the full potential of SiriusXM Guardian™
in your vehicle, you must activate your SiriusXM
Guardian™ connected services.
1. Press the Apps icon on the bottom of your in-vehicle touchscreen.
2. Select the Activate Services icon from your list of apps.
3. For customers in the United States , select
“Customer Care” to speak with a SiriusXM
Guardian™ Customer Care agent who will
activate services in your vehicle, or select
“Enter Email” to activate on the web.
For customers in Canada , enter your email
address to activate services in your vehicle.
Included Trial Period For New Vehicles
Your new vehicle may come with an included trial
period for use of the SiriusXM Guardian™
connected services starting on the date of vehicle
purchase. To get started with your trial, enrollment
in SiriusXM Guardian™ is required. Your Uconnect
system includes a trial* of SiriusXM Guardian™
connected services from your date of purchase.
* Included trial applies to new vehicles only.
Features And Packages
After the trial period, you must purchase a
subscription to continue your services by calling a
SiriusXM Guardian™ Customer Care agent.
GETTING STARTED WITH CONNECTED
V
EHICLE SERVICES
Download The Mobile App
Once you have activated your services, you’re only
a few steps away from using connected services.
Download the Mobile App to your mobile device.
Use your Owner Account login and password to
open the app and then set up a PIN.
22_DT_OM_EN_USC_t.book Page 284