tow RAM 1500 2022 Owners Manual
[x] Cancel search | Manufacturer: RAM, Model Year: 2022, Model line: 1500, Model: RAM 1500 2022Pages: 496, PDF Size: 18.03 MB
Page 5 of 496
3
Power Folding Outside Mirrors For
Standard And Trailer Tow — If Equipped.........48
Trailer Towing Mirrors — If Equipped...............49
Heated Mirrors — If Equipped..........................49
Tilt Side Mirrors In Reverse — If Equipped......49
UNIVERSAL GARAGE DOOR OPENER
(HOMELINK®) — IF EQUIPPED ............................ 49
Before You Begin Programming
HomeLink®.......................................................50
Erasing All The HomeLink® Channels ............50
Identifying Whether You Have A Rolling
Code Or Non-Rolling Code Device ...................50
Programming HomeLink® To A Garage
Door Opener .....................................................51
Programming HomeLink® To A
Miscellaneous Device ......................................52
Reprogramming A Single HomeLink®
Button ...............................................................52
Canadian/Gate Operator Programming .........52
Security .............................................................53
Troubleshooting Tips ........................................53
EXTERIOR LIGHTS.................................................. 54
Headlight Switch...............................................54
Multifunction Lever .........................................55
Daytime Running Lights (DRLs) ......................55
High/Low Beam Switch ...................................55 Automatic High Beam Headlamp
Control — If Equipped ......................................55
Flash-To-Pass ...................................................55
Automatic Headlights — If Equipped ..............56
Parking Lights And Panel Lights ......................56
Automatic Headlights With Wipers .................56
Headlight Delay ................................................56
Lights-On Reminder .........................................56
Fog Lights — If Equipped .................................57
Turn Signals ......................................................57
Lane Change Assist — If Equipped ..................57
Cargo Lights/Trailer Spotter Lights/
Trailer Hitch Light With Bed Lights —
If Equipped........................................................57
Battery Saver ....................................................59
INTERIOR LIGHTS ..................................................59
Courtesy Lights .................................................59
Illuminated Entry .............................................60
WINDSHIELD WIPERS AND WASHERS............... 61
Windshield Wiper Operation ............................61
Rain Sensing Wipers — If Equipped ................62
CLIMATE CONTROLS .............................................62
Automatic Climate Control
Descriptions And Functions ............................62
Manual Climate Control Descriptions And
Functions .........................................................65 Automatic Temperature Control (ATC) —
If Equipped .......................................................67
Climate Voice Recognition — If Equipped ....... 68
Operating Tips .................................................68
INTERIOR STORAGE AND EQUIPMENT ............... 69
Storage ............................................................. 69
USB/AUX Control .............................................. 75
Electrical Power Outlets................................... 76
Power Inverter — If Equipped .......................... 77
Wireless Charging Pad — If Equipped ............. 79
WINDOWS ............................................................. 79
Power Windows ................................................ 79
Automatic Window Features ........................... 80
Reset Auto-Up .................................................. 80
Window Lockout Switch ................................... 81
Power Sliding Rear Window — If Equipped ..... 81
Manual Sliding Rear Window —
If Equipped .......................................................81
Wind Buffeting .................................................81
POWER SUNROOF — IF EQUIPPED ..................... 82
Single Pane Power Sunroof — If Equipped ..... 82
Dual Pane Power Sunroof — If Equipped........ 83
HOOD....................................................................... 85
To Open The Hood............................................ 85
To Close The Hood ........................................... 86
22_DT_OM_EN_USC_t.book Page 3
Page 8 of 496
6
TRAILER CAMERAS — IF EQUIPPED ................. 203 Trailer Surround View Camera System —
If Equipped..................................................... 203
AUX Camera — If Equipped ........................... 206
REFUELING THE VEHICLE — GASOLINE
ENGINE ................................................................. 207
REFUELING THE VEHICLE — DIESEL
ENGINE ................................................................. 208
Avoid Using Contaminated Fuel ................... 208
Bulk Fuel Storage — Diesel Fuel................... 209
Diesel Exhaust Fluid ...................................... 209Diesel Exhaust Fluid Storage........................ 209
Adding Diesel Exhaust Fluid ......................... 209
VEHICLE LOADING ............................................... 211
Gross Vehicle Weight Rating (GVWR) .......... 211
Payload .......................................................... 211
Gross Axle Weight Rating (GAWR) ................ 211
Tire Size.......................................................... 212
Rim Size ......................................................... 212
Inflation Pressure .......................................... 212
Curb Weight ................................................... 212Loading .......................................................... 212
TRAILER TOWING ................................................ 212
Common Towing Definitions ......................... 213Trailer Hitch Type and Maximum Trailer
Weight ............................................................ 216
Trailer Towing Weights
(Maximum Trailer Weight Ratings) ............... 217 Trailer And Tongue Weight............................ 217
Trailer Reverse Steering Control .................. 217
Towing Requirements .................................. 219
Towing Tips ................................................... 225
SNOWPLOW......................................................... 225
Before Plowing............................................... 226
Snowplow Prep Package Model
Availability ...................................................... 226
Over The Road Operation With Snowplow
Attached......................................................... 226
Operating Tips ............................................... 226
General Maintenance ................................... 226
RECREATIONAL TOWING
(BEHIND MOTORHOME) .................................... 227
Towing This Vehicle Behind Another
Vehicle ........................................................... 227
Recreational Towing — Two-Wheel
Drive Models.................................................. 228
Recreational Towing — Four-Wheel
Drive Models.................................................. 228
DRIVING TIPS ....................................................... 230
Driving On Slippery Surfaces ....................... 230
Driving Through Water ................................. 231
Off-Road Driving Tips .................................... 232
MULTIMEDIA
UCONNECT SYSTEMS .......................................... 233
CYBERSECURITY .................................................. 233
UCONNECT SETTINGS ........................................ 234Customer Programmable Features ............ 235
UCONNECT INTRODUCTION................................ 259
System Overview .......................................... 259Safety And General Information .................. 261
UCONNECT MODES ............................................. 262
Steering Wheel Audio Controls..................... 262Radio Mode .................................................. 262Media Mode ................................................. 270
Phone Mode ................................................. 272
CONNECTED VEHICLE SERVICES —
IF EQUIPPED ........................................................ 282
Is My Vehicle Connected? ............................ 282
Introduction To Connected Vehicle
Services ........................................................ 283
Getting Started With Connected Vehicle
Services ........................................................ 284
Using SiriusXM Guardian™ .......................... 286
Manage My SiriusXM Guardian™
Account .......................................................... 297
22_DT_OM_EN_USC_t.book Page 6
Page 9 of 496
7
CONNECTED SERVICES FAQS ........................... 297 Connected Services SOS FAQs —
If Equipped .................................................... 298
Connected Services Remote Door
Lock/Unlock FAQs ........................................ 298
Connected Services Roadside
Assistance FAQs ........................................... 298Connected Services Send & Go FAQs —
If Equipped .................................................... 298
Connected Services Vehicle Finder FAQs ... 299
Connected Services Stolen Vehicle
Assistance FAQs — If Equipped ................... 299
Connected Services Remote Vehicle
Start FAQs ..................................................... 299
Connected Services Remote
Horn & Lights FAQs ....................................... 300
Connected Services Account
FAQs — If Equipped ....................................... 300
Data Collection & Privacy.............................. 302
RADIO OPERATION AND MOBILE PHONES...... 302
Regulatory And Safety Information .............. 303
PERFORMANCE PAGES — IF EQUIPPED...........303
Timers ............................................................ 304
Gauges ........................................................... 304G-Force ........................................................... 305Dynamometer (Dyno)/Engine ....................... 305
Vehicle Dynamics .......................................... 306 OFF-ROAD PAGES — IF EQUIPPED ................... 306
Off-Road Pages Status Bar .......................... 307
Vehicle Dynamics ......................................... 308
Accessory Gauge ........................................... 309Pitch & Roll .................................................... 310
Suspension .................................................... 311
Forward Facing Camera................................ 311
SAFETY
SAFETY FEATURES .............................................. 312
Anti-Lock Brake System (ABS) ..................... 312
Electronic Brake Control (EBC) System ....... 313
AUXILIARY DRIVING SYSTEMS.......................... 319
Blind Spot Monitoring (BSM) —
If Equipped .................................................... 319
Forward Collision Warning (FCW)
With Mitigation — If Equipped ...................... 325Tire Pressure Monitoring System (TPMS) .... 328
OCCUPANT RESTRAINT SYSTEMS ................... 334
Occupant Restraint Systems Features ....... 334
Important Safety Precautions ...................... 334Seat Belt Systems ........................................ 335Supplemental Restraint Systems (SRS) ...... 341Child Restraints ............................................ 354
SAFETY TIPS ........................................................ 368
Transporting Passengers .............................. 368Transporting Pets ....................................... 368 Safety Checks You Should Make
Inside The Vehicle ........................................ 368
Periodic Safety Checks You Should
Make Outside The Vehicle ............................ 369
Exhaust Gas................................................... 370
Carbon Monoxide Warnings ........................ 370
IN CASE OF EMERGENCY
HAZARD WARNING FLASHERS ......................... 371
ASSIST AND SOS SYSTEM — IF EQUIPPED ...... 372
JACKING AND TIRE CHANGING ......................... 375 Preparations For Jacking .............................. 375
Jack Location................................................. 376
Removal Of Jack And Tools .......................... 376
Removing The Spare Tire ............................. 378Jacking Instructions ...................................... 379
To Stow The Flat Or Spare ........................... 382
Reinstalling The Jack And Tools ................... 383
JUMP STARTING .................................................. 384
Preparations For Jump Start ........................ 384Jump Starting Procedure .............................. 385
REFUELING IN EMERGENCY –
IF EQUIPPED ........................................................ 386
IF YOUR ENGINE OVERHEATS ........................... 387
MANUAL PARK RELEASE ................................... 388
FREEING A STUCK VEHICLE .............................. 389
22_DT_OM_EN_USC_t.book Page 7
Page 10 of 496
8
TOWING A DISABLED VEHICLE .......................... 390 Two-Wheel Drive Models............................... 391
Four-Wheel Drive Models.............................. 392Emergency Tow Hooks — If Equipped .......... 392
ENHANCED ACCIDENT RESPONSE SYSTEM
(EARS) .................................................................. 392
EVENT DATA RECORDER (EDR) ......................... 392
SERVICING AND MAINTENANCE
SCHEDULED SERVICING — GASOLINE
ENGINE ................................................................. 393
Maintenance Plan ......................................... 394
SCHEDULED SERVICING — DIESEL
ENGINE ................................................................. 398
Maintenance Plan — Diesel Fuel Up To B5
Biodiesel ....................................................... 399
Additional Maintenance — B6 To B20
Biodiesel ........................................................ 402
ENGINE COMPARTMENT .................................... 403
3.6L Engine With Stop/Start ........................ 403
5.7L Engine Without Stop/Start ................... 404
5.7L Engine With Stop/Start ........................ 405
3.0L Diesel Engine ........................................ 406
Checking Oil Level ......................................... 407
Adding Washer Fluid ..................................... 407
Maintenance-Free Battery ............................ 408
Pressure Washing ......................................... 408 VEHICLE MAINTENANCE..................................... 408
Engine Oil — Gas Engine .............................. 409Engine Oil Filter ............................................ 409
Engine Air Cleaner Filter ............................... 410
Draining Fuel/Water Separator
Filter — Diesel Engine ................................... 412Underbody Mounted Fuel Filter
Replacement — Diesel Engine...................... 413Priming If The Engine Has Run Out
Of Fuel — Diesel Engine ................................ 414Intervention Regeneration Strategy —
Message Process Flow (Diesel Engine) ....... 414
Diesel Exhaust Fluid...................................... 415
Air Conditioner Maintenance........................ 415
Accessory Drive Belt Inspection ................... 418Body Lubrication ........................................... 418Windshield Wiper Blades.............................. 419Exhaust System ............................................ 420
Cooling System ............................................. 421Charge Air Cooler — Inter-Cooler
(Diesel Engine) .............................................. 424
Brake System ............................................... 425
Automatic Transmission .............................. 426Rear Axle And 4x4 Front Driving Axle
Fluid Level...................................................... 427
Transfer Case ................................................ 427Fuses.............................................................. 427
Bulb Replacement......................................... 438 TIRES ..................................................................... 444
Tire Safety Information ................................. 444
Tires — General Information ......................... 451
Tire Types....................................................... 455Spare Tires — If Equipped............................. 455Wheel And Wheel Trim Care......................... 457
Snow Traction Devices ................................. 458
Tire Rotation Recommendations ................ 460
DEPARTMENT OF TRANSPORTATION
UNIFORM TIRE QUALITY GRADES .................... 460
Treadwear...................................................... 460
Traction Grades ............................................. 461Temperature Grades..................................... 461
STORING THE VEHICLE ....................................... 461
BODYWORK .......................................................... 461
Protection From Atmospheric Agents .......... 461
Body And Underbody Maintenance ............. 462
Preserving The Bodywork ............................. 462
INTERIORS ........................................................... 464
Seats And Fabric Parts ................................. 464
Plastic And Coated Parts .............................. 465
Leather Surfaces........................................... 465
Glass Surfaces ............................................. 465
22_DT_OM_EN_USC_t.book Page 8
Page 18 of 496
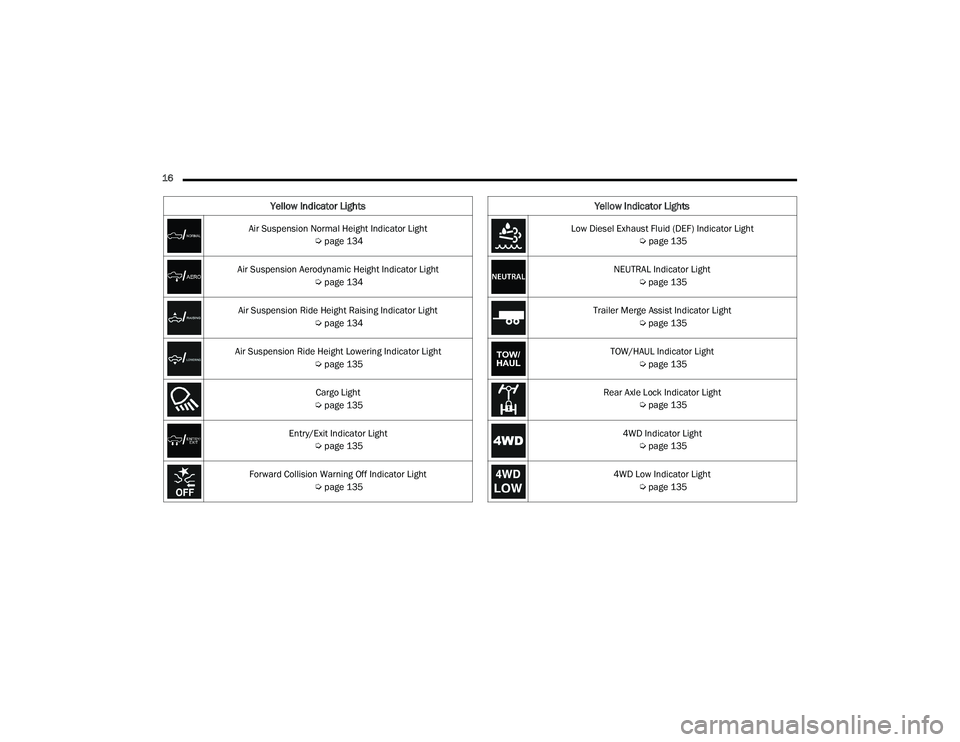
16 Air Suspension Normal Height Indicator Light Úpage 134
Air Suspension Aerodynamic Height Indicator Light Úpage 134
Air Suspension Ride Height Raising Indicator Light Úpage 134
Air Suspension Ride Height Lowering Indicator Light Úpage 135
Cargo Light
Ú page 135
Entry/Exit Indicator Light Úpage 135
Forward Collision Warning Off Indicator Light Úpage 135
Yellow Indicator Lights
Low Diesel Exhaust Fluid (DEF) Indicator Light
Úpage 135
NEUTRAL Indicator Light Úpage 135
Trailer Merge Assist Indicator Light Úpage 135
TOW/HAUL Indicator Light Úpage 135
Rear Axle Lock Indicator Light Úpage 135
4WD Indicator Light Úpage 135
4WD Low Indicator Light Úpage 135
Yellow Indicator Lights
22_DT_OM_EN_USC_t.book Page 16
Page 23 of 496
GETTING TO KNOW YOUR VEHICLE21
Replacing The Battery In The Key Fob
The replacement battery model is one CR2450
battery.
NOTE:
Customers are recommended to use a battery
obtained from Mopar®. Aftermarket coin
battery dimensions may not meet the original
OEM coin battery dimensions.
Perchlorate Material — special handling may
apply. See www.dtsc.ca.gov/hazard-
ouswaste/perchlorate for further information.
Do not touch the battery terminals that are on
the back housing or the printed circuit board.
Do not replace the coin battery if the LED on the
key fob above the top row buttons blinks when
a button is pressed. The coin battery should last
a minimum of three years with normal vehicle
usage.
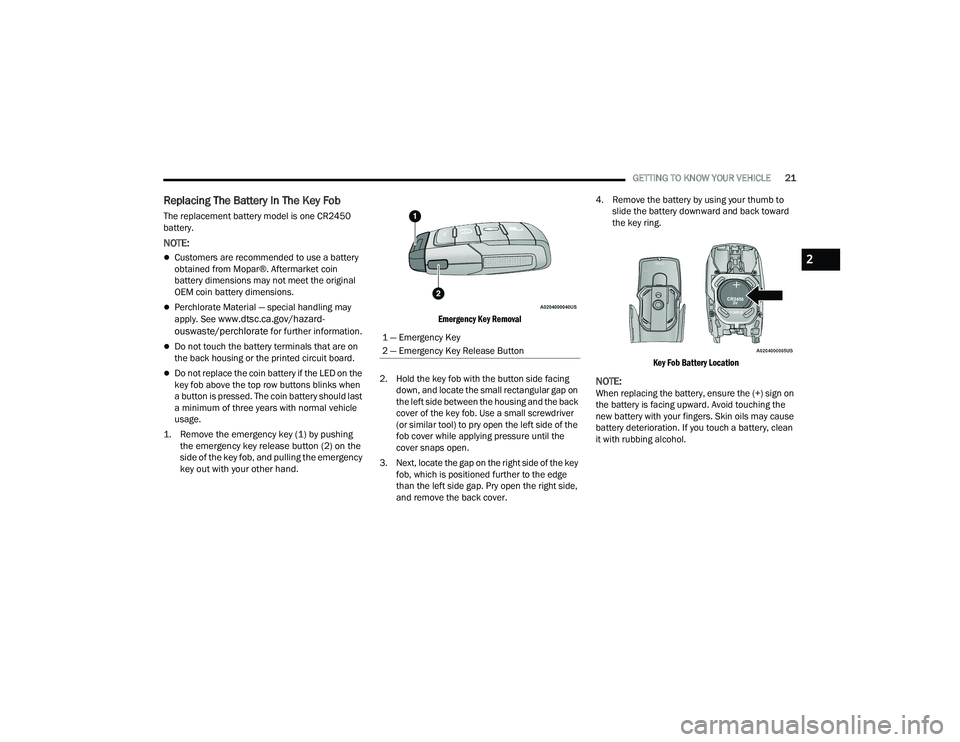
1. Remove the emergency key (1) by pushing the emergency key release button (2) on the
side of the key fob, and pulling the emergency
key out with your other hand.
Emergency Key Removal
2. Hold the key fob with the button side facing down, and locate the small rectangular gap on
the left side between the housing and the back
cover of the key fob. Use a small screwdriver
(or similar tool) to pry open the left side of the
fob cover while applying pressure until the
cover snaps open.
3. Next, locate the gap on the right side of the key fob, which is positioned further to the edge
than the left side gap. Pry open the right side,
and remove the back cover. 4. Remove the battery by using your thumb to
slide the battery downward and back toward
the key ring.
Key Fob Battery Location
NOTE:When replacing the battery, ensure the (+) sign on
the battery is facing upward. Avoid touching the
new battery with your fingers. Skin oils may cause
battery deterioration. If you touch a battery, clean
it with rubbing alcohol.
1 — Emergency Key
2 — Emergency Key Release Button
2
22_DT_OM_EN_USC_t.book Page 21
Page 35 of 496
GETTING TO KNOW YOUR VEHICLE33
NOTE:
When the Child-Protection Door Lock system is
engaged, the door can be opened only by using
the outside door handle even though the inside
door lock is in the unlocked position.
After disengaging the Child-Protection Door
Lock system, always test the door from the
inside to make certain it is in the unlocked posi -
tion.
After engaging the Child-Protection Door Lock
system, always test the door from the inside to
make certain it is in the locked position.
For emergency exit with the system engaged,
pull up on the door lock knob (unlocked posi -
tion), roll down the window, and open the door
with the outside door handle.
NOTE:Always use this device when carrying children.
After engaging the Child-Protection Door Lock
system on both rear doors, check for effective
engagement by trying to open a door with the
internal handle. Once the Child-Protection Door
Lock system is engaged, it is impossible to open
the doors from inside the vehicle. Before getting
out of the vehicle, be sure to check that there is
no one left inside.
STEERING WHEEL
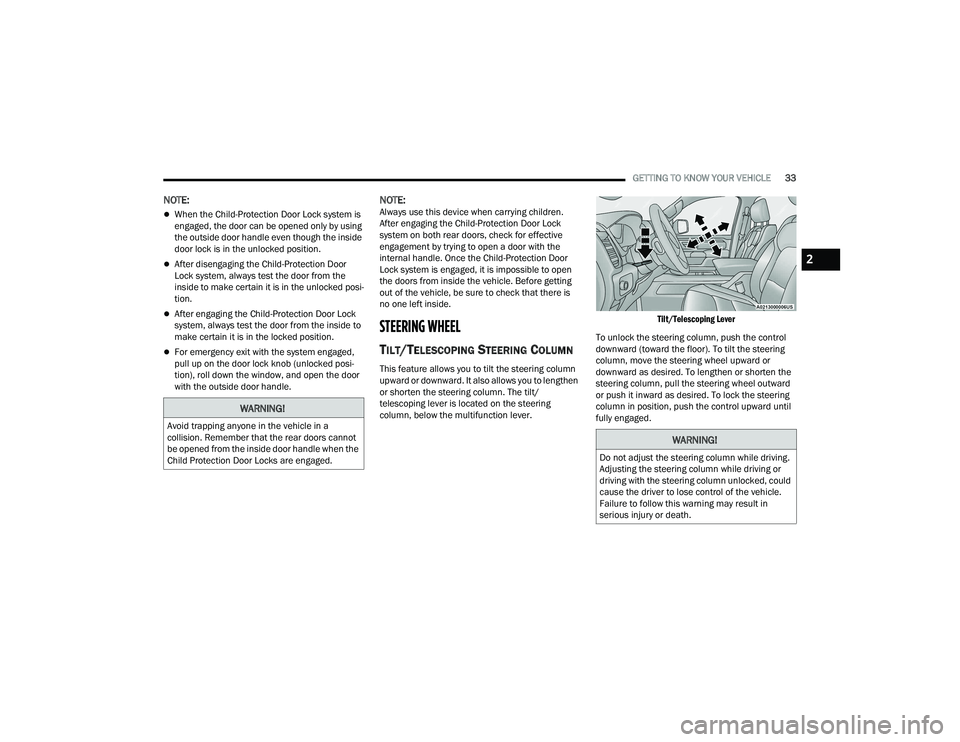
TILT/TELESCOPING STEERING COLUMN
This feature allows you to tilt the steering column
upward or downward. It also allows you to lengthen
or shorten the steering column. The tilt/
telescoping lever is located on the steering
column, below the multifunction lever.
Tilt/Telescoping Lever
To unlock the steering column, push the control
downward (toward the floor). To tilt the steering
column, move the steering wheel upward or
downward as desired. To lengthen or shorten the
steering column, pull the steering wheel outward
or push it inward as desired. To lock the steering
column in position, push the control upward until
fully engaged.
WARNING!
Avoid trapping anyone in the vehicle in a
collision. Remember that the rear doors cannot
be opened from the inside door handle when the
Child Protection Door Locks are engaged.
WARNING!
Do not adjust the steering column while driving.
Adjusting the steering column while driving or
driving with the steering column unlocked, could
cause the driver to lose control of the vehicle.
Failure to follow this warning may result in
serious injury or death.
2
22_DT_OM_EN_USC_t.book Page 33
Page 44 of 496
42GETTING TO KNOW YOUR VEHICLE
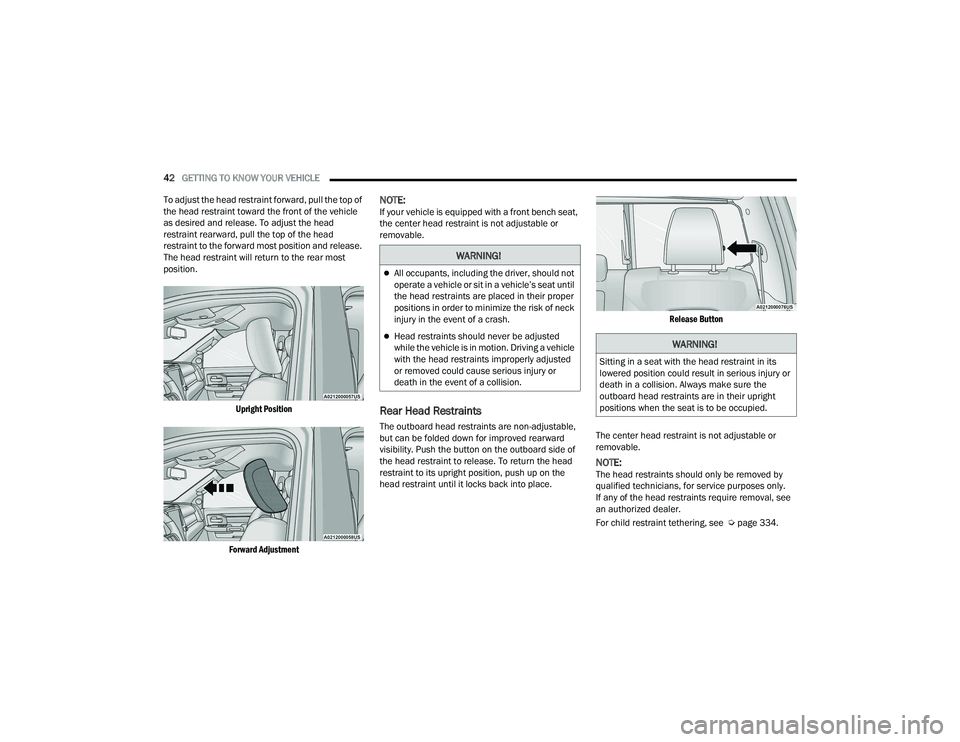
To adjust the head restraint forward, pull the top of
the head restraint toward the front of the vehicle
as desired and release. To adjust the head
restraint rearward, pull the top of the head
restraint to the forward most position and release.
The head restraint will return to the rear most
position.
Upright Position
Forward Adjustment
NOTE:If your vehicle is equipped with a front bench seat,
the center head restraint is not adjustable or
removable.
Rear Head Restraints
The outboard head restraints are non-adjustable,
but can be folded down for improved rearward
visibility. Push the button on the outboard side of
the head restraint to release. To return the head
restraint to its upright position, push up on the
head restraint until it locks back into place.
Release Button
The center head restraint is not adjustable or
removable.
NOTE:The head restraints should only be removed by
qualified technicians, for service purposes only.
If any of the head restraints require removal, see
an authorized dealer.
For child restraint tethering, see Ú page 334.
WARNING!
All occupants, including the driver, should not
operate a vehicle or sit in a vehicle’s seat until
the head restraints are placed in their proper
positions in order to minimize the risk of neck
injury in the event of a crash.
Head restraints should never be adjusted
while the vehicle is in motion. Driving a vehicle
with the head restraints improperly adjusted
or removed could cause serious injury or
death in the event of a collision.WARNING!
Sitting in a seat with the head restraint in its
lowered position could result in serious injury or
death in a collision. Always make sure the
outboard head restraints are in their upright
positions when the seat is to be occupied.
22_DT_OM_EN_USC_t.book Page 42
Page 46 of 496
44GETTING TO KNOW YOUR VEHICLE
5. You can interrupt the help message or system prompts by pushing the VR or Phone button
and saying a Voice Command from the current
category.
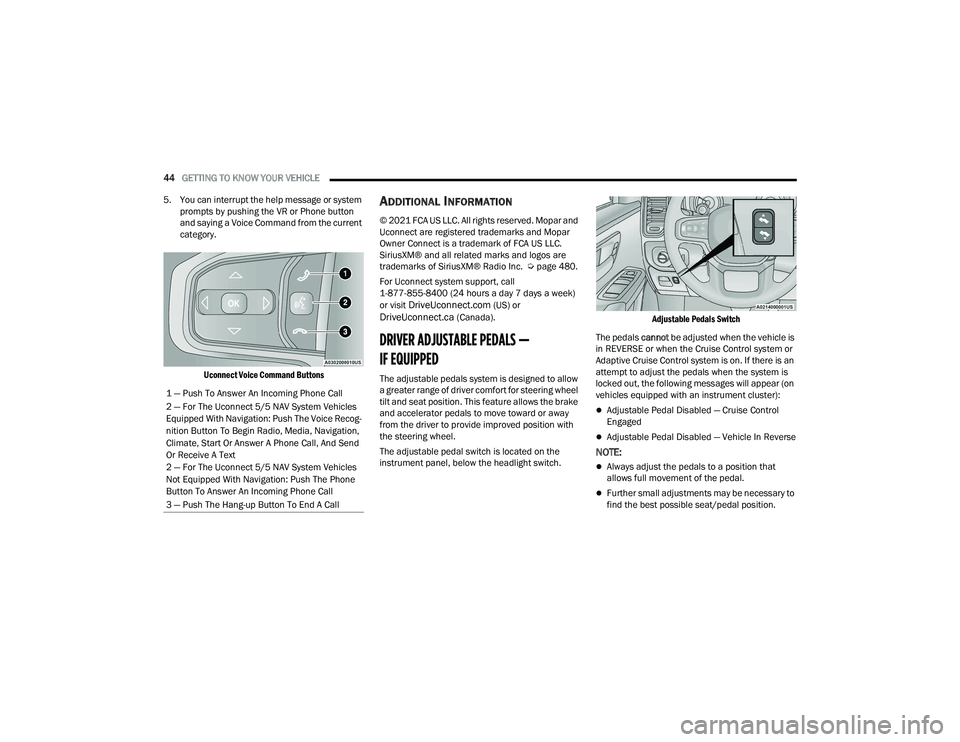
Uconnect Voice Command Buttons
ADDITIONAL INFORMATION
© 2021 FCA US LLC. All rights reserved. Mopar and
Uconnect are registered trademarks and Mopar
Owner Connect is a trademark of FCA US LLC.
SiriusXM® and all related marks and logos are
trademarks of SiriusXM® Radio Inc. Ú page 480.
For Uconnect system support, call
1-877-855-8400 (24 hours a day 7 days a week)
or visit
DriveUconnect.com (US) or DriveUconnect.ca (Canada).
DRIVER ADJUSTABLE PEDALS —
IF EQUIPPED
The adjustable pedals system is designed to allow
a greater range of driver comfort for steering wheel
tilt and seat position. This feature allows the brake
and accelerator pedals to move toward or away
from the driver to provide improved position with
the steering wheel.
The adjustable pedal switch is located on the
instrument panel, below the headlight switch.
Adjustable Pedals Switch
The pedals cannot be adjusted when the vehicle is
in REVERSE or when the Cruise Control system or
Adaptive Cruise Control system is on. If there is an
attempt to adjust the pedals when the system is
locked out, the following messages will appear (on
vehicles equipped with an instrument cluster):
Adjustable Pedal Disabled — Cruise Control
Engaged
Adjustable Pedal Disabled — Vehicle In Reverse
NOTE:
Always adjust the pedals to a position that
allows full movement of the pedal.
Further small adjustments may be necessary to
find the best possible seat/pedal position.
1 — Push To Answer An Incoming Phone Call
2 — For The Uconnect 5/5 NAV System Vehicles
Equipped With Navigation: Push The Voice Recog
-
nition Button To Begin Radio, Media, Navigation,
Climate, Start Or Answer A Phone Call, And Send
Or Receive A Text
2 — For The Uconnect 5/5 NAV System Vehicles
Not Equipped With Navigation: Push The Phone
Button To Answer An Incoming Phone Call
3 — Push The Hang-up Button To End A Call
22_DT_OM_EN_USC_t.book Page 44
Page 47 of 496
GETTING TO KNOW YOUR VEHICLE45
For vehicles equipped with Driver Memory
Settings Úpage 34, you can use your key fob or
the memory switch on the driver’s door trim
panel to return the adjustable pedals to
pre-programmed positions.MIRRORS
INSIDE REARVIEW MIRROR
Manual Mirror — If Equipped
The mirror head can be adjusted up, down, left,
and right. The mirror should be adjusted to center
on the view through the rear window.
Headlight glare from vehicles behind you can be
reduced by moving the small control under the
mirror to the night position (toward the rear of the
vehicle). The mirror should be adjusted while set in
the day position (toward the windshield).
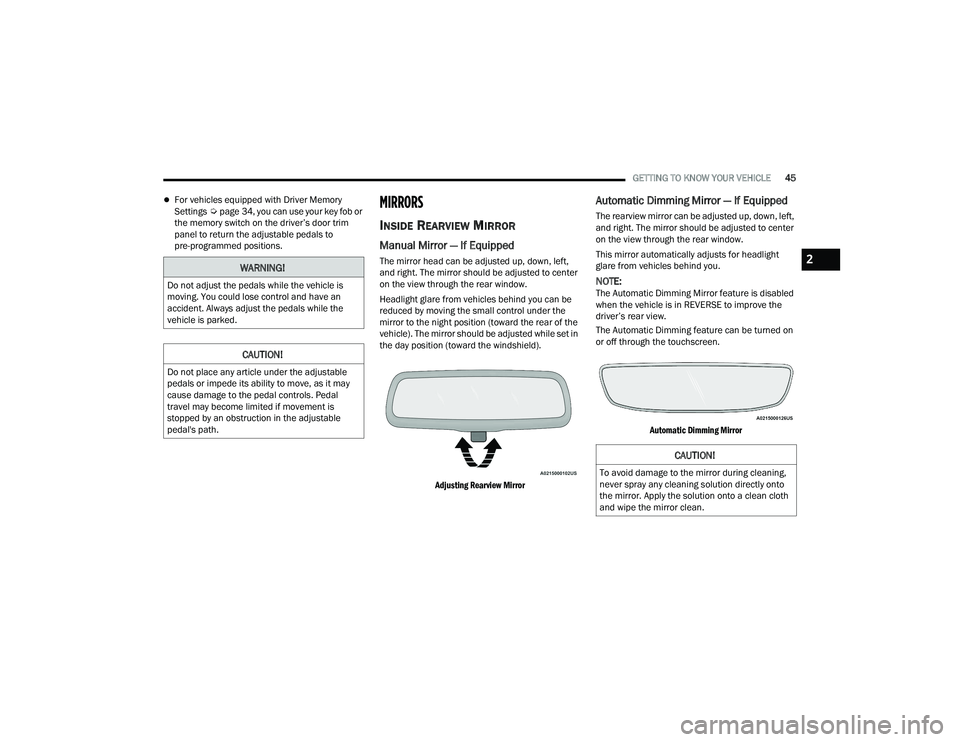
Adjusting Rearview Mirror
Automatic Dimming Mirror — If Equipped
The rearview mirror can be adjusted up, down, left,
and right. The mirror should be adjusted to center
on the view through the rear window.
This mirror automatically adjusts for headlight
glare from vehicles behind you.
NOTE:The Automatic Dimming Mirror feature is disabled
when the vehicle is in REVERSE to improve the
driver’s rear view.
The Automatic Dimming feature can be turned on
or off through the touchscreen.
Automatic Dimming Mirror
WARNING!
Do not adjust the pedals while the vehicle is
moving. You could lose control and have an
accident. Always adjust the pedals while the
vehicle is parked.
CAUTION!
Do not place any article under the adjustable
pedals or impede its ability to move, as it may
cause damage to the pedal controls. Pedal
travel may become limited if movement is
stopped by an obstruction in the adjustable
pedal's path.
CAUTION!
To avoid damage to the mirror during cleaning,
never spray any cleaning solution directly onto
the mirror. Apply the solution onto a clean cloth
and wipe the mirror clean.
2
22_DT_OM_EN_USC_t.book Page 45