remote start RAM 1500 2022 User Guide
[x] Cancel search | Manufacturer: RAM, Model Year: 2022, Model line: 1500, Model: RAM 1500 2022Pages: 496, PDF Size: 18.03 MB
Page 36 of 496

34GETTING TO KNOW YOUR VEHICLE
HEATED STEERING WHEEL —
I
F EQUIPPED
The steering wheel contains a heating
element that helps warm your hands in
cold weather. The heated steering wheel
has only one temperature setting. Once
the heated steering wheel has been turned on, it
will stay on until the operator turns it off. The
heated steering wheel may not turn on when it is
already warm.
The heated steering wheel button is located on the
center of the instrument panel below the radio
screen, and within the Climate or Controls screen
of the touchscreen.
Press the heated steering wheel button once to
turn the heating element on.
Press the heated steering wheel button a
second time to turn the heating element off.
NOTE:The engine must be running for the heated
steering wheel to operate.
For information on use with the Remote Start
system, see Ú page 26.
DRIVER MEMORY SETTINGS — IF EQUIPPED
This feature allows the driver to save up to two
different memory profiles for easy recall through a
memory switch. Each memory profile saves
desired position settings for the following features:
Driver’s seat
Easy Entry/Exit seat operation (if equipped)
Adjustable pedals (if equipped)
Side mirrors
NOTE:Your vehicle is equipped with two key fobs, each
can be linked to either memory position 1 or 2.
The driver memory settings switch is located on the
driver door, next to the door handle, and consists
of three buttons:
The set (S) button, which is used to activate the
memory save function.
The (1) and (2) buttons which are used to recall
either of two saved memory profiles.
Memory Settings Switch
WARNING!
Persons who are unable to feel pain to the
skin because of advanced age, chronic illness,
diabetes, spinal cord injury, medication,
alcohol use, exhaustion, or other physical
conditions must exercise care when using the
steering wheel heater. It may cause burns
even at low temperatures, especially if used
for long periods.
Do not place anything on the steering wheel
that insulates against heat, such as a blanket
or steering wheel covers of any type or mate -
rial. This may cause the steering wheel heater
to overheat.
22_DT_OM_EN_USC_t.book Page 34
Page 42 of 496

40GETTING TO KNOW YOUR VEHICLE
Front Heated Seats — If Equipped
The heated seat control buttons are
located on the center stack below the
radio screen, or within the Uconnect
system.
Push the heated seat button once to turn the
HI setting on.
Push the heated seat button a second time to
turn the MED setting on.
Push the heated seat button a third time to turn
the LO setting on.
Push the heated seat button a fourth time to
turn the heating elements off.
NOTE:
Once a heat setting is selected, heat will be felt
within two to five minutes.
The engine must be running for the heated
seats to operate.
The level of heat selected will stay on until the
operator changes it.
For information on use with the Remote Start
system, see Ú page 26.
Rear Heated Seats — If Equipped
On some models, the two rear outboard
seats may be equipped with heated
seats. There are two heated seat
switches that allow the rear passengers
to operate the seats independently. The heated
seat switches for each heater are located on the
rear of the center console.
You can choose from HI, MED, LO, or OFF heat
settings. Indicator lights in each switch indicate the
level of heat in use.
Push the heated seat button once to turn the
HI setting on.
Push the heated seat button a second time to
turn the MED setting on.
Push the heated seat button a third time to turn
the LO setting on.
Push the heated seat button a fourth time to
turn the heating elements off.
NOTE:The level of heat selected will stay on until the
operator changes it.
VENTILATED SEATS — IF EQUIPPED
Front Ventilated Seats
The ventilated seat control buttons are
located on the center stack below the
radio screen, or within the Uconnect
system. The fans operate at three
speeds, HI, MED and LO.
Press the ventilated seat button once to
choose HI.
Press the ventilated seat button a second time
to choose MED.
Press the ventilated seat button a third time to
choose LO.
Press the ventilated seat button a fourth time to
turn the ventilation off.
NOTE:The engine must be running for the ventilated
seats to operate.
For information on use with the Remote Start
system, see Ú page 26.
22_DT_OM_EN_USC_t.book Page 40
Page 64 of 496

62GETTING TO KNOW YOUR VEHICLE
RAIN SENSING WIPERS — IF EQUIPPED
This feature senses rain or snowfall on the
windshield and automatically activates the wipers.
Rotate the end of the multifunction lever to one of
four detent positions to activate this feature.
The sensitivity of the system can be adjusted with
the multifunction lever. Wiper delay position one is
the least sensitive, and wiper delay detent position
four is the most sensitive.
Wiper delay position three should be used for
normal rain conditions.
Positions one and two can be used if the driver
desires less wiper sensitivity. Position four can be
used if the driver desires more sensitivity. Place
the wiper switch in the O (off) position when not
using the system.
NOTE:
The Rain Sensing feature will not operate when
the wiper switch is in the low or high-speed posi -
tion.
The Rain Sensing feature may not function prop -
erly when ice, or dried salt water is present on
the windshield.
Use of Rain-X or products containing wax or sili-
cone may reduce Rain Sensing performance.
The Rain Sensing feature can be turned on and
off using the Uconnect system Ú page 234.The Rain Sensing system has protection features
for the wiper blades and arms, and will not operate
under the following conditions:
Low Ambient Temperature
— When the ignition
is first placed in the ON position, the Rain
Sensing system will not operate until the wiper
switch is moved, vehicle speed is greater than
3 mph (5 km/h), or the outside temperature is
greater than 32°F (0°C).
Transmission In NEUTRAL Position — When the
ignition is ON, and the automatic transmission
is in the NEUTRAL position, the Rain Sensing
system will not operate until the wiper switch is
moved, vehicle speed is greater than 3 mph
(5 km/h), or the gear selector is moved out of
the NEUTRAL position.
Remote Start Mode Inhibit — On vehicles
equipped with a Remote Start system, Rain
Sensing wipers are not operational when the
vehicle is in the Remote Start mode.
CLIMATE CONTROLS
The Climate Control system allows you to regulate
the temperature, air flow, and direction of air
circulating throughout the vehicle. The controls are
located on the touchscreen, and on the sides of
the touchscreen or on the instrument panel below
the radio.
AUTOMATIC CLIMATE CONTROL
D
ESCRIPTIONS AND FUNCTIONS
Uconnect 5 or 5 NAV With 8.4-inch Display Automatic
Temperature Controls
Uconnect 5 NAV With 12-inch Display Automatic Temperature Controls
22_DT_OM_EN_USC_t.book Page 62
Page 143 of 496

STARTING AND OPERATING141
NOTE:Engine start-up in very low ambient temperature
could result in evident white smoke. This condition
will disappear as the engine warms up.
AUTOMATIC TRANSMISSION
Start the engine with the transmission in PARK
position. Apply the brake before shifting into any
driving range.
NOTE:
This vehicle is equipped with a transmission
shift interlocking system. The brake pedal must
be pressed to shift out of PARK.
If equipped with an 8-speed transmission,
starting the vehicle in NEUTRAL is not possible
unless the Manual Park Release has been acti -
vated Ú page 388.
TIP START FEATURE
Do not press the accelerator. Cycle the ignition
switch briefly to the START position and release it.
The starter motor will continue to run and will
automatically disengage when the engine is
running.
KEYLESS ENTER ‘N GO™ — IGNITION
This feature allows the driver to operate the
ignition switch with the push of a button, as long as
the Remote Start/Keyless Enter ‘n Go™ key fob is
in the passenger compartment.
NORMAL STARTING USING ENGINE
START/STOP B
UTTON — GASOLINE
E
NGINE
To Turn On The Engine Using The ENGINE START/
STOP Button
1. The transmission must be in PARK.
2. Press and hold the brake pedal while pushing
the ENGINE START/STOP button once.
3. The system starts the vehicle. If the vehicle fails to start, the starter will disengage
automatically after 10 seconds.
4. If you wish to stop the cranking of the engine prior to the engine starting, push the button
again. To Turn Off The Engine Using The ENGINE START/
STOP Button
1. Place the gear selector in PARK, then push
and release the ENGINE START/STOP button.
The ignition will return to the OFF position.
2. If the gear selector is not in PARK, the ENGINE START/STOP button must be held for two
seconds or three short pushes in a row with
the vehicle speed above 5 mph (8 km/h) before the engine will shut off. The ignition will
remain in the ACC position until the gear
selector is in PARK and the button is pushed
twice to the OFF position.
3. If the gear selector is not in PARK and the ENGINE START/STOP button is pushed once
with the vehicle speed above 5 mph (8 km/h), the instrument cluster will display a “ Vehicle
Not In Park ” message and the engine will
remain running. Never leave a vehicle out of
the PARK position, or it could roll.
NOTE:If the gear selector is not in PARK, and the ENGINE
START/STOP button is pushed once with the
vehicle speed below 5 mph (8 km/h), the engine
will shut off and the ignition will remain in the ACC
position. If vehicle speed drops below 1.2 mph
(1.9 km/h), the vehicle may AutoPark
Ú page 142.
CAUTION!
The engine is allowed to crank as long as
25 seconds. If the engine fails to start during
this period, please wait at least two minutes
for the starter to cool before repeating start
procedure.
If the Water in Fuel Indicator Light remains on,
DO NOT START engine before you drain the
water from the fuel filter to avoid engine
damage Ú page 412.
4
22_DT_OM_EN_USC_t.book Page 141
Page 168 of 496
![RAM 1500 2022 User Guide
166STARTING AND OPERATING
Aero Height (Lowers the vehicle approximately
0.6 inch [15 mm]) – This position provides
improved aerodynamics by lowering the vehicle.
The vehicle will automatica RAM 1500 2022 User Guide
166STARTING AND OPERATING
Aero Height (Lowers the vehicle approximately
0.6 inch [15 mm]) – This position provides
improved aerodynamics by lowering the vehicle.
The vehicle will automatica](/img/34/59196/w960_59196-167.png)
166STARTING AND OPERATING
Aero Height (Lowers the vehicle approximately
0.6 inch [15 mm]) – This position provides
improved aerodynamics by lowering the vehicle.
The vehicle will automatically enter Automatic
Aero Mode when the vehicle speed remains
between 62 mph (100 km/h) and 66 mph
(106 km/h) for greater than 20 seconds or if the
vehicle speed exceeds 66 mph (106 km/h). The
vehicle will return to NRH from Aero Mode if the
vehicle speed remains between 30 mph
(48 km/h) and 35 mph (56 km/h) for greater
than 20 seconds or if the vehicle speed falls
below 30 mph (48 km/h).
NOTE:
Automatic Aero mode will be disabled if a
trailer is detected to prevent shifting loads.
Speed thresholds for raising/lowering the
vehicle automatically at higher speeds only
apply if Automatic Aero Mode is enabled in
your Uconnect Radio settings.
To enter Aero Height manually push the height
selector switch down once from NRH at any
vehicle speed. To return to NRH push the height
selector switch up once while vehicle speed is
less than 56 mph (90 km/h).
NOTE:Automatic Aero Mode may be disabled through
vehicle settings in the instrument cluster display
Ú page 114 or through your Uconnect Radio (if
equipped) Ú page 234.
Entry/Exit Height (Lowers the vehicle approxi -
mately 2 inches [51 mm]) – This position lowers
the vehicle for easier passenger entry and exit
as well as lowering the vehicle for easier loading
and unloading of cargo. To enter Entry/Exit
Mode, push the height selector switch down
once from the NRH while the vehicle speed is
below 33 mph (53 km/h). Once the vehicle
speed goes below 15 mph (24 km/h) the
vehicle height will begin to lower. If the vehicle
speed remains between 15 mph (24 km/h) and
25 mph (40 km/h) for greater than 60 seconds,
or the vehicle speed exceeds 25 mph (40 km/h)
the Entry/Exit change will be canceled. To return
to Normal Height Mode, push the height
selector switch up once while in Entry/Exit or
drive the vehicle over 15 mph (24 km/h).
NOTE:Entry/Exit Height may be achieved using the
Remote Lowering feature on your key fob for easier
entry/loading Ú page 19. The system requires that the ignition be in the ON/
RUN position or the engine running for all user
requested changes. When lowering the vehicle, all
of the doors must be closed. If a door is opened at
any time while the vehicle is lowering, the change
will not be completed until the open door(s) is
closed.
This system uses a lifting and lowering pattern
which keeps the headlights from incorrectly
shining into oncoming traffic. When raising the
vehicle, the rear of the vehicle will move up first
and then the front. When lowering the vehicle, the
front will move down first and then the rear.
After the engine is turned off, it may be noticed that
the air suspension system operates briefly; this is
normal. The system is correcting the position of the
vehicle to ensure a proper appearance.
To assist with changing a spare tire, the air
suspension system has a feature which allows the
automatic leveling to be disabled Ú
page 114.
CAUTION!
When in ENTRY/EXIT Height, be aware of your
surroundings, you may not have the clearance
required for certain areas and vehicle damage
may occur.
22_DT_OM_EN_USC_t.book Page 166
Page 226 of 496

224STARTING AND OPERATING
Seven-Pin Connector
Trailer Light Check
This feature will run the trailer lights through a
sequence to check the trailer light function. It is
available in the Instrument Cluster under the
Trailer Tow menu Ú page 121. When activated the feature will enable all of the
exterior lights sequentially for up to five minutes
for time to walk around and verify functionality. The
following exterior lights will remain on for the
entirety of the sequence:
Park/Running Lamps
Side Marker Lamps (if equipped)
License Lamp
Signature Lamp (if equipped)
Low Beams
Fog Lamps (if equipped)
Daytime Running Lamps
During this time the following lights will sequence,
each activating for three seconds:
1. Brake and CHMSL (third brake light)
2. Left turn signal
3. Right turn signal
4. Reverse Lamps
5. High Beam
This light check sequence will continue for a total
of five minutes. The sequence will only activate if the following
conditions are met:
Vehicle is equipped with the Trailer Tow
Package
Vehicle is in PARK
Vehicle is not in motion
Ignition is in ACC or ON/RUN
Remote start is inactive
Brakes are not applied
Left turn signal is not applied
Right turn signal is not applied
Hazard switch is not applied
The sequence will cancel if any of the following
conditions occur:
Brakes are applied
Vehicle is shifted from PARK
Vehicle is no longer stationary
Left turn signal activated from stalk
Right turn signal is activated from stalk
Hazard switch is activated
Any button on the key fob is pushed
Ignition button is pushed
High Beam stalk position is changed
Sequence is canceled in the instrument cluster
1 — Backup Lamps
2 — Running Lamps
3 — Left Stop/Turn
4 — Ground
5 — Battery
6 — Right Stop/Turn
7 — Electric Brakes
22_DT_OM_EN_USC_t.book Page 224
Page 239 of 496

MULTIMEDIA237
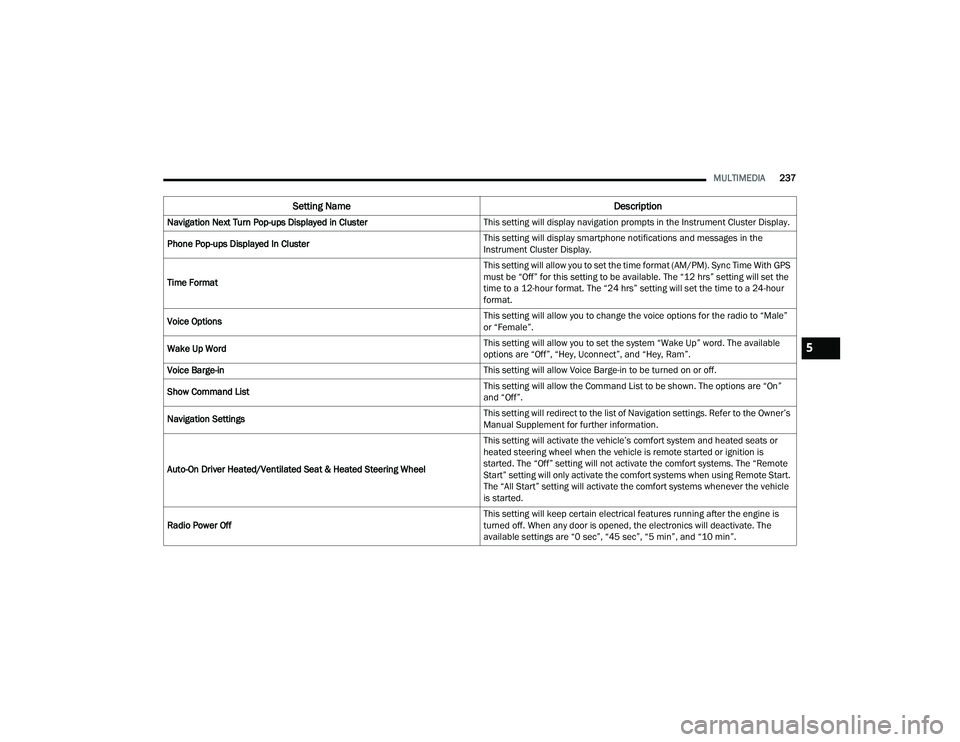
Navigation Next Turn Pop-ups Displayed in Cluster This setting will display navigation prompts in the Instrument Cluster Display.
Phone Pop-ups Displayed In Cluster This setting will display smartphone notifications and messages in the
Instrument Cluster Display.
Time Format This setting will allow you to set the time format (AM/PM). Sync Time With GPS
must be “Off” for this setting to be available. The “12 hrs” setting will set the
time to a 12-hour format. The “24 hrs” setting will set the time to a 24-hour
format.
Voice Options This setting will allow you to change the voice options for the radio to “Male”
or “Female”.
Wake Up Word This setting will allow you to set the system “Wake Up” word. The available
options are “Off”, “Hey, Uconnect”, and “Hey, Ram”.
Voice Barge-in This setting will allow Voice Barge-in to be turned on or off.
Show Command List This setting will allow the Command List to be shown. The options are “On”
and “Off”.
Navigation Settings This setting will redirect to the list of Navigation settings. Refer to the Owner’s
Manual Supplement for further information.
Auto-On Driver Heated/Ventilated Seat & Heated Steering Wheel This setting will activate the vehicle’s comfort system and heated seats or
heated steering wheel when the vehicle is remote started or ignition is
started. The “Off” setting will not activate the comfort systems. The “Remote
Start” setting will only activate the comfort systems when using Remote Start.
The “All Start” setting will activate the comfort systems whenever the vehicle
is started.
Radio Power Off This setting will keep certain electrical features running after the engine is
turned off. When any door is opened, the electronics will deactivate. The
available settings are “0 sec”, “45 sec”, “5 min”, and “10 min”.
Setting Name
Description
5
22_DT_OM_EN_USC_t.book Page 237
Page 252 of 496

250MULTIMEDIA
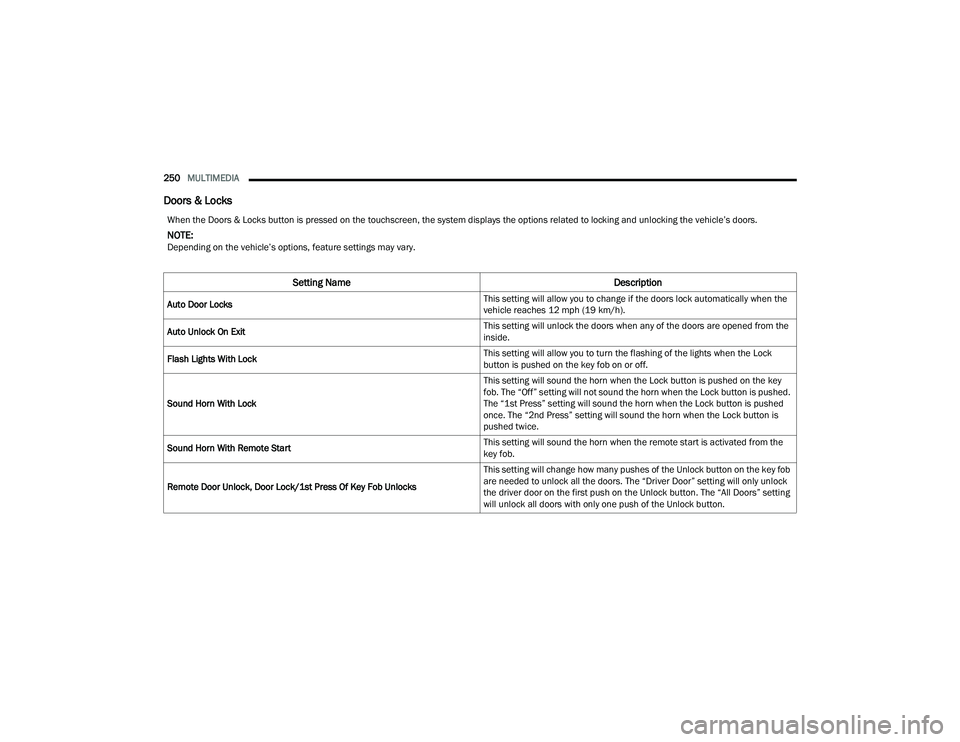
Doors & Locks
When the Doors & Locks button is pressed on the touchscreen, the system displays the options related to locking and unlocking the vehicle’s doors.
NOTE:Depending on the vehicle’s options, feature settings may vary.
Setting Name Description
Auto Door Locks This setting will allow you to change if the doors lock automatically when the
vehicle reaches 12 mph (19 km/h).
Auto Unlock On Exit This setting will unlock the doors when any of the doors are opened from the
inside.
Flash Lights With Lock This setting will allow you to turn the flashing of the lights when the Lock
button is pushed on the key fob on or off.
Sound Horn With Lock This setting will sound the horn when the Lock button is pushed on the key
fob. The “Off” setting will not sound the horn when the Lock button is pushed.
The “1st Press” setting will sound the horn when the Lock button is pushed
once. The “2nd Press” setting will sound the horn when the Lock button is
pushed twice.
Sound Horn With Remote Start This setting will sound the horn when the remote start is activated from the
key fob.
Remote Door Unlock, Door Lock/1st Press Of Key Fob Unlocks This setting will change how many pushes of the Unlock button on the key fob
are needed to unlock all the doors. The “Driver Door” setting will only unlock
the driver door on the first push on the Unlock button. The “All Doors” setting
will unlock all doors with only one push of the Unlock button.
22_DT_OM_EN_USC_t.book Page 250
Page 253 of 496

MULTIMEDIA251
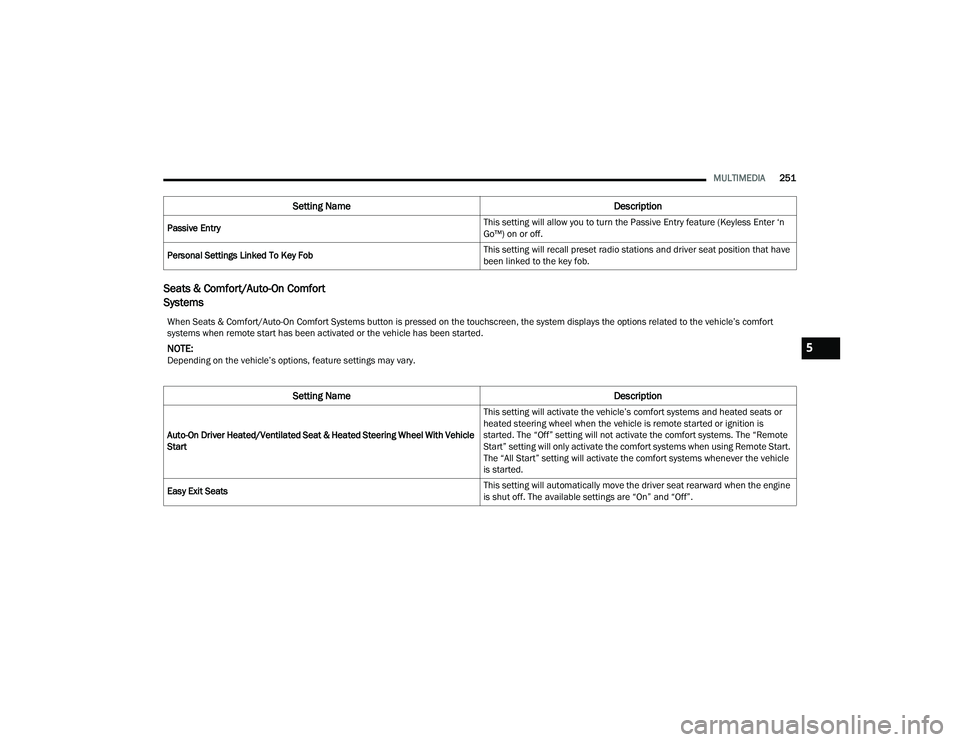
Seats & Comfort/Auto-On Comfort
Systems
Passive Entry This setting will allow you to turn the Passive Entry feature (Keyless Enter ‘n
Go™) on or off.
Personal Settings Linked To Key Fob This setting will recall preset radio stations and driver seat position that have
been linked to the key fob.
Setting Name
Description
When Seats & Comfort/Auto-On Comfort Systems button is pressed on the touchscreen, the system displays the options related to the vehicle’s comfort
systems when remote start has been activated or the vehicle has been started.
NOTE:Depending on the vehicle’s options, feature settings may vary.
Setting NameDescription
Auto-On Driver Heated/Ventilated Seat & Heated Steering Wheel With Vehicle
Start This setting will activate the vehicle’s comfort systems and heated seats or
heated steering wheel when the vehicle is remote started or ignition is
started. The “Off” setting will not activate the comfort systems. The “Remote
Start” setting will only activate the comfort systems when using Remote Start.
The “All Start” setting will activate the comfort systems whenever the vehicle
is started.
Easy Exit Seats This setting will automatically move the driver seat rearward when the engine
is shut off. The available settings are “On” and “Off”.
5
22_DT_OM_EN_USC_t.book Page 251
Page 286 of 496

284MULTIMEDIA
SiriusXM Guardian™ provides:
The ability to remotely lock/unlock and remote
start your vehicle from virtually anywhere by
using the Mobile App or your computer.
If equipped — Send & Go capability with the
Mobile App. Use the Mobile App to easily search,
map and send your locations directly to your
Uconnect Navigation.
The ability to locate your vehicle, when you
forget where you parked, using the Vehicle
Finder function of the Mobile App.
Before you drive, familiarize yourself with the
easy-to-use Uconnect system and SiriusXM
Guardian™ connected services.
The ASSIST and SOS Call Buttons On Your
Rearview Mirror Or Overhead Console
If equipped, the ASSIST Button is used for
contacting Roadside Assistance, Vehicle Care,
Uconnect Care, and SiriusXM Guardian™
Customer Care. The SOS Call button connects you
directly to SiriusXM Guardian™ Customer Care for
assistance in an emergency.
Activation — If Equipped
To unlock the full potential of SiriusXM Guardian™
in your vehicle, you must activate your SiriusXM
Guardian™ connected services.
1. Press the Apps icon on the bottom of your in-vehicle touchscreen.
2. Select the Activate Services icon from your list of apps.
3. For customers in the United States , select
“Customer Care” to speak with a SiriusXM
Guardian™ Customer Care agent who will
activate services in your vehicle, or select
“Enter Email” to activate on the web.
For customers in Canada , enter your email
address to activate services in your vehicle.
Included Trial Period For New Vehicles
Your new vehicle may come with an included trial
period for use of the SiriusXM Guardian™
connected services starting on the date of vehicle
purchase. To get started with your trial, enrollment
in SiriusXM Guardian™ is required. Your Uconnect
system includes a trial* of SiriusXM Guardian™
connected services from your date of purchase.
* Included trial applies to new vehicles only.
Features And Packages
After the trial period, you must purchase a
subscription to continue your services by calling a
SiriusXM Guardian™ Customer Care agent.
GETTING STARTED WITH CONNECTED
V
EHICLE SERVICES
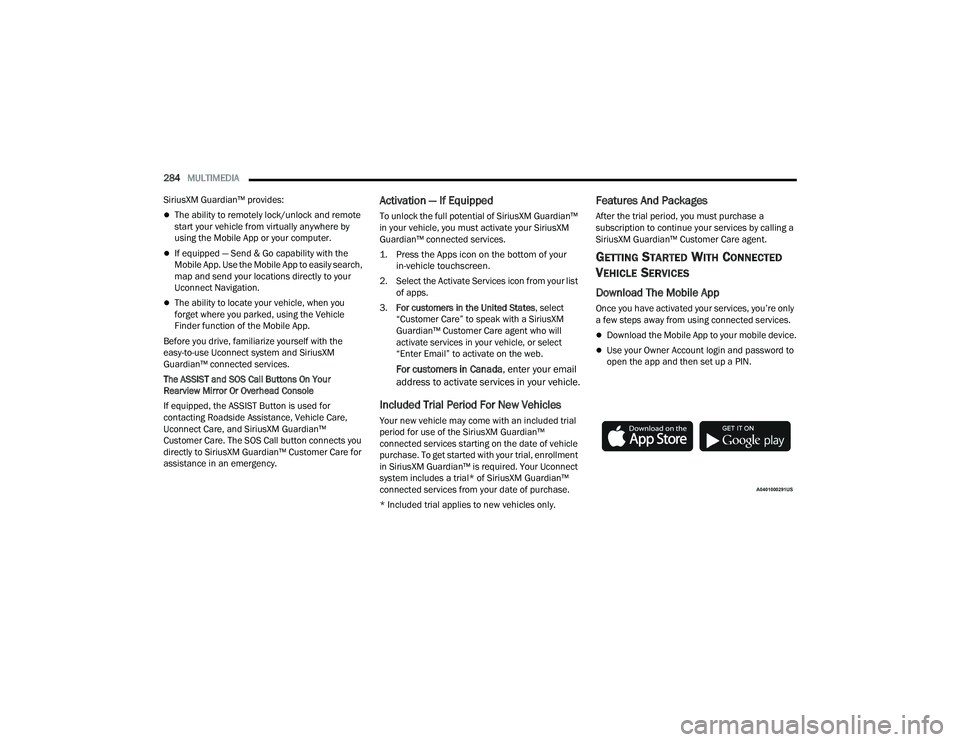
Download The Mobile App
Once you have activated your services, you’re only
a few steps away from using connected services.
Download the Mobile App to your mobile device.
Use your Owner Account login and password to
open the app and then set up a PIN.
22_DT_OM_EN_USC_t.book Page 284