buttons RAM 1500 2022 Owner's Guide
[x] Cancel search | Manufacturer: RAM, Model Year: 2022, Model line: 1500, Model: RAM 1500 2022Pages: 496, PDF Size: 18.03 MB
Page 267 of 496

MULTIMEDIA265
If the screen shows “Acquiring Signal”, you might
have to change the vehicle’s position in order to
receive a signal. In most cases, the satellite radio
does not receive a signal in underground parking
garages or tunnels.
No Subscription
Radios equipped with a Satellite receiver require a
subscription to the SiriusXM® Service. When the
radio does not have the necessary subscription,
the radio is able to receive the Preview channel
only.
Acquiring SiriusXM® Subscription
To activate the SiriusXM® Satellite Radio
subscription, US residents visit
http://
www.siriusxm.com/getallaccess or call:
1-800-643-2112
Canadian residents visit
https://
www.siriusxm.ca/ or call: 1-888-539-7474.
NOTE:You will need to provide the SiriusXM® ID (RID)
located at the bottom of the Channel 0 screen.
The Satellite Mode is activated by a press of the
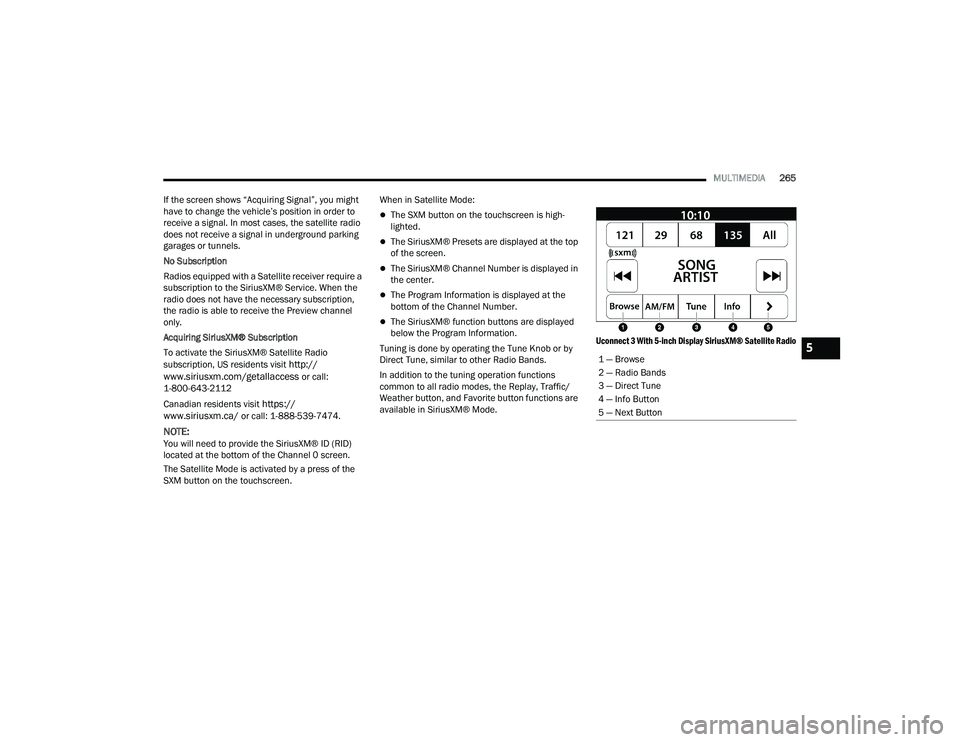
SXM button on the touchscreen. When in Satellite Mode:
The SXM button on the touchscreen is high
-
lighted.
The SiriusXM® Presets are displayed at the top
of the screen.
The SiriusXM® Channel Number is displayed in
the center.
The Program Information is displayed at the
bottom of the Channel Number.
The SiriusXM® function buttons are displayed
below the Program Information.
Tuning is done by operating the Tune Knob or by
Direct Tune, similar to other Radio Bands.
In addition to the tuning operation functions
common to all radio modes, the Replay, Traffic/
Weather button, and Favorite button functions are
available in SiriusXM® Mode.
Uconnect 3 With 5-inch Display SiriusXM® Satellite Radio
1 — Browse
2 — Radio Bands
3 — Direct Tune
4 — Info Button
5 — Next Button
5
22_DT_OM_EN_USC_t.book Page 265
Page 268 of 496

266MULTIMEDIA
REPLAY
Replay provides a means to store and replay up to 22 minutes of music audio and 48 minutes of talk radio. Once the channel is switched, content in replay
memory is lost.
Press the Replay button on the touchscreen. The Play/Pause, Rewind/Forward and Live buttons will display at the top of the screen, along with the replay time.
You can exit by pressing the Replay button on the touchscreen any time during the Replay Mode.
Play/Pause Press the Pause/Play button on the touchscreen to
pause the playing of live or rewound content at any
time. Play can be resumed by pressing the Pause/ Play button again on the touchscreen.
Rewind Press the Rewind button on the touchscreen to
rewind the content in steps of five seconds.
Pressing the Rewind button on the touchscreen for more than two seconds rewinds the content. The radio begins playing the content at the point at which the press is released.
Forward Each press of the Forward button on the
touchscreen forwards the content in steps of five seconds. Forwarding of the content can only be
done when the content is previously rewound, and therefore, cannot be done for live content. A
continuous press of the Forward button on the
touchscreen also forwards the content. The radio
begins playing the content at the point at which the press is release.
Live Press the Live button on the touchscreen to
resume the playing of live content.
22_DT_OM_EN_USC_t.book Page 266
Page 270 of 496

268MULTIMEDIA
Add/Delete — If Equipped
Press the Add/Delete button on the touchscreen to
activate the League Scroll list. Press the chosen
league and a scroll list of all teams within the
league will appear, then you can select a team by
pressing the corresponding box. A check mark
appears for all teams that are chosen.
Remove Selection/Trash Can Icon
Press the Remove Selection tab at the top of the
screen. Press the Delete All button on the
touchscreen to delete all of the selections or press
the Trash Can icon next to the selection to be
deleted.
Alert Settings
Press the Alert Setting tab at the top of the screen.
The Alert Settings menu allows you to choose from
“Alert me to on-air games upon start” or “Alert
upon score update” or both when one or more of
your selections is airing on any of the SiriusXM®
channels.
Tune Start
Tune Start begins playing the current song from
the beginning when you tune to a music channel
using one of the 12 presets. This feature occurs
the first time the preset is selected during that
current song.
Setting Presets
Uconnect 3 With 5-inch Display Radio Presets
The Presets are available for all Radio Modes, and
are activated by pressing any of the Preset
buttons, located at the top of the screen.
When you are on a station that you wish to save as
a preset, press and hold the numbered button on
the touchscreen for more than two seconds.
The Radio stores up to 12 presets in each of the
Radio Modes.
For the Uconnect 3 With 5-inch Display
A set of four presets will appear on the screen.
Press the All button to view all saved presets. To
remove a saved preset, a new preset must be
saved over the old one.
Audio Settings
Press the Audio button within the settings main
menu to activate the Audio Settings screen.
Uconnect 3 With 5-inch Display
22_DT_OM_EN_USC_t.book Page 268
Page 271 of 496

MULTIMEDIA269
Audio Setting Description
Balance/FadePress the Balance/Fade button on the touchscreen to balance audio between
the front speakers or fade the audio between the rear and front speakers.
Press the Front, Rear, Left or Right button or press and drag the red Speaker icon to adjust the Balance/Fade.
Equalizer Press the + or – button or press and drag the level bar to increase or decrease
each of the equalizer bands. The level value, which spans between plus or minus nine, is displayed at the top of each of the bands.
Speed Adjusted Volume The Speed Adjusted Volume is adjusted by selecting from “Off”, “1”, “2”, and
“3”. This alters the automatic adjustment of the audio volume with variation to vehicle speed. Volume increases automatically as speed increases to compensate for normal road noise.
Surround Sound When Surround Sound is on, you can hear audio coming from every direction
as in a movie theatre or home theatre system.
Loudness When Loudness is on, the sound quality at lower volumes improves.
AUX Volume Offset The AUX Volume Offset is adjusted by pressing + and – buttons. This alters the
AUX input audio volume. The level value, which spans between plus or minus three, is displayed above the adjustment bar.
Auto Play The Auto Play feature begins playing music as soon as a USB Media device is
connected to one of the vehicle’s Media USB ports, when it is turned on. Press “Off” to turn the setting off.
Radio Off With Door The Radio Off With Door feature, when activated, keeps the radio on until the
driver or passenger door is opened or until the Radio Off Delay selected time has expired.
5
22_DT_OM_EN_USC_t.book Page 269
Page 273 of 496

MULTIMEDIA271
AUX MODE
Overview
Auxiliary Mode (AUX) is entered by inserting an AUX
device using a cable with a 3.5 mm audio jack into
the AUX port, or by pushing the MEDIA button on
the faceplate, selecting the Source button and
then the AUX button.
To insert an Auxiliary device, gently insert the
Auxiliary device cable into the AUX port. If you
insert an Auxiliary device with the ignition and the
radio on, the unit will switch to AUX Mode and
begin to play.
Controlling The Auxiliary Device
The control of the Auxiliary device (e.g., selecting
playlists, play, fast forward, etc.) cannot be
provided by the radio; use the device controls
instead. Adjust the volume with the Volume button,
Volume/Mute rotary knob, or the On/Off rotary
knob, or with the volume of the attached device.
NOTE:The radio unit is acting as the amplifier for audio
output from the Auxiliary device. Therefore, if the
volume control on the Auxiliary device is set too
low, there will be insufficient audio signal for the
radio unit to play the music on the device. Seek Up
/Seek Down
In USB Mode, press the Seek Up button on the
touchscreen for the next selection on the USB
device. Press and release the Seek Down button
on the touchscreen to return to the beginning of
the current selection, or to return to the beginning
of the previous selection if the USB device is within
the first three seconds of the current selection.
In Bluetooth® Mode, press and release the Seek
Up button on the touchscreen for the next
selection on the Bluetooth® device. Press and
release the Seek Down button on the touchscreen
to return to the beginning of the current selection,
or return to the beginning of the previous selection
if the Bluetooth® device is within the first second
of the current selection.
Browse
In USB Mode, press the Browse button on the
touchscreen to display the browse window. In USB
Mode, the left side of the browse window displays
a list of ways you can browse through the contents
of the USB device. If supported by the device, you
can browse by Folder, Artist, Playlist, Album, Song,
etc. Press the desired button on the touchscreen
on the left side of the screen. The center of the
browse window shows items and their
sub-functions, which can be scrolled through by
pressing the Up and Down buttons to the right. The
TUNE/SCROLL knob can also be used to scroll. On the Uconnect 3 With 5-inch Display, select the
Browse button on the touchscreen to scroll
through and select a desired track on the device.
Press the Exit button on the touchscreen if you
wish to cancel the Browse function.
Media Mode
In USB Mode, press the Media button on the
touchscreen to select the desired audio source:
USB.
In Bluetooth® Mode, press the Media button on
the touchscreen to select the desired audio
source: Bluetooth®.
In AUX Mode, press the Media button on the
touchscreen to select the desired audio source:
AUX.
Repeat
In USB Mode, press the Repeat button on the
touchscreen to toggle the repeat functionality. The
Repeat button on the touchscreen is highlighted
when active. The Radio will continue to play the
current track, repeatedly, as long as the repeat is
active. Press the Repeat button again to enter
Repeat All. The radio will continue to play all the
current tracks, repeatedly, as long as the repeat
function is active. To cancel Repeat, press the
Repeat button a third time.
5
22_DT_OM_EN_USC_t.book Page 271
Page 279 of 496

MULTIMEDIA277
PHONEBOOK DOWNLOAD (AUTOMATIC
PHONEBOOK TRANSFER FROM MOBILE
PHONE) — IF EQUIPPED
If supported by your phone, Uconnect Phone has
the ability to download contact names and number
entries from the mobile phone’s phonebook.
Specific Bluetooth® Phones with Phonebook
Access Profile may support this feature. Your
mobile phone may receive a pop-up asking for
permission for the Uconnect system to access your
messages and contacts. Selecting “Ok” or “Allow”
will sync your contacts with the Uconnect system.
See the Uconnect website,
UconnectPhone.com,
for supported phones.
To call a name from a downloaded mobile
phonebook, Ú page 281.
Automatic download and update of a
phonebook, if supported, begins as soon as the
Bluetooth® wireless phone connection is made
to the Uconnect Phone, for example, after you
start the vehicle.
A maximum of 5,000 contact names with four
numbers per contact will be downloaded and
updated every time a phone is connected to the
Uconnect Phone.
Depending on the maximum number of entries
downloaded, there may be a short delay before
the latest downloaded names can be used. Until
then, if available, the previously downloaded
phonebook is available for use.
Only the phonebook of the currently connected
mobile phone is accessible.
This downloaded phonebook cannot be edited
or deleted on the Uconnect Phone. These can
only be edited on the mobile phone. The
changes are transferred and updated to Ucon -
nect Phone on the next phone connection.
MANAGING YOUR FAVORITES — IF EQUIPPED
There are two ways you can add an entry to your
favorites:
1. After loading the mobile phonebook, press the Favorites button on the touchscreen, and
then press one of the +Add Favorite Contact
buttons that appears on the list.
2. After loading the mobile phonebook, select “Contacts” from the Phone main screen, and
then select the appropriate number. Press the
Down Arrow button or the Settings Gear button
next to the selected number to display the
option’s pop-up. In the pop-up, select “Add to
Favorites”.
NOTE:If the Favorites list is full, you will be asked to
remove an existing favorite.
TO REMOVE A FAVORITE — IF EQUIPPED
1. To remove a Favorite, select “Favorites” from the Phone main screen.
2. Next, select the Down Arrow icon or the Settings Gear icon next to the contact you want
to remove from your favorites. This will bring
up the options for that Favorite contact.
3. Deselect the Star icon to delete the Favorite.
Phone Call Features
The following features can be accessed through
the Uconnect Phone if the feature(s) are available
and supported by Bluetooth® on your mobile
service plan. For example, if your mobile service
plan provides three-way calling, this feature can be
accessed through the Uconnect Phone. Check with
your mobile service provider for the features that
you have.
5
22_DT_OM_EN_USC_t.book Page 277
Page 280 of 496

278MULTIMEDIA
Listed below are the phone options with Uconnect:
Redial
Dial by pressing in the number
Voice Commands (Dial by Saying a Name, Call
by Saying a Phonebook Name, Redial or Call
Back)
Favorites
Mobile Phonebook
Recent Call Log
SMS Message Viewer
CALL CONTROLS
The touchscreen allows you to control the following
call features:
Uconnect 3 With 5-inch Display
Other phone call features include:
End Call
Hold/Unhold/Resume
Swap two active calls
KEY PAD NUMBER ENTRY
1. Press the Phone button.
2. Press the Dial/Keypad button on the touchscreen.
3. The Touch-Tone screen will be displayed.
4. Use the numbered buttons on the touchscreens to enter the number and press
“Dial/Call”.
RECENT CALLS — IF EQUIPPED
You may browse a list of the most recent of each of
the following call types:
All Calls
Incoming Calls or Calls Received
Outgoing Calls or Calls Made
Missed Calls
These can be accessed by pressing the Recent
Calls button on the phone main screen.
You can also push the VR button on your steering
wheel and perform the above operation. For
example, say “Show my incoming calls”.
1 — Answer
2 — Mute/Unmute
3 — Ignore
4 — Transfer
22_DT_OM_EN_USC_t.book Page 278
Page 284 of 496

282MULTIMEDIA
NOTE:Only use the numbering listed in the provided
table. Otherwise, the system will not transpose the
message.
Did You Know: Your mobile phone must have the
full implementation of the Message Access Profile
(MAP) to take advantage of this feature. For details
about MAP, visit
UconnectPhone.com. Apple® iPhone® iOS 5 or later supports reading
incoming
text messages only. For further
information on how to enable this feature on your
Apple® iPhone®, refer to your iPhone® “User
Manual”.
Did You Know: Voice Text Reply is not compatible
with iPhone®, but if your vehicle is equipped with
Siri® Eyes Free, you can use your voice to send a
text message.
Siri® Eyes Free — If Equipped
When used with your Apple® iPhone® connected
to your vehicle via Bluetooth®, Siri lets you use
your voice to send text messages, select media,
place phone calls and much more. Siri uses your
natural language to understand what you mean
and responds back to confirm your requests. The
system is designed to keep your eyes on the road
and your hands on the wheel by letting Siri help you
perform useful tasks.
To enable Siri, push and hold, then release the
Uconnect Voice Recognition (VR) button on the
steering wheel. After you hear a double beep, you
can ask Siri to play podcasts and music, get
directions, read text messages, and many other
useful requests.
BLUETOOTH® COMMUNICATION LINK
Mobile phones may lose connection to the
Uconnect Phone. When this happens, the
connection can generally be re-established by
restarting the mobile phone. Your mobile phone is
recommended to remain in Bluetooth® ON mode.
POWER-UP
After switching the ignition key from OFF to either
the ON/RUN or ACC position, or after a language
change, you must wait at least 15 seconds prior to
using the system Ú page 480.
CONNECTED VEHICLE SERVICES —
IF EQUIPPED
IS MY VEHICLE CONNECTED?
If equipped, vehicles with an ASSIST and an SOS
button are connected vehicles. These buttons will
be located on either the rearview mirror or
overhead console, depending on the vehicle. If
these buttons are present in your vehicle, you have
a connected radio and can take advantage of the
many connected vehicle features.
For further information about the ASSIST and SOS
buttons Úpage 372.
PRE-DEFINED VOICE TEXT REPLY
RESPONSES
Yes. Stuck in
traffic. See you later.
No. Start without
me. I’ll be late.
Okay. Where are
you? I will be 5
25, 30, 45,
60> minutes late.
Call me.
Are you there
yet?
I’ll call you later. I need
directions. See you in 5
minutes.
I’m on my way.
Can’t talk right
now.
I’m lost. Thanks.
22_DT_OM_EN_USC_t.book Page 282
Page 286 of 496

284MULTIMEDIA
SiriusXM Guardian™ provides:
The ability to remotely lock/unlock and remote
start your vehicle from virtually anywhere by
using the Mobile App or your computer.
If equipped — Send & Go capability with the
Mobile App. Use the Mobile App to easily search,
map and send your locations directly to your
Uconnect Navigation.
The ability to locate your vehicle, when you
forget where you parked, using the Vehicle
Finder function of the Mobile App.
Before you drive, familiarize yourself with the
easy-to-use Uconnect system and SiriusXM
Guardian™ connected services.
The ASSIST and SOS Call Buttons On Your
Rearview Mirror Or Overhead Console
If equipped, the ASSIST Button is used for
contacting Roadside Assistance, Vehicle Care,
Uconnect Care, and SiriusXM Guardian™
Customer Care. The SOS Call button connects you
directly to SiriusXM Guardian™ Customer Care for
assistance in an emergency.
Activation — If Equipped
To unlock the full potential of SiriusXM Guardian™
in your vehicle, you must activate your SiriusXM
Guardian™ connected services.
1. Press the Apps icon on the bottom of your in-vehicle touchscreen.
2. Select the Activate Services icon from your list of apps.
3. For customers in the United States , select
“Customer Care” to speak with a SiriusXM
Guardian™ Customer Care agent who will
activate services in your vehicle, or select
“Enter Email” to activate on the web.
For customers in Canada , enter your email
address to activate services in your vehicle.
Included Trial Period For New Vehicles
Your new vehicle may come with an included trial
period for use of the SiriusXM Guardian™
connected services starting on the date of vehicle
purchase. To get started with your trial, enrollment
in SiriusXM Guardian™ is required. Your Uconnect
system includes a trial* of SiriusXM Guardian™
connected services from your date of purchase.
* Included trial applies to new vehicles only.
Features And Packages
After the trial period, you must purchase a
subscription to continue your services by calling a
SiriusXM Guardian™ Customer Care agent.
GETTING STARTED WITH CONNECTED
V
EHICLE SERVICES
Download The Mobile App
Once you have activated your services, you’re only
a few steps away from using connected services.
Download the Mobile App to your mobile device.
Use your Owner Account login and password to
open the app and then set up a PIN.
22_DT_OM_EN_USC_t.book Page 284
Page 304 of 496

302MULTIMEDIA
14. Can I get a refund if I have not used the entire
subscription? Prorated refunds are provided
from the date of cancellation for annual plans
or longer. Please see the Uconnect and
SiriusXM Guardian™ Terms & Conditions for
refunds related to billing plans of other lengths
and other circumstances.
15. Can I cancel a subscription before it expires?
Yes. If you have an annual subscription, your
subscription will be canceled the day you
cancel. If you have a monthly subscription,
your subscription will be canceled on the last
day of the month in which you choose to
cancel.
16. What should I do if I want to sell my vehicle?
Before your vehicle is sold to a new owner,
you’ll want to remove your account
information. This process removes all personal
information, returns the Uconnect system to
its original factory settings, removes all
SiriusXM Guardian™ connected services and
account information. To remove your account
information from the Uconnect system,
contact SiriusXM Guardian™ Customer Care.
17. What if I forgot to remove my account
information before I returned my lease vehicle
or sold it? Contact SiriusXM Guardian™
Customer Care. 18.
What will happen if an operable LTE (voice/
data), 4G (data), or 5G (data) network
connection compatible with my device is
temporarily unavailable? The SOS Call and
ASSIST buttons will NOT function if you are not
connected to an operable LTE (voice/data) or
3G, 4G (data), 5G (data) network. Services that
required your smartphone only direct calls to
Roadside Assistance Call may be functioning if
you have an operable network.
DATA COLLECTION & PRIVACY
The Uconnect system collects and transmits data
which may include information about your vehicle,
your vehicle’s health and performance, your
vehicle’s location, your utilization of the features in
your vehicle, and other data. The collection, use
and sharing of this information is required to
provide the SiriusXM Guardian™ connected
services and is further described by the Uconnect
Privacy Policy, which can be found at
www.driveuconnect.com/connectedservices/
privacy.html (US Residents) or www.driveuconnect.ca (Canadian Residents).
This information may be collected by SiriusXM®
Connected Vehicle Services Inc. and shared with FCA US LLC for the purposes stated in the
Uconnect Privacy Policy. Vehicle health and
diagnostic information including location data may
be used by Uconnect to provide a Vehicle Health
Report to you.
Even if you cancel your SiriusXM Guardian™
subscription, this vehicle diagnostic health
information, including location data, may still be
transmitted from your vehicle and you may still
have a Vehicle Health Report sent to you.
Use of any of the Connected Services including
SiriusXM Guardian™ is deemed to be your consent
to the collection, use and disclosure of this
information in accordance with the Uconnect
Privacy Policy. If you do not want this information to
be collected, used, or shared, you must cancel your
Uconnect services in their entirety by contacting us
as referenced in the Uconnect Privacy Policy.
RADIO OPERATION AND MOBILE PHONES
Under certain conditions, the mobile phone being
on in your vehicle can cause erratic or noisy
performance from your radio. This condition may
be lessened or eliminated by repositioning the
mobile phone within the vehicle. This condition is
not harmful to the radio. If your radio performance
does not satisfactorily improve from repositioning
the mobile phone, it is recommended that the
volume be turned down or off during mobile phone
operation when not using the Uconnect system.
22_DT_OM_EN_USC_t.book Page 302