jump start RAM 1500 2022 Owners Manual
[x] Cancel search | Manufacturer: RAM, Model Year: 2022, Model line: 1500, Model: RAM 1500 2022Pages: 496, PDF Size: 18.03 MB
Page 9 of 496

7
CONNECTED SERVICES FAQS ........................... 297 Connected Services SOS FAQs —
If Equipped .................................................... 298
Connected Services Remote Door
Lock/Unlock FAQs ........................................ 298
Connected Services Roadside
Assistance FAQs ........................................... 298Connected Services Send & Go FAQs —
If Equipped .................................................... 298
Connected Services Vehicle Finder FAQs ... 299
Connected Services Stolen Vehicle
Assistance FAQs — If Equipped ................... 299
Connected Services Remote Vehicle
Start FAQs ..................................................... 299
Connected Services Remote
Horn & Lights FAQs ....................................... 300
Connected Services Account
FAQs — If Equipped ....................................... 300
Data Collection & Privacy.............................. 302
RADIO OPERATION AND MOBILE PHONES...... 302
Regulatory And Safety Information .............. 303
PERFORMANCE PAGES — IF EQUIPPED...........303
Timers ............................................................ 304
Gauges ........................................................... 304G-Force ........................................................... 305Dynamometer (Dyno)/Engine ....................... 305
Vehicle Dynamics .......................................... 306 OFF-ROAD PAGES — IF EQUIPPED ................... 306
Off-Road Pages Status Bar .......................... 307
Vehicle Dynamics ......................................... 308
Accessory Gauge ........................................... 309Pitch & Roll .................................................... 310
Suspension .................................................... 311
Forward Facing Camera................................ 311
SAFETY
SAFETY FEATURES .............................................. 312
Anti-Lock Brake System (ABS) ..................... 312
Electronic Brake Control (EBC) System ....... 313
AUXILIARY DRIVING SYSTEMS.......................... 319
Blind Spot Monitoring (BSM) —
If Equipped .................................................... 319
Forward Collision Warning (FCW)
With Mitigation — If Equipped ...................... 325Tire Pressure Monitoring System (TPMS) .... 328
OCCUPANT RESTRAINT SYSTEMS ................... 334
Occupant Restraint Systems Features ....... 334
Important Safety Precautions ...................... 334Seat Belt Systems ........................................ 335Supplemental Restraint Systems (SRS) ...... 341Child Restraints ............................................ 354
SAFETY TIPS ........................................................ 368
Transporting Passengers .............................. 368Transporting Pets ....................................... 368 Safety Checks You Should Make
Inside The Vehicle ........................................ 368
Periodic Safety Checks You Should
Make Outside The Vehicle ............................ 369
Exhaust Gas................................................... 370
Carbon Monoxide Warnings ........................ 370
IN CASE OF EMERGENCY
HAZARD WARNING FLASHERS ......................... 371
ASSIST AND SOS SYSTEM — IF EQUIPPED ...... 372
JACKING AND TIRE CHANGING ......................... 375 Preparations For Jacking .............................. 375
Jack Location................................................. 376
Removal Of Jack And Tools .......................... 376
Removing The Spare Tire ............................. 378Jacking Instructions ...................................... 379
To Stow The Flat Or Spare ........................... 382
Reinstalling The Jack And Tools ................... 383
JUMP STARTING .................................................. 384
Preparations For Jump Start ........................ 384Jump Starting Procedure .............................. 385
REFUELING IN EMERGENCY –
IF EQUIPPED ........................................................ 386
IF YOUR ENGINE OVERHEATS ........................... 387
MANUAL PARK RELEASE ................................... 388
FREEING A STUCK VEHICLE .............................. 389
22_DT_OM_EN_USC_t.book Page 7
Page 386 of 496

384IN CASE OF EMERGENCY
4. Place the jack and tools in the storage position holding the jack by the jack turn-screw, slip the
jack and tools under the seat so that the
bottom slot engages into the fastener on the
floor.
NOTE:Ensure that the jack slides into the front hold down
location.
5. Turn the wing bolt clockwise to secure to the floor pan. Reinstall the plastic cover.
Jack Hold Down Wing Bolt
JUMP STARTING
If your vehicle has a discharged battery, it can be
jump started using a set of jumper cables and a
battery in another vehicle, or by using a portable
battery booster pack. Jump starting can be
dangerous if done improperly, so please follow the
procedures in this section carefully.
NOTE:When using a portable battery booster pack, follow
the manufacturer's operating instructions and
precautions.
PREPARATIONS FOR JUMP START
The battery in your vehicle is located in the front of
the engine compartment, behind the left headlight
assembly.
WARNING!
After using the jack and tools, always reinstall
them in the original carrier and location. While
driving you may experience abrupt stopping,
rapid acceleration or sharp turns. A loose jack,
tools, bracket or other objects in the vehicle may
move around with force, resulting in serious
injury.
WARNING!
Do not attempt jump starting if the battery is
frozen. It could rupture or explode and cause
personal injury.
CAUTION!
Do not use a portable battery booster pack or
any other booster source with a system voltage
greater than 12 Volts or damage to the battery,
starter motor, alternator or electrical system may
occur.
22_DT_OM_EN_USC_t.book Page 384
Page 387 of 496

IN CASE OF EMERGENCY385
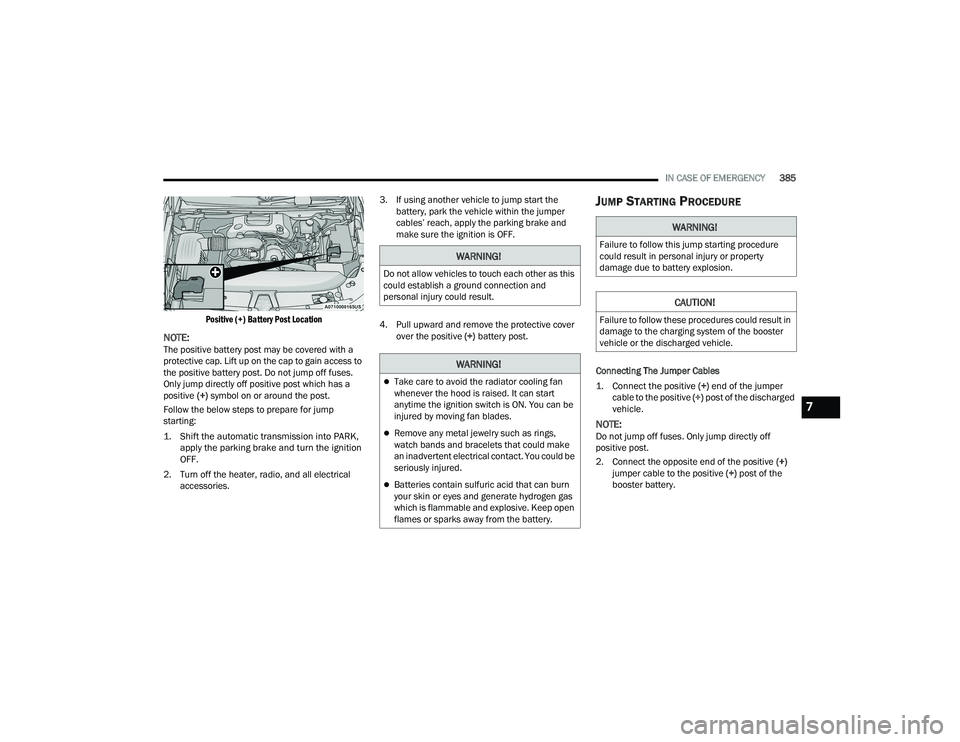
Positive (+) Battery Post Location
NOTE:The positive battery post may be covered with a
protective cap. Lift up on the cap to gain access to
the positive battery post. Do not jump off fuses.
Only jump directly off positive post which has a
positive (+) symbol on or around the post.
Follow the below steps to prepare for jump
starting:
1. Shift the automatic transmission into PARK, apply the parking brake and turn the ignition
OFF.
2. Turn off the heater, radio, and all electrical accessories. 3. If using another vehicle to jump start the
battery, park the vehicle within the jumper
cables’ reach, apply the parking brake and
make sure the ignition is OFF.
4. Pull upward and remove the protective cover over the positive (+) battery post.
JUMP STARTING PROCEDURE
Connecting The Jumper Cables
1. Connect the positive
(+) end of the jumper
cable to the positive (+)
post of the discharged
vehicle.
NOTE:Do not jump off fuses. Only jump directly off
positive post.
2. Connect the opposite end of the positive (+)
jumper cable to the positive (+) post of the
booster battery.
WARNING!
Do not allow vehicles to touch each other as this
could establish a ground connection and
personal injury could result.
WARNING!
Take care to avoid the radiator cooling fan
whenever the hood is raised. It can start
anytime the ignition switch is ON. You can be
injured by moving fan blades.
Remove any metal jewelry such as rings,
watch bands and bracelets that could make
an inadvertent electrical contact. You could be
seriously injured.
Batteries contain sulfuric acid that can burn
your skin or eyes and generate hydrogen gas
which is flammable and explosive. Keep open
flames or sparks away from the battery.
WARNING!
Failure to follow this jump starting procedure
could result in personal injury or property
damage due to battery explosion.
CAUTION!
Failure to follow these procedures could result in
damage to the charging system of the booster
vehicle or the discharged vehicle.
7
22_DT_OM_EN_USC_t.book Page 385
Page 388 of 496

386IN CASE OF EMERGENCY
3. Connect the negative (-) end of the jumper
cable to the negative (-) post of the booster
battery.
4. Connect the opposite end of the negative (-)
jumper cable to a good engine ground. A
“ground” is an exposed metallic/unpainted
part of the engine, frame or chassis, such as
an accessory bracket or large bolt. The ground
must be away from the battery and the fuel
injection system.
Jump Starting Label
5. Start the engine in the vehicle that has the
booster battery, let the engine idle a few
minutes, and then start the engine in the
vehicle with the discharged battery.
6. Once the engine is started, follow the discon -
nection procedure below.
Disconnecting The Jumper Cables
1. Disconnect the negative
(-)
end of the jumper
cable from the engine ground of the vehicle
with the discharged battery.
2. Disconnect the opposite end of the negative (-)
jumper cable from the negative (-) post of the
booster battery.
3. Disconnect the positive (+) end of the jumper
cable from the positive (+) post of the booster
battery.
4. Disconnect the opposite end of the positive (+)
jumper cable from the positive (+) post of the
vehicle with the discharged battery, and
reinstall the protective cap. If frequent jump starting is required to start your
vehicle you should have the battery and charging
system inspected at an authorized dealer.
REFUELING IN EMERGENCY – IF EQUIPPED
The vehicle is equipped with a refueling funnel for
a Cap-Less Fuel System. The refueling funnel can
be found with the jack and tools Ú
page 376. If
refueling is necessary, while using an approved
gas can, insert the refueling funnel into the filler
neck opening. Take care to open both flappers with
the funnel to avoid spills.
NOTE:In certain cold conditions, ice may prevent the fuel
door from opening. If this occurs, lightly push on
the fuel door to break the ice buildup and
re-release the fuel door using the inside release
button. Do not pry on the door.WARNING!
Do not connect the jumper cable to the negative
(-) post of the discharged battery. The resulting
electrical spark could cause the battery to
explode and could result in personal injury.
CAUTION!
Do not connect jumper cable to any of the fuses
on the positive battery terminal. The resulting
electrical current will blow the fuse.
CAUTION!
Accessories plugged into the vehicle power
outlets draw power from the vehicle’s battery,
even when not in use (i.e., cellular devices, etc.).
Eventually, if plugged in long enough without
engine operation, the vehicle’s battery will
discharge sufficiently to degrade battery life
and/or prevent the engine from starting.
22_DT_OM_EN_USC_t.book Page 386
Page 420 of 496

418SERVICING AND MAINTENANCE
ACCESSORY DRIVE BELT INSPECTION
When inspecting accessory drive belts, small
cracks that run across the ribbed surface of the
belt from rib to rib, are considered normal. This is
not a reason to replace the belt. However, cracks
running along a rib (not across) are not normal. Any
belt with cracks running along a rib must be
replaced. Also have the belt replaced if it has
excessive wear, frayed cords or severe glazing.
Accessory Belt (Serpentine Belt)
Conditions that would require replacement:
Rib chunking (one or more ribs has separated
from belt body)
Rib or belt wear
Longitudinal belt cracking (cracks between two
ribs)
Belt slips
“Groove jumping" (belt does not maintain
correct position on pulley)
Belt broken
Noise (objectionable squeal, squeak, or rumble
is heard or felt while drive belt is in operation)
NOTE:Identify and correct problem before new belt is
installed.
NOTE:If your vehicle is equipped with a Stop/Start, belt
must be replaced with an OEM grade Mopar® belt.
Some conditions can be caused by a faulty
component such as a belt pulley. Belt pulleys
should be carefully inspected for damage and
proper alignment.
Belt replacement on some models requires the
use of special tools, we recommend having your
vehicle serviced at an authorized dealer.
BODY LUBRICATION
Locks and all body pivot points, including such
items as seat tracks, door hinge pivot points and
rollers, liftgate, tailgate, decklid, sliding doors and
hood hinges, should be lubricated periodically. Use
a lithium-based grease, such as Mopar® Spray
White Lube to assure quiet, easy operation and to
protect against rust and wear. Prior to the
application of any lubricant, the parts concerned
should be wiped clean to remove dust and grit;
after lubricating excess oil and grease should be
removed. Particular attention should also be given
to hood latching components to ensure proper
function. When performing other underhood
services, the hood latch release mechanism, and
safety catch should be cleaned and lubricated.
WARNING!
Do not attempt to inspect an accessory drive
belt with vehicle running.
When working near the radiator cooling fan,
disconnect the fan motor lead. The fan is
temperature controlled and can start at any
time regardless of ignition mode. You could be
injured by the moving fan blades.
You can be badly injured working on or around
a motor vehicle. Only do service work for which
you have the knowledge and the proper equip -
ment. If you have any doubt about your ability
to perform a service job, take your vehicle to a
competent mechanic.
22_DT_OM_EN_USC_t.book Page 418
Page 485 of 496

483
Cruise Control Accel/Decel
............................................... 177Cancel....................................................... 177Resume..................................................... 177Cruise Control (Speed Control)... 133, 176, 178Cruise Light......................................... 136, 137Customer Assistance..................................... 477Cybersecurity................................................. 233
D
Daytime Running Lights................................... 55Dealer Service............................................... 408Defroster, Windshield...................... 62, 65, 368Deleting A Phone........................................... 276Diagnostic System, Onboard......................... 138Diesel Exhaust Fluid...................................... 209Adding....................................................... 209Fill Procedure............................................ 210Storage...................................................... 209Diesel Fuel..................................................... 469Diesel Fuel Requirements............................. 469Bulk Storage Of......................................... 209Diesel Fuel System, Re-Priming..................... 414Differential, Limited Slip................................ 173Dimmer Control Switch.................................... 60Disable Vehicle Towing.................................. 390
Disc Drive..................................................... 270Disconnecting............................................... 276DisposalAntifreeze (Engine Coolant)...................... 423Disturb.......................................................... 279Door Ajar Light..................................... 129, 130Door LocksAutomatic.................................................... 32Doors............................................................... 28Draining Fuel/Water Separator Filter............ 412Driver Memory Presets................................. 268Driver’s Seat Back Tilt...................................... 35DrivingThrough Flowing, Rising, Or ShallowStanding Water
.................................... 231Driving Tips................................................... 230Dual Rear Wheels......................................... 466
E
Electric Brake Control System....................... 313Anti-Lock Brake System............................ 312Electronic Roll Mitigation................. 314, 319Electric Parking Brake................................... 150Electric Power Steering................................. 173Electrical Power Outlets................................... 76Electronic Range Select (ERS)...................... 158Electronic Stability Control
(ESC)........................................... 131, 132, 314
Electronic Throttle Control Warning Light...... 129Electronically Shifted Transfer Case.... 160, 162Emergency Braking....................................... 327Emergency Gas Can Refueling...................... 386Emergency, In Case OfFreeing Vehicle When Stuck..................... 389Hazard Warning Flasher........................... 371Jump Starting........................................... 384Emission Control System Maintenance......... 139Engine........................................................... 403Air Cleaner................................................ 410Block Heater............................................. 149Break-In Recommendations..................... 150Compartment............... 403, 404, 405, 406CompartmentIdentification............ 403, 404, 405, 406Coolant (Antifreeze).................................. 473Exhaust Gas Caution................................ 370Fails To Start............................................. 143Flooded, Starting...................................... 143Fuel Requirements.......................... 467, 472Idling......................................................... 147Jump Starting........................................... 384Oil...........................................409, 472, 473Oil Filler Cap............................................. 403Oil Filter.................................................... 409
11
22_DT_OM_EN_USC_t.book Page 483
Page 487 of 496

485
Heater, Engine Block
..................................... 149High Beam/Low Beam Select
(Dimmer) Switch.............................................. 55Hill Descent Control............................. 137, 316Hill Descent Control Indicator........................ 316Hill Start Assist.............................................. 318Hitches Trailer Towing............................................ 216HomeLink (Garage Door Opener).................... 49HoodOpening..................................................... 130Hood Release.................................................. 85HUD..................................................... 121, 122
I
Ignition............................................................ 23Switch......................................................... 23Ignition Park Interlock.................................... 154Illuminated Entry............................................. 60Inside Rearview Mirror............................ 45, 372Instrument
Cluster............ 106, 108, 110, 111, 113, 114Descriptions.................. 107, 109, 111, 114Display...................................................... 114Engine Oil Reset........................................ 116Location And Controls............................... 115Menu Items............................................... 116
Instrument Cluster DisplayAudio........................................................ 121Driver Assist............................................. 117Fuel Economy........................................... 120Off-Road................................................... 117Speedometer............................................ 116StopStart.................................................. 120Stored Messages...................................... 121Trailer Tow................................................ 121Trip........................................................... 120Vehicle Info............................................... 116Instrument Panel Lens Cleaning................... 465Integrated Trailer Brake Control................... 221Interior Appearance Care.............................. 464Interior Lights................................................... 59Intervention Regeneration Strategy..... 124, 414Inverter Outlet (115V)...................................... 77
J
Jack Location................................................ 375Jump Starting............................................... 384
K
Key Fob............................................................ 19Programming Additional Key Fobs............... 22Key Fob Battery Replacement......................... 21
Key Fob Programming
(Remote Keyless Entry)....................................22Keyless Enter-N-Go................................ 30, 141Passive Entry...............................................30Keys.................................................................19
L
Lane Change Assist..........................................57LaneSense........................ 132, 136, 137, 196Lap/Shoulder Belts....................................... 336Latches......................................................... 370Hood............................................................85Lead Free Gasoline....................................... 467Leaks, Fluid................................................... 370Life Of Tires................................................... 454Light Bulbs........................................... 370, 438Lights............................................................ 3704WD.......................................................... 1354WD AUTO................................................ 1374WD High................................................. 1354WD Low.................................................. 135Air Bag.................................... 128, 342, 368Air Suspension Aerodynamic Height......... 134Air Suspension Fault................................. 131Air Suspension Off-Road 1........................ 134Air Suspension Off-Road 2........................ 134
11
22_DT_OM_EN_USC_t.book Page 485