manual radio set RAM 1500 2023 Owners Manual
[x] Cancel search | Manufacturer: RAM, Model Year: 2023, Model line: 1500, Model: RAM 1500 2023Pages: 416, PDF Size: 20.59 MB
Page 56 of 416
54GETTING TO KNOW YOUR VEHICLE
CLIMATE CONTROLS
The Climate Control system allows you to regulate the
temperature, air flow, and direction of air circulating
throughout the vehicle. The controls are located on the
touchscreen, on the sides of the touchscreen, or on the
instrument panel below the radio.
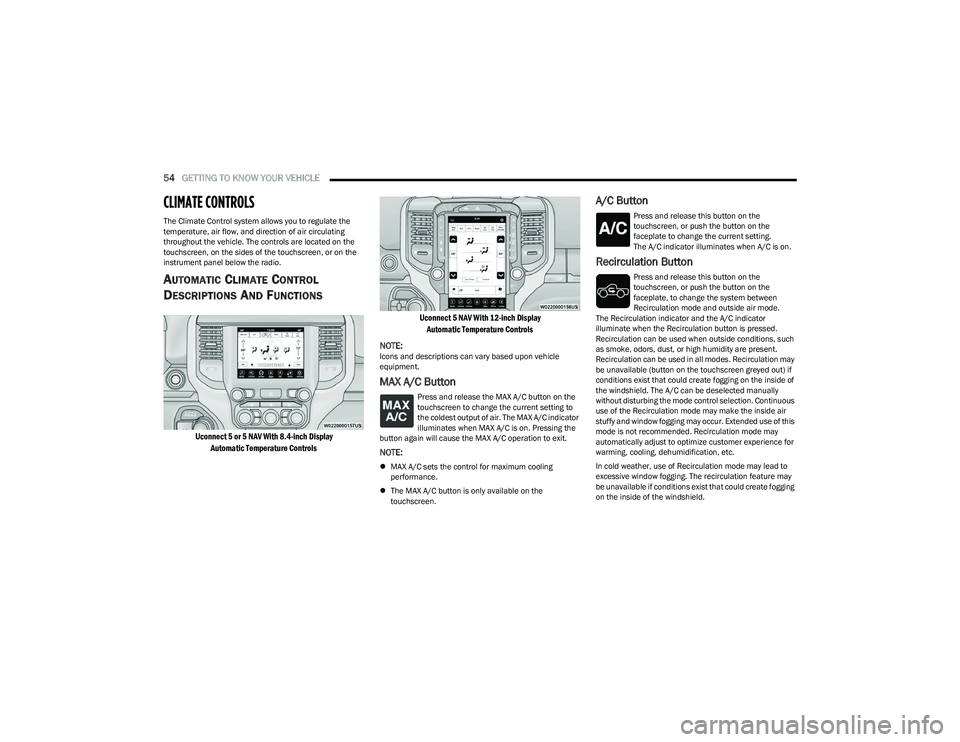
AUTOMATIC CLIMATE CONTROL
D
ESCRIPTIONS AND FUNCTIONS
Uconnect 5 or 5 NAV With 8.4-inch Display
Automatic Temperature Controls Uconnect 5 NAV With 12-inch Display
Automatic Temperature Controls
NOTE:
Icons and descriptions can vary based upon vehicle
equipment.
MAX A/C Button
Press and release the MAX A/C button on the
touchscreen to change the current setting to
the coldest output of air. The MAX A/C indicator
illuminates when MAX A/C is on. Pressing the
button again will cause the MAX A/C operation to exit.
NOTE:
MAX A/C sets the control for maximum cooling
performance.
The MAX A/C button is only available on the
touchscreen.
A/C Button
Press and release this button on the
touchscreen, or push the button on the
faceplate to change the current setting.
The A/C indicator illuminates when A/C is on.
Recirculation Button
Press and release this button on the
touchscreen, or push the button on the
faceplate, to change the system between
Recirculation mode and outside air mode.
The Recirculation indicator and the A/C indicator
illuminate when the Recirculation button is pressed.
Recirculation can be used when outside conditions, such
as smoke, odors, dust, or high humidity are present.
Recirculation can be used in all modes. Recirculation may
be unavailable (button on the touchscreen greyed out) if
conditions exist that could create fogging on the inside of
the windshield. The A/C can be deselected manually
without disturbing the mode control selection. Continuous
use of the Recirculation mode may make the inside air
stuffy and window fogging may occur. Extended use of this
mode is not recommended. Recirculation mode may
automatically adjust to optimize customer experience for
warming, cooling, dehumidification, etc.
In cold weather, use of Recirculation mode may lead to
excessive window fogging. The recirculation feature may
be unavailable if conditions exist that could create fogging
on the inside of the windshield.
23_DT_OM_EN_USC_t.book Page 54
Page 109 of 416

GETTING TO KNOW YOUR INSTRUMENT PANEL107
NOTE:
The charging system is independent from load reduc -
tion. The charging system performs a diagnostic on the
charging system continuously.
If the Battery Charge Warning Light is on it may indicate
a problem with the charging system
Úpage 108.
The electrical loads that may be switched off (if equipped),
and vehicle functions which can be affected by load
reduction:
Heated Seats / Vented Seats / Heated Wheel
Rear Defroster And Heated Mirrors
HVAC System
115 Volts AC Power Inverter System
Audio and Telematics System
Loss of the battery charge may indicate one or more of the
following conditions:
The charging system cannot deliver enough electrical
power to the vehicle system because the electrical
loads are larger than the capability of charging system.
The charging system is still functioning properly.
Turning on all possible vehicle electrical loads
(e.g. HVAC to max settings, exterior and interior lights,
overloaded power outlets +12 Volts, 115 Volts AC, USB
ports) during certain driving conditions (city driving,
towing, frequent stopping).
Installing options like additional lights, upfitter
electrical accessories, audio systems, alarms and
similar devices.
Unusual driving cycles (short trips separated by long
parking periods).
The vehicle was parked for an extended period of time
(weeks, months).
The battery was recently replaced and was not charged
completely.
The battery was discharged by an electrical load left on
when the vehicle was parked.
The battery was used for an extended period with the
engine not running to supply radio, lights, chargers,
+12 Volt portable appliances like vacuum cleaners,
game consoles and similar devices.
What to do when an electrical load reduction action
message is present (“Battery Saver On” or “Battery Saver
Mode”)
During a trip:
Reduce power to unnecessary loads if possible:
Turn off redundant lights (interior or exterior).
Check what may be plugged in to power outlets
+12 Volts, 115 Volts AC, USB ports.
Check HVAC settings (blower, temperature).
Check the audio settings (volume). After a trip:
Check if any aftermarket equipment was installed
(additional lights, upfitter electrical accessories, audio
systems, alarms) and review specifications if any
(load and Ignition Off Draw currents).
Evaluate the latest driving cycles (distance, driving
time and parking time).
The vehicle should have service performed if the
message is still present during consecutive trips and
the evaluation of the vehicle and driving pattern did not
help to identify the cause.
WARNING LIGHTS AND MESSAGES
The warning/indicator lights will illuminate in the
instrument panel together with a dedicated message
and/or acoustic signal when applicable. These indications
are indicative and precautionary and as such must not be
considered as exhaustive and/or alternative to the
information contained in the Owner’s Manual, which you
are advised to read carefully in all cases. Always refer to
the information in this chapter in the event of a failure
indication. All active telltales will display first if applicable.
The system check menu may appear different based upon
equipment options and current vehicle status. Some
telltales are optional and may not appear.
3
23_DT_OM_EN_USC_t.book Page 107
Page 137 of 416
STARTING AND OPERATING135
The vehicle will return to NRH from Aero Mode if the
vehicle speed remains between 30 mph (48 km/h)
and 35 mph (56 km/h) for greater than 20 seconds or
if the vehicle speed falls below 30 mph (48 km/h).
NOTE:
Automatic Aero mode will be disabled if a trailer is
detected to prevent shifting loads.
Speed thresholds for raising/lowering the vehicle
automatically at higher speeds only apply if
Automatic Aero Mode is enabled in your Uconnect
Radio settings.
To enter Aero Height manually push the height selector
switch down once from NRH at any vehicle speed. To
return to NRH push the height selector switch up once
while vehicle speed is less than 56 mph (90 km/h).
NOTE:Automatic Aero Mode may be disabled through vehicle
settings in the instrument cluster display Úpage 98 or
through your Uconnect Radio (if equipped) Úpage 191.
Entry/Exit Height (Lowers the vehicle approximately
2 inches [51 mm]) – This position lowers the vehicle
for easier passenger entry and exit as well as lowering
the vehicle for easier loading and unloading of cargo.
To enter Entry/Exit Mode, push the height selector
switch down once from the NRH while the vehicle
speed is below 33 mph (53 km/h). Once the vehicle
speed goes below 15 mph (24 km/h) the vehicle
height will begin to lower. If the vehicle speed remains
between 15 mph (24 km/h) and 25 mph (40 km/h) for
greater than 60 seconds, or the vehicle speed exceeds
25 mph (40 km/h) the Entry/Exit change will be canceled. To return to Normal Height Mode, push the height
selector switch up once while in Entry/Exit or drive the
vehicle over 15 mph (24 km/h).
NOTE:Entry/Exit Height may be achieved using the Remote
Lowering feature on your key fob for easier entry/loading
Úpage 16.
The system requires that the ignition be in the ON/RUN
position or the engine running for all user requested
changes. When lowering the vehicle, all of the doors must
be closed. If a door is opened at any time while the vehicle
is lowering, the change will not be completed until the
open door(s) is closed.
This system uses a lifting and lowering pattern which
keeps the headlights from incorrectly shining into
oncoming traffic. When raising the vehicle, the rear of the
vehicle will move up first and then the front. When
lowering the vehicle, the front will move down first and
then the rear.
After the engine is turned off, it may be noticed that the air
suspension system operates briefly; this is normal. The
system is correcting the position of the vehicle to ensure a
proper appearance.
To assist with changing a spare tire, the air suspension
system has a feature which allows the automatic leveling
to be disabled
Úpage 98. Default Ride Height:
Select Aero Height or Normal Ride Height as the default
for all vehicle speeds and operation. This is the
selected height that the suspension will level for speed
changes (e.g. raising from Entry/Exit Height at speed,
lowering from Off-Road Height at speed, etc.).
Default ride height can be changed by manually
adjusting the Air Suspension switch to Normal Ride
Height or Aero Ride Height and staying in the selected
height for 2.5 seconds. It will be stored as the default
ride height and the height will be maintained until a
new default ride height is selected.
NOTE:If equipped with a touchscreen radio, all enabling/
disabling of air suspension features must be done through
the radio
Úpage 191.
AIR SUSPENSION MODES
The air suspension system has multiple modes to protect
the system in unique situations. The engine should be
running to change between Air Suspension Modes.
CAUTION!
When in Entry/Exit Height, be aware of your
surroundings, you may not have the clearance required
for certain areas and vehicle damage may occur.
WARNING!
The air suspension system uses a high pressure
volume of air to operate the system. To avoid personal
injury or damage to the system, see an authorized
dealer for service.
4
23_DT_OM_EN_USC_t.book Page 135
Page 139 of 416

STARTING AND OPERATING137
Aero Height– Indicator lamps 5 and 4 will be
illuminated.
Entry/Exit – Indicator lamp 5 will be illuminated.
Entry/Exit can be requested up to 33 mph (53 km/h).
If vehicle speed is reduced to, and kept below, 15 mph
(24 km/h) indicator lamp 4 will flash and indicator
lamp 5 will remain solid until Entry/Exit is achieved at
which point indicator lamp 4 will turn off.
Automatic Aero Mode – Indicator lamps 5 and 4 will be
illuminated.
Transport Mode – No indicator lamps will be illumi -
nated. Transport Mode is disabled by driving the
vehicle or disabling in the Uconnect settings.
Tire/Jack Mode – Indicator lamps 5 and 1 will be illumi -
nated. Tire/Jack Mode is disabled by driving the vehicle
or disabling in the Uconnect settings.
Wheel Alignment Mode – Indicator lamps 3, 4, and 5
will be illuminated. Wheel Alignment Mode is disabled
by driving the vehicle or disabling in the Uconnect
settings.
ACTIVE-LEVEL FOUR CORNER
AIR SUSPENSION SYSTEM
(OFF-ROAD GROUP) — IF EQUIPPED
DESCRIPTION
The air suspension system provides full-time load-leveling
capability along with the benefit of being able to adjust
vehicle height by using the toggle switch.
Rebel Air Suspension Controls
Off-Road (OR) (Raises the vehicle approximately 1 inch
[26 mm]) – This position is intended for off-roading use
only where maximum ground clearance is required. To
enter OR, push the height selector switch up once from
the NRH position while vehicle speed is below 20 mph
(32 km/h). While in OR, if the vehicle speed exceeds
25 mph (40 km/h) the vehicle height will be automati -
cally lowered to NRH. Off-Road may not be available
due to vehicle payload, an instrument cluster display
message is shown when this occurs
Úpage 98.
Normal Ride Height (NRH) – This is the standard posi -
tion of the suspension and is meant for normal driving.
Aero Height (Lowers the vehicle approximately
0.6 inches [15 mm]) – This position provides improved
aerodynamics by lowering the vehicle. The vehicle will
automatically enter Automatic Aero Mode when the
vehicle speed remains between 62 mph (100 km/h)
and 66 mph (106 km/h) for greater than 20 seconds
or if the vehicle speed exceeds 66 mph (106 km/h).
The vehicle will return to NRH from Aero Mode if the
vehicle speed remains between 30 mph (48 km/h)
and 35 mph (56 km/h) for greater than 20 seconds or
if the vehicle speed falls below 30 mph (48 km/h).
NOTE:
Automatic Aero mode will be disabled if a trailer is
detected to prevent shifting loads.
Speed thresholds for raising or lowering the vehicle
only apply if Automatic Aero Mode is enabled
through vehicle settings on your Uconnect Radio.
To enter Aero Height manually push the height
selector switch down once from NRH at any vehicle
speed. To return to NRH push the height selector
switch up once while vehicle speed is less than
56 mph (90 km/h).
Automatic Aero Mode may be disabled through
vehicle settings on your Uconnect Radio.
1 — Off-Road Indicator (Customer Selectable)
2 — Normal Ride Height Indicator (Customer Selectable)
3 — Aero Height Indicator (Customer Selectable)
4 — Entry/Exit Height Indicator (Customer Selectable)
CAUTION!
If the vehicle is in Off-Road setting, be aware of your
surroundings, you may not have the clearance required
for certain areas and vehicle damage may occur.
4
23_DT_OM_EN_USC_t.book Page 137
Page 165 of 416
STARTING AND OPERATING163
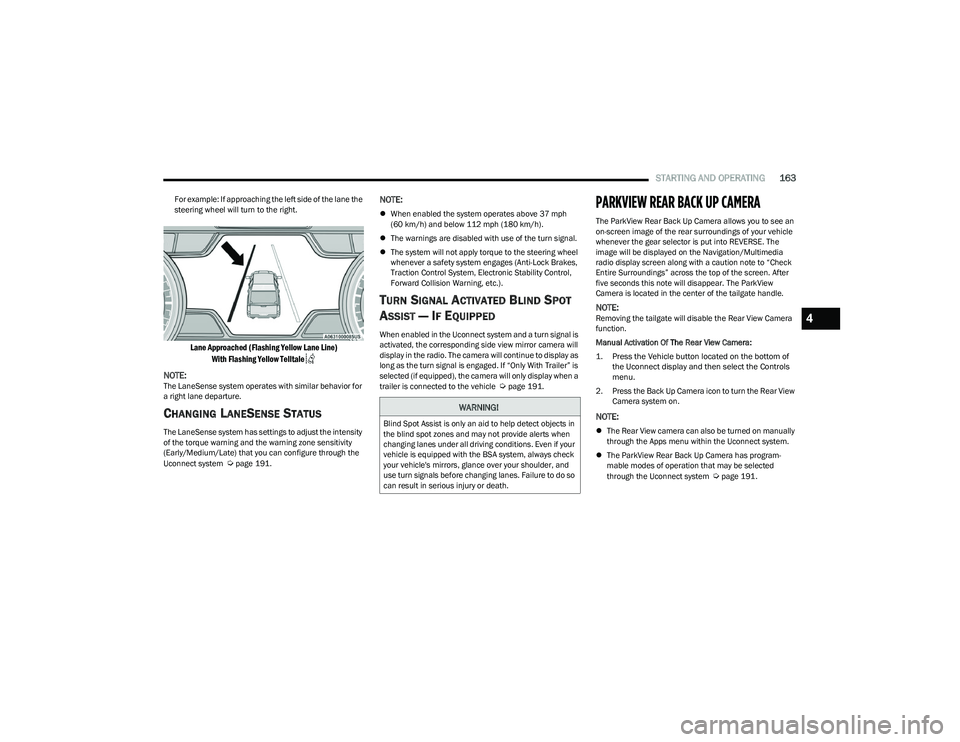
For example: If approaching the left side of the lane the
steering wheel will turn to the right.
Lane Approached (Flashing Yellow Lane Line)
With Flashing Yellow Telltale
NOTE:
The LaneSense system operates with similar behavior for
a right lane departure.
CHANGING LANESENSE STATUS
The LaneSense system has settings to adjust the intensity
of the torque warning and the warning zone sensitivity
(Early/Medium/Late) that you can configure through the
Uconnect system
Úpage 191.
NOTE:
When enabled the system operates above 37 mph
(60 km/h) and below 112 mph (180 km/h).
The warnings are disabled with use of the turn signal.
The system will not apply torque to the steering wheel
whenever a safety system engages (Anti-Lock Brakes,
Traction Control System, Electronic Stability Control,
Forward Collision Warning, etc.).
TURN SIGNAL ACTIVATED BLIND SPOT
A
SSIST — IF EQUIPPED
When enabled in the Uconnect system and a turn signal is
activated, the corresponding side view mirror camera will
display in the radio. The camera will continue to display as
long as the turn signal is engaged. If “Only With Trailer” is
selected (if equipped), the camera will only display when a
trailer is connected to the vehicle
Úpage 191.
PARKVIEW REAR BACK UP CAMERA
The ParkView Rear Back Up Camera allows you to see an
on-screen image of the rear surroundings of your vehicle
whenever the gear selector is put into REVERSE. The
image will be displayed on the Navigation/Multimedia
radio display screen along with a caution note to “Check
Entire Surroundings” across the top of the screen. After
five seconds this note will disappear. The ParkView
Camera is located in the center of the tailgate handle.
NOTE:Removing the tailgate will disable the Rear View Camera
function.
Manual Activation Of The Rear View Camera:
1. Press the Vehicle button located on the bottom of
the Uconnect display and then select the Controls
menu.
2. Press the Back Up Camera icon to turn the Rear View Camera system on.
NOTE:
The Rear View camera can also be turned on manually
through the Apps menu within the Uconnect system.
The ParkView Rear Back Up Camera has program -
mable modes of operation that may be selected
through the Uconnect system
Úpage 191.
WARNING!
Blind Spot Assist is only an aid to help detect objects in
the blind spot zones and may not provide alerts when
changing lanes under all driving conditions. Even if your
vehicle is equipped with the BSA system, always check
your vehicle's mirrors, glance over your shoulder, and
use turn signals before changing lanes. Failure to do so
can result in serious injury or death.
4
23_DT_OM_EN_USC_t.book Page 163
Page 193 of 416

191
MULTIMEDIA
UCONNECT SYSTEMS
For detailed information about your Uconnect 3 With
5-inch Display Úpage 215.
For detailed information about your Uconnect 5/5 NAV
With 8.4-inch Display system or your Uconnect 5 NAV With
12-inch Display system, refer to your Uconnect Radio
Instruction Manual.
NOTE:Uconnect screen images are for illustration purposes only
and may not reflect exact software for your vehicle.
CYBERSECURITY
Depending on applicability, your vehicle may be able to
send or receive information from a wired or wireless
network. This information allows systems and features in
your vehicle to function properly.
Your vehicle may be equipped with certain security
features to reduce the risk of unauthorized and unlawful
access to vehicle systems and wireless communications.
Vehicle software technology continues to evolve over time
and FCA US LLC, working with its suppliers, evaluates and
takes appropriate steps as needed. As always, if you
experience unusual behavior, contact an authorized
dealer immediately
Úpage 398, or refer to your
Uconnect Radio Instruction Manual for additional contact
information. The risk of unauthorized and unlawful access to your
vehicle systems may still exist, even if the most recent
version of vehicle software (such as Uconnect software) is
installed.
NOTE:To help further improve user experience, features,
stability, etc., and minimize the potential risk of a security
breach, vehicle owners should routinely check
www.driveuconnect.com (US Residents) or www.driveuco
-
nnect.ca (Canadian Residents) to learn about available
Uconnect software updates.
UCONNECT SETTINGS
The Uconnect system uses a combination of buttons on
the touchscreen and buttons on the faceplate located on
the center of the instrument panel. These buttons allow
you to access and change the Customer Programmable
Features. Many features can vary by vehicle.
Buttons on the faceplate are located below and/or beside
the Uconnect system in the center of the instrument
panel. In addition, there is a SCROLL/ENTER control knob
located on the right side. Turn the control knob to scroll
through menus and change settings. Push the center of
the control knob one or more times to select or change a
setting.
Your Uconnect system may also have SCREEN OFF and
MUTE buttons on the faceplate.
Push the SCREEN OFF button on the faceplate to turn off
the Uconnect screen. Push the button again or tap the
screen to turn the screen on.
Press the Back Arrow button to exit out of a Menu or
certain option on the Uconnect system.
For the Uconnect 5 systems, push and hold the
Power button on the radio’s faceplate for a minimum of
15 seconds to reset the radio.
WARNING!
ONLY insert trusted devices/components into your
vehicle. Media of unknown origin could possibly
contain malicious software, and if installed in your
vehicle, it may increase the possibility for vehicle
systems to be breached.
As always, if you experience unusual vehicle
behavior, take your vehicle to an authorized dealer
immediately.
5
23_DT_OM_EN_USC_t.book Page 191
Page 195 of 416
MULTIMEDIA193
My Profile
When the My Profile button is pressed on the touchscreen, the system displays options related to the vehicle’s profiles.
NOTE:Depending on the vehicle’s options, feature settings may vary.
Setting Name Description
Language This setting will change the language of the Uconnect system and Instrument Cluster
Display. The available languages are English, Français, Italiano, and Español.
Display Mode This setting will adjust the display for the radio to “Auto” or “Manual”. “Manual” allows for
more customization with the radio display.
Display Brightness Headlights On This setting will allow you to set the brightness when the headlights are on. To access this
setting, Display Mode must be set to “Manual”. The “+” setting will increase the
brightness; the “-” will decrease the brightness.
Display Brightness Headlights Off This setting will allow you to set the brightness when the headlights are off. To access this
setting, Display Mode must be set to “Manual”. The “+” setting will increase the
brightness; the “-” will decrease the brightness.
Set Theme This setting will allow you to change the display theme.
Units This setting will allow you to change the units to “US”, “Metric”, or “Custom”. The
available options within Custom are “Speed” (MPH or km/h), “Distance” (mi or km), “Fuel
Consumption” (MPG [US], MPG [UK], L/100 km, or km/L), “Pressure” (psi, kPa, or bar),
“Temperature” (°C or °F), “Power” (HP [US], Gal HP [UK], or kW), and “Torque” (lb-ft or
Nm) units of measurement independently.
Theme Mode This setting will allow you to adjust the brightness of your theme. Setting options are
“Light”, “Dark” and “Auto”. Select to show themes in Light or Dark mode. “Auto” changes
the theme with the headlights.
Touchscreen Beep This setting will allow you to turn the touchscreen beep on or off.
Show Main Category Bar Labels This setting will allow the main category bar labels to be shown on or off.
Navigation Next Turn Pop-ups Displayed in Cluster This setting will display navigation prompts in the Instrument Cluster Display.
5
23_DT_OM_EN_USC_t.book Page 193
Page 196 of 416
194MULTIMEDIA
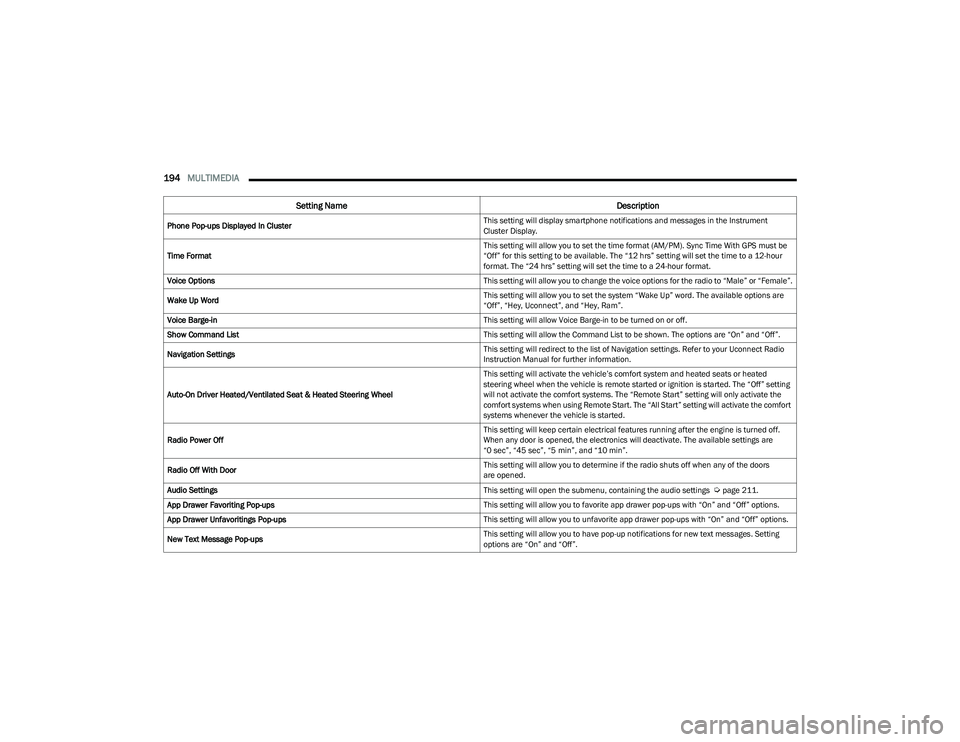
Phone Pop-ups Displayed In Cluster This setting will display smartphone notifications and messages in the Instrument
Cluster Display.
Time Format This setting will allow you to set the time format (AM/PM). Sync Time With GPS must be
“Off” for this setting to be available. The “12 hrs” setting will set the time to a 12-hour
format. The “24 hrs” setting will set the time to a 24-hour format.
Voice Options This setting will allow you to change the voice options for the radio to “Male” or “Female”.
Wake Up Word This setting will allow you to set the system “Wake Up” word. The available options are
“Off”, “Hey, Uconnect”, and “Hey, Ram”.
Voice Barge-in This setting will allow Voice Barge-in to be turned on or off.
Show Command List This setting will allow the Command List to be shown. The options are “On” and “Off”.
Navigation Settings This setting will redirect to the list of Navigation settings. Refer to your Uconnect Radio
Instruction Manual for further information.
Auto-On Driver Heated/Ventilated Seat & Heated Steering Wheel This setting will activate the vehicle’s comfort system and heated seats or heated
steering wheel when the vehicle is remote started or ignition is started. The “Off” setting
will not activate the comfort systems. The “Remote Start” setting will only activate the
comfort systems when using Remote Start. The “All Start” setting will activate the comfort
systems whenever the vehicle is started.
Radio Power Off This setting will keep certain electrical features running after the engine is turned off.
When any door is opened, the electronics will deactivate. The available settings are
“0 sec”, “45 sec”, “5 min”, and “10 min”.
Radio Off With Door This setting will allow you to determine if the radio shuts off when any of the doors
are opened.
Audio Settings This setting will open the submenu, containing the audio settings
Úpage 211.
App Drawer Favoriting Pop-ups This setting will allow you to favorite app drawer pop-ups with “On” and “Off” options.
App Drawer Unfavoritings Pop-ups This setting will allow you to unfavorite app drawer pop-ups with “On” and “Off” options.
New Text Message Pop-ups This setting will allow you to have pop-up notifications for new text messages. Setting
options are “On” and “Off”.
Setting Name
Description
23_DT_OM_EN_USC_t.book Page 194
Page 203 of 416
MULTIMEDIA201
Voice
Navigation
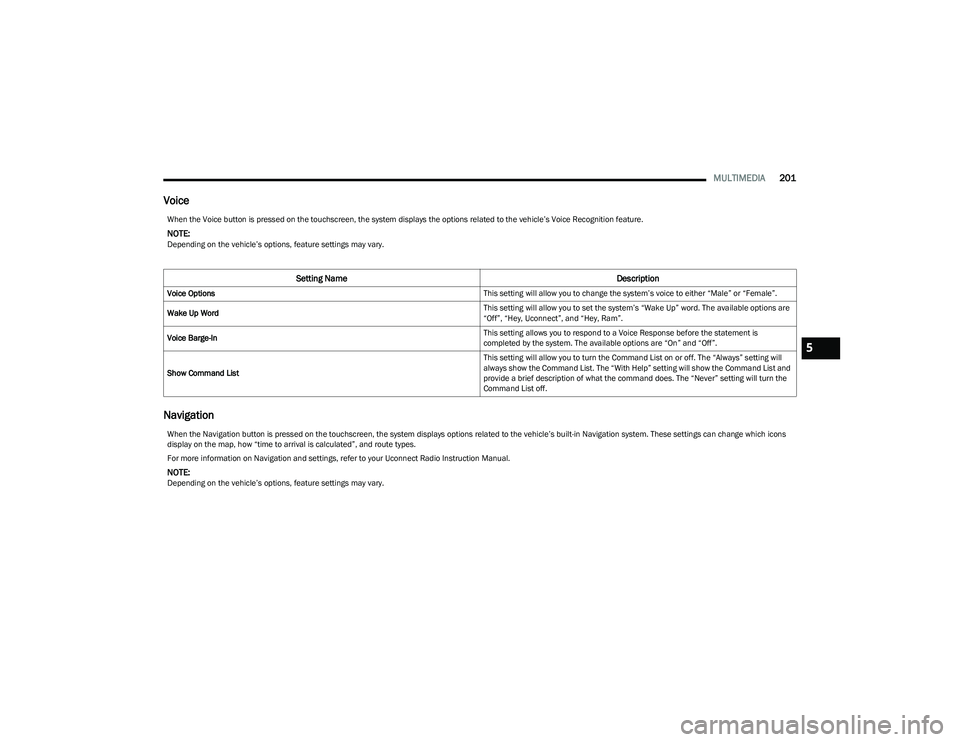
When the Voice button is pressed on the touchscreen, the system displays the options related to the vehicle’s Voice Recognition feature.
NOTE:Depending on the vehicle’s options, feature settings may vary.
Setting Name Description
Voice Options This setting will allow you to change the system’s voice to either “Male” or “Female”.
Wake Up Word This setting will allow you to set the system’s “Wake Up” word. The available options are
“Off”, “Hey, Uconnect”, and “Hey, Ram”.
Voice Barge-In This setting allows you to respond to a Voice Response before the statement is
completed by the system. The available options are “On” and “Off”.
Show Command List This setting will allow you to turn the Command List on or off. The “Always” setting will
always show the Command List. The “With Help” setting will show the Command List and
provide a brief description of what the command does. The “Never” setting will turn the
Command List off.
When the Navigation button is pressed on the touchscreen, the system displays options related to the vehicle’s built-in Navigation system. These settings can change which icons
display on the map, how “time to arrival is calculated”, and route types.
For more information on Navigation and settings, refer to your Uconnect Radio Instruction Manual.
NOTE:Depending on the vehicle’s options, feature settings may vary.
5
23_DT_OM_EN_USC_t.book Page 201
Page 218 of 416
216MULTIMEDIA
NOTE:Uconnect screen images are for illustration purposes only and may not reflect exact software for your vehicle.
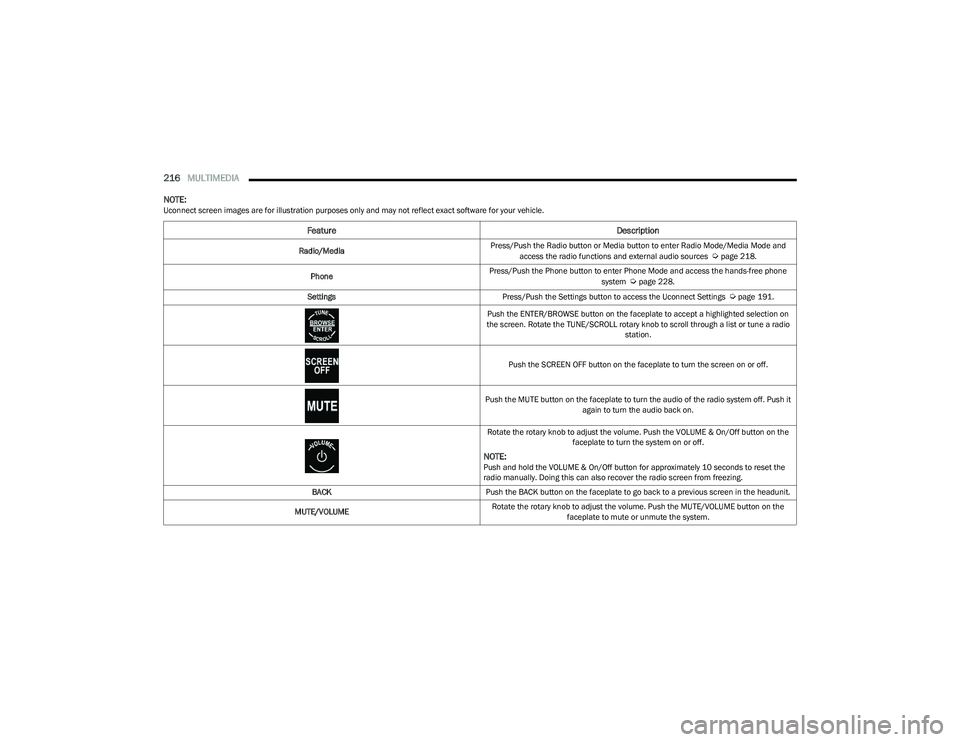
Feature Description
Radio/MediaPress/Push the Radio button or Media button to enter Radio Mode/Media Mode and
access the radio functions and external audio sources Úpage 218.
Phone Press/Push the Phone button to enter Phone Mode and access the hands-free phone
system
Úpage 228.
Settings Press/Push the Settings button to access the Uconnect Settings
Úpage 191.
Push the ENTER/BROWSE button on the faceplate to accept a highlighted selection on
the screen. Rotate the TUNE/SCROLL rotary knob to scroll through a list or tune a radio station.
Push the SCREEN OFF button on the faceplate to turn the screen on or off.
Push the MUTE button on the faceplate to turn the audio of the radio system off. Push it again to turn the audio back on.
Rotate the rotary knob to adjust the volume. Push the VOLUME & On/Off button on the faceplate to turn the system on or off.
NOTE:Push and hold the VOLUME & On/Off button for approximately 10 seconds to reset the
radio manually. Doing this can also recover the radio screen from freezing.
BACK Push the BACK button on the faceplate to go back to a previous screen in the headunit.
MUTE/VOLUME Rotate the rotary knob to adjust the volume. Push the MUTE/VOLUME button on the
faceplate to mute or unmute the system.
23_DT_OM_EN_USC_t.book Page 216