navigation system RAM 1500 2023 Owners Manual
[x] Cancel search | Manufacturer: RAM, Model Year: 2023, Model line: 1500, Model: RAM 1500 2023Pages: 416, PDF Size: 20.59 MB
Page 39 of 416
GETTING TO KNOW YOUR VEHICLE37
GET STARTED
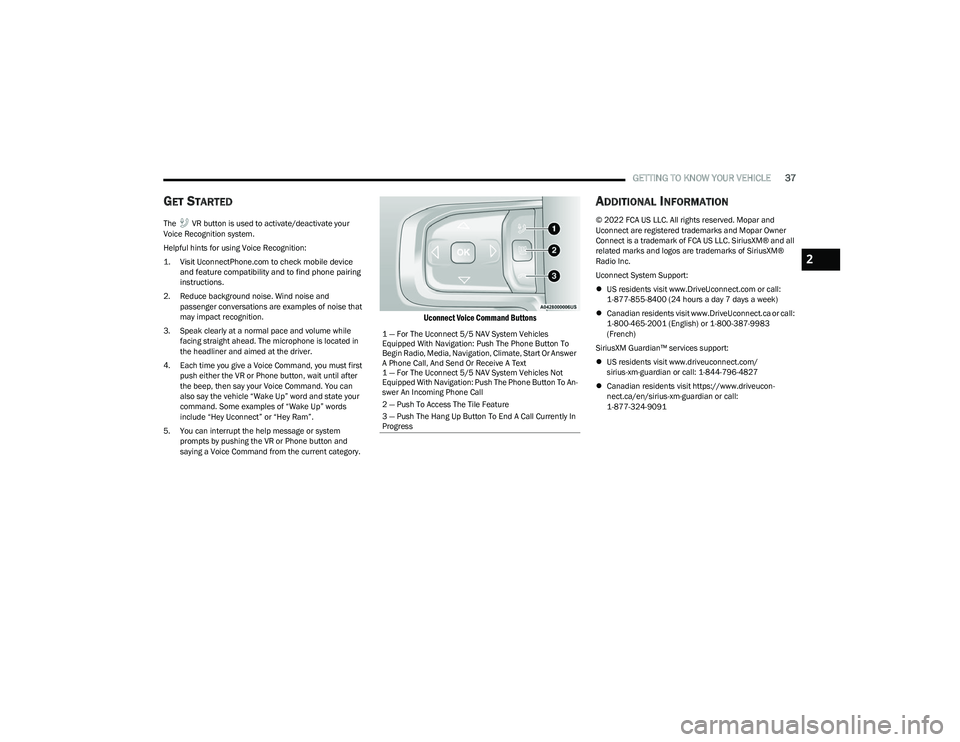
The VR button is used to activate/deactivate your
Voice Recognition system.
Helpful hints for using Voice Recognition:
1. Visit
UconnectPhone.com
to check mobile device
and feature compatibility and to find phone pairing
instructions.
2. Reduce background noise. Wind noise and passenger conversations are examples of noise that
may impact recognition.
3. Speak clearly at a normal pace and volume while facing straight ahead. The microphone is located in
the headliner and aimed at the driver.
4. Each time you give a Voice Command, you must first push either the VR or Phone button, wait until after
the beep, then say your Voice Command. You can
also say the vehicle “Wake Up” word and state your
command. Some examples of “Wake Up” words
include “Hey Uconnect” or “Hey Ram”.
5. You can interrupt the help message or system prompts by pushing the VR or Phone button and
saying a Voice Command from the current category.
Uconnect Voice Command Buttons
ADDITIONAL INFORMATION
© 2022 FCA US LLC. All rights reserved. Mopar and
Uconnect are registered trademarks and Mopar Owner
Connect is a trademark of FCA US LLC. SiriusXM® and all
related marks and logos are trademarks of SiriusXM®
Radio Inc.
Uconnect System Support:
US residents visit www.DriveUconnect.com or call:
1-877-855-8400 (24 hours a day 7 days a week)
Canadian residents visit www.DriveUconnect.ca or call:
1-800-465-2001 (English) or 1-800-387-9983
(French)
SiriusXM Guardian™ services support:
US residents visit www.driveuconnect.com/
sirius-xm-guardian or call: 1-844-796-4827
Canadian residents visit https://www.driveucon -
nect.ca/en/sirius-xm-guardian or call:
1-877-324-9091
1 — For The Uconnect 5/5 NAV System Vehicles
Equipped With Navigation: Push The Phone Button To
Begin Radio, Media, Navigation, Climate, Start Or Answer
A Phone Call, And Send Or Receive A Text
1 — For The Uconnect 5/5 NAV System Vehicles Not
Equipped With Navigation: Push The Phone Button To An -
swer An Incoming Phone Call
2 — Push To Access The Tile Feature
3 — Push The Hang Up Button To End A Call Currently In
Progress
2
23_DT_OM_EN_USC_t.book Page 37
Page 101 of 416
GETTING TO KNOW YOUR INSTRUMENT PANEL99
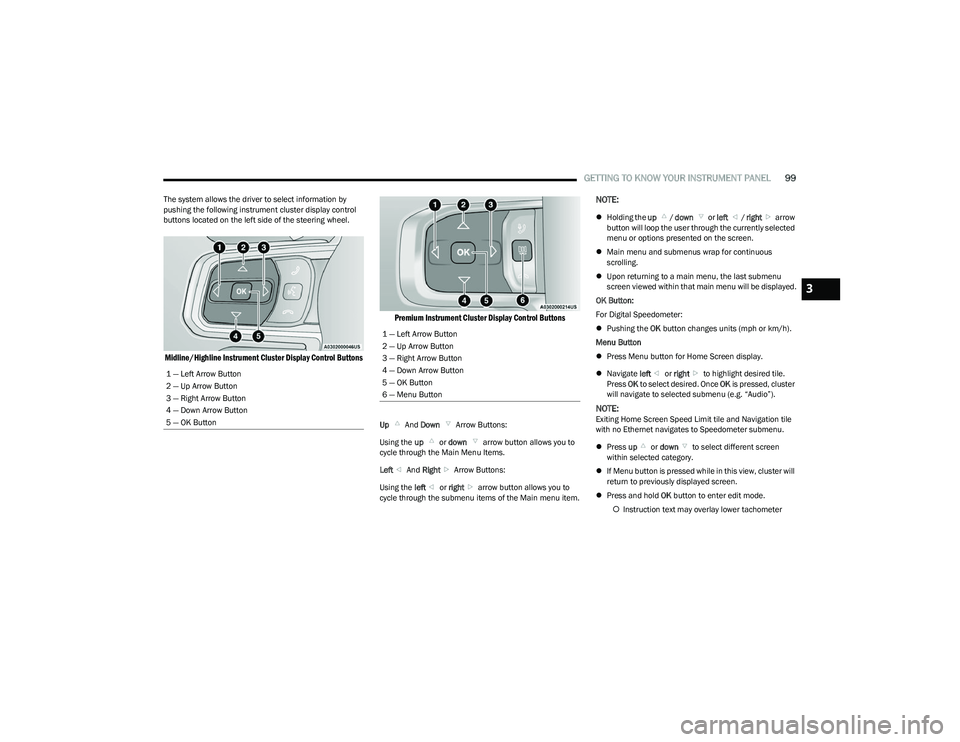
The system allows the driver to select information by
pushing the following instrument cluster display control
buttons located on the left side of the steering wheel.
Midline/Highline Instrument Cluster Display Control Buttons Premium Instrument Cluster Display Control Buttons
Up
And Down Arrow Buttons:
Using the up or down arrow button allows you to
cycle through the Main Menu Items.
Left And Right Arrow Buttons:
Using the left or right arrow button allows you to
cycle through the submenu items of the Main menu item.
NOTE:
Holding the up / down or left / right arrow
button will loop the user through the currently selected
menu or options presented on the screen.
Main menu and submenus wrap for continuous
scrolling.
Upon returning to a main menu, the last submenu
screen viewed within that main menu will be displayed.
OK Button:
For Digital Speedometer:
Pushing the OK button changes units (mph or km/h).
Menu Button
Press Menu button for Home Screen display.
Navigate left or right to highlight desired tile.
Press OK to select desired. Once OK is pressed, cluster
will navigate to selected submenu (e.g. “Audio”).
NOTE:Exiting Home Screen Speed Limit tile and Navigation tile
with no Ethernet navigates to Speedometer submenu.
Press up or down to select different screen
within selected category.
If Menu button is pressed while in this view, cluster will
return to previously displayed screen.
Press and hold OK button to enter edit mode.
Instruction text may overlay lower tachometer
1 — Left Arrow Button
2 — Up Arrow Button
3 — Right Arrow Button
4 — Down Arrow Button
5 — OK Button
1 — Left Arrow Button
2 — Up Arrow Button
3 — Right Arrow Button
4 — Down Arrow Button
5 — OK Button
6 — Menu Button
3
23_DT_OM_EN_USC_t.book Page 99
Page 107 of 416
GETTING TO KNOW YOUR INSTRUMENT PANEL105
PREMIUM CLUSTER
Display Style
Modern
Traditional
Current Gear
Off
On
Odometer
No Decimal Point
Decimal Point
Hide Fuel Gauge
Hide Range
Show Range
Defaults (Restores All Settings To Default Settings)
Restore
Cancel
HEAD UP DISPLAY (HUD) —
I
F EQUIPPED
Use this QR code to access your digital
experience.
NOTE:The HUD feature Settings are available
at any vehicle speed. Some infor -
mation like speed limit or Driver Assist
may not appear on the HUD unless
your vehicle is equipped Traffic Sign
Assist or Driver Assist systems. Push and release the
up or down arrow button until
the Settings Menu icon/title is highlighted in the
instrument cluster display. Push and release the left or
right arrow button until the HUD Menu icon/title is
highlighted in the instrument cluster display. Push and
release the OK button to enter HUD. Use the up or
down arrow button to select a setting, then push and
release the OK button to adjust the setting.
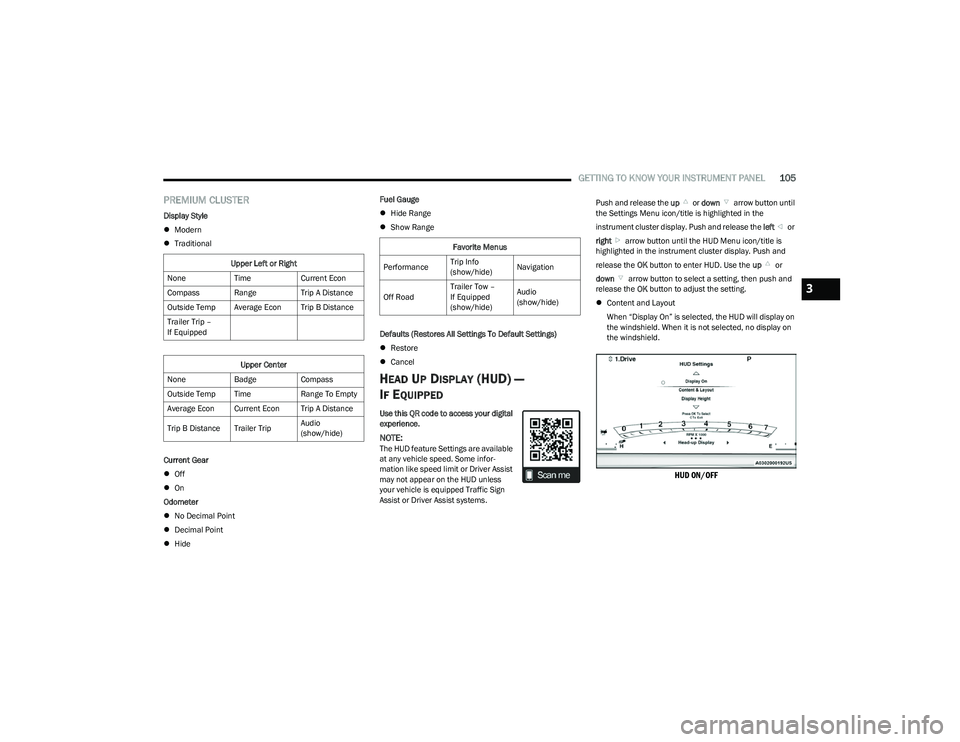
Content and Layout
When “Display On” is selected, the HUD will display on
the windshield. When it is not selected, no display on
the windshield.
HUD ON/OFF
Upper Left or Right
None TimeCurrent Econ
Compass Range Trip A Distance
Outside Temp Average Econ Trip B Distance
Trailer Trip –
If Equipped
Upper Center
None BadgeCompass
Outside Temp Time Range To Empty
Average Econ Current Econ Trip A Distance
Trip B Distance Trailer Trip Audio
(show/hide)
Favorite Menus
Performance Trip Info
(show/hide)Navigation
Off Road Trailer Tow –
If Equipped
(show/hide)Audio
(show/hide)
3
23_DT_OM_EN_USC_t.book Page 105
Page 108 of 416
106GETTING TO KNOW YOUR INSTRUMENT PANEL
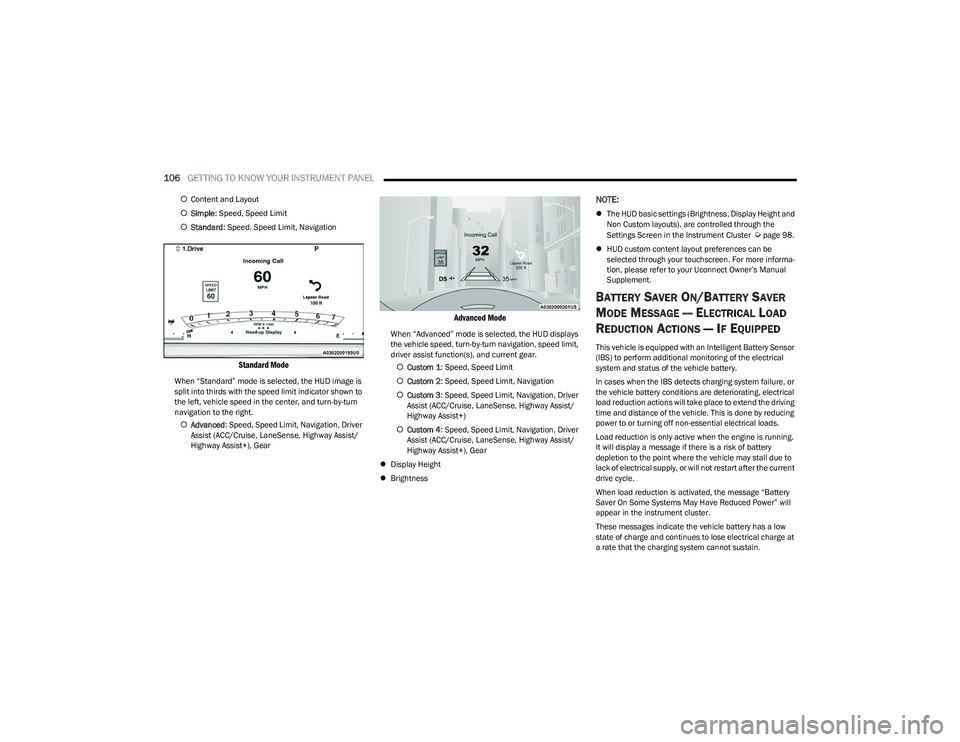
Content and Layout
Simple : Speed, Speed Limit
Standard : Speed, Speed Limit, Navigation
Standard Mode
When “Standard” mode is selected, the HUD image is
split into thirds with the speed limit indicator shown to
the left, vehicle speed in the center, and turn-by-turn
navigation to the right.
Advanced : Speed, Speed Limit, Navigation, Driver
Assist (ACC/Cruise, LaneSense, Highway Assist/
Highway Assist+), Gear
Advanced Mode
When “Advanced” mode is selected, the HUD displays
the vehicle speed, turn-by-turn navigation, speed limit,
driver assist function(s), and current gear.
Custom 1 : Speed, Speed Limit
Custom 2 : Speed, Speed Limit, Navigation
Custom 3 : Speed, Speed Limit, Navigation, Driver
Assist (ACC/Cruise, LaneSense, Highway Assist/
Highway Assist+)
Custom 4 : Speed, Speed Limit, Navigation, Driver
Assist (ACC/Cruise, LaneSense, Highway Assist/
Highway Assist+), Gear
Display Height
Brightness
NOTE:
The HUD basic settings (Brightness, Display Height and
Non Custom layouts), are controlled through the
Settings Screen in the Instrument Cluster
Úpage 98.
HUD custom content layout preferences can be
selected through your touchscreen. For more informa -
tion, please refer to your Uconnect Owner’s Manual
Supplement.
BATTERY SAVER ON/BATTERY SAVER
M
ODE MESSAGE — ELECTRICAL LOAD
R
EDUCTION ACTIONS — IF EQUIPPED
This vehicle is equipped with an Intelligent Battery Sensor
(IBS) to perform additional monitoring of the electrical
system and status of the vehicle battery.
In cases when the IBS detects charging system failure, or
the vehicle battery conditions are deteriorating, electrical
load reduction actions will take place to extend the driving
time and distance of the vehicle. This is done by reducing
power to or turning off non-essential electrical loads.
Load reduction is only active when the engine is running.
It will display a message if there is a risk of battery
depletion to the point where the vehicle may stall due to
lack of electrical supply, or will not restart after the current
drive cycle.
When load reduction is activated, the message “Battery
Saver On Some Systems May Have Reduced Power” will
appear in the instrument cluster.
These messages indicate the vehicle battery has a low
state of charge and continues to lose electrical charge at
a rate that the charging system cannot sustain.
23_DT_OM_EN_USC_t.book Page 106
Page 165 of 416
STARTING AND OPERATING163
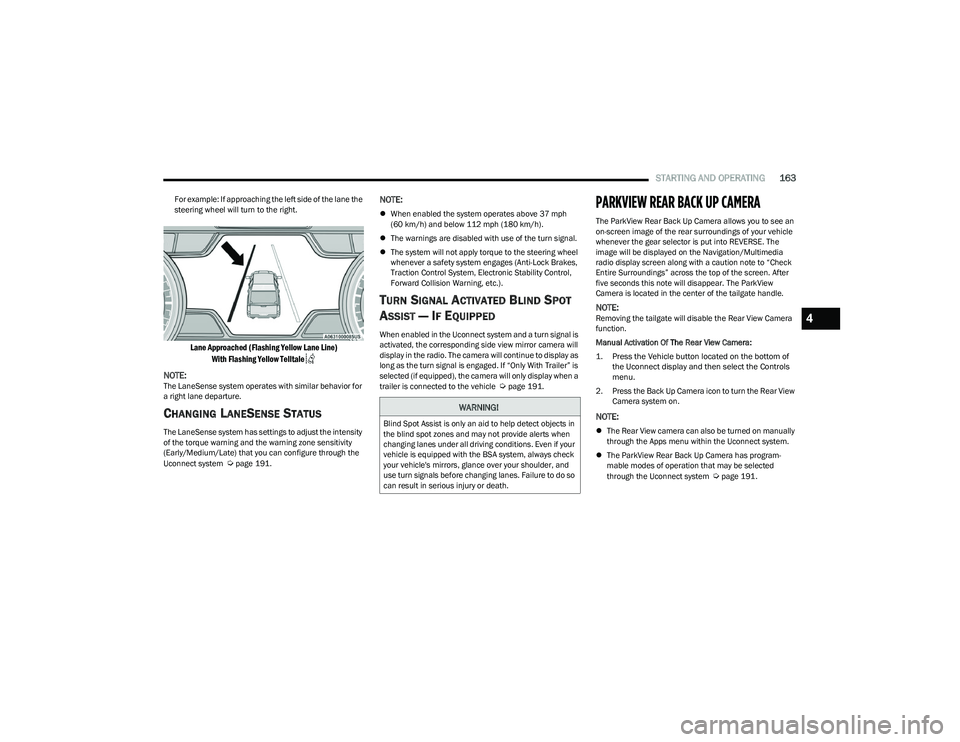
For example: If approaching the left side of the lane the
steering wheel will turn to the right.
Lane Approached (Flashing Yellow Lane Line)
With Flashing Yellow Telltale
NOTE:
The LaneSense system operates with similar behavior for
a right lane departure.
CHANGING LANESENSE STATUS
The LaneSense system has settings to adjust the intensity
of the torque warning and the warning zone sensitivity
(Early/Medium/Late) that you can configure through the
Uconnect system
Úpage 191.
NOTE:
When enabled the system operates above 37 mph
(60 km/h) and below 112 mph (180 km/h).
The warnings are disabled with use of the turn signal.
The system will not apply torque to the steering wheel
whenever a safety system engages (Anti-Lock Brakes,
Traction Control System, Electronic Stability Control,
Forward Collision Warning, etc.).
TURN SIGNAL ACTIVATED BLIND SPOT
A
SSIST — IF EQUIPPED
When enabled in the Uconnect system and a turn signal is
activated, the corresponding side view mirror camera will
display in the radio. The camera will continue to display as
long as the turn signal is engaged. If “Only With Trailer” is
selected (if equipped), the camera will only display when a
trailer is connected to the vehicle
Úpage 191.
PARKVIEW REAR BACK UP CAMERA
The ParkView Rear Back Up Camera allows you to see an
on-screen image of the rear surroundings of your vehicle
whenever the gear selector is put into REVERSE. The
image will be displayed on the Navigation/Multimedia
radio display screen along with a caution note to “Check
Entire Surroundings” across the top of the screen. After
five seconds this note will disappear. The ParkView
Camera is located in the center of the tailgate handle.
NOTE:Removing the tailgate will disable the Rear View Camera
function.
Manual Activation Of The Rear View Camera:
1. Press the Vehicle button located on the bottom of
the Uconnect display and then select the Controls
menu.
2. Press the Back Up Camera icon to turn the Rear View Camera system on.
NOTE:
The Rear View camera can also be turned on manually
through the Apps menu within the Uconnect system.
The ParkView Rear Back Up Camera has program -
mable modes of operation that may be selected
through the Uconnect system
Úpage 191.
WARNING!
Blind Spot Assist is only an aid to help detect objects in
the blind spot zones and may not provide alerts when
changing lanes under all driving conditions. Even if your
vehicle is equipped with the BSA system, always check
your vehicle's mirrors, glance over your shoulder, and
use turn signals before changing lanes. Failure to do so
can result in serious injury or death.
4
23_DT_OM_EN_USC_t.book Page 163
Page 195 of 416
MULTIMEDIA193
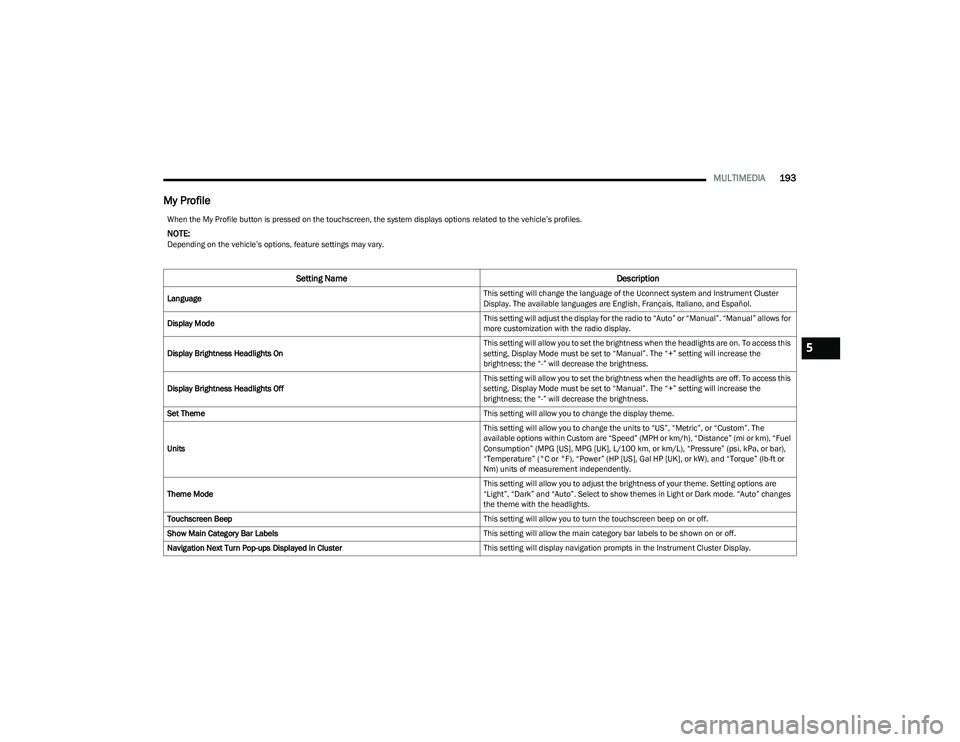
My Profile
When the My Profile button is pressed on the touchscreen, the system displays options related to the vehicle’s profiles.
NOTE:Depending on the vehicle’s options, feature settings may vary.
Setting Name Description
Language This setting will change the language of the Uconnect system and Instrument Cluster
Display. The available languages are English, Français, Italiano, and Español.
Display Mode This setting will adjust the display for the radio to “Auto” or “Manual”. “Manual” allows for
more customization with the radio display.
Display Brightness Headlights On This setting will allow you to set the brightness when the headlights are on. To access this
setting, Display Mode must be set to “Manual”. The “+” setting will increase the
brightness; the “-” will decrease the brightness.
Display Brightness Headlights Off This setting will allow you to set the brightness when the headlights are off. To access this
setting, Display Mode must be set to “Manual”. The “+” setting will increase the
brightness; the “-” will decrease the brightness.
Set Theme This setting will allow you to change the display theme.
Units This setting will allow you to change the units to “US”, “Metric”, or “Custom”. The
available options within Custom are “Speed” (MPH or km/h), “Distance” (mi or km), “Fuel
Consumption” (MPG [US], MPG [UK], L/100 km, or km/L), “Pressure” (psi, kPa, or bar),
“Temperature” (°C or °F), “Power” (HP [US], Gal HP [UK], or kW), and “Torque” (lb-ft or
Nm) units of measurement independently.
Theme Mode This setting will allow you to adjust the brightness of your theme. Setting options are
“Light”, “Dark” and “Auto”. Select to show themes in Light or Dark mode. “Auto” changes
the theme with the headlights.
Touchscreen Beep This setting will allow you to turn the touchscreen beep on or off.
Show Main Category Bar Labels This setting will allow the main category bar labels to be shown on or off.
Navigation Next Turn Pop-ups Displayed in Cluster This setting will display navigation prompts in the Instrument Cluster Display.
5
23_DT_OM_EN_USC_t.book Page 193
Page 196 of 416
194MULTIMEDIA
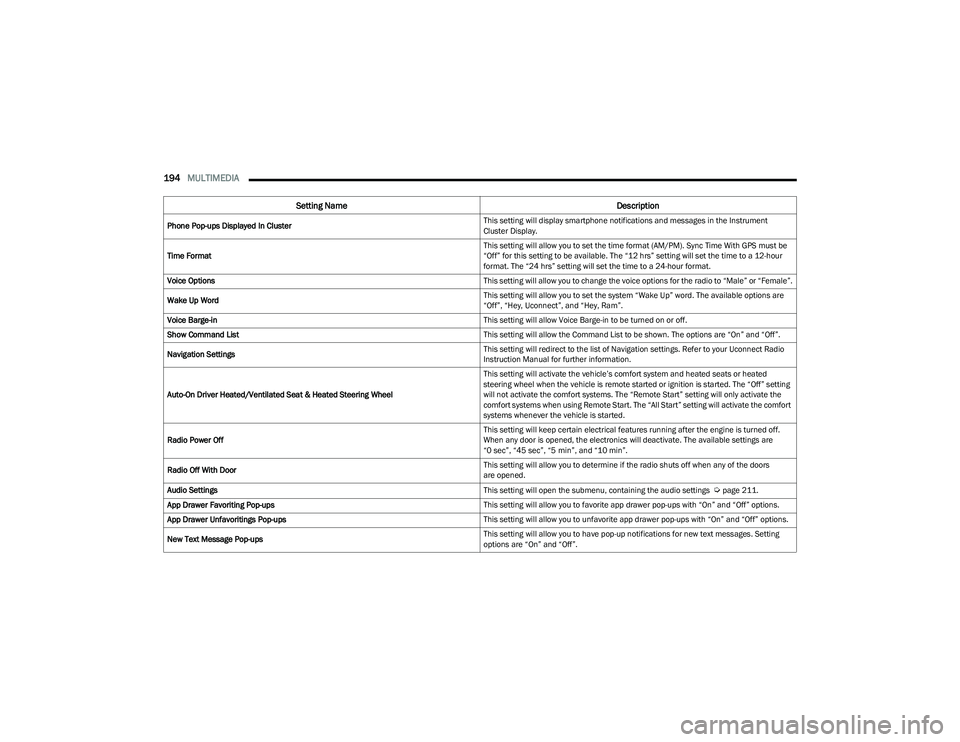
Phone Pop-ups Displayed In Cluster This setting will display smartphone notifications and messages in the Instrument
Cluster Display.
Time Format This setting will allow you to set the time format (AM/PM). Sync Time With GPS must be
“Off” for this setting to be available. The “12 hrs” setting will set the time to a 12-hour
format. The “24 hrs” setting will set the time to a 24-hour format.
Voice Options This setting will allow you to change the voice options for the radio to “Male” or “Female”.
Wake Up Word This setting will allow you to set the system “Wake Up” word. The available options are
“Off”, “Hey, Uconnect”, and “Hey, Ram”.
Voice Barge-in This setting will allow Voice Barge-in to be turned on or off.
Show Command List This setting will allow the Command List to be shown. The options are “On” and “Off”.
Navigation Settings This setting will redirect to the list of Navigation settings. Refer to your Uconnect Radio
Instruction Manual for further information.
Auto-On Driver Heated/Ventilated Seat & Heated Steering Wheel This setting will activate the vehicle’s comfort system and heated seats or heated
steering wheel when the vehicle is remote started or ignition is started. The “Off” setting
will not activate the comfort systems. The “Remote Start” setting will only activate the
comfort systems when using Remote Start. The “All Start” setting will activate the comfort
systems whenever the vehicle is started.
Radio Power Off This setting will keep certain electrical features running after the engine is turned off.
When any door is opened, the electronics will deactivate. The available settings are
“0 sec”, “45 sec”, “5 min”, and “10 min”.
Radio Off With Door This setting will allow you to determine if the radio shuts off when any of the doors
are opened.
Audio Settings This setting will open the submenu, containing the audio settings
Úpage 211.
App Drawer Favoriting Pop-ups This setting will allow you to favorite app drawer pop-ups with “On” and “Off” options.
App Drawer Unfavoritings Pop-ups This setting will allow you to unfavorite app drawer pop-ups with “On” and “Off” options.
New Text Message Pop-ups This setting will allow you to have pop-up notifications for new text messages. Setting
options are “On” and “Off”.
Setting Name
Description
23_DT_OM_EN_USC_t.book Page 194
Page 197 of 416
MULTIMEDIA195
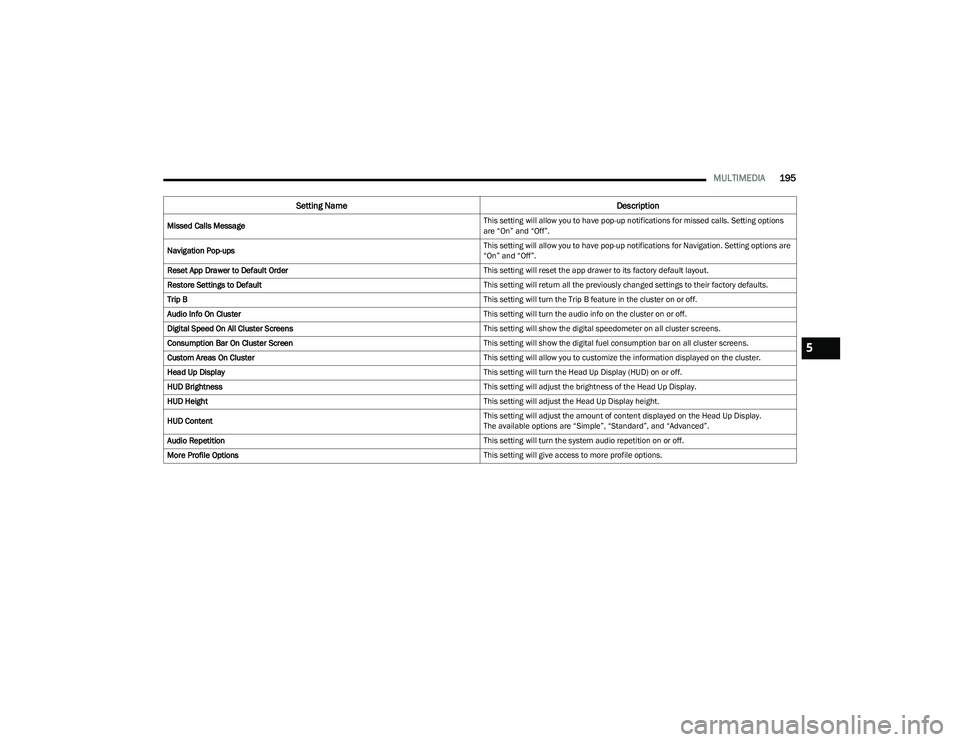
Missed Calls Message This setting will allow you to have pop-up notifications for missed calls. Setting options
are “On” and “Off”.
Navigation Pop-ups This setting will allow you to have pop-up notifications for Navigation. Setting options are
“On” and “Off”.
Reset App Drawer to Default Order This setting will reset the app drawer to its factory default layout.
Restore Settings to Default This setting will return all the previously changed settings to their factory defaults.
Trip B This setting will turn the Trip B feature in the cluster on or off.
Audio Info On Cluster This setting will turn the audio info on the cluster on or off.
Digital Speed On All Cluster Screens This setting will show the digital speedometer on all cluster screens.
Consumption Bar On Cluster Screen This setting will show the digital fuel consumption bar on all cluster screens.
Custom Areas On Cluster This setting will allow you to customize the information displayed on the cluster.
Head Up Display This setting will turn the Head Up Display (HUD) on or off.
HUD Brightness This setting will adjust the brightness of the Head Up Display.
HUD Height This setting will adjust the Head Up Display height.
HUD Content This setting will adjust the amount of content displayed on the Head Up Display.
The available options are “Simple”, “Standard”, and “Advanced”.
Audio Repetition This setting will turn the system audio repetition on or off.
More Profile Options This setting will give access to more profile options.
Setting NameDescription
5
23_DT_OM_EN_USC_t.book Page 195
Page 199 of 416
MULTIMEDIA197
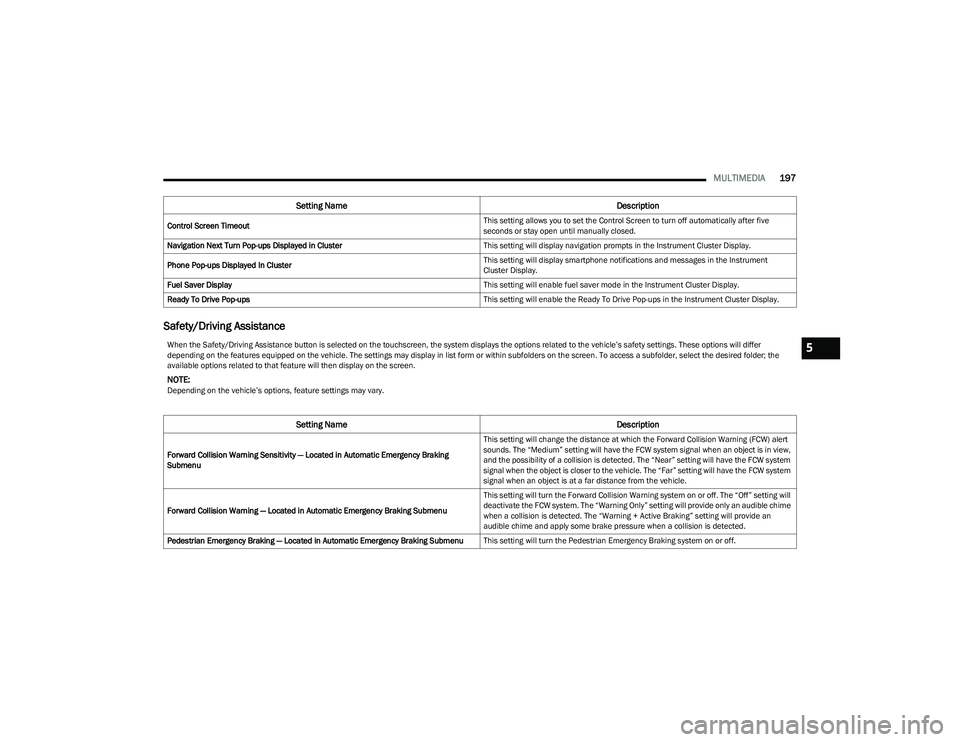
Safety/Driving Assistance
Control Screen Timeout This setting allows you to set the Control Screen to turn off automatically after five
seconds or stay open until manually closed.
Navigation Next Turn Pop-ups Displayed in Cluster This setting will display navigation prompts in the Instrument Cluster Display.
Phone Pop-ups Displayed In Cluster This setting will display smartphone notifications and messages in the Instrument
Cluster Display.
Fuel Saver Display This setting will enable fuel saver mode in the Instrument Cluster Display.
Ready To Drive Pop-ups This setting will enable the Ready To Drive Pop-ups in the Instrument Cluster Display.
Setting NameDescription
When the Safety/Driving Assistance button is selected on the touchscreen, the system displays the options related to the vehicle’s safety settings. These options will differ
depending on the features equipped on the vehicle. The settings may display in list form or within subfolders on the screen. To access a subfolder, select the desired folder; the
available options related to that feature will then display on the screen.
NOTE:Depending on the vehicle’s options, feature settings may vary.
Setting NameDescription
Forward Collision Warning Sensitivity — Located in Automatic Emergency Braking
Submenu This setting will change the distance at which the Forward Collision Warning (FCW) alert
sounds. The “Medium” setting will have the FCW system signal when an object is in view,
and the possibility of a collision is detected. The “Near” setting will have the FCW system
signal when the object is closer to the vehicle. The “Far” setting will have the FCW system
signal when an object is at a far distance from the vehicle.
Forward Collision Warning — Located in Automatic Emergency Braking Submenu This setting will turn the Forward Collision Warning system on or off. The “Off” setting will
deactivate the FCW system. The “Warning Only” setting will provide only an audible chime
when a collision is detected. The “Warning + Active Braking” setting will provide an
audible chime and apply some brake pressure when a collision is detected.
Pedestrian Emergency Braking — Located in Automatic Emergency Braking Submenu This setting will turn the Pedestrian Emergency Braking system on or off.
5
23_DT_OM_EN_USC_t.book Page 197
Page 203 of 416
MULTIMEDIA201
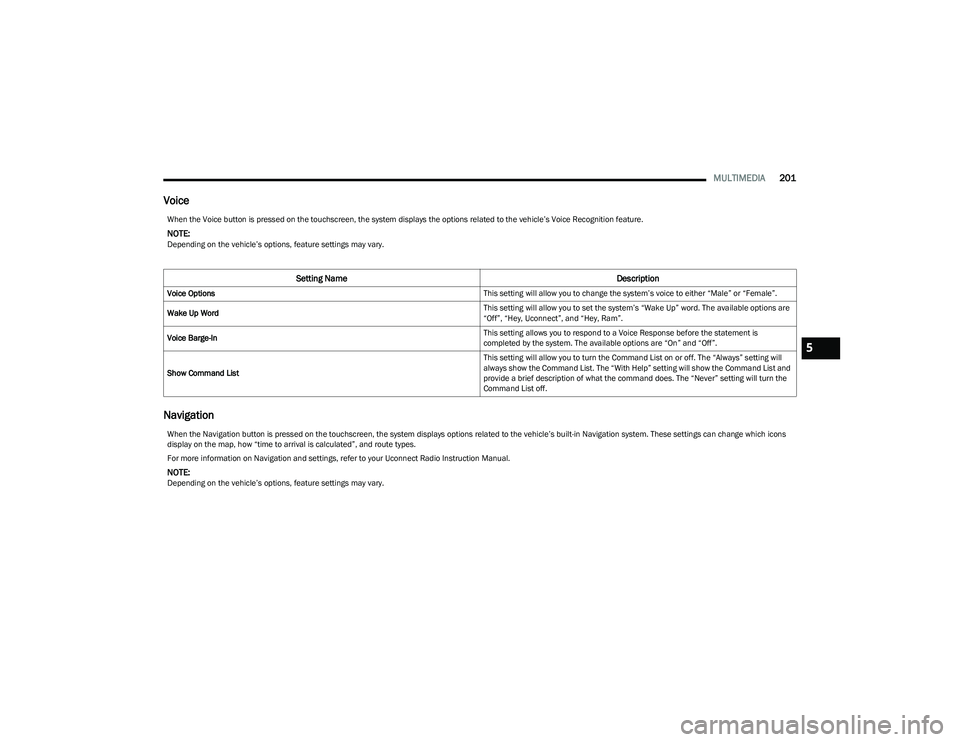
Voice
Navigation
When the Voice button is pressed on the touchscreen, the system displays the options related to the vehicle’s Voice Recognition feature.
NOTE:Depending on the vehicle’s options, feature settings may vary.
Setting Name Description
Voice Options This setting will allow you to change the system’s voice to either “Male” or “Female”.
Wake Up Word This setting will allow you to set the system’s “Wake Up” word. The available options are
“Off”, “Hey, Uconnect”, and “Hey, Ram”.
Voice Barge-In This setting allows you to respond to a Voice Response before the statement is
completed by the system. The available options are “On” and “Off”.
Show Command List This setting will allow you to turn the Command List on or off. The “Always” setting will
always show the Command List. The “With Help” setting will show the Command List and
provide a brief description of what the command does. The “Never” setting will turn the
Command List off.
When the Navigation button is pressed on the touchscreen, the system displays options related to the vehicle’s built-in Navigation system. These settings can change which icons
display on the map, how “time to arrival is calculated”, and route types.
For more information on Navigation and settings, refer to your Uconnect Radio Instruction Manual.
NOTE:Depending on the vehicle’s options, feature settings may vary.
5
23_DT_OM_EN_USC_t.book Page 201