transmission oil Ram 2500 2011 Owner's Manual
[x] Cancel search | Manufacturer: RAM, Model Year: 2011, Model line: 2500, Model: Ram 2500 2011Pages: 622
Page 223 of 622
WARNING!
Continued operation with the Transmission Tem-
perature Warning Light illuminated could cause the
fluid to boil over, come in contact with hot engine or
exhaust components causing a fire that may result in
personal injury.
For vehicles equipped with a premium cluster this warn-
ing light will display in the Electronic Vehicle Informa-
tion Center (EVIC). Refer to ”Electronic Vehicle Informa-
tion Center (EVIC) — If Equipped” for further
information.
31. Seat Belt Reminder Light
When the ignition switch is first turned to ON/
RUN, this light will turn on for five to eight
seconds as a bulb check. During the bulb check, if
the driver’s seat belt is unbuckled, a chime will sound.
After the bulb check or when driving, if the driver’s seatbelt remains unbuckled, the seat belt reminder light will
flash or remain on continuously. Refer to “Occupant
Restraints” in “Things To Know Before Starting Your
Vehicle” for further information.
32. Charging System Light
This light shows the status of the electrical charg-
ing system. The light should come on when the
ignition switch is first turned to ON/RUN and remain on
briefly as a bulb check. If the light stays on or comes on
while driving, turn off some of the vehicle’s non-essential
electrical devices or increase engine speed (if at idle). If
the charging system light remains on, it means that the
vehicle is experiencing a problem with the charging
system. Obtain SERVICE IMMEDIATELY. See an autho-
rized dealer.
If jump starting is required, refer to “Jump Starting
Procedures” in “What To Do In Emergencies”.
222 UNDERSTANDING YOUR INSTRUMENT PANEL
Page 231 of 622

•Transmission Temperature Light
This light indicates that there is excessive trans-
mission fluid temperature that might occur
with severe usage such as trailer towing. It may
also occur when operating the vehicle in a high
torque converter slip condition, such as 4-wheel-drive
operation (e.g., snow plowing, off- road operation). If this
light comes on, stop the vehicle and run the engine at idle
or faster, with the transmission in NEUTRAL until the
light goes off.
CAUTION!
Continuous driving with the Transmission Tempera-
ture Indicator illuminated will eventually cause se-
vere transmission damage or transmission failure.
WARNING!
In some circumstances a Transmission Temperature
Indicator, under continued operation, could cause the
fluid to boil over, come in contact with hot engine or
exhaust components and cause a fire.
•Loose Gascap Indicator
If the vehicle diagnostic system determines
that the fuel filler cap is loose, improperly
installed, or damaged, a loose gascap indicator
will display in the telltale display area. Tighten
the fuel filler cap properly and press the SELECT button
to turn off the message. If the problem continues, the
message will appear the next time the vehicle is started.
A loose, improperly installed, or damaged fuel filler cap
may also turn on the Malfunction Indicator Light (MIL).
230 UNDERSTANDING YOUR INSTRUMENT PANEL
Page 235 of 622
Vehicle Info (Customer Information Features)
Press and release the UP or DOWN button until “Vehicle
Info” displays in the EVIC and press the SELECT button.
Press the UP and DOWN button to scroll through the
available information displays, then press SELECT to
display anyone of the following choices.
•Coolant Temp
Displays the actual coolant temperature.
•Oil Temperature — If Equipped
Displays the actual oil temperature.
•Oil Pressure
Displays the actual oil pressure.
•Trans Temperature — If Equipped
Displays the actual transmission temperature.
•Engine Hours
Displays the hours of engine operation.
•Trailer Brake — If Equipped
Displays trailer brake output power and trailer brake
status indicator.
Tire PSI
Press and release the UP or DOWN button until “Tire
PSI” displays in the EVIC and press the SELECT button.
This will display the Tire Pressure Monitor System
(shows the current pressure of all four road tires). For
additional information, refer to “Tire Pressure Monitor
System” in “Starting And Operating”.
234 UNDERSTANDING YOUR INSTRUMENT PANEL
Page 352 of 622

ability to proceed then make sure you are in 4L (Low
Range) with the transmission in first gear (manually
select first gear on automatic transmissions) and pro-
ceed with caution. Allow engine braking to control the
descent and apply your brakes if necessary, but do not
allow the tires to lock.
WARNING!
Do not descend a steep grade in NEUTRAL. Use
vehicle brakes in conjunction with engine braking.
Descending a grade too fast could cause you to lose
control and be seriously injured.
•Driving Across An Incline– If at all possible avoid
driving across an incline. If it is necessary, know your
vehicle’s abilities. Driving across an incline places
more weight on the down hill wheels, which increases
the possibilities of a down hill slide or rollover. Makesure the surface has good traction with firm and stable
soils. If possible transverse the incline at an angle
heading slightly up or down.
WARNING!
Driving across an incline increases the risk of a
rollover, which may result in severe injury.
•If You Stall Or Begin To Lose Headway– If you stall
or begin to lose headway while climbing a steep hill,
allow your vehicle to come to a stop and immediately
apply the brake. Restart the engine and shift into
REVERSE. Back slowly down the hill allowing the
compression braking of the engine and transmission to
help regulate your speed. If the brakes are required to
control vehicle speed, apply them lightly and avoid
locking or skidding the tires.5
STARTING AND OPERATING 351
Page 364 of 622
Shallow Standing Water
Although your vehicle is capable of driving through
shallow standing water, consider the following Caution
and Warning before doing so.
CAUTION!
•Always check the depth of the standing water
before driving through it. Never drive through
standing water that is deeper than the bottom of
the tire rims mounted on the vehicle.
•Determine the condition of the road or the path
that is under water and if there are any obstacles in
the way before driving through the standing wa-
ter.
•Do not exceed 5 mph (8 km/h) when driving
through standing water. This will minimize wave
effects.
(Continued)
CAUTION! (Continued)
•Driving through standing water may cause dam-
age to your vehicle’s drivetrain components. Al-
ways inspect your vehicle’s fluids (i.e., engine oil,
transmission, axle, etc.) for signs of contamination
(i.e., fluid that is milky or foamy in appearance)
after driving through standing water. Do not con-
tinue to operate the vehicle if any fluid appears
contaminated, as this may result in further dam-
age. Such damage is not covered by the New
Vehicle Limited Warranty.
•Getting water inside your vehicle’s engine can
cause it to lock up and stall out, and cause serious
internal damage to the engine. Such damage is not
covered by the New Vehicle Limited Warranty.
5
STARTING AND OPERATING 363
Page 517 of 622
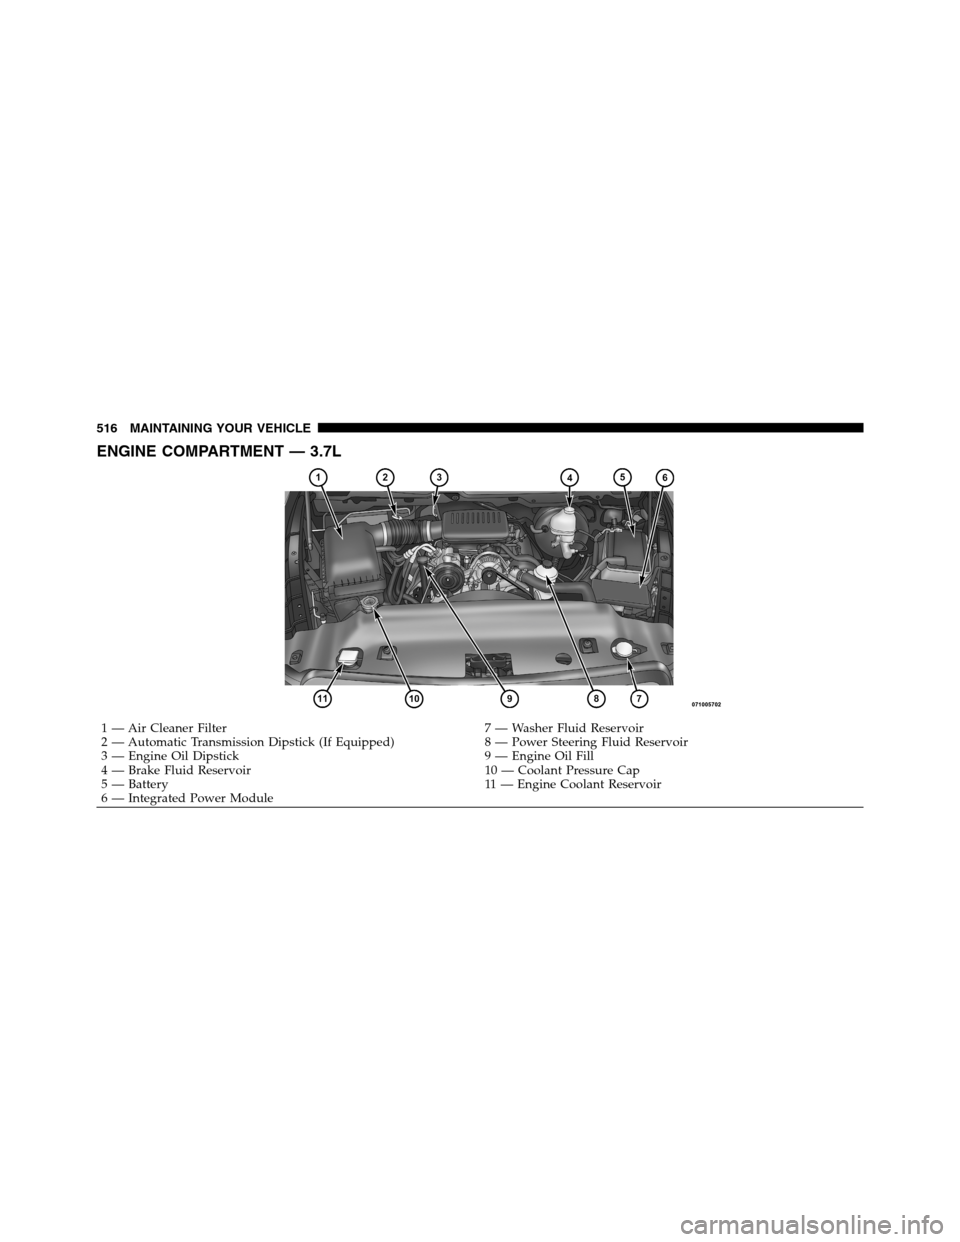
ENGINE COMPARTMENT — 3.7L
1 — Air Cleaner Filter 7 — Washer Fluid Reservoir
2 — Automatic Transmission Dipstick (If Equipped) 8 — Power Steering Fluid Reservoir
3 — Engine Oil Dipstick 9 — Engine Oil Fill
4 — Brake Fluid Reservoir 10 — Coolant Pressure Cap
5 — Battery 11 — Engine Coolant Reservoir
6 — Integrated Power Module 516 MAINTAINING YOUR VEHICLE
Page 518 of 622
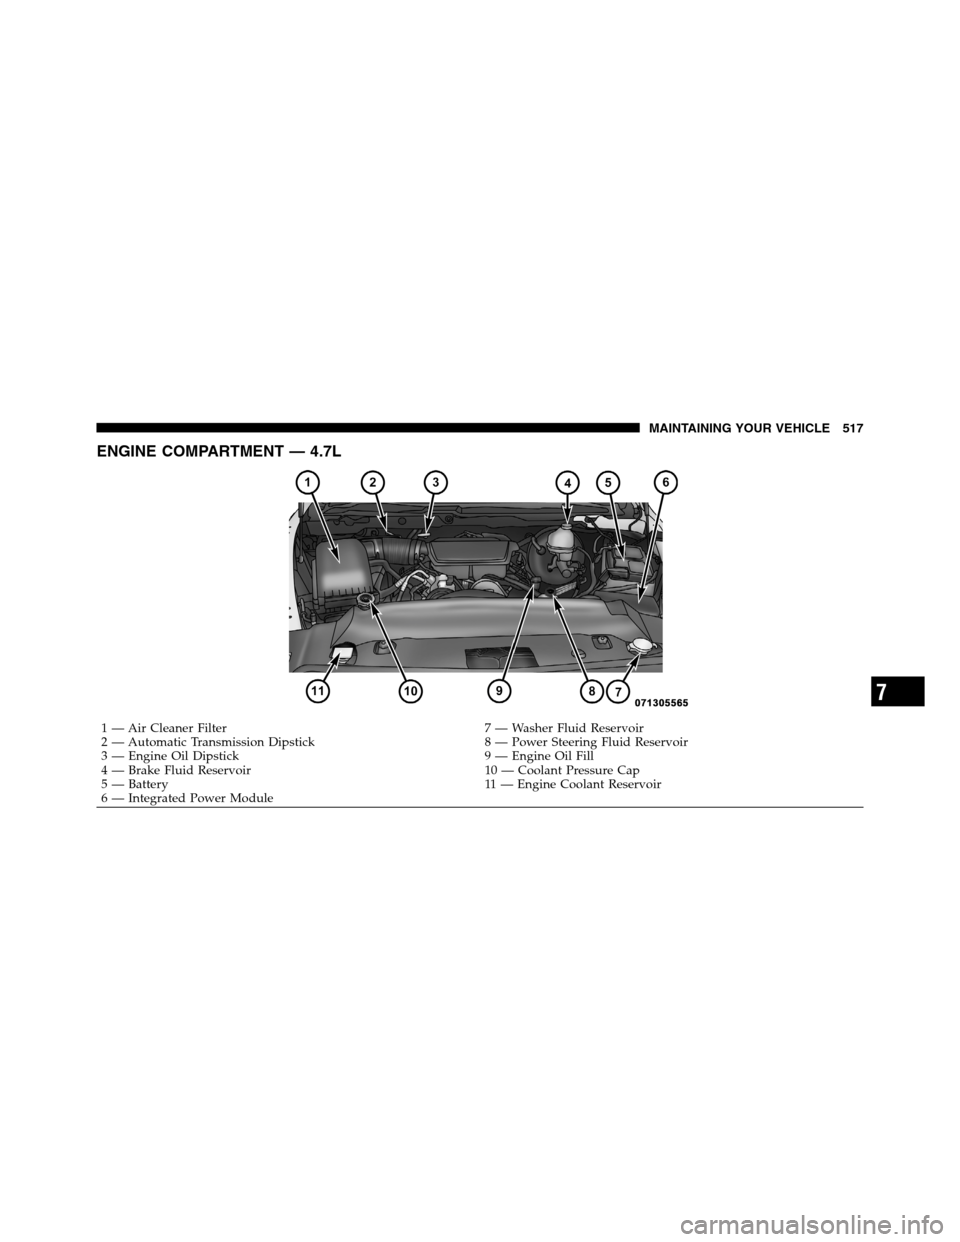
ENGINE COMPARTMENT — 4.7L
1 — Air Cleaner Filter 7 — Washer Fluid Reservoir
2 — Automatic Transmission Dipstick 8 — Power Steering Fluid Reservoir
3 — Engine Oil Dipstick 9 — Engine Oil Fill
4 — Brake Fluid Reservoir 10 — Coolant Pressure Cap
5 — Battery 11 — Engine Coolant Reservoir
6 — Integrated Power Module
7
MAINTAINING YOUR VEHICLE 517
Page 519 of 622
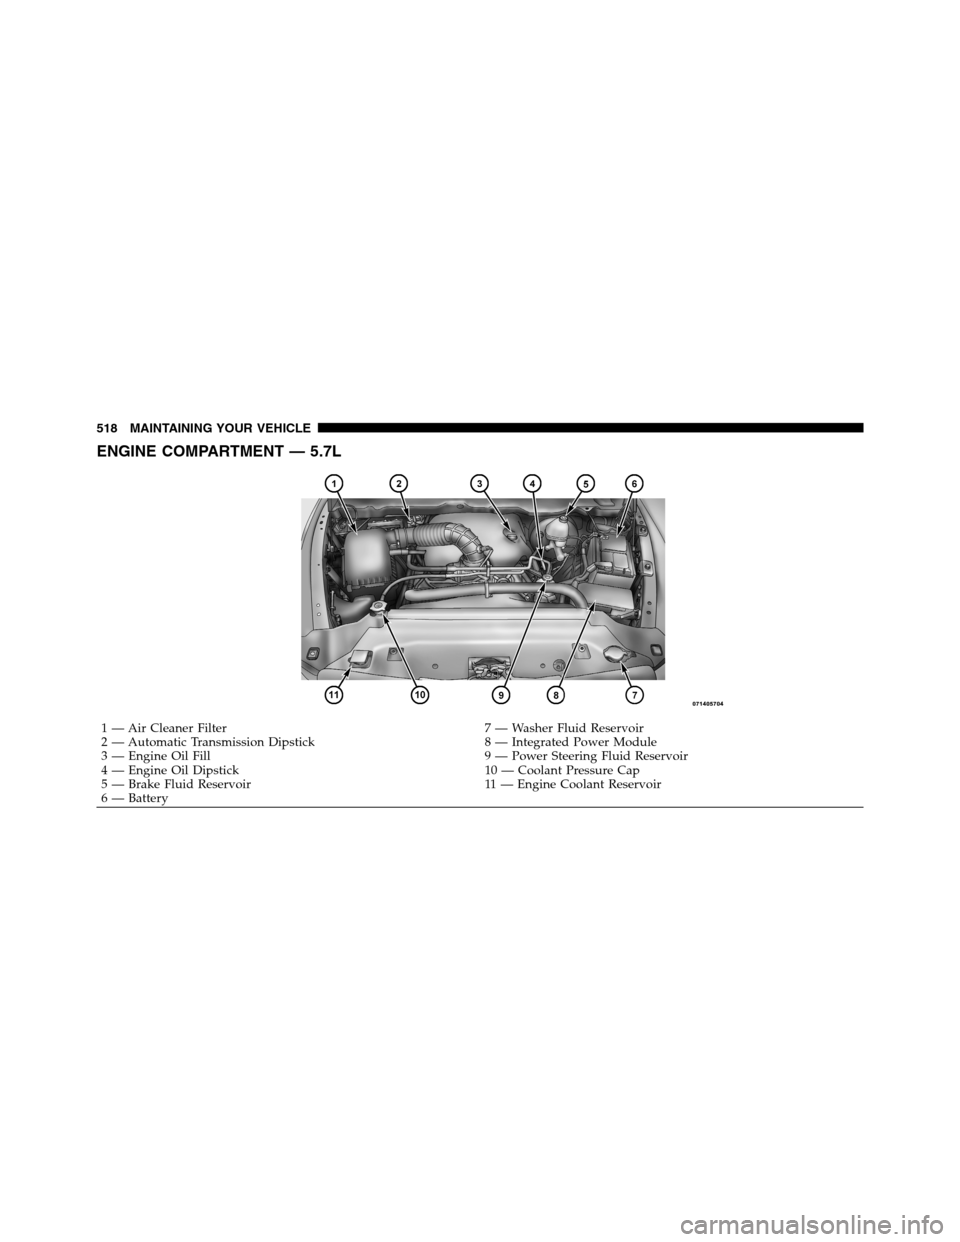
ENGINE COMPARTMENT — 5.7L
1 — Air Cleaner Filter 7 — Washer Fluid Reservoir
2 — Automatic Transmission Dipstick 8 — Integrated Power Module
3 — Engine Oil Fill 9 — Power Steering Fluid Reservoir
4 — Engine Oil Dipstick 10 — Coolant Pressure Cap
5 — Brake Fluid Reservoir 11 — Engine Coolant Reservoir
6 — Battery 518 MAINTAINING YOUR VEHICLE
Page 524 of 622
CAUTION! (Continued)
•Your vehicle has been built with improved fluids
that protect the performance and durability of
your vehicle and also allow extended maintenance
intervals. Do not use chemical flushes in these
components as the chemicals can damage your
engine, transmission, power steering or air condi-
tioning. Such damage is not covered by the New
Vehicle Limited Warranty. If a flush is needed
because of component malfunction, use only the
specified fluid for the flushing procedure.
Engine Oil
Checking Oil Level
To assure proper lubrication of your vehicle’s engine, the
engine oil must be maintained at the correct level. Check
the oil level at regular intervals, such as every fuel stop.The best time to check the engine oil level is about five
minutes after a fully warmed up engine is shut off.
Checking the oil while the vehicle is on level ground will
improve the accuracy of the oil level readings. Always
maintain the oil level within the SAFE zone on the
dipstick. Adding one quart of oil when the reading is at
the bottom of the SAFE zone will result in a reading at the
top of the safe zone on these engines.
CAUTION!
Overfilling or underfilling the crankcase will cause
oil aeration or loss of oil pressure. This could damage
your engine.
Change Engine Oil
The oil change indicator system will remind you that it is
time to take your vehicle in for scheduled maintenance.
Refer to “Maintenance Schedule” for further information.
7
MAINTAINING YOUR VEHICLE 523
Page 545 of 622

Fluid Level Check
If equipped with a dipstick, use the following procedure.
If your vehicle has a capped dipstick tube, it is sealed and
should not be tampered with. Your authorized dealer has
the proper tools to ensure that the fluid level is set
properly. The fluid level should be checked when the
engine is fully warmed up and the fluid in the transmis-
sion is at normal operating temperature. Operation of the
transmission with an improper fluid level will greatly
reduce the life of the transmission and of the fluid. Check
the fluid level whenever the vehicle is serviced.
Fluid Level Check – 42RLE/545RFE
Check the fluid level while the transmission is at normal
operating temperature 82°C (180°F). This occurs after at
least 15 miles (25 km) of driving. At normal operating
temperature the fluid cannot be held comfortably be-
tween the fingertips.To check the automatic transmission fluid level properly,
the following procedure must be used:
1. Operate the engine at idle speed and normal operating
temperature.
2. The vehicle must be on level ground.
3. Fully apply the parking brake and press the brake
pedal.
4. Place the shift lever momentarily into each gear posi-
tion ending with the lever in PARK.
5. Remove the dipstick, wipe it clean and reinsert it until
seated.
6. Remove the dipstick again and note the fluid level on
both sides. The fluid level should be between the “HOT”
(upper) reference holes on the dipstick at normal operat-
ing temperature. Verify that solid coating of oil is seen on
both sides of the dipstick. If the fluid is low, add as
544 MAINTAINING YOUR VEHICLE