display Ram 2500 2017 Manual Online
[x] Cancel search | Manufacturer: RAM, Model Year: 2017, Model line: 2500, Model: Ram 2500 2017Pages: 734, PDF Size: 7.3 MB
Page 311 of 734
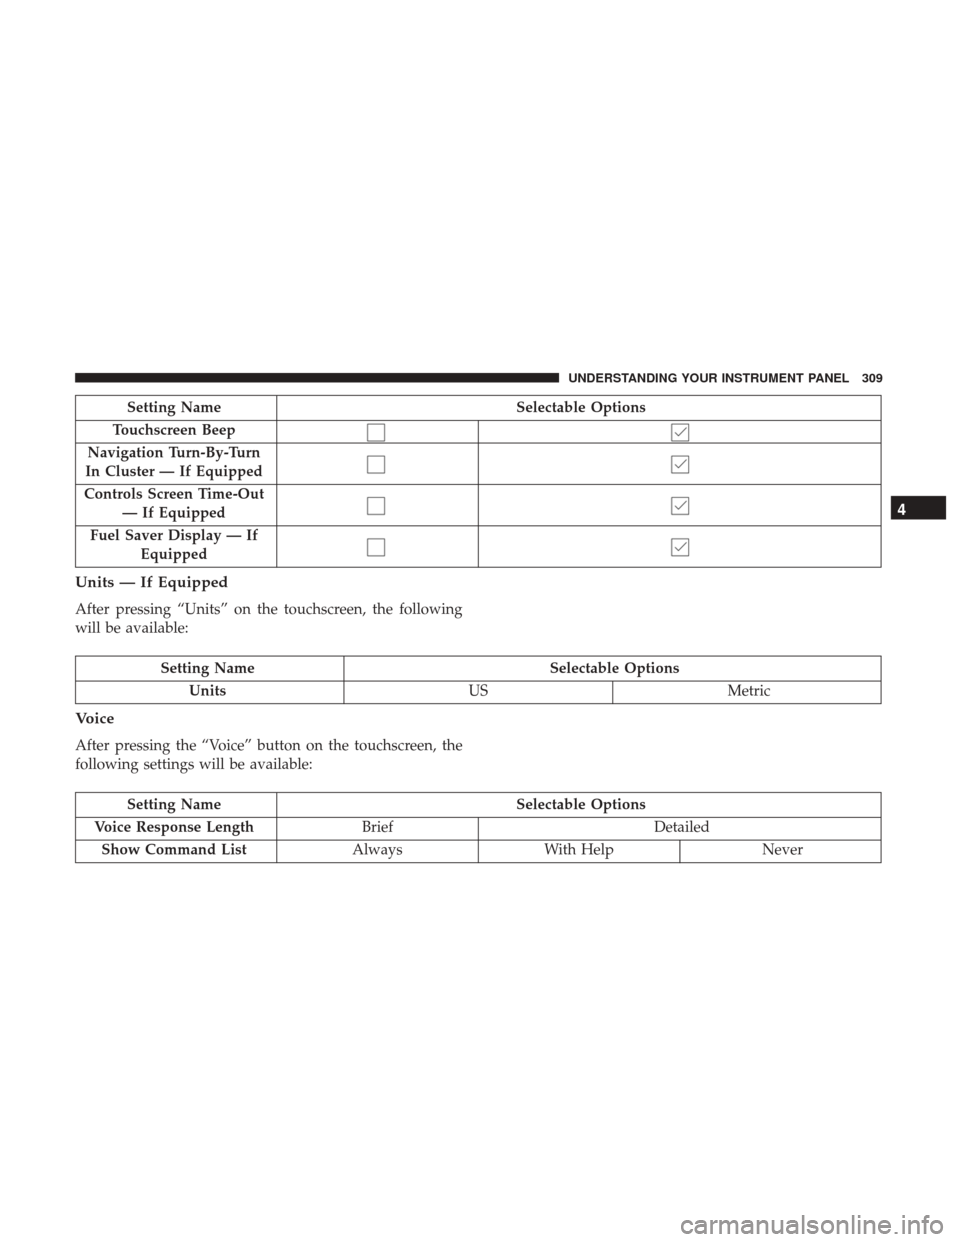
Setting NameSelectable Options
Touchscreen Beep
Navigation Turn-By-Turn
In Cluster — If Equipped
Controls Screen Time-Out — If Equipped
Fuel Saver Display — If Equipped
Units — If Equipped
After pressing “Units” on the touchscreen, the following
will be available:
Setting Name Selectable Options
Units USMetric
Voice
After pressing the “Voice” button on the touchscreen, the
following settings will be available:
Setting Name Selectable Options
Voice Response Length Brief Detailed
Show Command List AlwaysWith Help Never
4
UNDERSTANDING YOUR INSTRUMENT PANEL 309
Page 313 of 734
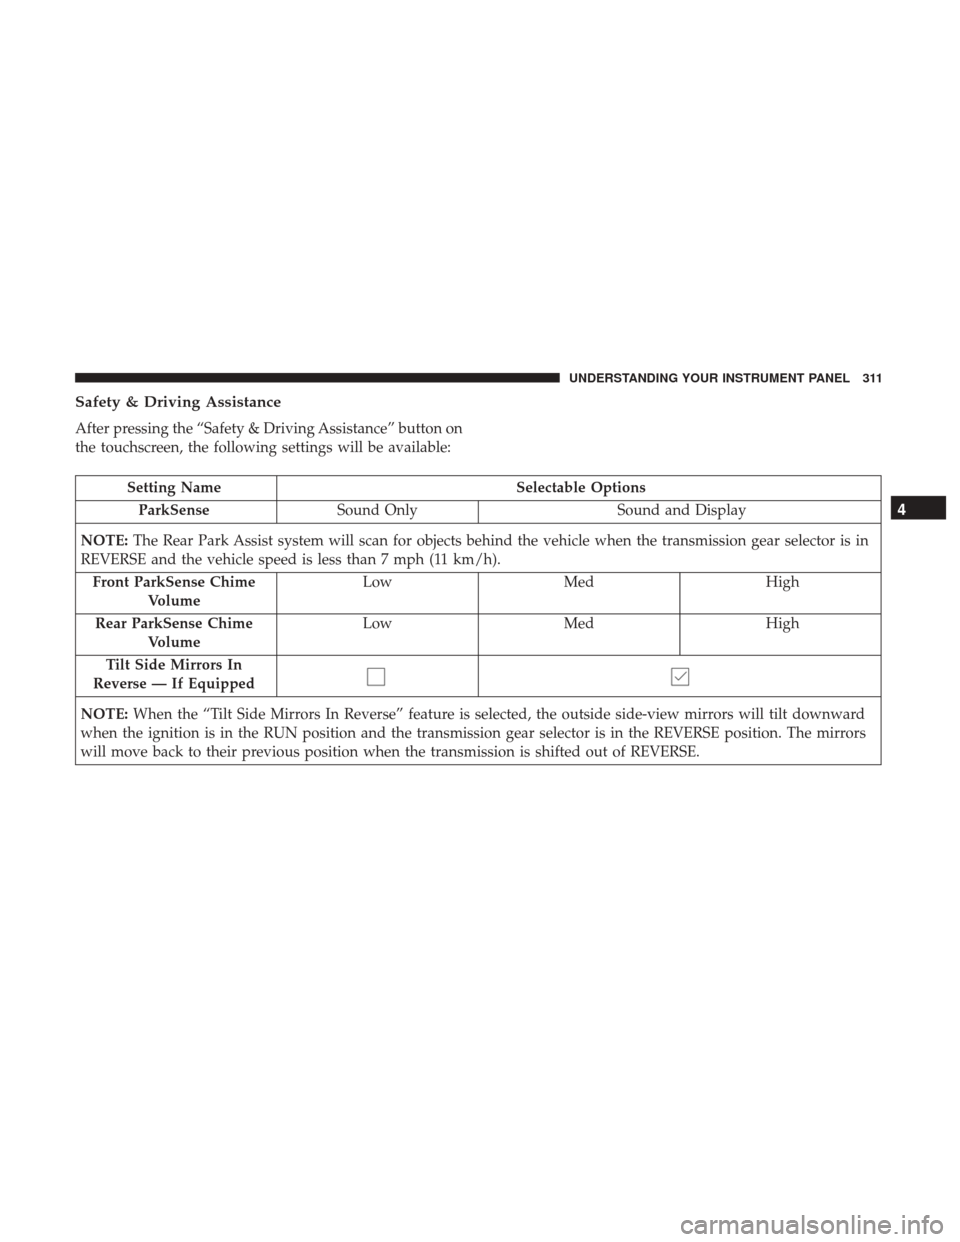
Safety & Driving Assistance
After pressing the “Safety & Driving Assistance” button on
the touchscreen, the following settings will be available:
Setting NameSelectable Options
ParkSense Sound Only Sound and Display
NOTE: The Rear Park Assist system will scan for objects behind the vehicle when the transmission gear selector is in
REVERSE and the vehicle speed is less than 7 mph (11 km/h).
Front ParkSense Chime Volume Low
Med High
Rear ParkSense Chime Volume Low
Med High
Tilt Side Mirrors In
Reverse — If Equipped
NOTE: When the “Tilt Side Mirrors In Reverse” feature is selected, the outside side-view mirrors will tilt downward
when the ignition is in the RUN position and the transmission gear selector is in the REVERSE position. The mirrors
will move back to their previous position when the transmission is shifted out of REVERSE.
4
UNDERSTANDING YOUR INSTRUMENT PANEL 311
Page 314 of 734
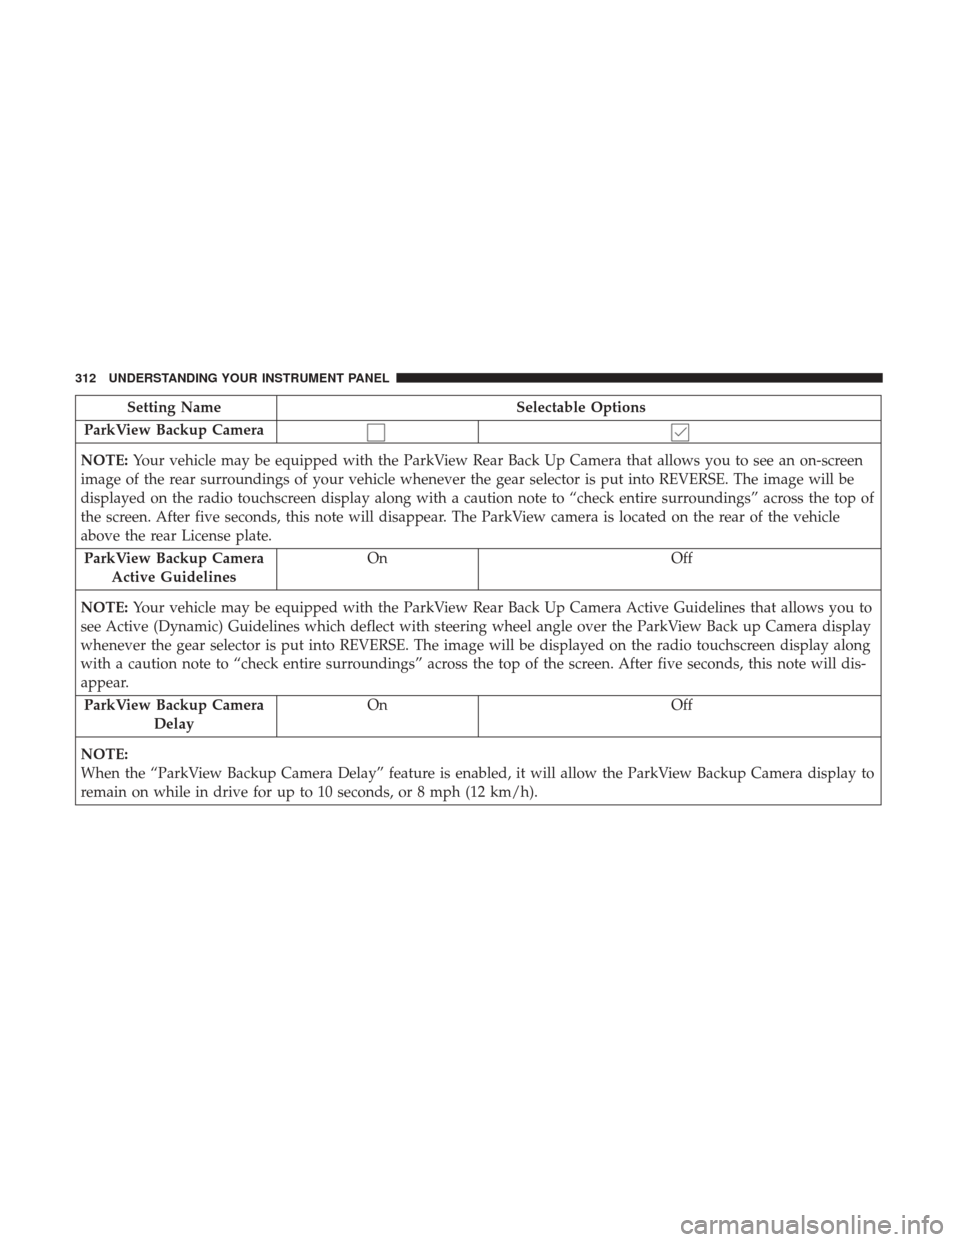
Setting NameSelectable Options
ParkView Backup Camera
NOTE: Your vehicle may be equipped with the ParkView Rear Back Up Camera that allows you to see an on-screen
image of the rear surroundings of your vehicle whenever the gear selector is put into REVERSE. The image will be
displayed on the radio touchscreen display along with a caution note to “check entire surroundings” across the top of
the screen. After five seconds, this note will disappear. The ParkView camera is located on the rear of the vehicle
above the rear License plate.
ParkView Backup Camera Active Guidelines On
Off
NOTE: Your vehicle may be equipped with the ParkView Rear Back Up Camera Active Guidelines that allows you to
see Active (Dynamic) Guidelines which deflect with steering wheel angle over the ParkView Back up Camera display
whenever the gear selector is put into REVERSE. The image will be displayed on the radio touchscreen display along
with a caution note to “check entire surroundings” across the top of the screen. After five seconds, this note will dis-
appear.
ParkView Backup Camera Delay On
Off
NOTE:
When the “ParkView Backup Camera Delay” feature is enabled, it will allow the ParkView Backup Camera display to
remain on while in drive for up to 10 seconds, or 8 mph (12 km/h).
312 UNDERSTANDING YOUR INSTRUMENT PANEL
Page 321 of 734
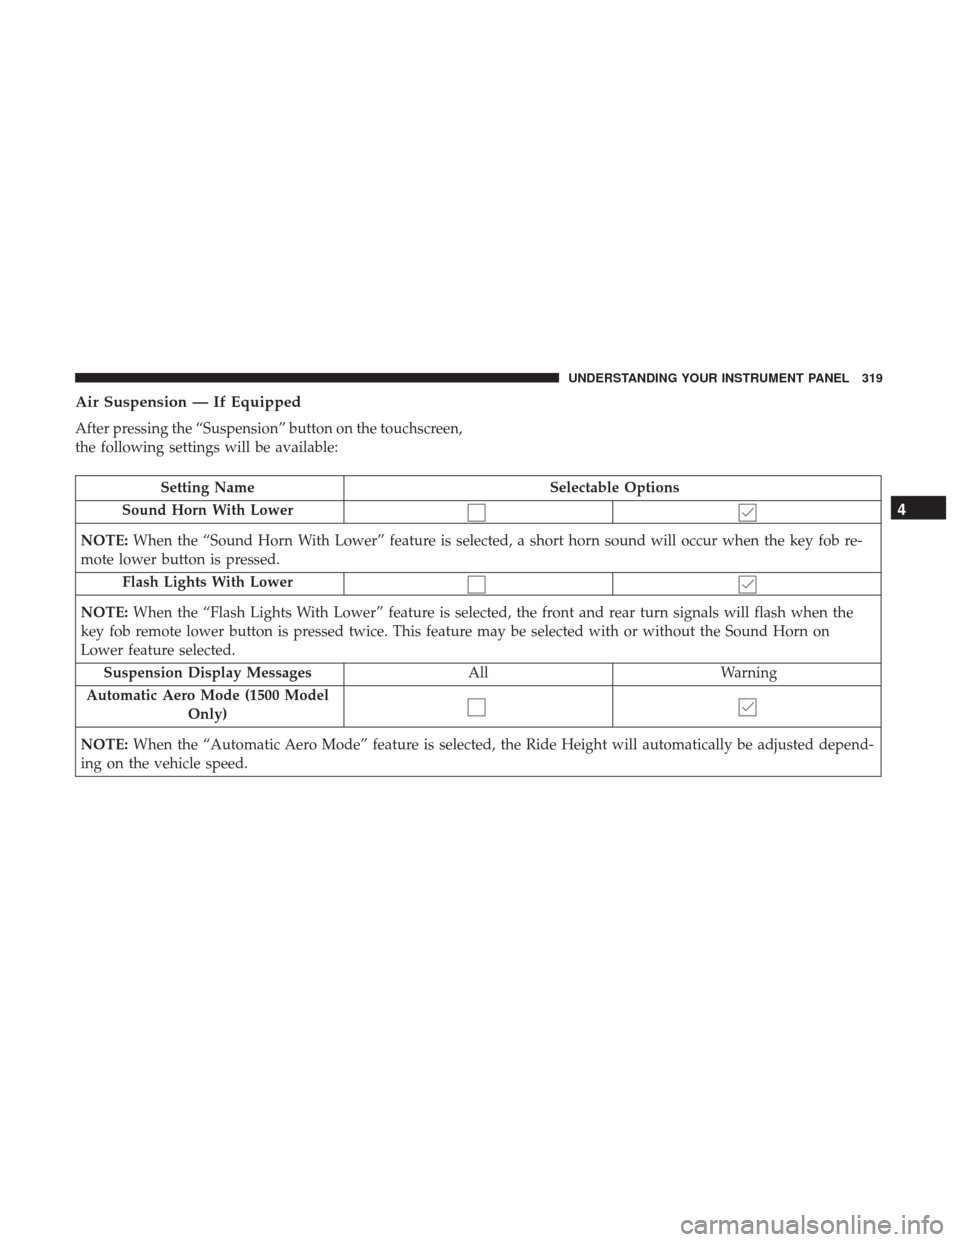
Air Suspension — If Equipped
After pressing the “Suspension” button on the touchscreen,
the following settings will be available:
Setting NameSelectable Options
Sound Horn With Lower
NOTE: When the “Sound Horn With Lower” feature is selected, a short horn sound will occur when the key fob re-
mote lower button is pressed.
Flash Lights With Lower
NOTE: When the “Flash Lights With Lower” feature is selected, the front and rear turn signals will flash when the
key fob remote lower button is pressed twice. This feature may be selected with or without the Sound Horn on
Lower feature selected.
Suspension Display Messages AllWarning
Automatic Aero Mode (1500 Model Only)
NOTE: When the “Automatic Aero Mode” feature is selected, the Ride Height will automatically be adjusted depend-
ing on the vehicle speed.
4
UNDERSTANDING YOUR INSTRUMENT PANEL 319
Page 323 of 734
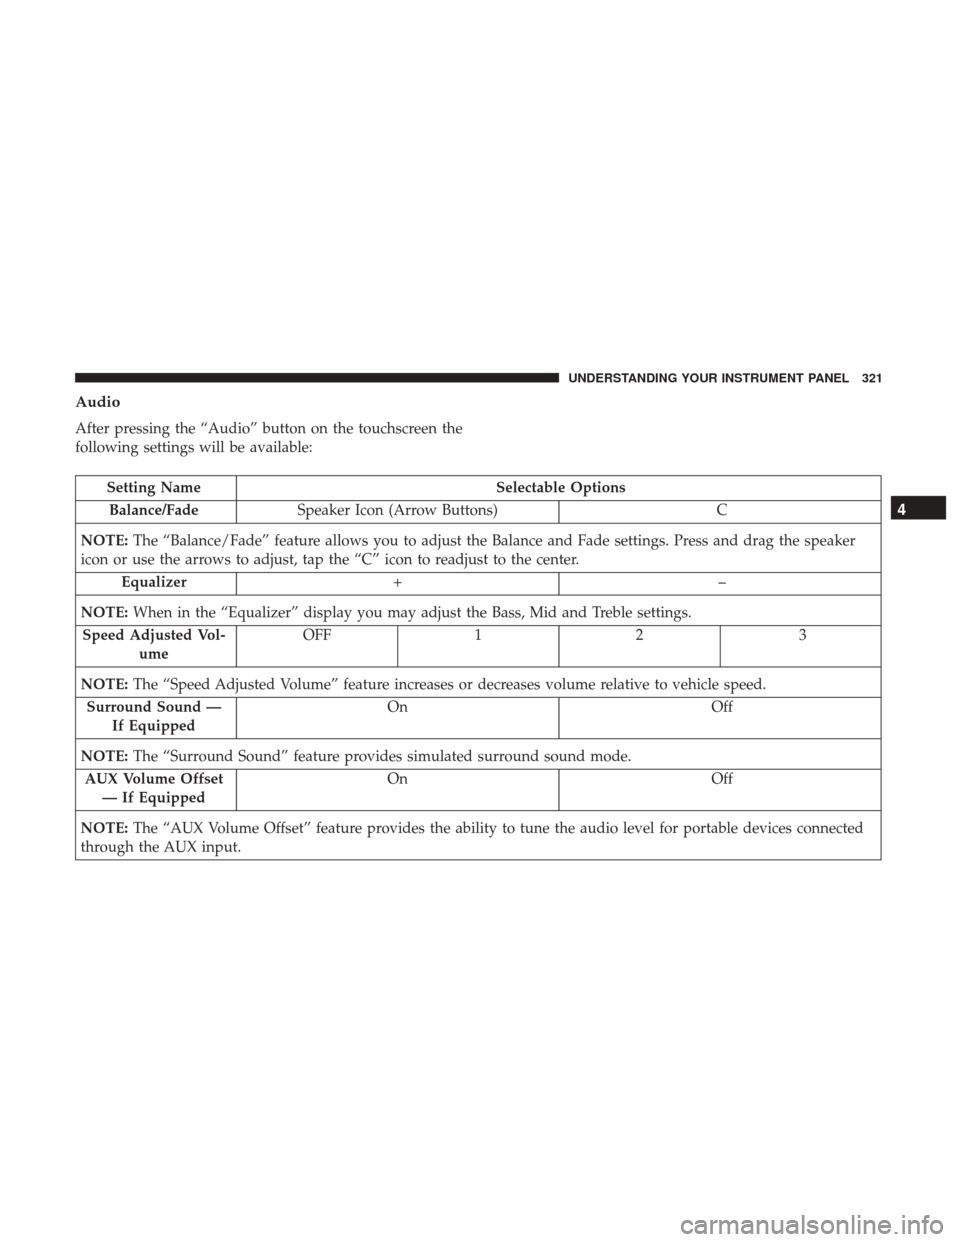
Audio
After pressing the “Audio” button on the touchscreen the
following settings will be available:
Setting NameSelectable Options
Balance/Fade Speaker Icon (Arrow Buttons) C
NOTE: The “Balance/Fade” feature allows you to adjust the Balance and Fade settings. Press and drag the speaker
icon or use the arrows to adjust, tap the “C” icon to readjust to the center.
Equalizer +–
NOTE: When in the “Equalizer” display you may adjust the Bass, Mid and Treble settings.
Speed Adjusted Vol- ume OFF
12 3
NOTE: The “Speed Adjusted Volume” feature increases or decreases volume relative to vehicle speed.
Surround Sound — If Equipped On
Off
NOTE: The “Surround Sound” feature provides simulated surround sound mode.
AUX Volume Offset — If Equipped On
Off
NOTE: The “AUX Volume Offset” feature provides the ability to tune the audio level for portable devices connected
through the AUX input.
4
UNDERSTANDING YOUR INSTRUMENT PANEL 321
Page 327 of 734
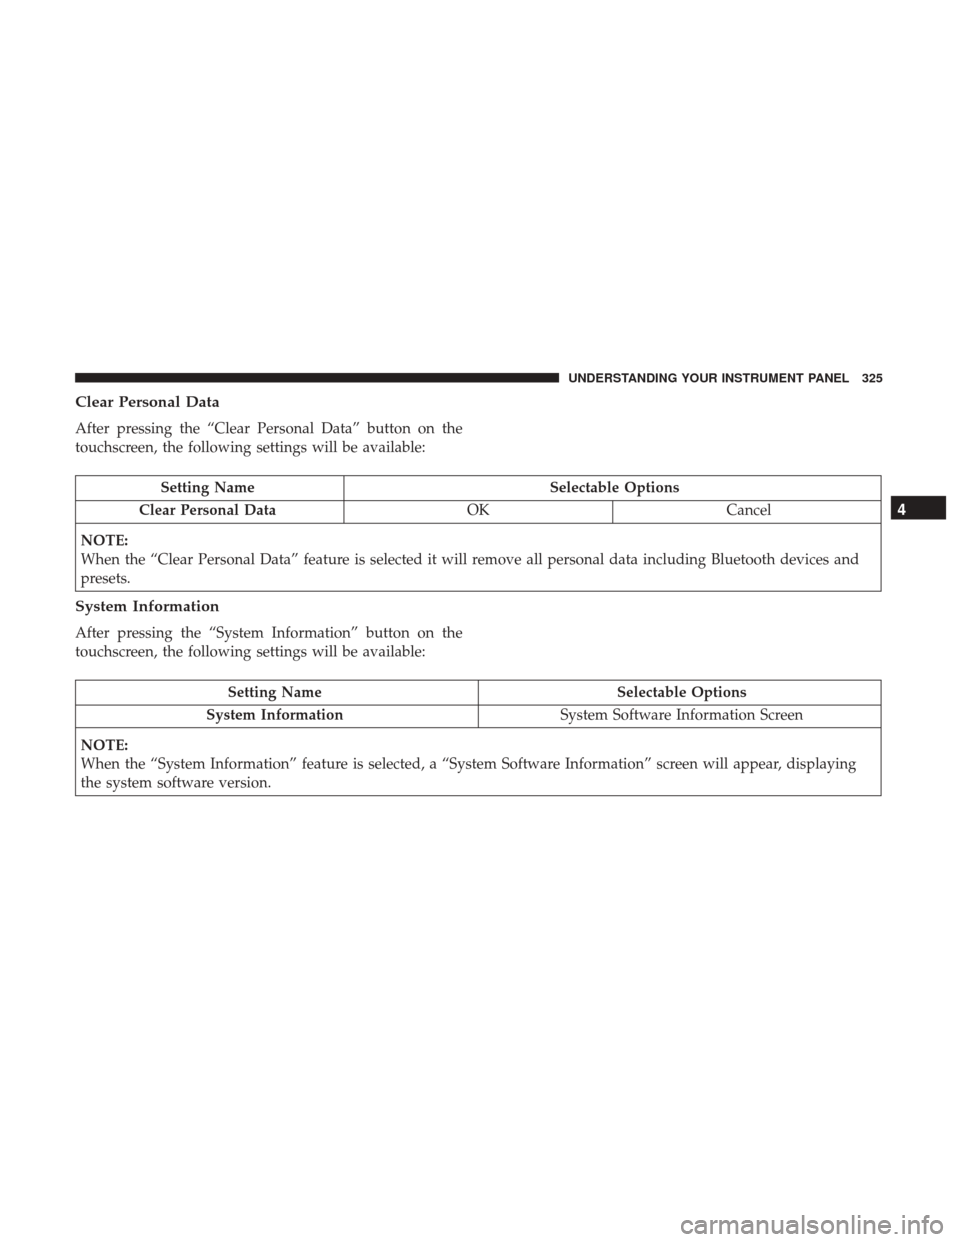
Clear Personal Data
After pressing the “Clear Personal Data” button on the
touchscreen, the following settings will be available:
Setting NameSelectable Options
Clear Personal Data OKCancel
NOTE:
When the “Clear Personal Data” feature is selected it will remove all personal data including Bluetooth devices and
presets.
System Information
After pressing the “System Information” button on the
touchscreen, the following settings will be available:
Setting Name Selectable Options
System Information System Software Information Screen
NOTE:
When the “System Information” feature is selected, a “System Software Information” screen will appear, displaying
the system software version.
4
UNDERSTANDING YOUR INSTRUMENT PANEL 325
Page 347 of 734
disabled automatically if this mode is selected. Attempting
to use Recirculation while in this mode will cause the LED
in the control button to blink and then turn off.
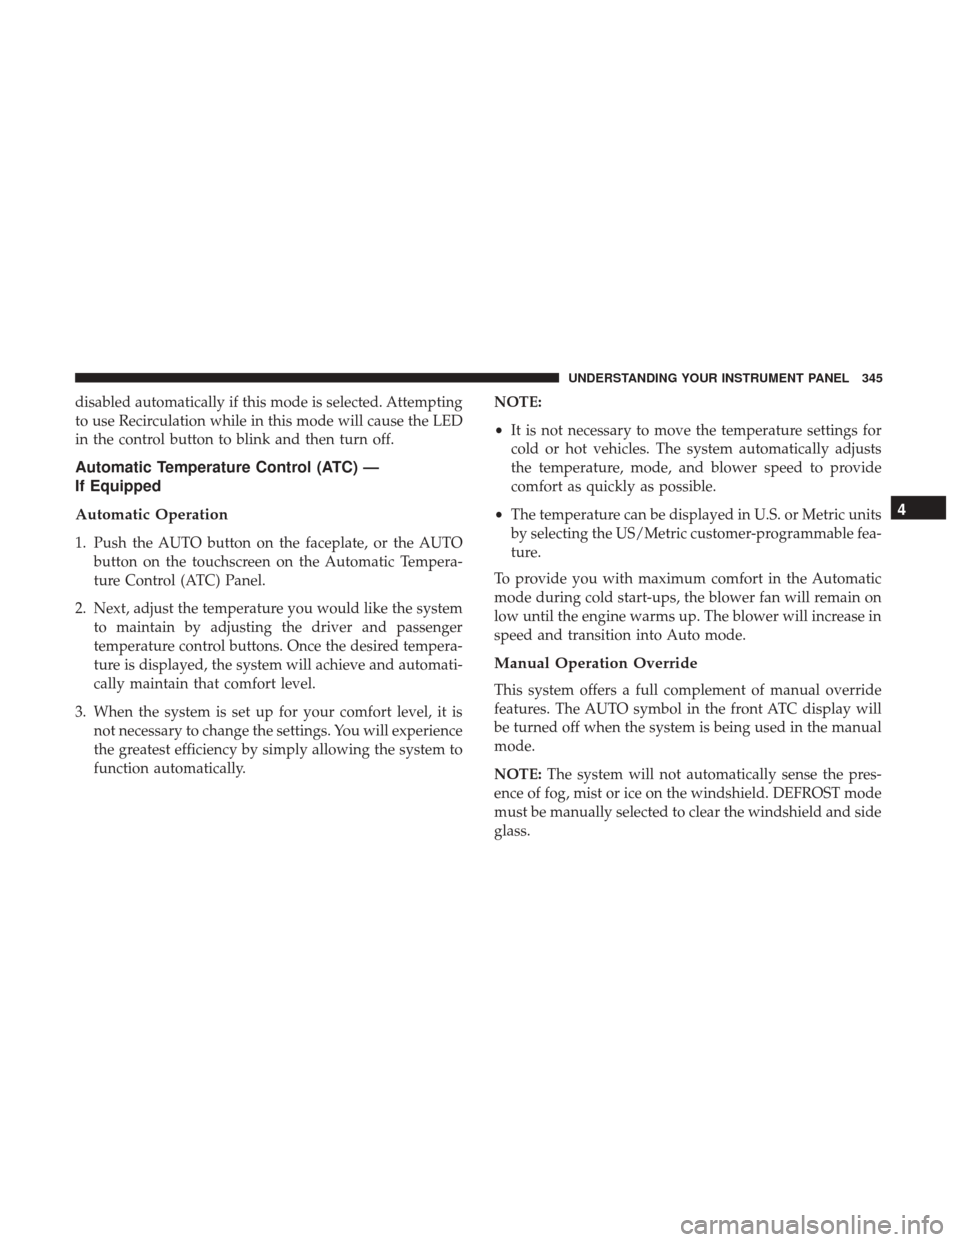
Automatic Temperature Control (ATC) —
If Equipped
Automatic Operation
1. Push the AUTO button on the faceplate, or the AUTObutton on the touchscreen on the Automatic Tempera-
ture Control (ATC) Panel.
2. Next, adjust the temperature you would like the system to maintain by adjusting the driver and passenger
temperature control buttons. Once the desired tempera-
ture is displayed, the system will achieve and automati-
cally maintain that comfort level.
3. When the system is set up for your comfort level, it is not necessary to change the settings. You will experience
the greatest efficiency by simply allowing the system to
function automatically. NOTE:
•
It is not necessary to move the temperature settings for
cold or hot vehicles. The system automatically adjusts
the temperature, mode, and blower speed to provide
comfort as quickly as possible.
• The temperature can be displayed in U.S. or Metric units
by selecting the US/Metric customer-programmable fea-
ture.
To provide you with maximum comfort in the Automatic
mode during cold start-ups, the blower fan will remain on
low until the engine warms up. The blower will increase in
speed and transition into Auto mode.
Manual Operation Override
This system offers a full complement of manual override
features. The AUTO symbol in the front ATC display will
be turned off when the system is being used in the manual
mode.
NOTE: The system will not automatically sense the pres-
ence of fog, mist or ice on the windshield. DEFROST mode
must be manually selected to clear the windshield and side
glass.
4
UNDERSTANDING YOUR INSTRUMENT PANEL 345
Page 358 of 734
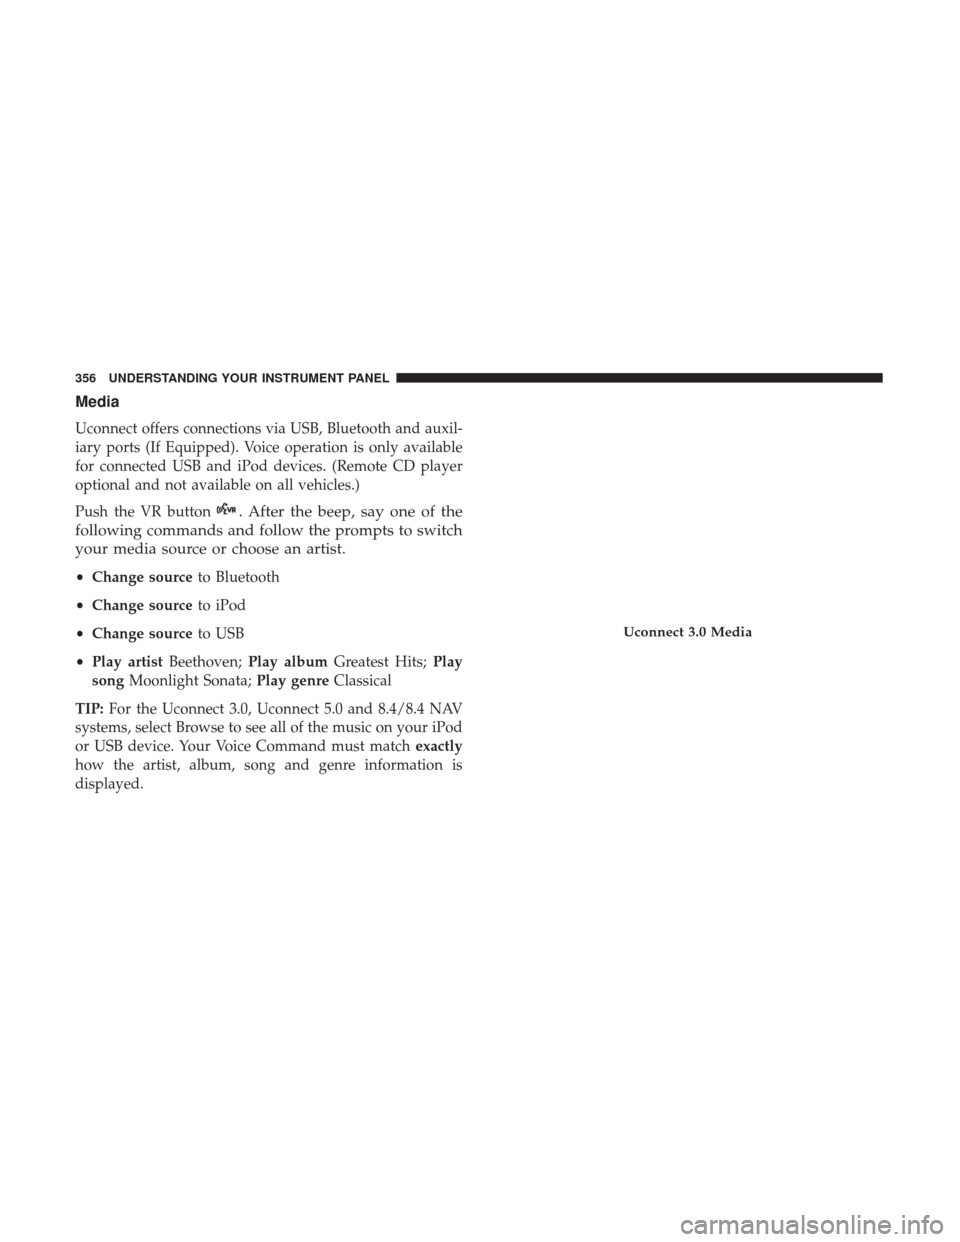
Media
Uconnect offers connections via USB, Bluetooth and auxil-
iary ports (If Equipped). Voice operation is only available
for connected USB and iPod devices. (Remote CD player
optional and not available on all vehicles.)
Push the VR button
. After the beep, say one of the
following commands and follow the prompts to switch
your media source or choose an artist.
• Change source to Bluetooth
• Change source to iPod
• Change source to USB
• Play artist Beethoven; Play album Greatest Hits; Play
song Moonlight Sonata; Play genreClassical
TIP: For the Uconnect 3.0, Uconnect 5.0 and 8.4/8.4 NAV
systems, select Browse to see all of the music on your iPod
or USB device. Your Voice Command must match exactly
how the artist, album, song and genre information is
displayed.
Uconnect 3.0 Media
356 UNDERSTANDING YOUR INSTRUMENT PANEL
Page 369 of 734
Yelp (8.4/8.4 NAV)
Once registered with Uconnect Access, you can use your
voice to search for the most popular places or things
around you.
1. Press the “Apps
” button on the touchscreen.
2. Press the “Yelp” button on the touchscreen.
3. Once the YELP home screen appears on the touchscreen,push the VR button
, then say: “YELP search.”
4. Listen to the system prompts and after the beep, tell
Uconnect the place or business that you’d like Uconnect
to find.
TIP: Once you perform a search, you can reorganize the
results by selecting either the Best Match, Rating or Dis-
tance tab on the top of the touchscreen display.
Yelp
4
UNDERSTANDING YOUR INSTRUMENT PANEL 367
Page 374 of 734
Do Not Disturb
With Do Not Disturb, you can disable notifications from
incoming calls and texts, allowing you to keep your eyes
on the road and hands on the wheel. For your convenience,
there is a counter display to keep track of your missed calls
and text messages while you were using Do Not Disturb.
Do Not Disturb can automatically reply with a text mes-
sage, a call or both, when declining an incoming call and
send it to voicemail.
Automatic reply messages can be:
•“I am driving right now, I will get back to you shortly.”
• Create a custom auto reply message up to 160 characters.
NOTE: Only the first 25 characters can been seen on the
touchscreen while typing a custom message. While in Do Not Disturb, Conference Call can be selected
so you can still place a second call without being inter-
rupted by incoming calls.
NOTE:
•
Reply with text message is not compatible with iPhones.
•
Auto reply with text message is only available on phones
that supporting Bluetooth MAP.
372 UNDERSTANDING YOUR INSTRUMENT PANEL