steering wheel Ram 2500 2020 Workshop Manual
[x] Cancel search | Manufacturer: RAM, Model Year: 2020, Model line: 2500, Model: Ram 2500 2020Pages: 553, PDF Size: 21.99 MB
Page 326 of 553
324STARTING AND OPERATING
(Continued)
Towing Requirements — Tires
Do not attempt to tow a trailer while using a
compact spare tire.
Do not drive more than 50 mph (80 km/h) when towing while using a full size spare tire.
Proper tire inflation pressures are essential
to the safe and satisfactory operation of your
vehicle. Refer to “Tires” in “Servicing And
Maintenance” for proper tire inflation proce -
dures.
Check the trailer tires for proper tire inflation
pressures before trailer usage.
Check for signs of tire wear or visible tire
damage before towing a trailer. Refer to
“Tires” in “Servicing And Maintenance” for
the proper inspection procedure.
When replacing tires, refer to “Tires” in
“Servicing And Maintenance” for the proper
tire replacement procedures. Replacing tires
with a higher load carrying capacity will not
increase the vehicle's GVWR and GAWR
limits.
Towing Requirements — Trailer Brakes
Do not interconnect the hydraulic brake
system or vacuum system of your vehicle
with that of the trailer. This could cause inad -
equate braking and possible personal injury.
An electronically actuated trailer brake
controller is required when towing a trailer
with electronically actuated brakes. When
towing a trailer equipped with a hydraulic
surge actuated brake system, an electronic
brake controller is not required.
Trailer brakes are recommended for trailers
over 1,000 lbs (453 kg) and required for
trailers in excess of 2,000 lbs (907 kg).
When hauling cargo or towing a trailer, do
not overload your vehicle or trailer. Over -
loading can cause a loss of control, poor
performance or damage to brakes, axle,
engine, transmission, steering, suspension,
chassis structure or tires.
Safety chains must always be used
between your vehicle and trailer. Always
connect the chains to the hook retainers of
the vehicle hitch. Cross the chains under
the trailer tongue and allow enough slack
for turning corners.
Vehicles with trailers should not be parked
on a grade. When parking, apply the
parking brake on the tow vehicle. Put the
tow vehicle transmission in PARK. For
four-wheel drive vehicles, make sure the
transfer case is not in NEUTRAL. Always,
block or "chock" the trailer wheels.
GCWR must not be exceeded.
WARNING! (Continued)
Total weight must be distributed between
the tow vehicle and the trailer such that the
following four ratings are not exceeded :
GVWR
GTW
GAWR
Tongue weight rating for the trailer
hitch utilized.
WARNING! (Continued)
20_DJD2_OM_EN_USC_t.book Page 324
Page 328 of 553

326STARTING AND OPERATING
GAIN
The GAIN setting is used to set the trailer brake
control for the specific towing condition and
should be changed as towing conditions
change. Changes to towing conditions include
trailer load, vehicle load, road conditions and
weather.
Adjusting GAIN
NOTE:
This should only be performed in a traffic free
environment at speeds of approximately
20–25 mph (30–40 km/h).
1. Make sure the trailer brakes are in good
working condition, functioning normally
and properly adjusted. See your trailer
dealer if necessary.
2. Hook up the trailer and make the electrical connections according to the trailer manu -
facturer's instructions. 3. When a trailer with electric/EOH brakes is
plugged in, the trailer connected message
should appear in the instrument cluster
display (if the connection is not recognized
by the ITBM, braking functions will not be
available), the GAIN setting will illuminate
and the correct type of trailer must be
selected from the instrument cluster display
options.
4. Push the UP or DOWN button on the steering wheel until “TRAILER TOW”
appears on the screen.
5. Push the RIGHT arrow on the steering wheel to enter “TRAILER TOW”.
6. Push the UP or DOWN buttons until the Trailer Brake Type appears on the screen. 7. Push the RIGHT arrow and then push the UP
or DOWN buttons until the proper Trailer
Brake Type appears on the screen.
8. In a traffic-free environment, tow the trailer on a dry, level surface at a speed of
20–25 mph (30–40 km/h) and squeeze
the manual brake control lever completely.
9. If the trailer wheels lockup (indicated by squealing tires), reduce the GAIN setting; if
the trailer wheels turn freely, increase the
GAIN setting.
Repeat steps 8 and 9 until the GAIN setting is at
a point just below trailer wheel lockup. If towing
a heavier trailer, trailer wheel lockup may not be
attainable even with the maximum GAIN setting
of 10.
20_DJD2_OM_EN_USC_t.book Page 326
Page 338 of 553

336STARTING AND OPERATING
(Continued)
Off-Road Driving Tips
Care should be taken when attempting to climb
steep hills or driving diagonally across a hill or
slope. If natural obstacles force you to travel
diagonally up or down a hill, choose a mild angle
and keep as little side tilt as possible. Keep the
vehicle moving and make turns slowly and
cautiously. If you must back down a hill, back straight down
using REVERSE gear. Never back down in
NEUTRAL or diagonally across the hill.
When driving over sand, mud, and other soft
terrain, shift to low gear and drive steadily.
Apply the accelerator slowly to avoid spinning
the wheels.
Do not reduce the tire pressures for this type of
driving.
After Driving Off-Road
Off-road operation puts more stress on your
vehicle than does most on-road driving. After
going off-road, it is always a good idea to check
for damage. That way you can get any problems
taken care of right away and have your vehicle
ready when you need it.
Completely inspect the underbody of your
vehicle. Check tires, body structure, steering,
suspension, and exhaust system for damage.
Inspect the radiator for mud and debris and
clean as required.
Driving through standing water limits your
vehicle’s braking capabilities, which
increases stopping distances. Therefore,
after driving through standing water, drive
slowly and lightly press on the brake pedal
several times to dry the brakes.
Failure to follow these warnings may result
in injuries that are serious or fatal to you,
your passengers, and others around you.
CAUTION!
Always check the depth of the standing
water before driving through it. Never drive
through standing water that is deeper than
the bottom of the tire rims mounted on the
vehicle.
Determine the condition of the road or the
path that is under water and if there are any
obstacles in the way before driving through
the standing water.
Do not exceed 5 mph (8 km/h) when
driving through standing water. This will
minimize wave effects.
WARNING!
(Continued)
Driving through standing water may cause
damage to your vehicle’s drivetrain compo -
nents. Always inspect your vehicle’s fluids
(i.e., engine oil, transmission, axle, etc.) for
signs of contamination (i.e., fluid that is
milky or foamy in appearance) after driving
through standing water. Do not continue to
operate the vehicle if any fluid appears
contaminated, as this may result in further
damage. Such damage is not covered by
the New Vehicle Limited Warranty.
Getting water inside your vehicle’s engine
can cause it to lock up and stall out, and
cause serious internal damage to the
engine. Such damage is not covered by the
New Vehicle Limited Warranty.
CAUTION! (Continued)
20_DJD2_OM_EN_USC_t.book Page 336
Page 339 of 553
STARTING AND OPERATING337
Check threaded fasteners for looseness,
particularly on the chassis, drivetrain compo -
nents, steering, and suspension. Retighten
them, if required, and torque to the values
specified in the Service Manual.
Check for accumulations of plants or brush.
These things could be a fire hazard. They
might hide damage to fuel lines, brake hoses,
axle pinion seals, and propeller shafts.
After extended operation in mud, sand,
water, or similar dirty conditions, have the
radiator, fan, brake rotors, wheels, brake
linings, and axle yokes inspected and
cleaned as soon as possible.If you experience unusual vibration after
driving in mud, slush or similar conditions,
check the wheels for impacted material.
Impacted material can cause a wheel imbal-
ance and freeing the wheels of it will correct
the situation.
WARNING!
Abrasive material in any part of the brakes
may cause excessive wear or unpredictable
braking. You might not have full braking
power when you need it to prevent a collision.
If you have been operating your vehicle in
dirty conditions, get your brakes checked and
cleaned as necessary.
5
20_DJD2_OM_EN_USC_t.book Page 337
Page 341 of 553
IN CASE OF EMERGENCY339
NOTE:
Your vehicle may be transmitting data as
authorized by the subscriber.
The SOS and ASSIST buttons will only func -
tion if you are connected to an operable LTE
(voice/data) or 4G (data) network. Other
Uconnect services will only be operable if
your SiriusXM Guardian™ service is active
and you are connected to an operable LTE
(voice/data) or 4G (data) network. ASSIST Call
The ASSIST Button is used to automatically
connect you to any one of the following support
centers:
Roadside Assistance – If you get a flat tire, or
need a tow, just push the ASSIST button and
you’ll be connected to someone who can
help. Roadside Assistance will know what
vehicle you’re driving and its location. Addi
-
tional fees may apply for roadside assis -
tance.
SiriusXM Guardian™ Customer Care –
In-vehicle support for SiriusXM Guardian™.
Vehicle Customer Care – Total support for all
other vehicle issues.
SOS Call
1. Push the SOS Call button on the overhead console.
NOTE:
In case the SOS Call button is pushed in error,
there will be a 10 second delay before the SOS
Call system initiates a call to a SOS operator. To
cancel the SOS Call connection, push the SOS
call button on the overhead console or press the cancellation button on the Device Screen.
Termination of the SOS Call will turn off the
green LED light on the overhead console.
2. The LED light located between the ASSIST
and SOS buttons on the overhead console
will turn green once a connection to a SOS
operator has been made.
3. Once a connection between the vehicle and a SOS operator is made, the SOS Call
system may transmit the following
important vehicle information to a SOS
operator: Indication that the occupant placed a SOS Call.
The vehicle brand.
The last known GPS coordinates of the vehicle.
4. You should be able to speak with the SOS operator through the vehicle audio system
to determine if additional help is needed.
WARNING!
ALWAYS obey traffic laws and pay attention to
the road. ALWAYS drive safely with your hands
on the steering wheel. You have full
responsibility and assume all risks related to
the use of the features and applications in
this vehicle. Only use the features and
applications when it is safe to do so. Failure
to do so may result in an accident involving
serious injury or death.
6
20_DJD2_OM_EN_USC_t.book Page 339
Page 342 of 553
340IN CASE OF EMERGENCY
(Continued)
NOTE:
Your vehicle may be transmitting data as
authorized by the subscriber.
Once a connection is made between the
vehicle’s SOS Call system and the SOS oper-
ator, the SOS operator may be able to open a
voice connection with the vehicle to deter -
mine if additional help is needed. Once the
SOS operator opens a voice connection with
the vehicle’s SOS Call system, the operator
should be able to speak with you or other
vehicle occupants and hear sounds occurring
in the vehicle. The vehicle’s SOS Call system
will attempt to remain connected with the SOS operator until the SOS operator termi
-
nates the connection.
5. The SOS operator may attempt to contact appropriate emergency responders and
provide them with important vehicle infor -
mation and GPS coordinates.
WARNING!
ALWAYS obey traffic laws and pay attention to
the road. ALWAYS drive safely with your hands
on the steering wheel. You have full
responsibility and assume all risks related to
the use of the features and applications in
this vehicle. Only use the features and
applications when it is safe to do so. Failure
to do so may result in an accident involving
serious injury or death.
WARNING!
If anyone in the vehicle could be in danger
(e.g., fire or smoke is visible, dangerous
road conditions or location), do not wait for
voice contact from an Emergency Services
Agent. All occupants should exit the vehicle
immediately and move to a safe location.
Never place anything on or near the
vehicle’s operable network and GPS
antennas. You could prevent operable
network and GPS signal reception, which
can prevent your vehicle from placing an
emergency call. An operable network and
GPS signal reception is required for the SOS
Call system to function properly.
The SOS Call system is embedded into the
vehicle’s electrical system. Do not add
aftermarket electrical equipment to the
vehicle’s electrical system. This may
prevent your vehicle from sending a signal
to initiate an emergency call. To avoid inter -
ference that can cause the SOS Call system
to fail, never add aftermarket equipment
(e.g., two-way mobile radio, CB radio, data
recorder, etc.) to your vehicle’s electrical
system or modify the antennas on your
vehicle. IF YOUR VEHICLE LOSES BATTERY
POWER FOR ANY REASON (INCLUDING
DURING OR AFTER AN ACCIDENT), THE
UCONNECT FEATURES, APPS AND
SERVICES, AMONG OTHERS, WILL NOT
OPERATE.
Modifications to any part of the SOS Call
system could cause the air bag system to
fail when you need it. You could be injured
if the air bag system is not there to help
protect you.
WARNING! (Continued)
20_DJD2_OM_EN_USC_t.book Page 340
Page 343 of 553
IN CASE OF EMERGENCY341
SOS Call System Limitations
Vehicles sold in Mexico DO NOT have SOS Call
system capabilities.
SOS or other emergency line operators in
Mexico may not answer or respond to SOS
system calls.
If the SOS Call system detects a malfunction,
any of the following may occur at the time the
malfunction is detected, and at the beginning of
each ignition cycle:
The overhead console light located between
the ASSIST and SOS buttons will continuously
be illuminated red.
The Device Screen will display the following
message: “Vehicle device requires service.
Please contact your dealer.”
An In-Vehicle Audio message will state
“Vehicle device requires service. Please
contact your dealer.” Even if the SOS Call system is fully functional,
factors beyond FCA US LLC’s control may
prevent or stop the SOS Call system operation.
These include, but are not limited to, the
following factors:
Delayed accessories mode is active.
The ignition is in the OFF position.
The vehicle’s electrical systems are not
intact.
The SOS Call system software and/or hard
-
ware are damaged during a crash.
The vehicle battery loses power or becomes
disconnected during a vehicle crash.
LTE (voice/data) or 4G (data) network and/or
Global Positioning Satellite signals are
unavailable or obstructed.
Equipment malfunction at the SOS operator
facility.
Operator error by the SOS operator.
LTE (voice/data) or 4G (data) network
congestion.
Weather.
Buildings, structures, geographic terrain, or
tunnels.
WARNING!
Ignoring the overhead console light could
mean you will not have SOS Call services. If
the overhead console light is illuminated,
have an authorized dealer service the SOS
Call system immediately.
The Occupant Restraint Control module
turns on the air bag Warning Light on the
instrument panel if a malfunction in any
part of the system is detected. If the Air Bag
Warning Light is illuminated, have an
authorized dealer service the Occupant
Restraint Control system immediately.
WARNING!
ALWAYS obey traffic laws and pay attention to
the road. ALWAYS drive safely with your hands
on the steering wheel. You have full
responsibility and assume all risks related to
the use of the features and applications in
this vehicle. Only use the features and
applications when it is safe to do so. Failure
to do so may result in an accident involving
serious injury or death.
6
20_DJD2_OM_EN_USC_t.book Page 341
Page 355 of 553
IN CASE OF EMERGENCY353
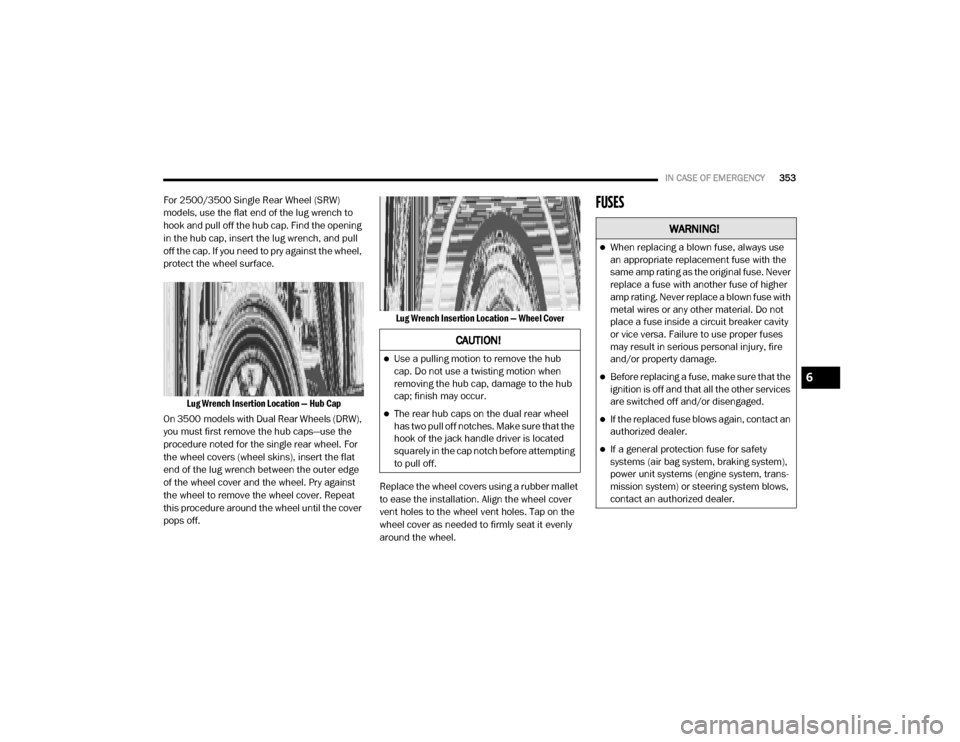
For 2500/3500 Single Rear Wheel (SRW)
models, use the flat end of the lug wrench to
hook and pull off the hub cap. Find the opening
in the hub cap, insert the lug wrench, and pull
off the cap. If you need to pry against the wheel,
protect the wheel surface.
Lug Wrench Insertion Location — Hub Cap
On 3500 models with Dual Rear Wheels (DRW),
you must first remove the hub caps—use the
procedure noted for the single rear wheel. For
the wheel covers (wheel skins), insert the flat
end of the lug wrench between the outer edge
of the wheel cover and the wheel. Pry against
the wheel to remove the wheel cover. Repeat
this procedure around the wheel until the cover
pops off.
Lug Wrench Insertion Location — Wheel Cover
Replace the wheel covers using a rubber mallet
to ease the installation. Align the wheel cover
vent holes to the wheel vent holes. Tap on the
wheel cover as needed to firmly seat it evenly
around the wheel.FUSES
CAUTION!
Use a pulling motion to remove the hub
cap. Do not use a twisting motion when
removing the hub cap, damage to the hub
cap; finish may occur.
The rear hub caps on the dual rear wheel
has two pull off notches. Make sure that the
hook of the jack handle driver is located
squarely in the cap notch before attempting
to pull off.
WARNING!
When replacing a blown fuse, always use
an appropriate replacement fuse with the
same amp rating as the original fuse. Never
replace a fuse with another fuse of higher
amp rating. Never replace a blown fuse with
metal wires or any other material. Do not
place a fuse inside a circuit breaker cavity
or vice versa. Failure to use proper fuses
may result in serious personal injury, fire
and/or property damage.
Before replacing a fuse, make sure that the
ignition is off and that all the other services
are switched off and/or disengaged.
If the replaced fuse blows again, contact an
authorized dealer.
If a general protection fuse for safety
systems (air bag system, braking system),
power unit systems (engine system, trans -
mission system) or steering system blows,
contact an authorized dealer.
6
20_DJD2_OM_EN_USC_t.book Page 353
Page 359 of 553

IN CASE OF EMERGENCY357
F3730 Amp Pink –Fuel Heater #2, Aux Relay 2 – If Equipped (HD Only)
SSV (DS 1500 Only)
F38 30 Amp Pink –Integrated Trailer Brake Module – If Equipped (HD Only)
Power Inverter 115 Volts AC – If Equipped (DS 1500 Only)
F39 20 Amp Blue –Power Outlet – SSV Only
F40 –10 Amp Red Ventilated Seats – If Equipped (HD Only)
F41 –10 Amp Red Active Grille Shutter / Active Air Dam – If Equipped
F42 –20 Amp Yellow Horn
F43 –15 Amp Blue Heated Steering Wheel – If Equipped (HD Only)
F44 –10 Amp Red Diagnostic Port
F46 –10 Amp RedUpfitters Relay Coil – If Equipped (HD Only)
Spare (DS 1500 Only)
F49 –10 Amp RedInstrument Panel Cluster / HVAC (DS 1500 Only)
Instrument Cluster / MOD CSG (HD Only)
F50 –20 Amp Yellow Air Suspension Control Module – If Equipped
F51 –10 Amp RedIgnition Node Module / Keyless Ignition Node Module,
Radio Frequency Hub Module / Electric Steering Column
Lock - If Equipped
F52 –5 Amp Tan Battery Sensor
F53 –20 Amp Yellow Trailer Tow – Left Turn/Stop Lights - If Equipped
F54 –20 Amp Yellow Non Memory Adjustable Pedals - If Equipped
F56 –15 Amp Blue Additional Diesel Content - If Equipped (DS 1500 Only)
CavityCartridge Fuse Micro Fuse Description
6
20_DJD2_OM_EN_USC_t.book Page 357
Page 363 of 553

IN CASE OF EMERGENCY361
F90/F91 –20 Amp Yellow IGN or BATT Customer Selectable – If Equipped (HD Only)
Power Outlet (Rear Seats) Customer Selectable (DS 1500
Only)
F93 –20 Amp Yellow Cigar Lighter - If Equipped
F94 –10 Amp RedShift-By-Wire / Transfer Case Switch (DS 1500 Only)
Shift-By-Wire / Transfer Case Switch / Module TPM Trailer
(HD Only) / Module Gateway Can-C Trailer TPM (HD Only)
F95 –10 Amp RedRearview Camera / Park Assist / CHMSL Camera / Blind
Spot Sensor / Surround View Camera (HD Only)
Rear Camera / Park Assist / Blind Spot Sensor / Compass
(DS 1500 Only)
F96 –10 Amp RedRear Seat Heater Switch / Trunk Lamp With Flashlamp
Charger / Truck Lamp - If Equipped (DS 1500 Only)
Trailer Camera – If Equipped (HD Only)
F97 –25 Amp ClearRear Heated Seats And Heated Steering Wheel – If
Equipped (DS 1500 Only)
F97 –20 Amp Yellow Front Heated Seat Passenger – If Equipped (HD Only)
F98 –25 Amp Clear Front Heated Seats – If Equipped (DS 1500 Only)
F98 –20 Amp Yellow Front Heated Seat Driver – If Equipped (HD Only)
F99 –10 Amp RedHVAC / DASM (DS 1500 Only)
HVAC / In-Car Temperature Sensor / CSG MOD (HD Only)
F100 –10 Amp Red Upfitters – If Equipped (HD Only)
F101 –15 Amp Blue SSV Only
CavityCartridge Fuse Micro Fuse Description
6
20_DJD2_OM_EN_USC_t.book Page 361