Esc disable Ram 2500 2020 Owner's Manual
[x] Cancel search | Manufacturer: RAM, Model Year: 2020, Model line: 2500, Model: Ram 2500 2020Pages: 553, PDF Size: 21.99 MB
Page 74 of 553
72GETTING TO KNOW YOUR VEHICLE
Window Lockout Switch
The window lockout switch on the driver's door
allows you to disable the window control on the
rear passenger doors. To disable the window
controls on the rear passenger doors, push the
window lock switch into the latched or down
position. To enable the window controls, push
the window lock switch again and return the
switch to the released or up position.
Window Lockout Switch
Power Sliding Rear Window — If Equipped
The switch for the power sliding rear window is
located on the overhead console.
Power Sliding Rear Window Switch
Push the rearward portion of the switch to open
the window. Push the forward portion of the
switch to close the window.
Manual Sliding Rear Window — If Equipped
A locking device in the center of the window
helps to prevent entry from the rear of the
vehicle. Squeeze the lock to release the
window.
Wind Buffeting
Wind buffeting can be described as the percep -
tion of pressure on the ears or a helicopter-type
sound in the ears. Your vehicle may exhibit wind
buffeting with the windows down, or the sunroof
(if equipped) in certain open or partially open
positions. This is a normal occurrence and can
be minimized. If the buffeting occurs with the rear windows open, open the front and rear
windows together to minimize the buffeting. If
the buffeting occurs with the sunroof open,
adjust the sunroof opening to minimize the
buffeting or open any window.
POWER SUNROOF — IF EQUIPPED
Single Pane Power Sunroof — If Equipped
The power sunroof switches are located on the
overhead console between the courtesy/
reading lights.
Power Sunroof Switches
1 — Opening/Closing Sunroof
2 — Venting Sunroof
20_DJD2_OM_EN_USC_t.book Page 72
Page 149 of 553
SAFETY147
ESC Operating Modes
NOTE:
Depending upon model and mode of operation,
the ESC system may have multiple operating
modes. ESC On
This is the normal operating mode for the ESC.
Whenever the vehicle is started, the ESC system
will be in this mode. This mode should be used
for most driving conditions. Alternate ESC
modes should only be used for specific reasons
as noted in the following paragraphs.
Partial Off
The “Partial Off” mode is intended for times
when a more spirited driving experience is
desired. This mode may modify TCS and ESC
thresholds for activation, which allows for more
wheel spin than normally allowed. This mode
may be useful if the vehicle becomes stuck.
To enter the “Partial Off” mode, momentarily
push the “ESC OFF” switch and the “ESC OFF
Indicator Light” will illuminate. To turn the ESC
on again, momentarily push the “ESC OFF”
switch and the “ESC OFF Indicator Light” will
turn off.
NOTE:
For vehicles with multiple partial ESC modes, a
momentary button push will toggle the ESC
mode. Multiple momentary button pushes may
be required to return to ESC On.
Full Off — If Equipped
This mode is intended for off-highway or
off-road use only and should not be used on any
public roadways. In this mode, TCS and ESC
features are turned off. To enter the “Full Off”
mode, push and hold the “ESC OFF” switch for
five seconds while the vehicle is stopped with
the engine running. After five seconds, a chime
will sound, the “ESC OFF Indicator Light” will illu
-
minate, and the “ESC OFF” message will display
in the instrument cluster. To turn ESC on again,
momentarily push the “ESC OFF” switch.
Vehicle modifications, or failure to properly
maintain your vehicle, may change the
handling characteristics of your vehicle,
and may negatively affect the performance
of the ESC system. Changes to the steering
system, suspension, braking system, tire
type and size or wheel size may adversely
affect ESC performance. Improperly
inflated and unevenly worn tires may also
degrade ESC performance. Any vehicle
modification or poor vehicle maintenance
that reduces the effectiveness of the ESC
system can increase the risk of loss of
vehicle control, vehicle rollover, personal
injury and death.
WARNING! (Continued)WARNING!
When in “Partial Off” mode, the TCS func -
tionality of ESC, (except for the limited slip
feature described in the TCS section), has
been disabled and the “ESC Off Indicator
Light” will be illuminated. When in “Partial
Off” mode, the engine power reduction
feature of TCS is disabled, and the
enhanced vehicle stability offered by the
ESC system is reduced.
Trailer Sway Control (TSC) is disabled when
the ESC system is in the “Partial Off” mode.
4
20_DJD2_OM_EN_USC_t.book Page 147
Page 150 of 553
148SAFETY
(Continued)
NOTE:
System may switch from ESC “Full Off” to
“Partial Off” mode when vehicle exceeds a
predetermined speed. When the vehicle speed
slows below the predetermined speed the
system will return to ESC “Full Off”.
ESC modes may also be affected by drive
modes (if equipped).
ESC Activation/Malfunction Indicator Light
And ESC OFF Indicator Light
The “ESC Activation/Malfunction Indi -
cator Light” in the instrument cluster
will come on when the ignition is
turned to the ON mode. It should go
out with the engine running. If the “ESC Activa -
tion/Malfunction Indicator Light” comes on
continuously with the engine running, a
malfunction has been detected in the ESC
system. If this light remains on after several
ignition cycles, and the vehicle has been driven
several miles (kilometers) at speeds greater
than 30 mph (48 km/h), see an authorized dealer as soon as possible to have the problem
diagnosed and corrected.
The “ESC Activation/Malfunction Indicator
Light” (located in the instrument cluster) starts
to flash as soon as the tires lose traction and
the ESC system becomes active. The “ESC Acti
-
vation/Malfunction Indicator Light” also flashes
when TCS is active. If the “ESC Activation/
Malfunction Indicator Light” begins to flash
during acceleration, ease up on the accelerator
and apply as little throttle as possible. Be sure
to adapt your speed and driving to the prevailing
road conditions.
NOTE:
The “ESC Activation/Malfunction Indicator
Light” and the “ESC OFF Indicator Light”
come on momentarily each time the ignition
is placed in the ON position.
Each time the ignition is placed in the ON
position, the ESC system will be on even if it
was turned off previously.
The ESC system will make buzzing or clicking
sounds when it is active. This is normal; the
sounds will stop when ESC becomes inactive
following the maneuver that caused the ESC
activation.
WARNING!
In the ESC “Full Off” mode, the engine
torque reduction and stability features are
disabled. Therefore, enhanced vehicle
stability offered by the ESC system is
unavailable. In an emergency evasive
maneuver, the ESC system will not engage
to assist in maintaining stability. ESC “Full
Off” mode is intended for off-highway or
off-road use only.
The Electronic Stability Control (ESC)
cannot prevent the natural laws of physics
from acting on the vehicle, nor can it
increase the traction afforded by prevailing
road conditions. ESC cannot prevent all
accidents, including those resulting from
excessive speed in turns, driving on very
slippery surfaces, or hydroplaning. ESC also
cannot prevent collisions.
WARNING! (Continued)
20_DJD2_OM_EN_USC_t.book Page 148
Page 151 of 553
SAFETY149
The “ESC OFF Indicator Light” indi -
cates the customer has elected to
have the Electronic Stability Control
(ESC) in a reduced mode.
Electronic Roll Mitigation (ERM)
This system anticipates the potential for wheel
lift by monitoring the driver’s steering wheel
input and the speed of the vehicle. When Elec -
tronic Roll Mitigation (ERM) determines that the
rate of change of the steering wheel angle and
vehicle’s speed are sufficient to potentially
cause wheel lift, it then applies the appropriate
brake and may also reduce engine power to
lessen the chance that wheel lift will occur. ERM
can only reduce the chance of wheel lift occur -
ring during severe or evasive driving maneu -
vers; it cannot prevent wheel lift due to other
factors, such as road conditions, leaving the
roadway, or striking objects or other vehicles.
NOTE:
ERM is disabled anytime the ESC is in “Full Off”
mode (if equipped). Refer to “Electronic Stability
Control (ESC)” in this section for a complete
explanation of the available ESC modes.
Hill Descent Control (HDC) — If Equipped
Hill Descent Control (HDC) is intended for low
speed off road driving while in 4L Range. HDC
maintains vehicle speed while descending hills
during various driving situations. HDC controls
vehicle speed by actively controlling the brakes. HDC Has Three States:
1. Off (feature is not enabled and will not acti
-
vate)
2. Enabled (feature is enabled and ready but activation conditions are not met, or driver
is actively overriding with brake or throttle
application)
3. Active (feature is enabled and actively controlling vehicle speed)
Enabling HDC
HDC is enabled by pushing the HDC switch, but
the following conditions must also be met to
enable HDC:Driveline is in 4L Range
Vehicle speed is below 5 mph (8 km/h)
Parking brake is released
Driver door is closed
WARNING!
Many factors, such as vehicle loading, road
conditions and driving conditions, influence
the chance that wheel lift or rollover may
occur. ERM cannot prevent all wheel lift or roll
overs, especially those that involve leaving
the roadway or striking objects or other
vehicles. The capabilities of an
ERM-equipped vehicle must never be
exploited in a reckless or dangerous manner
which could jeopardize the user's safety or
the safety of others.
4
20_DJD2_OM_EN_USC_t.book Page 149
Page 153 of 553
SAFETY151
The cluster icon and switch lamp will flash for
several seconds then extinguish when HDC
disables due to excess speed.
The cluster icon and switch lamp will flash
when HDC deactivates due to overheated
brakes. The flashing will stop and HDC will
activate again once the brakes have cooled
sufficiently.
Hill Start Assist (HSA)
The Hill Start Assist (HSA) system is designed to
mitigate roll back from a complete stop while on
an incline. If the driver releases the brake while
stopped on an incline, HSA will continue to hold
the brake pressure for a short period. If the
driver does not apply the throttle before this
time expires, the system will release brake pres -
sure and the vehicle will roll down the hill as
normal. The following conditions must be met in order
for HSA to activate:
The feature must be enabled.
The vehicle must be stopped.
The park brake must be off.
The driver door must be closed.
The vehicle must be on a sufficient grade.
The gear selection must match vehicle uphill
direction (i.e., vehicle facing uphill is in
forward gear; vehicle backing uphill is in
REVERSE (R) gear).
HSA will work in REVERSE gear and all
forward gears. The system will not activate if
the transmission is in PARK or NEUTRAL (N).
For vehicles equipped with a manual trans
-
mission, if the clutch is pressed, HSA will
remain active.
WARNING!
HDC is only intended to assist the driver in
controlling vehicle speed when descending
hills. The driver must remain attentive to the
driving conditions and is responsible for
maintaining a safe vehicle speed.
WARNING!
There may be situations where the Hill Start
Assist (HSA) will not activate and slight rolling
may occur, such as on minor hills or with a
loaded vehicle, or while pulling a trailer. HSA
is not a substitute for active driving
involvement. It is always the driver’s
responsibility to be attentive to distance to
other vehicles, people, and objects, and most
importantly brake operation to ensure safe
operation of the vehicle under all road
conditions. Your complete attention is always
required while driving to maintain safe control
of your vehicle. Failure to follow these
warnings can result in a collision or serious
personal injury.
4
20_DJD2_OM_EN_USC_t.book Page 151
Page 154 of 553
152SAFETY
Disabling And Enabling HSA
This feature can be turned on or turned off. To
change the current setting, proceed as follows:
If disabling HSA using your instrument cluster
display, refer to “Instrument Cluster Display”
in “Getting To Know Your Instrument Panel”
for further information.
If disabling HSA using Uconnect Settings,
refer to “Uconnect Settings” in “Multimedia”
for further information.
For vehicles not equipped with an instrument
cluster display, perform the following steps:
1. Center the steering wheel (front wheels pointing straight forward).
2. Shift the transmission into PARK.
3. Apply the parking brake.
4. Start the engine.
5. Rotate the steering wheel slightly more than one-half turn to the left. 6. Push the “ESC OFF” button located in the
lower switch bank below the climate control
four times within 20 seconds. The “ESC OFF
Indicator Light” should turn on and turn off
two times.
7. Rotate the steering wheel back to center and then an additional slightly more than
one-half turn to the right.
8. Place the ignition in the OFF mode and then back to ON. If the sequence was completed
properly, the “ESC OFF Indicator Light” will
blink several times to confirm HSA is
disabled.
9. Repeat these steps if you want to return this feature to its previous setting.
Towing With HSA
HSA will also provide assistance to mitigate roll
back while towing a trailer.
WARNING!
If you use a trailer brake controller with your
trailer, the trailer brakes may be activated
and deactivated with the brake switch. If
so, there may not be enough brake pres -
sure to hold both the vehicle and the trailer
on a hill when the brake pedal is released.
In order to avoid rolling down an incline
while resuming acceleration, manually acti -
vate the trailer brake or apply more vehicle
brake pressure prior to releasing the brake
pedal.
HSA is not a parking brake. Always apply
the parking brake fully when exiting your
vehicle. Also, be certain to place the trans -
mission in PARK.
Failure to follow these warnings can result
in a collision or serious personal injury.
20_DJD2_OM_EN_USC_t.book Page 152
Page 155 of 553
SAFETY153
Traction Control System (TCS)
This system monitors the amount of wheel spin
of each of the driven wheels. If wheel spin is
detected, the Traction Control System (TCS)
may apply brake pressure to the spinning
wheel(s) and/or reduce engine power to provide
enhanced acceleration and stability. A feature
of the TCS, Brake Limited Differential (BLD),
functions similar to a limited slip differential
and controls the wheel spin across a driven
axle. If one wheel on a driven axle is spinning
faster than the other, the system will apply the
brake of the spinning wheel. This will allow more
engine power to be applied to the wheel that is
not spinning. BLD may remain enabled even if
TCS and Electronic Stability Control (ESC) are in
a reduced mode.
Trailer Sway Control (TSC)
Trailer Sway Control (TSC) uses sensors in the
vehicle to recognize an excessively swaying
trailer and will take the appropriate actions to
attempt to stop the sway. TSC will become
active automatically once an excessively
swaying trailer is recognized. NOTE:
TSC cannot stop all trailers from swaying.
Always use caution when towing a trailer and
follow the trailer tongue weight recommenda
-
tions. Refer to “Trailer Towing” in “Starting And
Operating” for further information.
When TSC is functioning, the “ESC Activation/
Malfunction Indicator Light” will flash, the
engine power may be reduced and you may feel
the brakes being applied to individual wheels to
attempt to stop the trailer from swaying. TSC is
disabled when the ESC system is in the “Partial
Off” or “Full Off” modes.
AUXILIARY DRIVING SYSTEMS
Blind Spot Monitoring (BSM) — If Equipped
The Blind Spot Monitoring (BSM) system uses
two radar-based sensors, located inside the tail -
lights, to detect highway licensable vehicles
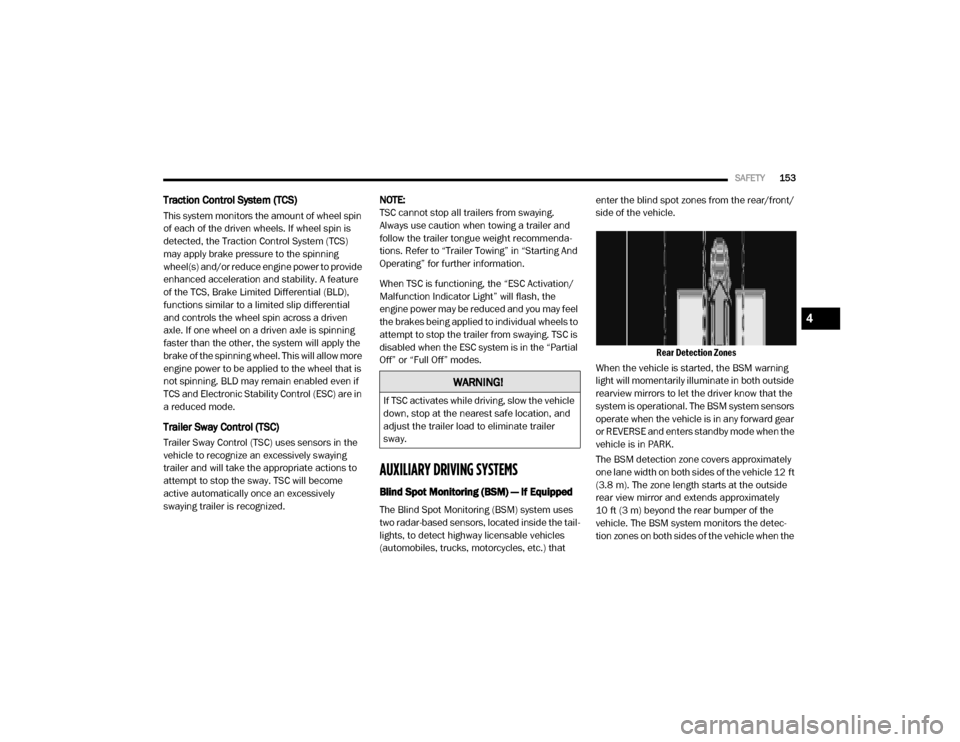
(automobiles, trucks, motorcycles, etc.) that enter the blind spot zones from the rear/front/
side of the vehicle.
Rear Detection Zones
When the vehicle is started, the BSM warning
light will momentarily illuminate in both outside
rearview mirrors to let the driver know that the
system is operational. The BSM system sensors
operate when the vehicle is in any forward gear
or REVERSE and enters standby mode when the
vehicle is in PARK.
The BSM detection zone covers approximately
one lane width on both sides of the vehicle 12 ft
(3.8 m). The zone length starts at the outside
rear view mirror and extends approximately
10 ft (3 m) beyond the rear bumper of the
vehicle. The BSM system monitors the detec -
tion zones on both sides of the vehicle when the
WARNING!
If TSC activates while driving, slow the vehicle
down, stop at the nearest safe location, and
adjust the trailer load to eliminate trailer
sway.
4
20_DJD2_OM_EN_USC_t.book Page 153
Page 252 of 553
250STARTING AND OPERATING
Transfer Case Position Indicator Light
The “Transfer Case Position Indicator Light” in
the instrument cluster is used to alert the driver
that the front axle is fully engaged and all four
wheels are driving.
AIR SUSPENSION SYSTEM — IF EQUIPPED
Description
This air suspension system is a rear leveling ride
height system. The main purpose of this system
is to maintain the truck’s rear ride height level.
There are two selectable heights that can be
chosen based on your operating conditions.
The system requires that the ignition be in the
ON/RUN position or the engine running with
zero vehicle speed for all user requested
changes and load leveling.
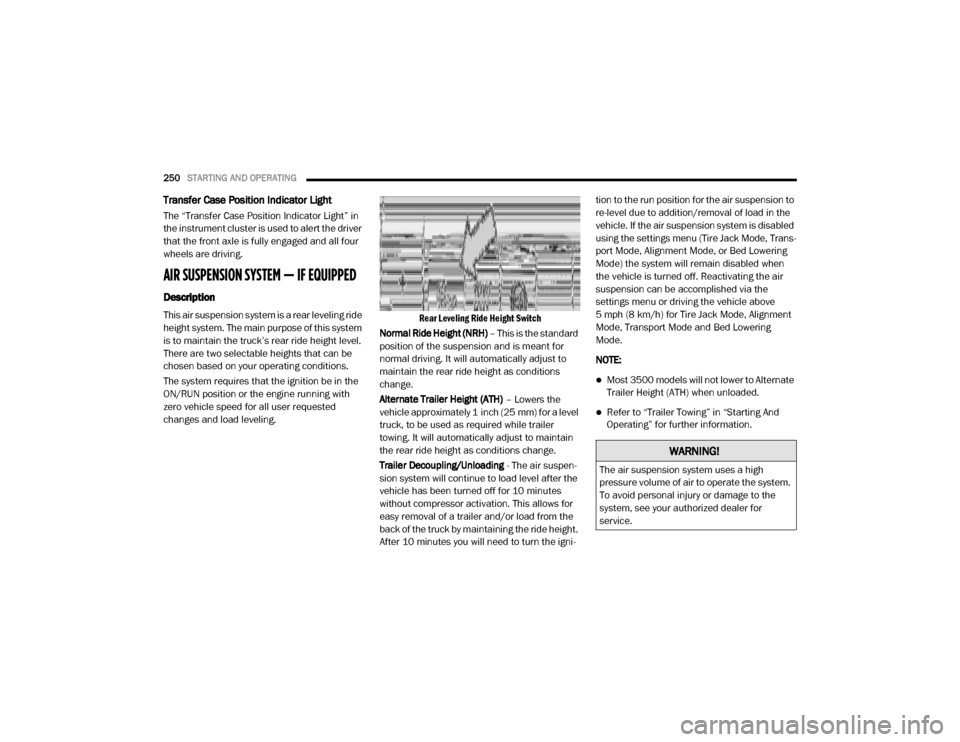
Rear Leveling Ride Height Switch
Normal Ride Height (NRH) – This is the standard
position of the suspension and is meant for
normal driving. It will automatically adjust to
maintain the rear ride height as conditions
change.
Alternate Trailer Height (ATH) – Lowers the
vehicle approximately 1 inch (25 mm) for a level
truck, to be used as required while trailer
towing. It will automatically adjust to maintain
the rear ride height as conditions change.
Trailer Decoupling/Unloading - The air suspen-
sion system will continue to load level after the
vehicle has been turned off for 10 minutes
without compressor activation. This allows for
easy removal of a trailer and/or load from the
back of the truck by maintaining the ride height.
After 10 minutes you will need to turn the igni -tion to the run position for the air suspension to
re-level due to addition/removal of load in the
vehicle. If the air suspension system is disabled
using the settings menu (Tire Jack Mode, Trans
-
port Mode, Alignment Mode, or Bed Lowering
Mode) the system will remain disabled when
the vehicle is turned off. Reactivating the air
suspension can be accomplished via the
settings menu or driving the vehicle above
5 mph (8 km/h) for Tire Jack Mode, Alignment
Mode, Transport Mode and Bed Lowering
Mode.
NOTE:
Most 3500 models will not lower to Alternate
Trailer Height (ATH) when unloaded.
Refer to “Trailer Towing” in “Starting And
Operating” for further information.
WARNING!
The air suspension system uses a high
pressure volume of air to operate the system.
To avoid personal injury or damage to the
system, see your authorized dealer for
service.
20_DJD2_OM_EN_USC_t.book Page 250
Page 291 of 553
STARTING AND OPERATING289
quent tap of the button results in a decrease
of 1 mph.
If the button is continually pushed, the set
speed will continue to decrease in 5 mph
decrements until the button is released. The
decrease in set speed is reflected in the
instrument cluster display.
Metric Speed (km/h)
Pushing the SET (-) button once will result in
a 1 km/h decrease in set speed. Each subse -
quent tap of the button results in a decrease
of 1 km/h.
If the button is continually pushed, the set
speed will continue to decrease in 10 km/h
decrements until the button is released. The
decrease in set speed is reflected in the
instrument cluster display.
To Cancel
The following conditions will cancel the Normal
(Fixed Speed) Cruise Control without clearing
the memory:
The brake pedal is applied.
The CANCEL button is pushed.
The Electronic Stability Control/Traction
Control System (ESC/TCS) activates.
The vehicle parking brake is applied.
The braking temperature exceeds normal
range (overheated).
The gear selector is removed from the DRIVE
position.
The driver switches ESC to Full Off mode.
To Resume Speed
To resume a previously set speed, push the RES
(+) button and release. Resume can be used at
any speed above 20 mph (32 km/h).
To Turn Off
The system will turn off and erase the set speed
in memory if:
The Normal (Fixed Speed) Cruise Control on/
off button is pushed.
The ignition is placed in the OFF position.
You engage Four-Wheel Drive Low.
The Adaptive Cruise Control (ACC) on/off
button is pushed.
PARKSENSE REAR PARK ASSIST — IF
EQUIPPED
The ParkSense Rear Park Assist system
provides visual and audible indications of the
distance between the rear fascia and a
detected obstacle when backing up (e.g. during
a parking maneuver). Refer to “ParkSense
System Usage Precautions” in this section for
limitations of this system and recommenda -
tions.
ParkSense will retain the system state (enabled
or disabled) from the previous ignition cycle
when the ignition is placed in the ON/RUN posi -
tion.
ParkSense can be active only when the gear
selector is in REVERSE. If ParkSense is enabled
at this gear selector position, the system will
remain active until the vehicle speed is
increased to approximately 7 mph (11 km/h) or
above. When in REVERSE and above the
system's operating speed, a warning will appear
within the instrument cluster display indicating
the vehicle speed is too fast. The system will
become active again if the vehicle speed is
decreased to speeds less than approximately
6 mph (9 km/h).
5
20_DJD2_OM_EN_USC_t.book Page 289
Page 371 of 553
IN CASE OF EMERGENCY369
TOWING A DISABLED VEHICLE
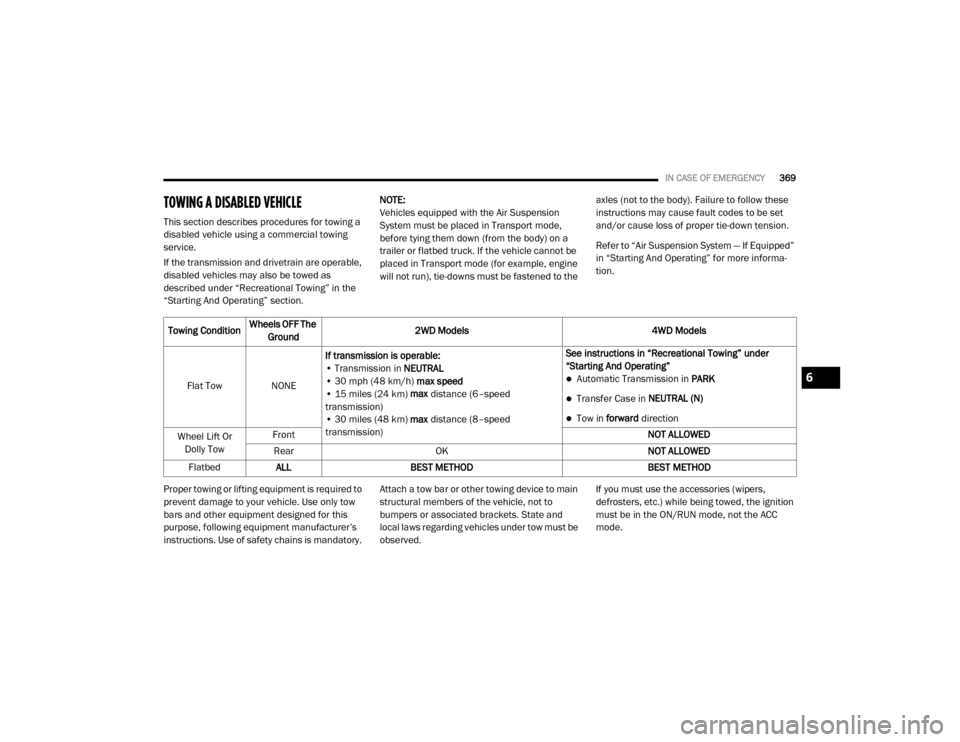
This section describes procedures for towing a
disabled vehicle using a commercial towing
service.
If the transmission and drivetrain are operable,
disabled vehicles may also be towed as
described under “Recreational Towing” in the
“Starting And Operating” section. NOTE:
Vehicles equipped with the Air Suspension
System must be placed in Transport mode,
before tying them down (from the body) on a
trailer or flatbed truck. If the vehicle cannot be
placed in Transport mode (for example, engine
will not run), tie-downs must be fastened to the
axles (not to the body). Failure to follow these
instructions may cause fault codes to be set
and/or cause loss of proper tie-down tension.
Refer to “Air Suspension System — If Equipped”
in “Starting And Operating” for more informa
-
tion.
Proper towing or lifting equipment is required to
prevent damage to your vehicle. Use only tow
bars and other equipment designed for this
purpose, following equipment manufacturer’s
instructions. Use of safety chains is mandatory. Attach a tow bar or other towing device to main
structural members of the vehicle, not to
bumpers or associated brackets. State and
local laws regarding vehicles under tow must be
observed.If you must use the accessories (wipers,
defrosters, etc.) while being towed, the ignition
must be in the ON/RUN mode, not the ACC
mode.
Towing Condition
Wheels OFF The
Ground 2WD Models
4WD Models
Flat Tow NONE If transmission is operable:
• Transmission in NEUTRAL
• 30 mph (48 km/h) max speed
• 15 miles (24 km) max distance (6–speed
transmission)
• 30 miles (48 km) max distance (8–speed
transmission) See instructions in “Recreational Towing” under
“Starting And Operating”
Automatic Transmission in
PARK
Transfer Case in NEUTRAL (N)
Tow in forward direction
Wheel Lift Or Dolly Tow Front
NOT ALLOWED
Rear OK NOT ALLOWED
Flatbed ALL BEST METHOD BEST METHOD
6
20_DJD2_OM_EN_USC_t.book Page 369