steering Ram 3500 2016 Manual PDF
[x] Cancel search | Manufacturer: RAM, Model Year: 2016, Model line: 3500, Model: Ram 3500 2016Pages: 919, PDF Size: 6.67 MB
Page 783 of 919

2. Using a small screwdriver or similar tool, remove theManual Park Release access cover, which is just above
the parking brake release handle, below and to the left
of the steering column.
3. Using the screwdriver or similar tool, push the Manual Park Release lever locking tab (just below the
middle of the lever) to the right.
4. While holding the locking tab in the disengaged position, pull the tether strap to rotate the lever
rearward, until it locks in place pointing towards the
driver’s seat. Release the locking tab and verify that
the Manual Park Release lever is locked in the released
position.
5. The vehicle is now out of PARK and can be towed. Release the parking brake only when the vehicle is
securely connected to a tow vehicle. To Reset The Manual Park Release:
1. Push the locking tab to the right, to unlock the lever.
2. Rotate the Manual Park Release lever forward to its
original position, until the locking tab snaps into place
to secure the lever.
3. Pull gently on the tether strap to confirm that the lever is locked in its stowed position.
4. Re-install the access cover.
6
WHAT TO DO IN EMERGENCIES 781
Page 787 of 919
and the rear wheels on a towing dolly, or (when using a
suitable steering wheel stabilizer to hold the front wheels
in the straight position) with the rear wheels raised and
the front wheels on the ground.
CAUTION!
Towing this vehicle in violation of the above require-
ments can cause severe engine and/or transmission
damage. Damage from improper towing is not cov-
ered under the New Vehicle Limited Warranty.
Four-Wheel Drive Models
The manufacturer recommends towing with all wheels
OFFthe ground. Acceptable methods are to tow the
vehicle on a flatbed or with one end of vehicle raised and
the opposite end on a towing dolly.
If flatbed equipment is not available, and the transfer
case is operable, the vehicle may be towed (in the forward direction, with
ALLwheels on the ground), IF
the transfer case is in NEUTRAL (N) and the transmis-
sion is in PARK(for automatic transmissions) or in gear
(NOT in NEUTRAL, for manual transmissions). Refer to
“Recreational Towing” in “Starting And Operating” for
further information and detailed instructions.
CAUTION!
• Front or rear wheel lifts must not be used. Internal
damage to the transmission or transfer case will
occur if a front or rear wheel lift is used when
towing.
• Towing this vehicle in violation of the above re-
quirements can cause severe transmission and/or
transfer case damage. Damage from improper tow-
ing is not covered under the New Vehicle Limited
Warranty.6
WHAT TO DO IN EMERGENCIES 785
Page 793 of 919
ENGINE COMPARTMENT — 5.7L
1 — Air Cleaner Filter7 — Washer Fluid Reservoir
2 — Automatic Transmission Dipstick (6-Speed Trans Only) 8 — Power Distribution Center (Fuses)
3 — Engine Oil Fill 9 — Power Steering Fluid Reservoir (2500/3500 Models Only)
4 — Engine Oil Dipstick 10 — Coolant Pressure Cap
5 — Brake Fluid Reservoir 11 — Engine Coolant Reservoir
6 — Battery
7
MAINTAINING YOUR VEHICLE 791
Page 794 of 919
ENGINE COMPARTMENT — 6.4L
1 — Coolant Pressure Bottle6 — Battery
2 — Transmission Dipstick 7 — Power Distribution Center (Fuses)
3 — Engine Oil Fill 8 — Washer Solvent
4 — Engine Oil Dipstick 9 — Power Steering Fluid Reservoir
5 — Brake Fluid Reservoir 10 — Air Cleaner Filter
792 MAINTAINING YOUR VEHICLE
Page 844 of 919
WARNING!(Continued)
•If the replaced fuse blows again, contact an autho-
rized dealer.
• If a general protection fuse for safety systems (air
bag system, braking system), power unit systems
(engine system, gearbox system) or steering system
blows, contact an authorized dealer.
Power Distribution Center
The Power Distribution Center is located in the engine
compartment near the battery. This center contains car-
tridge fuses, micro fuses, relays, and circuit breakers. A
description of each fuse and component may be stamped
on the inside cover, otherwise the cavity number of each fuse is stamped on the inside cover that corresponds to
the following chart.
Power Distribution Center Location
842 MAINTAINING YOUR VEHICLE
Page 851 of 919
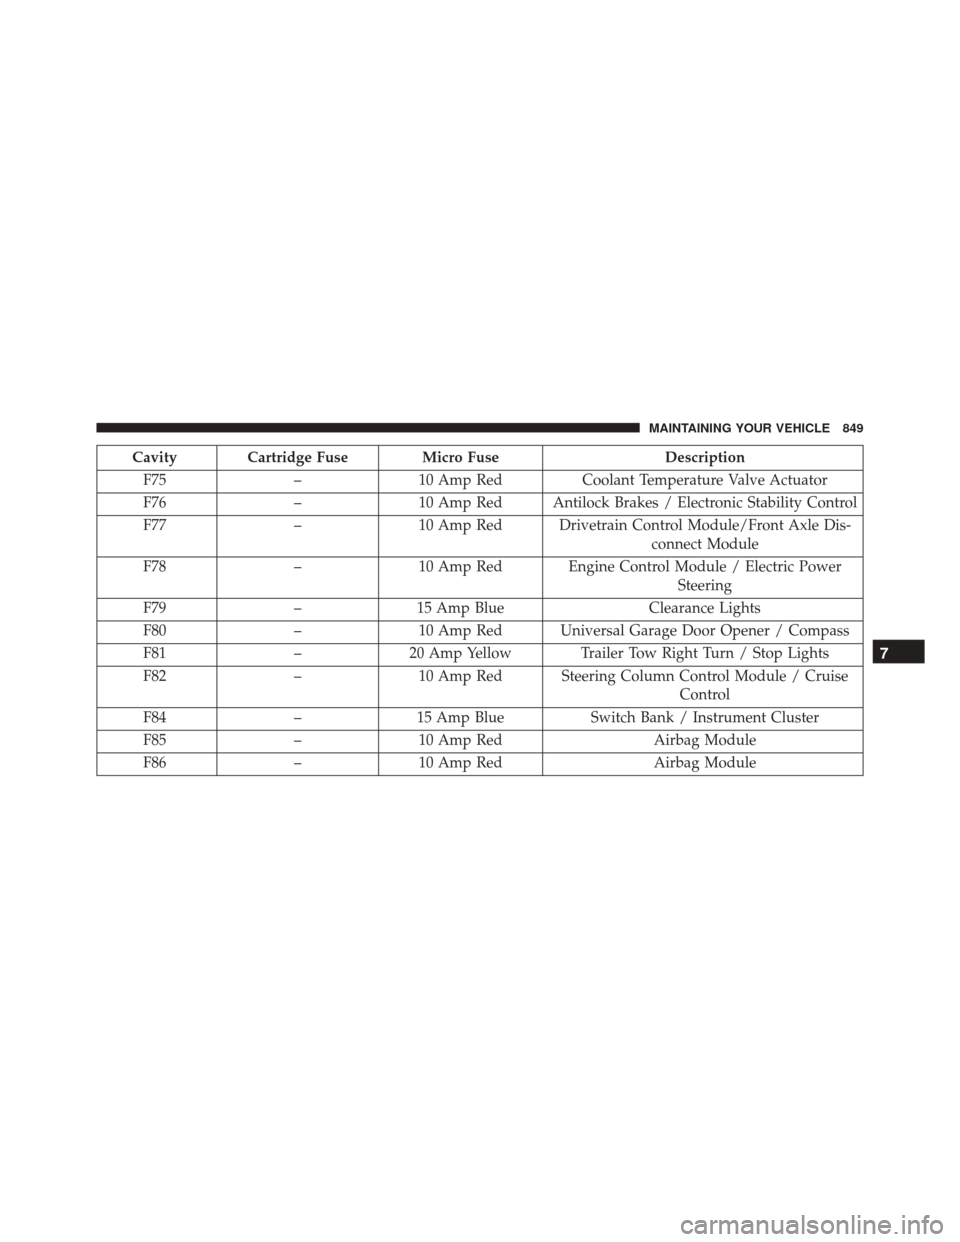
Cavity Cartridge Fuse Micro FuseDescription
F75 –10 Amp Red Coolant Temperature Valve Actuator
F76 –10 Amp Red Antilock Brakes / Electronic Stability Control
F77 –10 Amp Red Drivetrain Control Module/Front Axle Dis-
connect Module
F78 –10 Amp Red Engine Control Module / Electric Power
Steering
F79 –15 Amp Blue Clearance Lights
F80 –10 Amp Red Universal Garage Door Opener / Compass
F81 –20 Amp Yellow Trailer Tow Right Turn / Stop Lights
F82 –10 Amp Red Steering Column Control Module / Cruise
Control
F84 –15 Amp Blue Switch Bank / Instrument Cluster
F85 –10 Amp Red Airbag Module
F86 –10 Amp Red Airbag Module
7
MAINTAINING YOUR VEHICLE 849
Page 852 of 919
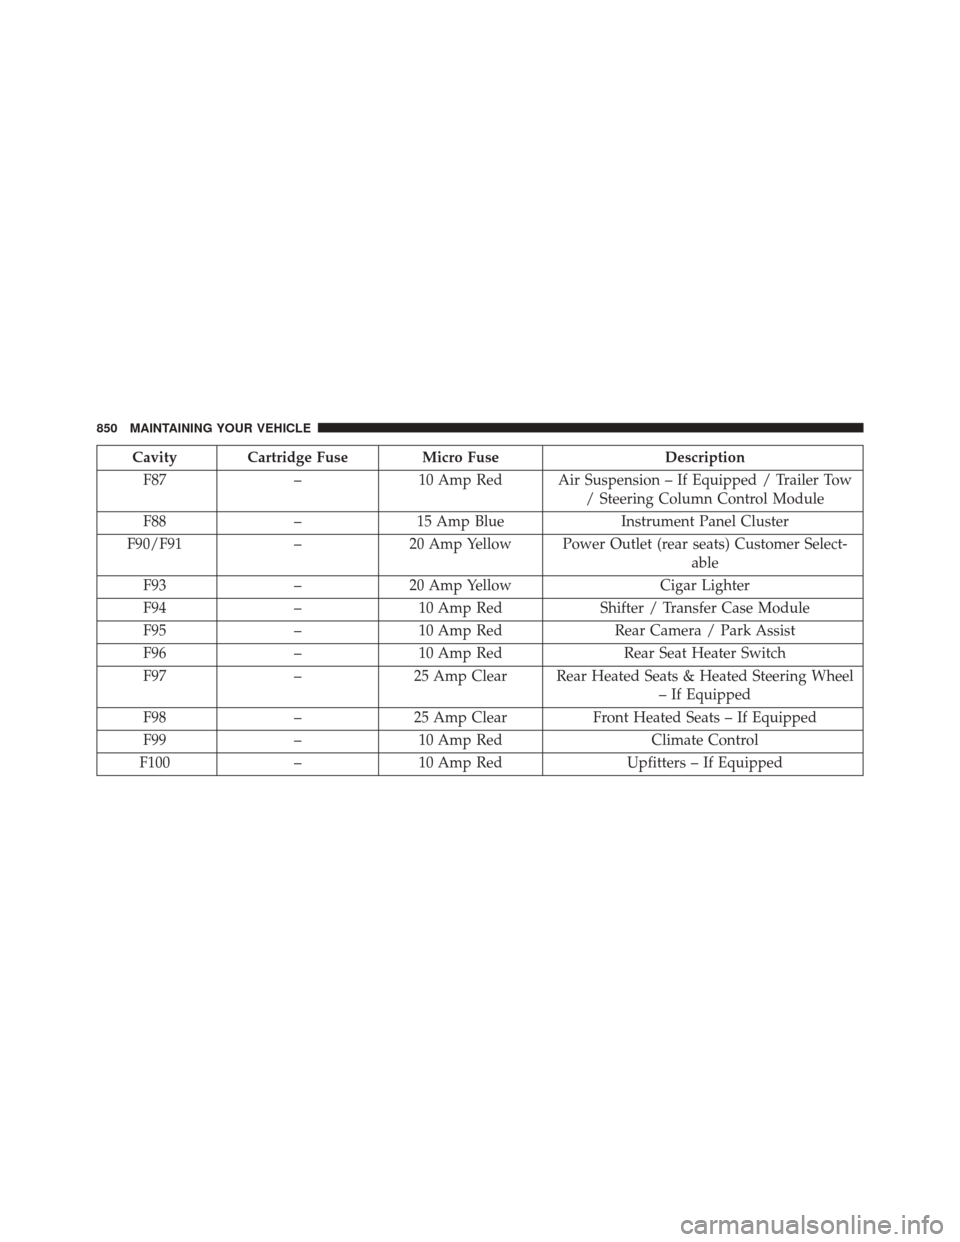
Cavity Cartridge Fuse Micro FuseDescription
F87 –10 Amp Red Air Suspension – If Equipped / Trailer Tow
/ Steering Column Control Module
F88 –15 Amp Blue Instrument Panel Cluster
F90/F91 –20 Amp Yellow Power Outlet (rear seats) Customer Select-
able
F93 –20 Amp Yellow Cigar Lighter
F94 –10 Amp Red Shifter / Transfer Case Module
F95 –10 Amp Red Rear Camera / Park Assist
F96 –10 Amp Red Rear Seat Heater Switch
F97 –25 Amp Clear Rear Heated Seats & Heated Steering Wheel
– If Equipped
F98 –25 Amp Clear Front Heated Seats – If Equipped
F99 –10 Amp Red Climate Control
F100 –10 Amp Red Upfitters – If Equipped
850 MAINTAINING YOUR VEHICLE
Page 873 of 919
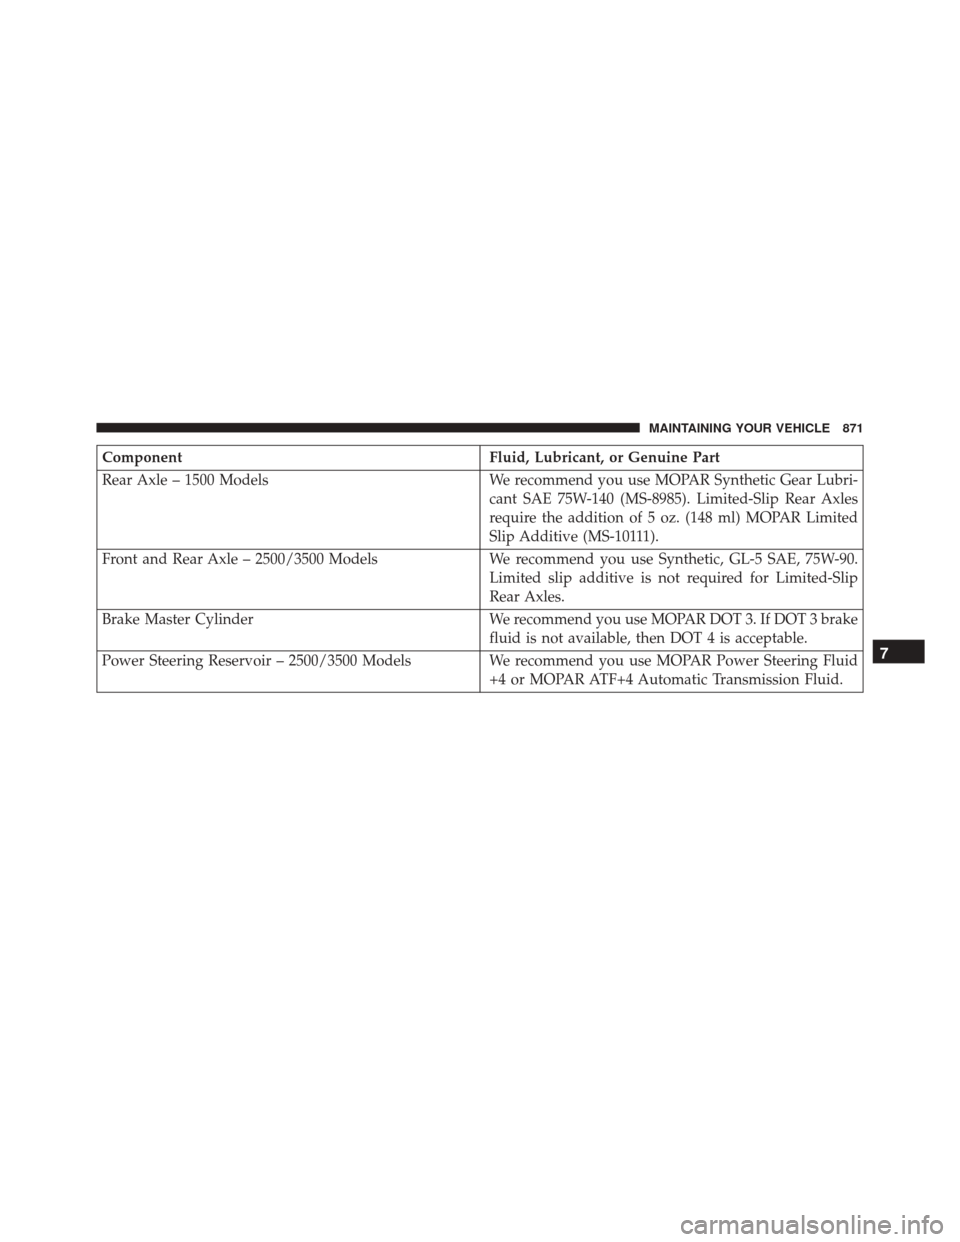
ComponentFluid, Lubricant, or Genuine Part
Rear Axle – 1500 Models We recommend you use MOPAR Synthetic Gear Lubri-
cant SAE 75W-140 (MS-8985). Limited-Slip Rear Axles
require the addition of 5 oz. (148 ml) MOPAR Limited
Slip Additive (MS-10111).
Front and Rear Axle – 2500/3500 Models We recommend you use Synthetic, GL-5 SAE, 75W-90.
Limited slip additive is not required for Limited-Slip
Rear Axles.
Brake Master Cylinder We recommend you use MOPAR DOT 3. If DOT 3 brake
fluid is not available, then DOT 4 is acceptable.
Power Steering Reservoir – 2500/3500 Models We recommend you use MOPAR Power Steering Fluid
+4 or MOPAR ATF+4 Automatic Transmission Fluid.
7
MAINTAINING YOUR VEHICLE 871
Page 877 of 919
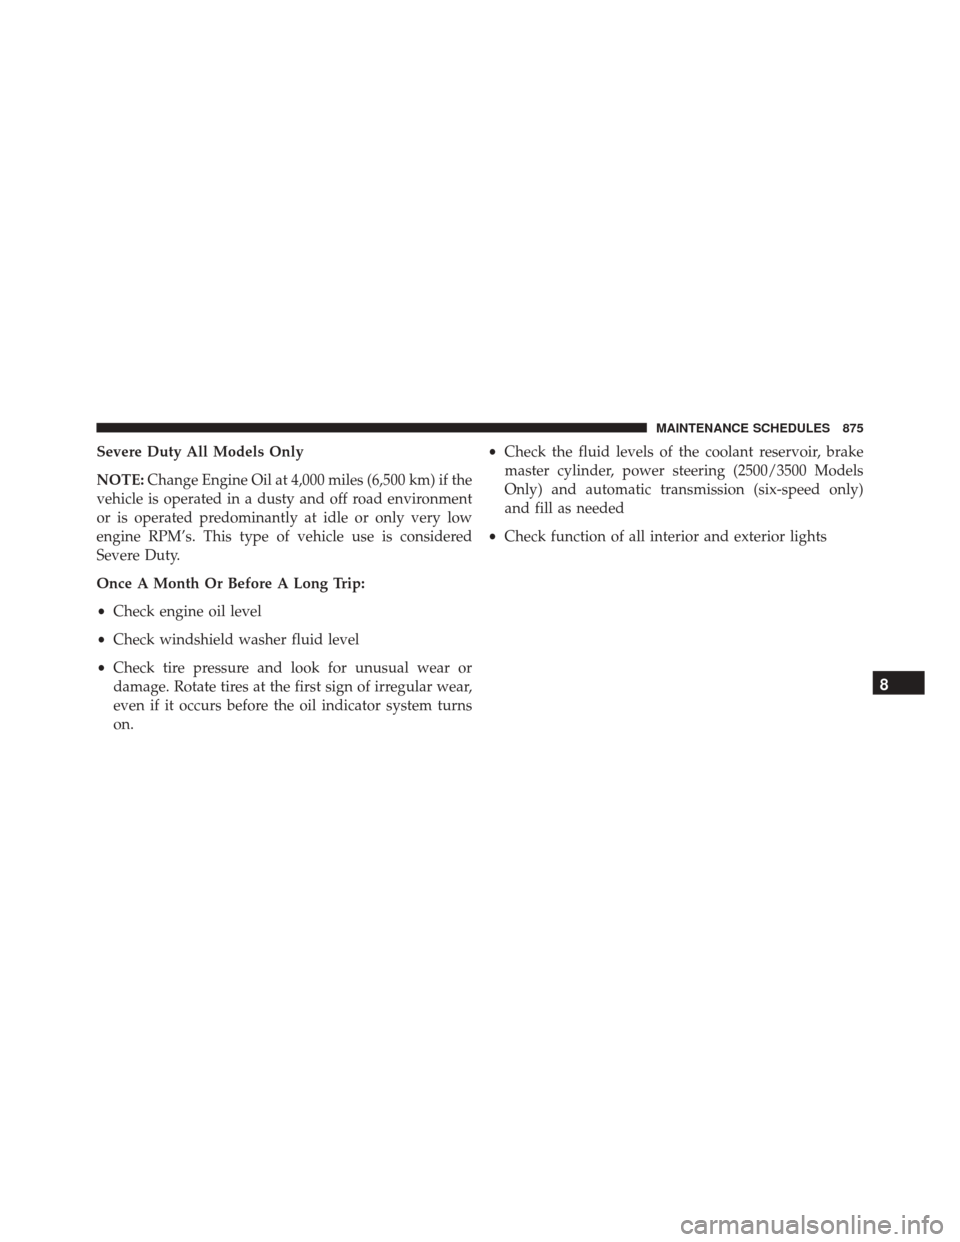
Severe Duty All Models Only
NOTE:Change Engine Oil at 4,000 miles (6,500 km) if the
vehicle is operated in a dusty and off road environment
or is operated predominantly at idle or only very low
engine RPM’s. This type of vehicle use is considered
Severe Duty.
Once A Month Or Before A Long Trip:
• Check engine oil level
• Check windshield washer fluid level
• Check tire pressure and look for unusual wear or
damage. Rotate tires at the first sign of irregular wear,
even if it occurs before the oil indicator system turns
on. •
Check the fluid levels of the coolant reservoir, brake
master cylinder, power steering (2500/3500 Models
Only) and automatic transmission (six-speed only)
and fill as needed
• Check function of all interior and exterior lights
8
MAINTENANCE SCHEDULES 875
Page 900 of 919

Brake/Transmission Interlock.................489
Bulb Replacement ..................... .852, 854
Bulbs, Light ......................... .122, 852
Cab Top Clearance Lights ...................860
Camera, Rear ........................... .212
Camper ............................... .271
Capacities, Fluid ......................... .864
Caps, Filler Oil (Engine) .......................... .801
Power Steering ........................ .615
Radiator (Coolant Pressure) ................821
Carbon Monoxide Warning ...............119,680
Cargo Light ............................ .180
Car Washes ............................ .834
Center High Mounted Stop Light ..............858
Center Seat Storage Compartment .............242
Certification Label ........................ .687
Chart, Tire Sizing ........................ .638Check Engine Light (Malfunction Indicator Light) . .795
Checking Your Vehicle For Safety
..............118
Checks, Safety ............................118
Child Restraint ............................85
Child Restraints Booster Seats ...........................90
Child Restraints .........................85
Child Seat Installation .................104, 106
How To Stow An Unused ALR Seat Belt .......102
Infants And Child Restraints ................88
Install A LATCH-Compatible Child Restraint . . . .101
Installing Child Restraints Using The Vehicle Seat
Belt ................................ .103
Locating The LATCH Anchorages ............98
Lower Anchors And Tethers For Children .......93
Older Children And Child Restraints ..........89
Seating Positions ........................92
Cigar Lighter ........................... .235
Clean Air Gasoline ....................... .677
898 INDEX