manual radio set Ram 3500 2018 User Guide
[x] Cancel search | Manufacturer: RAM, Model Year: 2018, Model line: 3500, Model: Ram 3500 2018Pages: 372, PDF Size: 7.1 MB
Page 173 of 372
if the vehicle speed exceeds 66 mph
(106 km/h). The vehicle will return to NRH
from Aero Mode if the vehicle speed re-
mains between 30 mph (48 km/h) and
35 mph (56 km/h) for greater than 20 sec-
onds or if the vehicle speed falls below
30 mph (48 km/h).
NOTE:
Automatic Aero Mode may be disabled
through vehicle settings in the instrument
cluster when equipped with Uconnect 3.0, or
your Uconnect Radio when equipped with
Uconnect 5.0, 8.4A, or 8.4AN.
• Entry/Exit Mode (Lowers the vehicle approxi-
mately 2 in (51 mm)) - This position lowers
the vehicle for easier passenger entry and
exit as well as lowering the rear of the
vehicle for easier loading and unloading of
cargo. To enter Entry/Exit Mode, push the
“Down” button once from the NHR while
the vehicle speed is below 33 mph (53 km/
h). Once the vehicle speed goes below
15 mph (24 km/h) the vehicle height will
begin to lower. If the vehicle speed remains
between 15 mph (24 km/h) and 25 mph
(40 km/h) for greater than 60 seconds, or the vehicle speed exceeds 25 mph
(40 km/h) the Entry/Exit change will be
cancelled. To return to Normal Height
Mode, push the “Up” button once while in
Entry/Exit or drive the vehicle over 15 mph
(24 km/h). Entry/Exit mode may not be
available due to vehicle payload, an instru-
ment cluster message will be displayed
when this occurs. Refer to “Instrument
Cluster Display” in “Getting To Know Your
Instrument Panel” in the Owner’s Manual
for further information.
Air Suspension Modes
The Air Suspension system has multiple
modes to protect the system in unique situa-
tions:
AERO Mode
To improve aerodynamics, the air suspension
system has a feature which will put the ve-
hicle into AERO height automatically. Refer
to “Instrument Cluster Display” in “Getting
To Know Your Instrument Panel” in the Own-
er’s Manual for further information.
NOTE:
This mode is intended to be enabled with
engine running.
Tire/Jack Mode
To assist with changing a tire, the air suspen-
sion system has a feature which allows the
automatic leveling to be disabled. Refer to
“Instrument Cluster Display” in “Getting To
Know Your Instrument Panel” in the Owner’s
Manual for further information.
NOTE:
This mode is intended to be enabled with
engine running.
Transport Mode
For towing your vehicle with four wheels off
the ground, the air suspension system has a
feature which will put the vehicle into Entry/
Exit height and disable the automatic load
leveling system. Refer to “Instrument Cluster
Display” in “Getting To Know Your Instru-
ment Panel” in the Owner’s Manual for fur-
ther information.
171
Page 175 of 372
•Normal Ride Height (NRH) – This is the stan-
dard position of the suspension and is
meant for normal driving.
• Off-Road (OR) (Raises the vehicle approxi-
mately 1 in (26 mm)) – This position is
intended for off-roading use only where
maximum ground clearance is required. To
enter OR, push the “Up” button once from
the NRH position while vehicle speed is
below 20 mph (32 km/h). While in OR, if
the vehicle speed exceeds 25 mph
(40 km/h) the vehicle height will be auto-
matically lowered to NRH. Off-Road may
not be available due to vehicle payload, an
instrument cluster display message will be
shown when this occurs. Refer to “Instru-
ment Cluster Display” in “Getting To Know
Your Instrument Panel” in your Owner’s
Manual for further information.
• Aero Mode (Lowers the vehicle approximately
.6 in (15 mm)) – This position provides
improved aerodynamics by lowering the ve-
hicle. The vehicle will automatically enter
Aero Mode when the vehicle speed remains
between 62 mph (100 km/h) and 66 mph
(106 km/h) for greater than 20 seconds or
if the vehicle speed exceeds 66 mph (106 km/h). The vehicle will return to NRH
from Aero Mode if the vehicle speed re-
mains between 30 mph (48 km/h) and
35 mph (56 km/h) for greater than 20 sec-
onds or if the vehicle speed falls below
30 mph (48 km/h).
To enter Aero Mode manually push the down
button once from NRH at any vehicle speed.
To return to NRH push the up button once
while vehicle speed is less than 56 mph
(90 km/h).
NOTE:
Automatic Aero Mode may be disabled
through vehicle settings on your Uconnect
Radio when equipped with UConnect 5.0,
8.4A, or 8.4AN. Refer to “Uconnect Set-
tings” in “Multimedia” in your Owner’s
Manual for further information.
• Entry/Exit Mode (Lowers the vehicle approxi-
mately 3 in (73 mm)) – This position lowers
the vehicle for easier passenger entry and
exit as well as lowering the rear of the
vehicle for easier loading and unloading of
cargo. To enter Entry/Exit Mode, push the
“Down” button twice from the NRH while
the vehicle speed is below 33 mph (53 km/ h). Once the vehicle speed goes below
15 mph (24 km/h) the vehicle height will
begin to lower. If the vehicle speed remains
between 15 mph (24 km/h) and 25 mph
(40 km/h) for greater than 60 seconds, or
the vehicle speed exceeds 25 mph
(40 km/h) the Entry/Exit change will be
cancelled. To return to Normal Height
Mode, push the “Up” button twice while in
Entry/Exit or drive the vehicle over 15 mph
(24 km/h). Entry/Exit mode may not be
available due to vehicle payload, an instru-
ment cluster display message will be shown
when this occurs. Refer to “Instrument
Cluster Display” in “Getting To Know Your
Instrument Panel” in your Owner’s Manual
for further information.
Air Suspension Modes
The Air Suspension system has multiple
modes to protect the system in unique situa-
tions:
AERO Mode
To improve aerodynamics, the air suspension
system has a feature which will put the ve-
hicle into AERO height automatically. Refer
173
Page 177 of 372
Normal Ride Height (NRH)– This is the stan-
dard position of the suspension and is meant
for normal driving. It will automatically adjust
to maintain the rear ride height as conditions
change.
Alternate Trailer Height (ATH) – Lowers the
vehicle approximately 1 in (25 mm) for a
level truck, to be used as required while
trailer towing. It will automatically adjust to
maintain the rear ride height as conditions
change.
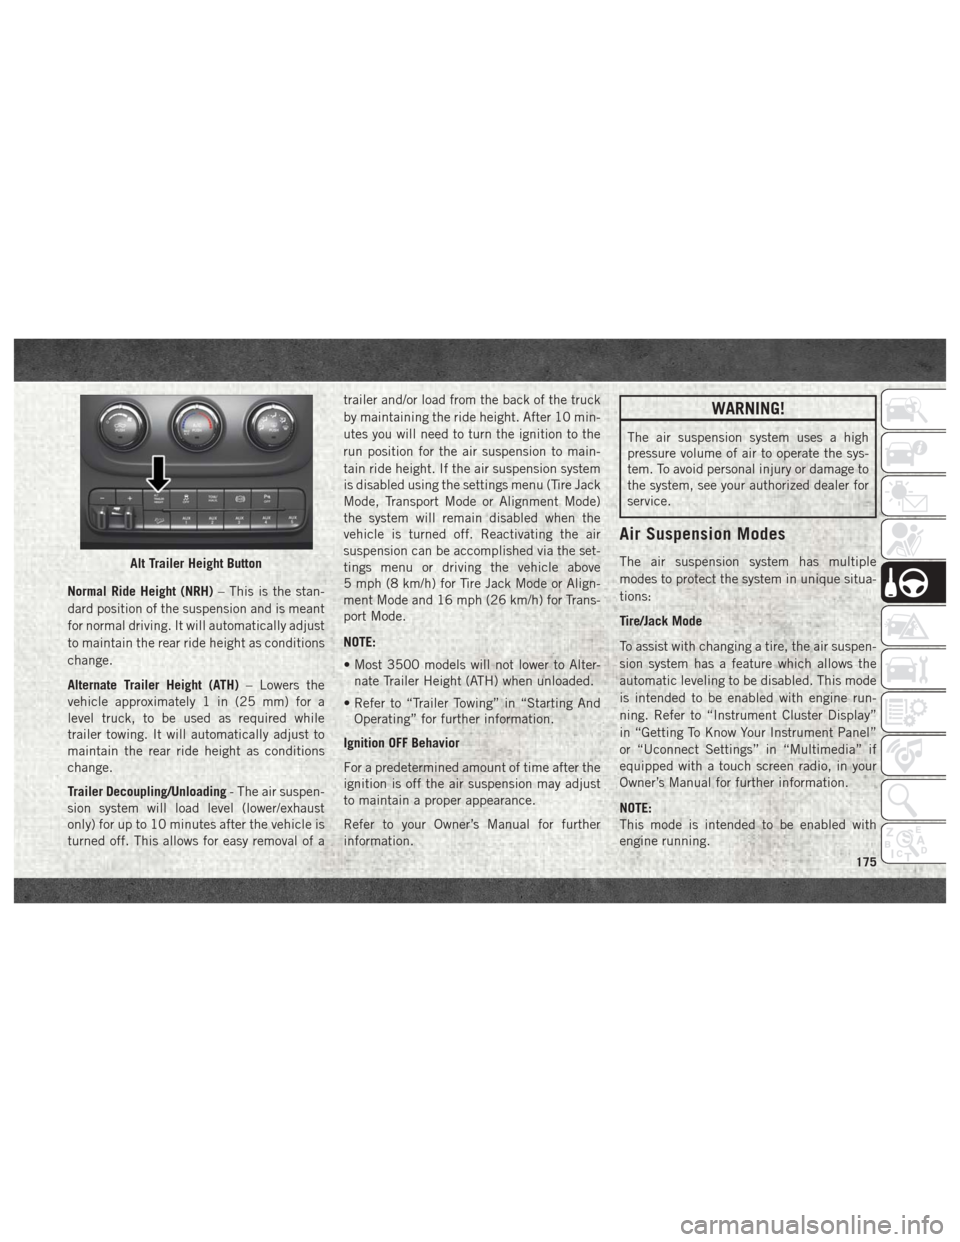
Trailer Decoupling/Unloading - The air suspen-
sion system will load level (lower/exhaust
only) for up to 10 minutes after the vehicle is
turned off. This allows for easy removal of a trailer and/or load from the back of the truck
by maintaining the ride height. After 10 min-
utes you will need to turn the ignition to the
run position for the air suspension to main-
tain ride height. If the air suspension system
is disabled using the settings menu (Tire Jack
Mode, Transport Mode or Alignment Mode)
the system will remain disabled when the
vehicle is turned off. Reactivating the air
suspension can be accomplished via the set-
tings menu or driving the vehicle above
5 mph (8 km/h) for Tire Jack Mode or Align-
ment Mode and 16 mph (26 km/h) for Trans-
port Mode.
NOTE:
• Most 3500 models will not lower to Alter-
nate Trailer Height (ATH) when unloaded.
• Refer to “Trailer Towing” in “Starting And Operating” for further information.
Ignition OFF Behavior
For a predetermined amount of time after the
ignition is off the air suspension may adjust
to maintain a proper appearance.
Refer to your Owner’s Manual for further
information.
WARNING!
The air suspension system uses a high
pressure volume of air to operate the sys-
tem. To avoid personal injury or damage to
the system, see your authorized dealer for
service.
Air Suspension Modes
The air suspension system has multiple
modes to protect the system in unique situa-
tions:
Tire/Jack Mode
To assist with changing a tire, the air suspen-
sion system has a feature which allows the
automatic leveling to be disabled. This mode
is intended to be enabled with engine run-
ning. Refer to “Instrument Cluster Display”
in “Getting To Know Your Instrument Panel”
or “Uconnect Settings” in “Multimedia” if
equipped with a touch screen radio, in your
Owner’s Manual for further information.
NOTE:
This mode is intended to be enabled with
engine running.Alt Trailer Height Button
175
Page 178 of 372
Transport Mode
To assist with flat bed towing, the air suspen-
sion system has a feature which will put the
vehicle below Normal Ride Height (NRH) and
disable the automatic load leveling system.
This mode is intended to be enabled with
engine running. Refer to “Instrument Cluster
Display” in “Getting To Know Your Instru-
ment Panel” or “Uconnect Settings” in “Mul-
timedia” if equipped with a touch screen
radio, in your Owner’s Manual for further
information.
NOTE:
This mode is intended to be enabled with
engine running.
Wheel Alignment Mode
Before performing a wheel alignment this
mode must be enabled. Refer to “Instrument
Cluster Display” in “Getting To Know Your
Instrument Panel” or “Uconnect Settings” in
“Multimedia” if equipped with a touch
screen radio, in your Owner’s Manual for
further information.NOTE:
This mode is intended to be enabled with
engine running.
Protection Strategy
In order to “protect” the air suspension sys-
tem, the vehicle will disable load leveling as
required (suspension overloaded, battery
charge low, etc.). Load leveling will automati-
cally resume as soon as system operation
requirements are met. See your authorized
dealer if system does not resume.
SPEED CONTROL
When engaged, the Speed Control takes over
accelerator operations at speeds greater than
25 mph (40 km/h).
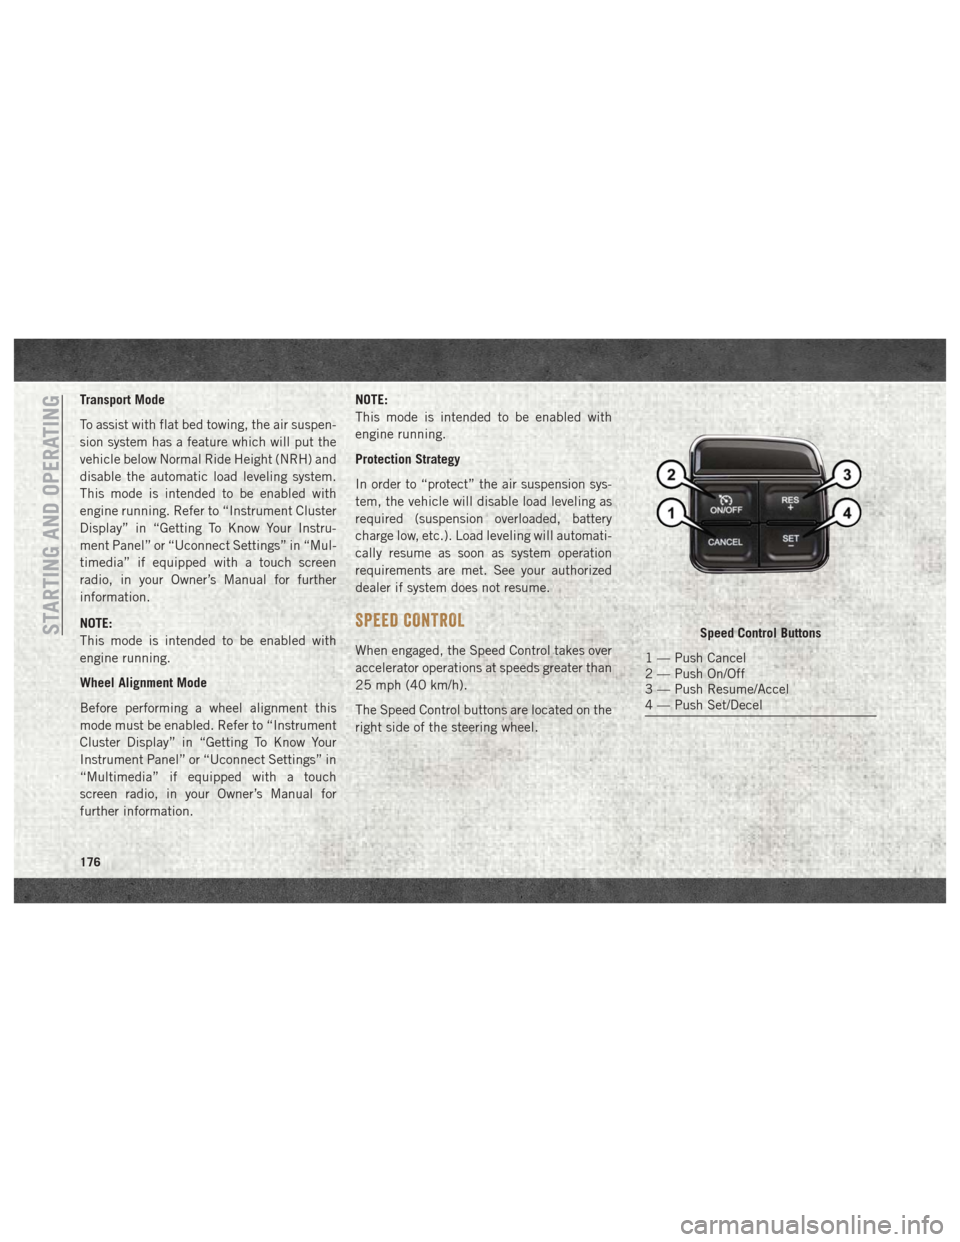
The Speed Control buttons are located on the
right side of the steering wheel.
Speed Control Buttons
1 — Push Cancel
2 — Push On/Off
3 — Push Resume/Accel
4 — Push Set/Decel
STARTING AND OPERATING
176
Page 291 of 372
MULTIMEDIA
CYBERSECURITY..............291
RADIO 3.0 ................. .292
Clock Setting.................293
Audio Setting .................293
Radio Operation ...............293
Disc Operation — If Equipped ......293
USB/Audio Jack (AUX) Manual
Operation ...................294
UCONNECT 3.0 ...............295
Clock Setting.................296
Audio Setting .................296
Radio Operation ...............296
Disc Operation — If Equipped ......296
USB/Audio Jack (AUX) Manual
Operation ...................297
UCONNECT 3 WITH 5-INCH DISPLAY . .298
Controls On The Front Panel .......298
Clock Setting .................299
Equalizer, Balance And Fade .......299
Radio Mode ..................300
Media Mode .................301 Bluetooth Source
..............304
UCONNECT 4C/4C NAV WITH 8.4-INCH
DISPLAY.................. .306
Uconnect 4C/4C NAV At A Glance . . . .306
Personalized Menu Bar...........309
Radio .....................310
Android Auto .................310
Apple CarPlay Integration .........314
SIRIUSXM GUARDIAN — IF EQUIPPED.316
SiriusXM Guardian — If Equipped
(Available on Uconnect 4C NAV) .....316
SiriusXM Guardian Activation ......317
Download The Uconnect App .......318
Renewing Subscriptions (Uconnect 4C
NAV)......................318
Maintaining Your SiriusXM Guardian
Account ...................318
Built-In Features ..............318
SiriusXM Guardian Remote Features . .321
UCONNECT SETTINGS ...........324
TIPS CONTROLS AND GENERAL
INFORMATION ............... .325
Steering Wheel Audio Controls ......325
Reception Conditions ............325
Care And Maintenance ...........325
Anti-Theft Protection ............325
IPOD/USB/MEDIA PLAYER CONTROL . .325
Audio Jack (AUX)..............326
USB Port ...................326
Bluetooth Streaming Audio ........326
NAVIGATION................ .327
Changing The Navigation Voice Prompt
Volume....................327
Finding Points Of Interest .........329
Finding A Place By Spelling The Name .329
One-Step Voice Destination Entry . . . .329
Setting Your Home Location ........329
Home .....................330
Adding A Stop ................330
Taking A Detour ...............330
SiriusXM Traffic Plus (4C NAV) .....330
SiriusXM Travel Link (4C NAV) ......331
UCONNECT PHONE............332
MULTIMEDIA
289
Page 295 of 372
Clock Setting
1. Push the Menu button at the bottom ofthe radio, and push the Enter/Browse but-
ton for System Settings. Next, select the
Time and Format setting and then select
Set Time by pushing the Enter/Browse
button.
2. Adjust the hours or minutes by turning the Tune/Scroll knob, then pushing the Enter/
Browse button to move to the next entry.
You can also select 12hr or 24hr format by
turning the Tune/Scroll knob, then push-
ing the Enter/Browse button on the de-
sired selection.
3. Once the time is set, press the “Ok” button to exit the time screen.
Audio Setting
• Push the AUDIO button on the radio face-plate.
• The Audio Menu shows the following op- tions for you to customize your audio
settings. Treble, Mid, Bass, Fade, Balance, Speed Ad-
justed Volume, Loudness and AUX Offset
• Select the desired setting to adjust, then
push the ENTER/BROWSE button. Turn the
TUNE/SCROLL knob to adjust the setting +
or - . Push the “Back” button when done.
Radio Operation
Seek Up/Down Buttons
• Push the up or down button to seek throughradio stations in AM, FM or SXM bands.
• Hold either button to bypass stations with- out stopping.
Store Radio Presets Manually
The presets are available for all Radio Modes,
and are activated by pushing any of the six
preset buttons. The Radio stores up to
18 presets in each of the Radio modes. Push
the A-B-C button on the faceplate to select
the A, B, or C preset list.
To store a radio preset manually, follow the
steps below:
1. Tune to the desired station. 2. Push and hold the desired numbered but-
ton for more than two seconds, or until you
hear a confirmation beep.
Disc Operation — If Equipped
Your vehicle may have a remote CD player
located in the lower center console storage
bin, or in the lower center bench seat bin.
• CD/Disc Mode is entered by either insertinga CD/Disc or by pushing the MEDIA button
located on the side of the display. Once in
Media Mode, select “Disc.”
Gently insert one CD into the CD player with
the CD label facing as indicated on the illus-
tration located on the Disc player.
Seek Up/Down Buttons
• Push to seek through CD tracks.
• Hold either button to bypass tracks without stopping.
293
Page 298 of 372
Clock Setting
1. Push the Menu button at the bottom ofthe radio, and push the Enter/Browse but-
ton for System Settings. Next, select the
Time and Format setting and then select
Set Time by pushing the Enter/Browse
button.
2. Adjust the hours or minutes by turning the Tune/Scroll knob, then pushing the Enter/
Browse button to move to the next entry.
You can also select 12hr or 24hr format
by turning the Tune/Scroll knob, then
pushing the Enter/Browse button on the
desired selection.
3. Once the time is set, press the “Ok” button to exit the time screen.
Audio Setting
• Push the AUDIO button on the radio face-plate.
• The Audio Menu shows the following op- tions for you to customize your audio
settings. Treble, Mid, Bass, Fade, Balance, Speed Ad-
justed Volume, Loudness and AUX Offset
• Select the desired setting to adjust, then
push the ENTER/BROWSE button. Turn the
TUNE/SCROLL knob to adjust the setting +
or - . Push the “Back” button when done.
Radio Operation
Seek Up/Down Buttons
• Push the up or down button to seek throughradio stations in AM, FM or SXM bands.
• Hold either button to bypass stations with- out stopping.
Store Radio Presets Manually
The presets are available for all Radio Modes,
and are activated by pushing any of the six
preset buttons. The Radio stores up to
18 presets in each of the Radio modes. Push
the A-B-C button on the faceplate to select
the A, B, or C preset list. To store a radio preset manually, follow the
steps below:
1. Tune to the desired station.
2. Push and hold the desired numbered but-
ton for more than two seconds, or until
you hear a confirmation beep.
Disc Operation — If Equipped
Your vehicle may have a remote CD player
located in the lower center console storage
bin, or in the lower center bench seat bin.
• CD/Disc Mode is entered by either insertinga CD/Disc or by pushing the MEDIA button
located on the side of the display. Once in
Media Mode, select “Disc.”
Gently insert one CD into the CD player with
the CD label facing as indicated on the illus-
tration located on the Disc player.
Seek Up/Down Buttons
• Push to seek through CD tracks.
• Hold either button to bypass tracks without stopping.
MULTIMEDIA
296
Page 303 of 372
Seek Previous/Next Buttons
Seek Up
Press and release the “Seek Up”button
on the touchscreen to tune the radio to the
next listenable station or channel.
During a Seek Up function, if the radio
reaches the starting station after passing
through the entire band two times, the radio
will stop at the station where it began.
Fast Seek Up
Press and hold the “Seek Up”button on
the touchscreen to advance the radio through
the available stations or channels at a faster
rate, the radio stops at the next available
station or channel when the button on the
touchscreen is released.
Seek Down
Press and release the “Seek Down”but-
ton on the touchscreen to tune the radio to
the next listenable station or channel.
During a Seek Down function, if the radio
reaches the starting station after passing
through the entire band two times, the radio
will stop at the station where it began. Fast Seek Down
Press and hold the “Seek Down”button
on the touchscreen to advance the radio
through the available stations or channel at a
faster rate, the radio stops at the next avail-
able station or channel when the button on
the touchscreen is released.
Store Radio Presets
The Radio stores up to 12 presets in each of
the Radio modes. There are four visible pre-
sets at the top of the radio screen. Pressing
the “All” button on the touchscreen on the
radio home screen will display all of the
preset stations for that mode.
To store a radio preset manually, follow the
steps below:
1. Tune to the desired station.
2. Press and hold the desired numbered but- ton on the touchscreen for more than two
seconds or until you hear a confirmation
beep.
Media Mode
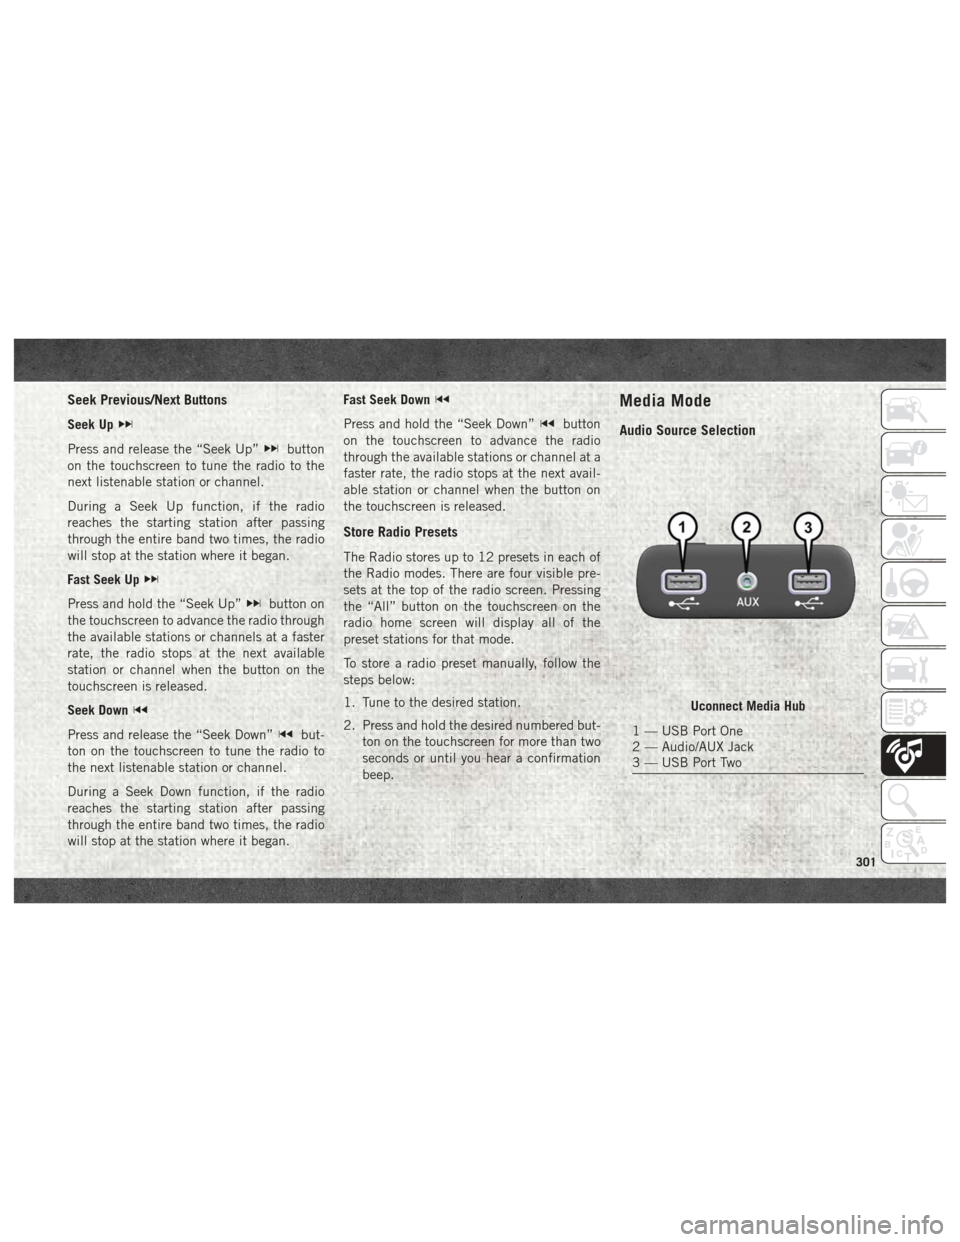
Audio Source Selection
Uconnect Media Hub
1 — USB Port One
2 — Audio/AUX Jack
3 — USB Port Two
301
Page 309 of 372
WARNING!
ALWAYS drive safely with your hands on
the wheel. You have full responsibility and
assume all risks related to the use of the
Uconnect features, SiriusXM Guardian
services, and applications in this vehicle.
Only use Uconnect features and SiriusXM
Guardian services when it is safe to do so.
Failure to do so may result in an accident
involving serious injury or death.
CAUTION!
Do NOT attach any object to the touch-
screen, doing so can result in damage to
the screen.
NOTE:
Uconnect screen images are for illustration
purposes only and may not reflect exact soft-
ware for your vehicle. Setting The Time
• Model 4C NAV synchronizes time automati-
cally via GPS, so it should not require any
time adjustment. If you do need to set the
time manually, follow the instructions be-
low for Model 4C NAV.
• For Model 4C, turn the unit on, and then press the time display at the top of the
screen. Press “Yes.”
• If the time is not displayed at the top of the screen, press the “Settings” button on the
touchscreen. In the Settings screen, press
the “Clock” button on the touchscreen,
then check or uncheck this option.
• Press “+” or “–” next to Set Time Hours and Set Time Minutes to adjust the time.
• If these features are not available, uncheck the Sync Time box.
• Press “X” to save your settings and exit out of the Clock Setting screen. Background Themes
• Screen background themes are selectable
from a pre-loaded list of themes. If you’d
like to set a theme, follow the instructions
below.
• Press the “Settings” button on the touch- screen.
• Press the “Display” button on the touch- screen.
• Then press “Set Theme” button on the touchscreen and select a theme.
Audio Settings
• Press of the “Audio” button on the touch- screen to activate the Audio settings screen
to adjust Balance\Fade, Equalizer, and
Speed Adjusted Volume.
• You can return to the Radio screen by pressing the “X” located at the top right.
Balance/Fade
• Press the “Balance/Fade” button on the touchscreen to Balance audio between the
front speakers or fade the audio between
the rear and front speakers.
307
Page 312 of 372
1. Press the “Apps” button to open the
App screen.
2. Press and hold, then drag the selected App to replace an existing shortcut in the
main menu bar.
The new app shortcut, that was dragged
down onto the main menu bar, will now
be an active App/shortcut.
NOTE:
This feature is only available if the vehicle is
in PARK.
Radio
WARNING!
ALWAYS drive safely with your hands on
the wheel. You have full responsibility and
assume all risks related to the use of the
Uconnect features, SiriusXM Guardian
services, and applications in this vehicle.
Only use Uconnect features and SiriusXM
Guardian services when it is safe to do so.
Failure to do so may result in an accident
involving serious injury or death. • To access the Radio mode, press the “Ra-
dio” button on the touchscreen.
Selecting Radio Stations
• Press the desired radio band (AM, FM or SXM) button on the touchscreen.
Seek Up/Seek Down
• Press the Seek up or down arrow buttons on the touchscreen for less than two seconds
to seek through radio stations.
• Press and hold either arrow button on the touchscreen for more than two seconds to
bypass stations without stopping. The radio
will stop at the next listenable station once
the arrow button on the touchscreen is
released.
Direct Tune
• Tune directly to a radio station by pressing the “Tune” button on the screen, and en-
tering the desired station number.
Store Radio Presets Manually
Your radio can store 36 total preset stations,
12 presets per band (AM, FM and SXM). They
are shown at the top of your radio screen. To see the 12 preset stations per band, press the
arrow button on the touchscreen at the top
right of the screen to toggle between the two
sets of six presets.
To store a radio preset manually, follow the
steps below:
1. Tune to the desired station.
2. Press and hold the desired numbered but-
ton on the touchscreen for more than two
seconds or until you hear a confirmation
beep.
HD Radio — If Equipped
• HD Radio (available on Uconnect 4C/4C NAV) operates similar to conventional radio
except it allows broadcasters to transmit a
high-quality digital signal.
• With an HD radio receiver, the listener is provided with a clear sound that enhances
the listening experience. HD radio can also
transmit data such as song title or artist.
Android Auto
Android Auto is a feature of your Uconnect
system, and your Android 5.0 Lollipop, or
higher, powered smartphone with a data
MULTIMEDIA
310