seat adjustment Ram 3500 2018 User Guide
[x] Cancel search | Manufacturer: RAM, Model Year: 2018, Model line: 3500, Model: Ram 3500 2018Pages: 372, PDF Size: 7.1 MB
Page 11 of 372

GETTING TO KNOW YOUR VEHICLE
VEHICLE USER GUIDE — IF EQUIPPED .11
KEYS......................13
Key Fobs ....................13
IGNITION SWITCH ..............17
Wireless Ignition Node (WIN) — If
Equipped....................17
Keyless Push Button Ignition — If
Equipped ....................17
REMOTE START — IF EQUIPPED .....17
To Enter Remote Start Mode........17
To Exit Remote Start Mode Without
Driving The Vehicle .............18
To Exit Remote Start Mode And Drive
The Vehicle ...................18
General Information .............18
VEHICLE SECURITY ALARM ........18
To Arm The System..............18
To Disarm The System ............19
DOORS.....................19
Keyless Enter-N-Go — Passive Entry . . .19
SEATS .....................22
Driver Memory Seat — If Equipped ....22
Heated Seats ..................25
HEAD RESTRAINTS ..............27
Front Head Restraint Adjustment .....27
Rear Head Restraint Adjustment ......28
Front Head Restraint Removal .......28
Rear Head Restraint Removal ........28
STEERING WHEEL..............29
Tilt Steering Column .............29
Heated Steering Wheel — If Equipped . .29
DRIVER ADJUSTABLE PEDALS — IF
EQUIPPED ...................30
MIRRORS ...................31
Power Folding Outside Mirrors For Standard
And Trailer Tow — If Equipped .......31
EXTERIOR LIGHTS..............32
Headlight Switch...............32
Headlights ...................32
Multifunction Lever .............32
High/Low Beam Switch ...........32Automatic High Beam Headlamp Control —
If Equipped
..................33
Automatic Headlights — If Equipped . .33
Parking Lights And Panel Lights ......33
Turn Signals ..................33
Lane Change Assist — If Equipped ....34
Cargo Light With Bed Lights —
If Equipped ..................34
WINDSHIELD WIPERS AND WASHERS .35
Windshield Wipers ..............35
CLIMATE CONTROLS .............36
Manual Climate Controls With A
Touchscreen..................36
Automatic Climate Controls With A
Touchscreen ..................41
Climate Control Functions ..........46
Automatic Temperature Control (ATC) —
If Equipped ...................47
Operating Tips .................48
POWER SUNROOF — IF EQUIPPED ....49
Opening Sunroof...............49
Closing Sunroof ................49
GETTING TO KNOW YOUR VEHICLE
9
Page 29 of 372

If your vehicle is equipped with a touch-
screen, this feature can be programmed
through the Uconnect system. Refer to
“Uconnect Settings” in “Multimedia” in the
Owner’s Manual for further information.
If your vehicle is not equipped with a touch-
screen, this feature can be programmed
through the instrument cluster display. Refer
to “Instrument Cluster Display” in “Getting
To Know Your Instrument Panel” in the Own-
er’s Manual for further information.
HEAD RESTRAINTS
Head restraints are designed to reduce the
risk of injury by restricting head movement in
the event of a rear impact. Head restraints
should be adjusted so that the top of the head
restraint is located above the top of your ear.
WARNING!
• All occupants, including the driver,should not operate a vehicle or sit in a
vehicle’s seat until the head restraints
are placed in their proper positions in
order to minimize the risk of neck injury
in the event of a crash.
• Head restraints should never be ad-
justed while the vehicle is in motion.
Driving a vehicle with the head restraints
improperly adjusted or removed could
cause serious injury or death in the event
of a collision.
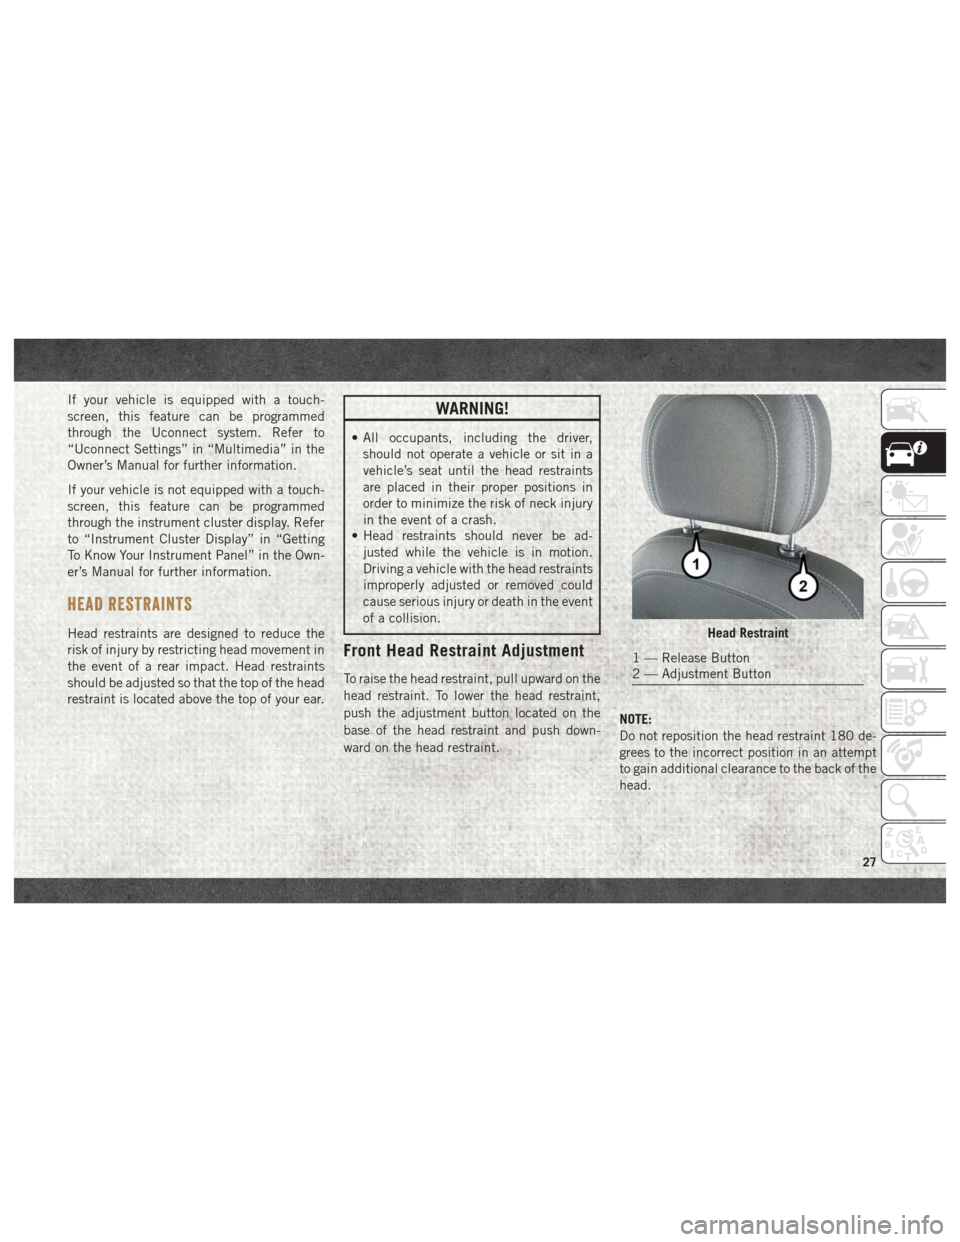
Front Head Restraint Adjustment
To raise the head restraint, pull upward on the
head restraint. To lower the head restraint,
push the adjustment button located on the
base of the head restraint and push down-
ward on the head restraint. NOTE:
Do not reposition the head restraint 180 de-
grees to the incorrect position in an attempt
to gain additional clearance to the back of the
head.
Head Restraint
1 — Release Button
2 — Adjustment Button
27
Page 30 of 372

Rear Head Restraint Adjustment
The rear seats are equipped with adjustable
and removable head restraints. To raise the
head restraint, pull upward on the head re-
straint. To lower the head restraint, push the
adjustment button located on the base of the
head restraint and push downward on the
head restraint.
NOTE:
• The rear center head restraint (Crew Caband Quad Cab) has only one adjustment
position that is used to aid in the routing of
a tether. Refer to “Occupant Restraints” in
“Safety” in the Owner's Manual for further
information.
• Do not reposition the head restraint 180 degrees to the incorrect position in an
attempt to gain additional clearance to the
back of the head.
Front Head Restraint Removal
To remove the head restraint, raise it up as far
as it can go. Then, push the adjustment
button and the release button at the base of
each post while pulling the head restraint up. To reinstall the head restraint, put the head
restraint posts into the holes. Then, adjust it
to the appropriate height.
NOTE:
Do not reposition the head restraint 180 de-
grees to the incorrect position in an attempt
to gain additional clearance to the back of the
head.
WARNING!
• A loose head restraint thrown forward in
a collision or hard stop could cause
serious injury or death to occupants of
the vehicle. Always securely stow re-
moved head restraints in a location out-
side the occupant compartment.
• ALL the head restraints MUST be rein-
stalled in the vehicle to properly protect
the occupants. Follow the re-installation
instructions above prior to operating the
vehicle or occupying a seat.
Rear Head Restraint Removal
To remove the head restraint, push the ad-
justment button and the release button while
pulling upward on the whole assembly. To
reinstall the head restraint, put the head
restraint posts into the holes and adjust it to
the appropriate height.
NOTE:
To remove outboard restraints, the rear seat
bottom must be folded up.
WARNING!
• A loose head restraint thrown forward ina collision or hard stop could cause
serious injury or death to occupants of
the vehicle. Always securely stow re-
moved head restraints in a location out-
side the occupant compartment.
• ALL the head restraints MUST be rein-
stalled in the vehicle to properly protect
the occupants. Follow the re-installation
instructions above prior to operating the
vehicle or occupying a seat.
GETTING TO KNOW YOUR VEHICLE
28
Page 32 of 372

This feature can be programmed through the
Uconnect system. Refer to “Uconnect Set-
tings” in “Multimedia” in the Owner’s
Manual for further information.
WARNING!
• Persons who are unable to feel pain tothe skin because of advanced age,
chronic illness, diabetes, spinal cord in-
jury, medication, alcohol use, exhaus-
tion, or other physical conditions must
exercise care when using the steering
wheel heater. It may cause burns even at
low temperatures, especially if used for
long periods.
• Do not place anything on the steering
wheel that insulates against heat, such
as a blanket or steering wheel covers of
any type and material. This may cause
the steering wheel heater to overheat.
DRIVER ADJUSTABLE PEDALS — IF
EQUIPPED
The adjustable pedals system is designed to
allow a greater range of driver comfort for
steering wheel tilt and seat position. This
feature allows the brake, accelerator, and
clutch pedals (if equipped) to move toward or
away from the driver to provide improved
position with the steering wheel.
The adjustable pedal switch is located to the
left side of the steering column.
• The pedals can be adjusted with the igni-
tion OFF.
• The pedals cannotbe adjusted when the
vehicle is in REVERSE or when the Speed
Control System is on. The following mes-
sages will appear on vehicles equipped with
an instrument cluster display if the pedals
are attempted to be adjusted when the
system is locked out: “Adjustable Pedal
Disabled — Cruise Control Engaged” or
“Adjustable Pedal Disabled — Vehicle In
Reverse”. NOTE:
• Always adjust the pedals to a position that
allows full pedal travel.
• Further small adjustments may be neces- sary to find the best possible seat/pedal
position.
• For vehicles equipped with Driver Memory Seat, you can use your remote keyless entry
key fob or the memory switch on the driver’s
door trim panel to return the adjustable
pedals to pre-programmed positions. Refer
to “Driver Memory Seat” in “Getting To
Know Your Vehicle” for further information.
WARNING!
Do not adjust the pedals while the vehicle
is moving. You could lose control and have
an accident. Always adjust the pedals
while the vehicle is parked.
CAUTION!
Do not place any article under the adjust-
able pedals or impede its ability to move,
as it may cause damage to the pedal con-
GETTING TO KNOW YOUR VEHICLE
30
Page 101 of 372

As a guide, if you are shorter than average,
you will prefer the shoulder belt anchorage in
a lower position, and if you are taller than
average, you will prefer the shoulder belt
anchorage in a higher position. After you
release the anchorage button, try to move it
up or down to make sure that it is locked in
position.
NOTE:
The adjustable upper shoulder belt anchor-
age is equipped with an Easy Up feature. This
feature allows the shoulder belt anchorage to
be adjusted in the upward position without
pushing or squeezing the release button. To
verify the shoulder belt anchorage is latched,
pull downward on the shoulder belt anchor-
age until it is locked into position.
WARNING!
• Wearing your seat belt incorrectly couldmake your injuries in a collision much
worse. You might suffer internal injuries,
or you could even slide out of the seat
belt. Follow these instructions to wear
WARNING!
your seat belt safely and to keep your
passengers safe, too.
• Position the shoulder belt across the
shoulder and chest with minimal, if any
slack so that it is comfortable and not
resting on your neck. The retractor will
withdraw any slack in the shoulder belt.
• Misadjustment of the seat belt could
reduce the effectiveness of the safety
belt in a crash.
First Row Center Seat Belt Operating In-
structions (Regular Cab Only)
The first row center seat belt (Regular Cab
only) features a seat belt with a mini-latch
plate and buckle, which allows the seat belt
to detach from the lower anchor when the
seat is folded. The latch plate and regular
latch plate can then be stored out of the way
in the seat for added convenience to open up
utilization of the storage areas behind the
front seats when the seat is not occupied. 1. Remove the mini-latch plate and regular
latch plate from its stowed position on the
seat.
Connect Mini-Latch To Mini-Buckle
99
Page 363 of 372

Phone (Uconnect)..............332
Pickup Box ..............57, 59, 63
Placard, Tire And Loading Information .261
Power Distribution Center (Fuses) ......203
Outlet (Auxiliary Electrical
Outlet) ................55, 56
Sunroof ..................49
Power Steering Fluid ............282
Pregnant Women And Seat Belts .....101
Pretensioners Seat Belts ................102
Radial Ply Tires ...............266
Radio Presets ........293, 296, 301, 310
Radio 3.0 ...................292
Radio Frequency General Information ......16, 18, 21
Radio Operation ...............300
Radio Screens ................306
Radio (Sound Systems) ..........300
Rear Cargo Area Utility Rails ........62
Rear ParkSense System ..........179
Rear Seat, Folding ..............22
Recreational Towing .............196 Shifting Into Transfer Case
Neutral (N)
...............198
Shifting Out Of Transfer Case
Neutral (N) ...............199
Release, Hood .................50
Reminder, Lights On .............32
Reminder, Seat Belt .............94
Remote Keyless Entry ............15
Panic Alarm ................15
Remote Starting Exit Remote Start Mode ........18
Replacement Bulbs .............202
Replacement Tires .............267
Reporting Safety Defects ..........354
Resetting Perform Service Indicator . . .239
Restraint, Head ................27
Restraints, Child ...............115
Safety Checks Inside Vehicle .......134
Safety Checks Outside Vehicle ......136
Safety Defects, Reporting .........354
Safety, Exhaust Gas .............134
Safety
Information, Tire ..........257
Safety Tips ..................134
Schedule, Maintenance .......230, 234
SD Card Port .................325 Seat Belt
Adjustable Upper Shoulder Belt
Anchorage .................98
Automatic Locking Retractor (ALR) .102
Energy Management Feature .....102
Lap/Shoulder Belt Operation ......97
Lap/Shoulder Belt Untwisting .....98
Pregnant Women ............101
Seat Belt Extender ...........101
Seat Belt Pretensioner ........102
Seat Belt Reminder ............94
Seat Belt Reminder ..............94
Seat Belts ................94, 134
Adjustable Shoulder Belt ........98
Adjustable Upper Shoulder
Anchorage .................98
Child Restraint .............115
Extender .................101
Front Seat ..............94, 97
Inspection ................134
Operating Instructions .........97
Pregnant Women ............101
Pretensioners ..............102
Reminder .................76
Untwisting Procedure ..........98
Seats ......................22
Adjustment ................22
361