engine oil Ram 3500 2020 Owner's Manual
[x] Cancel search | Manufacturer: RAM, Model Year: 2020, Model line: 3500, Model: Ram 3500 2020Pages: 568
Page 6 of 568
4
GARAGE DOOR OPENER — IF EQUIPPED .........76 Before You Begin Programming
HomeLink® .................................................. 76 Canadian/Gate Operator Programming ..... 79
Using HomeLink® ........................................ 79
Security......................................................... 80
Troubleshooting Tips ................................... 80
General Information .................................... 80
INTERNAL EQUIPMENT ........................................81
Storage ......................................................... 81
Cupholders .................................................. 86
Electrical Power Outlets .............................. 86
Power Inverter — If Equipped ..................... 88
Wireless Charging Pad — If Equipped ........ 89
Overhead Sunglass Storage........................ 90
PICKUP BOX .........................................................90
Cargo Camera — If Equipped ...................... 91
RAMBOX — IF EQUIPPED .....................................92
RamBox Integrated Box Side
Storage Bins ................................................. 92 RamBox Safety Warning .............................. 94
Bed Divider — If Equipped ........................... 94
Bed Rail Tie-Down System — If Equipped .. 96
SLIDE-IN CAMPERS .............................................98
Camper Applications ................................... 98 EASY-OFF TAILGATE ........................................... 98
Disconnecting The Rear Camera And
Remote Keyless Entry ................................. 98 Removing The Tailgate ................................ 99
Locking Tailgate ........................................... 99
TRI-FOLD TONNEAU COVER — IF EQUIPPED ..100
Tri-Fold Tonneau Cover Removal.............. 100
Tri-Fold Tonneau Cover Installation.......... 102Tri-Fold Tonneau Cover Cleaning .............. 105
GETTING TO KNOW YOUR
INSTRUMENT PANEL
BASE / MIDLINE INSTRUMENT CLUSTER —
GAS ENGINE........................................................ 106
Base / Midline Instrument Cluster
Descriptions — Gas Engine ....................... 106
PREMIUM INSTRUMENT CLUSTER —
GAS ENGINE........................................................ 108
Premium Instrument Cluster
Descriptions — Gas Engine ....................... 108
BASE INSTRUMENT CLUSTER —
DIESEL ENGINE ................................................. 110
Base Instrument Cluster Descriptions —
Diesel Engine ............................................. 110 PREMIUM INSTRUMENT CLUSTER —
DIESEL ENGINE .................................................. 112
Premium Instrument Cluster
Descriptions — Diesel Engine ................... 112
INSTRUMENT CLUSTER DISPLAY ................... 113
Instrument Cluster Display Controls ........ 114
Oil Life Reset ............................................. 115
Display Menu Items ................................... 116
Diesel Messages And Warnings — 6.7L
Cummins Diesel Engine ............................ 125 Battery Saver On/Battery Saver Mode
Message — Electrical Load Reduction
Actions — If Equipped ............................... 129
WARNING LIGHTS AND MESSAGES ............... 130
Red Warning Lights ................................... 130
Yellow Warning Lights ............................... 133Yellow Indicator Lights .............................. 138
Green Indicator Lights ............................... 140White Indicator Lights ............................... 141Blue Indicator Lights ................................. 142
ONBOARD DIAGNOSTIC SYSTEM — OBD II ... 142
Onboard Diagnostic System
(OBD II) Cybersecurity ............................... 142
EMISSIONS INSPECTION AND MAINTENANCE
PROGRAMS ....................................................... 143
20_DJD2_OM_EN_USC_t.book Page 4
Page 10 of 568

8
BULB REPLACEMENT ....................................... 351 Replacement Bulbs ..................................351Replacing Exterior Bulbs ...........................353
FUSES .................................................................. 358
Power Distribution Center .........................358
JACKING AND TIRE CHANGING ...................... 365
Jack Location .............................................365Removal Of Jack And Tools .......................365
Removing The Spare Tire ..........................367
Preparations For Jacking...........................368
Jacking Instructions ...................................368
To Stow The Flat Or Spare ........................ 372Reinstalling The Jack And Tools ...............373
Hub Caps/Wheel Covers — If Equipped ...374
JUMP STARTING ................................................ 375
Preparations For Jump Start .....................375Jump Starting Procedure...........................376
GEAR SELECTOR OVERRIDE — 6–SPEED
TRANSMISSION ................................................ 377
MANUAL PARK RELEASE — 8 – SPEED
TRANSMISSION ................................................ 378
IF YOUR ENGINE OVERHEATS ......................... 379
FREEING A STUCK VEHICLE ............................ 380 TOWING A DISABLED VEHICLE .......................381
Two-Wheel Drive Models ........................... 382
Four-Wheel Drive Models .......................... 383Emergency Tow Hooks — If Equipped ...... 384
ENHANCED ACCIDENT RESPONSE
SYSTEM (EARS) ................................................. 384
EVENT DATA RECORDER (EDR) .......................384
SERVICING AND MAINTENANCE
SCHEDULED SERVICING — GAS ENGINE .......385
Maintenance Plan — Gasoline Engine...... 386
Heavy Duty Use Of The Vehicle................. 389
SCHEDULED SERVICING— DIESEL ENGINE .... 389
Oil Change Indicator System —
Cummins Diesel......................................... 390 Perform Service Indicator —
Cummins Diesel ........................................ 390 Maintenance Plan — Cummins Diesel
Engine ........................................................ 391
ENGINE COMPARTMENT .................................. 396
6.4L Engine ................................................ 396
6.7L Diesel Engine — Six-Speed 68RFE ... 397
6.7L Diesel Engine — Six-Speed AISIN
(AS69RC HD) .............................................. 398 Checking Oil Level — Gas Engine ............. 399
Checking Oil Level — Diesel Engine .......... 399
Adding Washer Fluid ................................. 399Maintenance-Free Battery ....................... 400Pressure Washing...................................... 400
DEALER SERVICE .............................................. 401
Engine Oil .................................................. 401
Engine Oil Filter ......................................... 403Engine Air Cleaner Filter ........................... 403
Air Conditioner Maintenance ................... 405
Accessory Drive Belt Inspection ............... 408Draining Fuel/Water Separator Filter —
Diesel Engine ............................................ 409 Engine Mounted Fuel Filter
Replacement — Diesel Engine .................. 410 Underbody Mounted Fuel Filter
Replacement — Diesel Engine .................. 412 Priming If The Engine Has Run Out Of
Fuel — Diesel Engine ................................. 412 Intervention Regeneration Strategy —
Message Process Flow ............................. 413 Diesel Exhaust Fluid .................................. 414
Body Lubrication ........................................ 414
20_DJD2_OM_EN_USC_t.book Page 8
Page 109 of 568
GETTING TO KNOW YOUR INSTRUMENT PANEL107
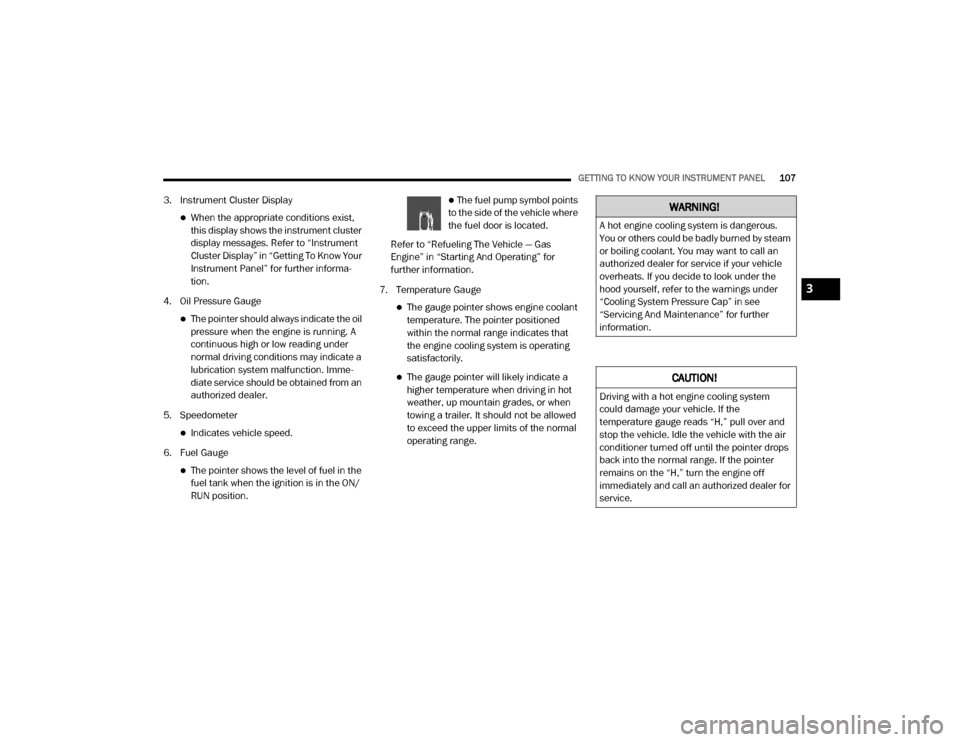
3. Instrument Cluster Display
When the appropriate conditions exist,
this display shows the instrument cluster
display messages. Refer to “Instrument
Cluster Display” in “Getting To Know Your
Instrument Panel” for further informa-
tion.
4. Oil Pressure Gauge
The pointer should always indicate the oil
pressure when the engine is running. A
continuous high or low reading under
normal driving conditions may indicate a
lubrication system malfunction. Imme -
diate service should be obtained from an
authorized dealer.
5. Speedometer
Indicates vehicle speed.
6. Fuel Gauge
The pointer shows the level of fuel in the
fuel tank when the ignition is in the ON/
RUN position.
The fuel pump symbol points
to the side of the vehicle where
the fuel door is located.
Refer to “Refueling The Vehicle — Gas
Engine” in “Starting And Operating” for
further information.
7. Temperature Gauge
The gauge pointer shows engine coolant
temperature. The pointer positioned
within the normal range indicates that
the engine cooling system is operating
satisfactorily.
The gauge pointer will likely indicate a
higher temperature when driving in hot
weather, up mountain grades, or when
towing a trailer. It should not be allowed
to exceed the upper limits of the normal
operating range.
WARNING!
A hot engine cooling system is dangerous.
You or others could be badly burned by steam
or boiling coolant. You may want to call an
authorized dealer for service if your vehicle
overheats. If you decide to look under the
hood yourself, refer to the warnings under
“Cooling System Pressure Cap” in see
“Servicing And Maintenance” for further
information.
CAUTION!
Driving with a hot engine cooling system
could damage your vehicle. If the
temperature gauge reads “H,” pull over and
stop the vehicle. Idle the vehicle with the air
conditioner turned off until the pointer drops
back into the normal range. If the pointer
remains on the “H,” turn the engine off
immediately and call an authorized dealer for
service.
3
20_DJD2_OM_EN_USC_t.book Page 107
Page 111 of 568
GETTING TO KNOW YOUR INSTRUMENT PANEL109
The fuel pump symbol points
to the side of the vehicle where
the fuel door is located.
Refer to “Refueling The Vehicle — Gas
Engine” in “Starting And Operating” for
further information.
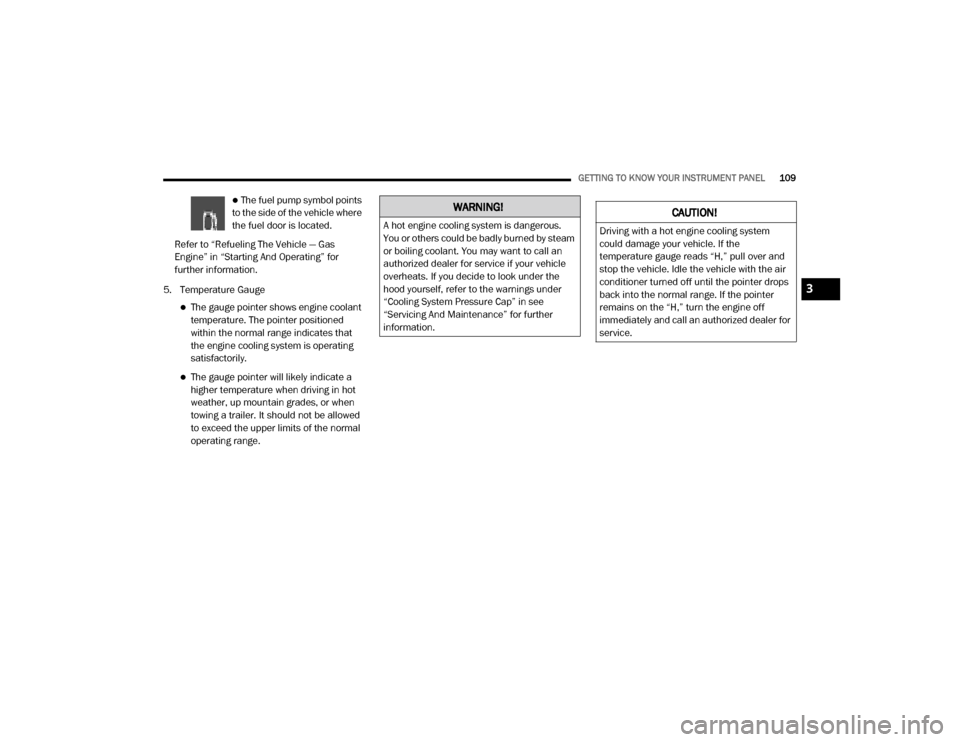
5. Temperature Gauge
The gauge pointer shows engine coolant
temperature. The pointer positioned
within the normal range indicates that
the engine cooling system is operating
satisfactorily.
The gauge pointer will likely indicate a
higher temperature when driving in hot
weather, up mountain grades, or when
towing a trailer. It should not be allowed
to exceed the upper limits of the normal
operating range.
WARNING!
A hot engine cooling system is dangerous.
You or others could be badly burned by steam
or boiling coolant. You may want to call an
authorized dealer for service if your vehicle
overheats. If you decide to look under the
hood yourself, refer to the warnings under
“Cooling System Pressure Cap” in see
“Servicing And Maintenance” for further
information.
CAUTION!
Driving with a hot engine cooling system
could damage your vehicle. If the
temperature gauge reads “H,” pull over and
stop the vehicle. Idle the vehicle with the air
conditioner turned off until the pointer drops
back into the normal range. If the pointer
remains on the “H,” turn the engine off
immediately and call an authorized dealer for
service.
3
20_DJD2_OM_EN_USC_t.book Page 109
Page 113 of 568
GETTING TO KNOW YOUR INSTRUMENT PANEL111
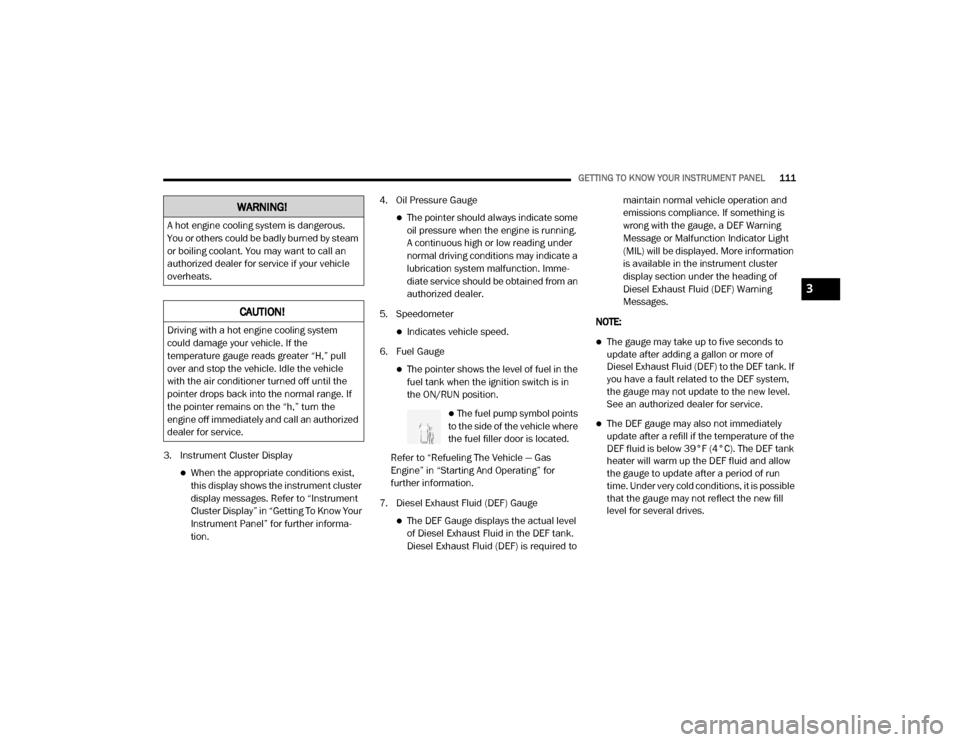
3. Instrument Cluster Display
When the appropriate conditions exist,
this display shows the instrument cluster
display messages. Refer to “Instrument
Cluster Display” in “Getting To Know Your
Instrument Panel” for further informa-
tion. 4. Oil Pressure Gauge
The pointer should always indicate some
oil pressure when the engine is running.
A continuous high or low reading under
normal driving conditions may indicate a
lubrication system malfunction. Imme
-
diate service should be obtained from an
authorized dealer.
5. Speedometer
Indicates vehicle speed.
6. Fuel Gauge
The pointer shows the level of fuel in the
fuel tank when the ignition switch is in
the ON/RUN position.
The fuel pump symbol points
to the side of the vehicle where
the fuel filler door is located.
Refer to “Refueling The Vehicle — Gas
Engine” in “Starting And Operating” for
further information.
7. Diesel Exhaust Fluid (DEF) Gauge
The DEF Gauge displays the actual level
of Diesel Exhaust Fluid in the DEF tank.
Diesel Exhaust Fluid (DEF) is required to maintain normal vehicle operation and
emissions compliance. If something is
wrong with the gauge, a DEF Warning
Message or Malfunction Indicator Light
(MIL) will be displayed. More information
is available in the instrument cluster
display section under the heading of
Diesel Exhaust Fluid (DEF) Warning
Messages.
NOTE:
The gauge may take up to five seconds to
update after adding a gallon or more of
Diesel Exhaust Fluid (DEF) to the DEF tank. If
you have a fault related to the DEF system,
the gauge may not update to the new level.
See an authorized dealer for service.
The DEF gauge may also not immediately
update after a refill if the temperature of the
DEF fluid is below 39°F (4°C). The DEF tank
heater will warm up the DEF fluid and allow
the gauge to update after a period of run
time. Under very cold conditions, it is possible
that the gauge may not reflect the new fill
level for several drives.
WARNING!
A hot engine cooling system is dangerous.
You or others could be badly burned by steam
or boiling coolant. You may want to call an
authorized dealer for service if your vehicle
overheats.
CAUTION!
Driving with a hot engine cooling system
could damage your vehicle. If the
temperature gauge reads greater “H,” pull
over and stop the vehicle. Idle the vehicle
with the air conditioner turned off until the
pointer drops back into the normal range. If
the pointer remains on the “h,” turn the
engine off immediately and call an authorized
dealer for service.
3
20_DJD2_OM_EN_USC_t.book Page 111
Page 117 of 568
GETTING TO KNOW YOUR INSTRUMENT PANEL115
Up Arrow Button
Push and release the up arrow
button to scroll upward through the
main menu items, submenu
screen, and vehicle settings.
Down Arrow Button
Push and release the down arrow
button to scroll downward through
the main menu items, submenu
screen, and vehicle settings.
Right Arrow Button
Push and release the right arrow
button to access/select the infor -
mation screens or submenu
screens of a main menu item. Push
and hold the right arrow button for two
seconds to reset displayed/selected features
that can be reset.
Left Arrow Button
Push and release the left arrow
button to access/select the infor -
mation screens, submenu screens
of a main menu item, or to return to
the main menu.
OIL LIFE RESET
Your vehicle is equipped with an engine oil
change indicator system. The “Oil Change
Required” message will display in the
instrument cluster display after a single chime
has sounded, to indicate the next scheduled oil
change interval. The engine oil change indicator
system is duty cycle based, which means the
engine oil change interval may fluctuate,
dependent upon your personal driving style.
NOTE:
Use the steering wheel instrument cluster
display controls for the following procedure.
Oil Life Reset Procedure
1. Without pushing the brake pedal, push the ENGINE START/STOP button and place the
ignition to the ON/RUN position (do not
start the engine).
2. Push and release the down arrow button to
scroll downward through the main menu to
“Vehicle Info.”
3. Push and release the right arrow button to
access the ”Vehicle Info” screen, then scroll
up or down to select “Oil Life.” 4. Push and hold the
right arrow button to
select “Reset”.
5. Push and release the down arrow button to
select “Yes,” then push and release the
right arrow button to reset the Oil Life to
100%.
6. Push and release the up arrow button to exit
the instrument cluster display screen.
Secondary Method Of Resetting Engine Oil Life
1. Without pressing the brake pedal, push the ENGINE START/STOP button and place the
ignition to the ON/RUN position (do not
start the engine).
2. Fully press the accelerator pedal, slowly, three times within ten seconds.
3. Without pushing the brake pedal, push the ENGINE START/STOP button once to return
the ignition to the OFF/LOCK position.
NOTE:
If the indicator message illuminates when you
start the vehicle, the oil change indicator
system did not reset. If necessary, repeat this
procedure.
3
20_DJD2_OM_EN_USC_t.book Page 115
Page 118 of 568
116GETTING TO KNOW YOUR INSTRUMENT PANEL
DISPLAY MENU ITEMS
Push and release the up or down arrow button
until the desired selectable menu icon is
highlighted in the instrument cluster display.
Refer to “Instrument Cluster Display” in this
chapter for further information.
Speedometer
Push and release the up or down arrow button
until the speedometer menu item is highlighted
in the instrument cluster display. Push and
release the right arrow button to cycle the
display between mph and km/h.
Vehicle Info
Push and release the up or down arrow button
until the Vehicle Info menu item is highlighted in
the instrument cluster display. Push and
release the right arrow button to enter the
submenus items of Vehicle Info. Follow the
directional prompts to access or reset any of the
following Vehicle Info submenu items:
Tire Pressure
Coolant Temperature
Transmission Temperature — If Equipped
Oil Temperature
Oil Pressure
Exhaust Brake — If Equipped
Turbo Boost — If Equipped
Oil Life
Fuel Filter Life — If Equipped
Battery Voltage
Gauge Summary
Engine Hours
Driver Assist — If Equipped
The Driver Assist menu displays the status of
the Adaptive Cruise Control (ACC) and
LaneSense systems.
Push and release the up or down arrow button
until the Driver Assist menu is displayed in the
instrument cluster display.
Adaptive Cruise Control (ACC) Feature
The instrument cluster display displays the
current ACC system settings. The information
displayed depends on ACC system status. Push the Adaptive Cruise Control (ACC) on/off
button (located on the steering wheel) until one
of the following displays in the instrument
cluster display:
Adaptive Cruise Control Off
When ACC is deactivated, the display will read
“Adaptive Cruise Control Off.”
Adaptive Cruise Control Ready
When ACC is activated but the vehicle speed
setting has not been selected, the display will
read “Adaptive Cruise Control Ready.”
Push the SET + or the SET- button (located on
the steering wheel) and the following will display
in the instrument cluster display:
ACC SET
When ACC is set, the set speed will display in
the instrument cluster.
The ACC screen may display once again if any
ACC activity occurs, which may include any of
the following:
Distance Setting Change
System Cancel
Driver Override
20_DJD2_OM_EN_USC_t.book Page 116
Page 128 of 568

126GETTING TO KNOW YOUR INSTRUMENT PANEL
remove the trapped Particulate Matter (PM).
If this occurs, the “Exhaust Filter XX% Full
Safely Drive at Highway Speeds to Remedy”
message will be displayed in the instrument
cluster display. If this message is displayed,
you will hear one chime to assist in alerting
you of this condition
By simply driving your vehicle at highway
speeds for as little as 45 minutes, you can
remedy the condition in the particulate filter
system and allow your Cummins diesel
engine and exhaust after-treatment system
to remove the trapped Particulate Matter
(PM) and restore the system to normal oper-
ating condition.
Exhaust System — Regeneration In Process
Exhaust Filter XX% Full — Indicates that the
Diesel Particulate Filter (DPF) is self-cleaning.
Maintain your current driving condition until
regeneration is completed.
Exhaust System — Regeneration Completed
— This message indicates that the Diesel
Particulate Filter (DPF) self-cleaning is
completed. If this message is displayed, you
will hear one chime to assist in alerting you of
this condition.
Exhaust Service Required — See Dealer Now
— This message indicates regeneration has
been disabled due to a system malfunction.
At this point the engine Powertrain Control
Module (PCM) will register a fault code, the
instrument panel will display a MIL light.
Exhaust Filter Full — Power Reduced See
Dealer — This message indicates the PCM
has derated the engine to limit the likelihood
of permanent damage to the after-treatment
system. If this condition is not corrected and
a dealer service is not performed, extensive
exhaust after-treatment damage can occur.
To correct this condition it will be necessary
to have your vehicle serviced by your local
authorized dealer.
NOTE:
Failing to follow the oil change indicator,
changing your oil and resetting the oil change
indicator by 0 miles remaining will prevent the
diesel exhaust filter from performing it's cleaning routine. This will shortly result in a
Malfunction Indicator Light (MIL) and reduced
engine power. Only an authorized dealer will be
able to correct this condition.
Cold Ambient Derate Mode Messages
The vehicle will display messages when a
derate (engine power reduction) is activated to
protect the engine during start up in cold
ambient temperatures.
Engine Power Reduced During Warmup
—
This message will display during start up
when the ambient temperature is between
10°F (-12°C) and -10°F (-23°C).
Engine Power Reduced Up To 30 Sec
(Seconds) During Warmup — This message
will display during start up when the ambient
temperature is between -10°F (-23°C) and
-25°F (-32°C).
CAUTION!
See an authorized dealer, as damage to the
exhaust system could occur soon with
continued operation.
CAUTION!
See an authorized dealer, as damage to the
exhaust system could occur soon with
continued operation.
20_DJD2_OM_EN_USC_t.book Page 126
Page 134 of 568
132GETTING TO KNOW YOUR INSTRUMENT PANEL
Hood Open Warning Light
This warning light will illuminate when
the hood is ajar/open and not fully
closed.
NOTE:
If the vehicle is moving, there will also be a
single chime.
Vehicle Security Warning Light — If
Equipped
This light will flash at a fast rate for
approximately 15 seconds when the
vehicle security alarm is arming, and
then will flash slowly until the vehicle
is disarmed.
Engine Coolant Temperature Warning
Light
This warning light warns of an
overheated engine condition. If the
engine coolant temperature is too
high, this indicator will illuminate and
a single chime will sound. If the temperature
reaches the upper limit, a continuous chime will
sound for four minutes or until the engine is
able to cool; whichever comes first. If the light turns on while driving, safely pull over
and stop the vehicle. If the Air Conditioning
(A/C) system is on, turn it off. Also, shift the
transmission into NEUTRAL and idle the vehicle.
If the temperature reading does not return to
normal, turn the engine off immediately and call
for service.
Refer to “If Your Engine Overheats” in “In Case
Of Emergency” for further information.
Battery Charge Warning Light
This warning light will illuminate when
the battery is not charging properly. If
it stays on while the engine is running,
there may be a malfunction with the
charging system. Contact an authorized dealer
as soon as possible.
This indicates a possible problem with the
electrical system or a related component.
Oil Pressure Warning Light
This warning light will illuminate to
indicate low engine oil pressure. If the
light turns on while driving, stop the
vehicle, shut off the engine as soon as
possible, and contact an authorized dealer. A
chime will sound when this light turns on. Do not operate the vehicle until the cause is
corrected. This light does not indicate how
much oil is in the engine. The engine oil level
must be checked under the hood.
Oil Temperature Warning Light
This warning light will illuminate to
indicate the engine oil temperature is
high. If the light turns on while driving,
stop the vehicle and shut off the
engine as soon as possible. Wait for oil
temperature to return to normal levels.
Electronic Throttle Control (ETC) Warning
Light
This warning light will illuminate to
indicate a problem with the Electronic
Throttle Control (ETC) system. If a
problem is detected while the vehicle
is running, the light will either stay on or flash
depending on the nature of the problem. Cycle
the ignition when the vehicle is safely and
completely stopped and the transmission is
placed in the PARK (P) position. The light should
turn off. If the light remains on with the vehicle
running, your vehicle will usually be drivable;
however, see an authorized dealer for service
as soon as possible.
20_DJD2_OM_EN_USC_t.book Page 132
Page 135 of 568
GETTING TO KNOW YOUR INSTRUMENT PANEL133
NOTE:
This light may turn on if the accelerator and
brake pedals are pressed at the same time.
If the light continues to flash when the vehicle is
running, immediate service is required and you
may experience reduced performance, an
elevated/rough idle, or engine stall and your
vehicle may require towing. The light will come
on when the ignition is placed in the ON/RUN or
ACC/ON/RUN position and remain on briefly as
a bulb check. If the light does not come on
during starting, have the system checked by an
authorized dealer.
Trailer Brake Disconnected Warning Light
This warning light will illuminate when
the Trailer Brake has been
disconnected.
Refer to “Trailer Towing” in “Starting And
Operating” for further information.
Transmission Temperature Warning Light
— If Equipped
This warning light will illuminate to
warn of a high transmission fluid
temperature. This may occur with
strenuous usage such as trailer towing. If this light turns on, stop the vehicle and
run the engine at idle or slightly faster, with the
transmission in PARK (P) or NEUTRAL (N), until
the light turns off. Once the light turns off, you
may continue to drive normally.
Door Open Warning Light
This indicator will illuminate when a
door is ajar/open and not fully closed.
NOTE:
If the vehicle is moving there will also be a single
chime.
YELLOW WARNING LIGHTS
Adaptive Cruise Control (ACC) Fault
Warning Light — If Equipped
This warning light will illuminate to
indicate a fault in the ACC system.
Contact a local authorized dealer for
service.
For further information, refer to “Adaptive
Cruise Control (ACC)” in “Starting And
Operating.”
Air Suspension Fault Warning Light — If
Equipped
This light will illuminate when a fault is
detected with the air suspension
system.
Refer to “Air Suspension System — If Equipped”
in “Starting And Operating” for further
information.
Engine Check/Malfunction Indicator
Warning Light (MIL)
The Engine Check/Malfunction
Indicator Light (MIL) is a part of an
Onboard Diagnostic System called
OBD II that monitors engine and
WARNING!
If you continue operating the vehicle when
the Transmission Temperature Warning Light
is illuminated you could cause the fluid to boil
over, come in contact with hot engine or
exhaust components and cause a fire.
CAUTION!
Continuous driving with the Transmission
Temperature Warning Light illuminated will
eventually cause severe transmission
damage or transmission failure.
3
20_DJD2_OM_EN_USC_t.book Page 133