light Ram 3500 Chassis Cab 2020 Owner's Manual
[x] Cancel search | Manufacturer: RAM, Model Year: 2020, Model line: 3500 Chassis Cab, Model: Ram 3500 Chassis Cab 2020Pages: 516, PDF Size: 29.24 MB
Page 302 of 516

300IN CASE OF EMERGENCY
BULB REPLACEMENT
Replacement Bulbs
All of the inside bulbs are brass or glass-wedge base. Aluminum base bulbs are not approved.
Interior Bulbs
Bulb Name Bulb Number
Overhead Console Lamps TS 212–9
Dome Lamp 7679
NOTE:
For lighted switches, see an authorized dealer for replacement instructions.
Exterior Bulbs
Bulb Name Bulb Number
Low Beam (Halogen Reflector Headlamp) H11LL
High Beam (Halogen Reflector Headlamp) 9005LL
Low & High Beam (LED Reflector Headlamp) LED (Serviced At An Authorized Dealer)
Low & High Beam (LED Projector Headlamp) LED (Serviced At An Authorized Dealer)
Turn Signal / Front Position (Halogen Reflector Headlamp) 7444NA
Turn Signal / Front Position (LED Headlamps) LED (Serviced At An Authorized Dealer)
Front Side Marker (Halogen Reflector Headlamp) W5W
Front Side Marker (LED Headlamps) LED (Serviced At An Authorized Dealer)
Front Fog Lamps (Halogen Reflector Headlamp) H11LL
2020_RAM_CHASSIS_CAB_OM_USA=GUID-6C67832B-7839-4CCF-BEFC-CDF988F949EA=1=en=.book Page 300
Page 309 of 516
IN CASE OF EMERGENCY307
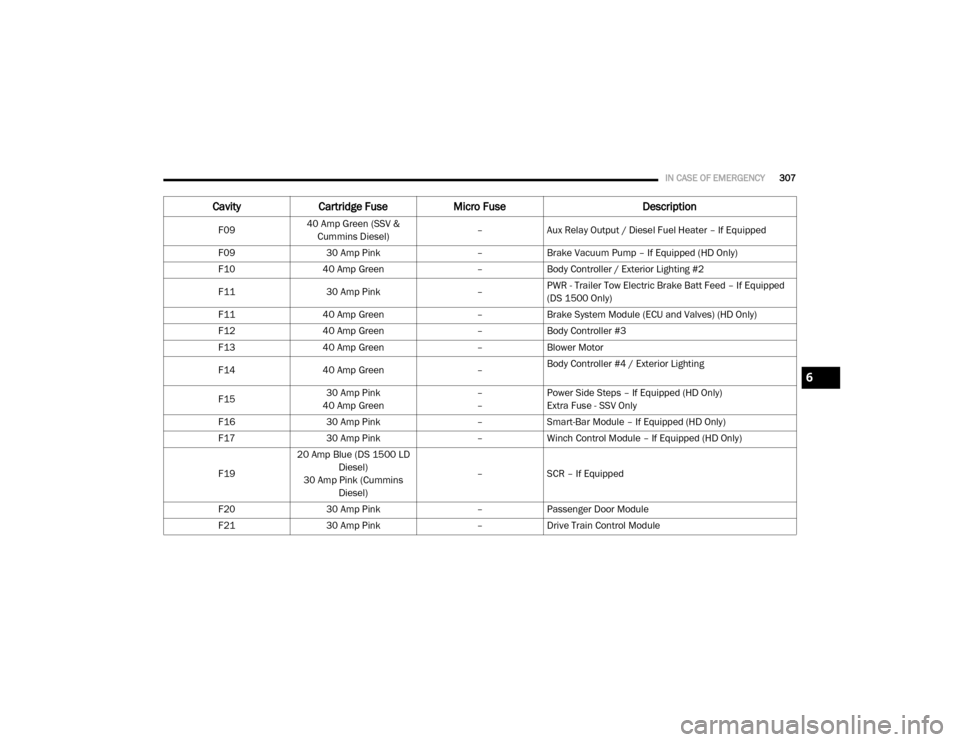
F0940 Amp Green (SSV &
Cummins Diesel) –
Aux Relay Output / Diesel Fuel Heater – If Equipped
F09 30 Amp Pink –Brake Vacuum Pump – If Equipped (HD Only)
F10 40 Amp Green –Body Controller / Exterior Lighting #2
F11 30 Amp Pink –PWR - Trailer Tow Electric Brake Batt Feed – If Equipped
(DS 1500 Only)
F11 40 Amp Green –Brake System Module (ECU and Valves) (HD Only)
F12 40 Amp Green –Body Controller #3
F13 40 Amp Green –Blower Motor
F14 40 Amp Green –Body Controller #4 / Exterior Lighting
F15 30 Amp Pink
40 Amp Green –
–Power Side Steps – If Equipped (HD Only)
Extra Fuse - SSV Only
F16 30 Amp Pink –Smart-Bar Module – If Equipped (HD Only)
F17 30 Amp Pink –Winch Control Module – If Equipped (HD Only)
F19 20 Amp Blue (DS 1500 LD
Diesel)
30 Amp Pink (Cummins Diesel) –
SCR – If Equipped
F20 30 Amp Pink –Passenger Door Module
F21 30 Amp Pink –Drive Train Control Module
Cavity Cartridge Fuse Micro Fuse Description
6
2020_RAM_CHASSIS_CAB_OM_USA=GUID-6C67832B-7839-4CCF-BEFC-CDF988F949EA=1=en=.book Page 307
Page 310 of 516
308IN CASE OF EMERGENCY
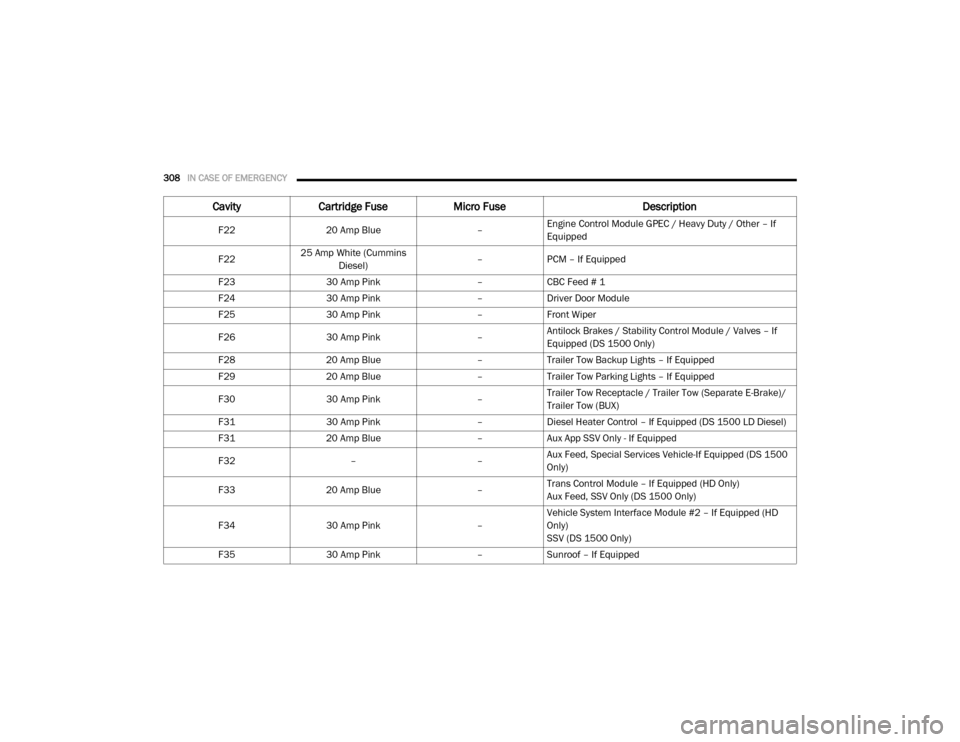
F2220 Amp Blue –Engine Control Module GPEC / Heavy Duty / Other – If
Equipped
F22 25 Amp White (Cummins
Diesel) –
PCM – If Equipped
F23 30 Amp Pink –CBC Feed # 1
F24 30 Amp Pink –Driver Door Module
F25 30 Amp Pink –Front Wiper
F26 30 Amp Pink –Antilock Brakes / Stability Control Module / Valves – If
Equipped (DS 1500 Only)
F28 20 Amp Blue –Trailer Tow Backup Lights – If Equipped
F29 20 Amp Blue –Trailer Tow Parking Lights – If Equipped
F30 30 Amp Pink –Trailer Tow Receptacle / Trailer Tow (Separate E-Brake)/
Trailer Tow (BUX)
F31 30 Amp Pink –Diesel Heater Control – If Equipped (DS 1500 LD Diesel)
F31 20 Amp Blue –Aux App SSV Only - If Equipped
F32 ––Aux Feed, Special Services Vehicle-If Equipped (DS 1500
Only)
F33 20 Amp Blue –Trans Control Module – If Equipped (HD Only)
Aux Feed, SSV Only (DS 1500 Only)
F34 30 Amp Pink –Vehicle System Interface Module #2 – If Equipped (HD
Only)
SSV (DS 1500 Only)
F35 30 Amp Pink –Sunroof – If Equipped
Cavity Cartridge Fuse Micro Fuse Description
2020_RAM_CHASSIS_CAB_OM_USA=GUID-6C67832B-7839-4CCF-BEFC-CDF988F949EA=1=en=.book Page 308
Page 311 of 516
IN CASE OF EMERGENCY309
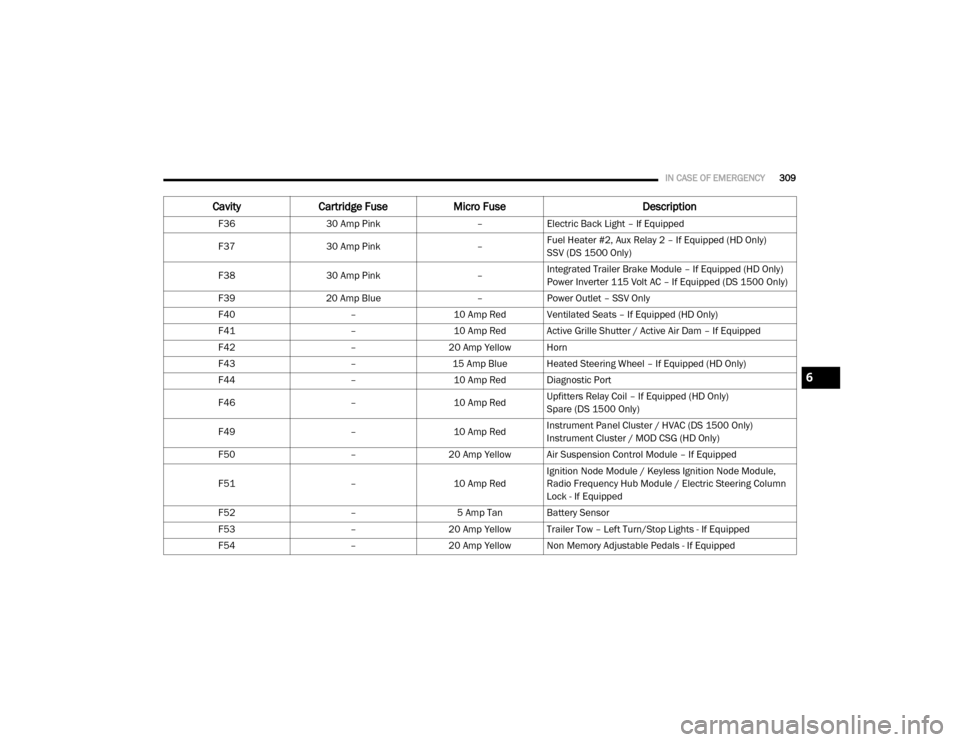
F3630 Amp Pink –Electric Back Light – If Equipped
F37 30 Amp Pink –Fuel Heater #2, Aux Relay 2 – If Equipped (HD Only)
SSV (DS 1500 Only)
F38 30 Amp Pink –Integrated Trailer Brake Module – If Equipped (HD Only)
Power Inverter 115 Volt AC – If Equipped (DS 1500 Only)
F39 20 Amp Blue –Power Outlet – SSV Only
F40 –10 Amp Red Ventilated Seats – If Equipped (HD Only)
F41 –10 Amp Red Active Grille Shutter / Active Air Dam – If Equipped
F42 –20 Amp Yellow Horn
F43 –15 Amp Blue Heated Steering Wheel – If Equipped (HD Only)
F44 –10 Amp Red Diagnostic Port
F46 –10 Amp RedUpfitters Relay Coil – If Equipped (HD Only)
Spare (DS 1500 Only)
F49 –10 Amp RedInstrument Panel Cluster / HVAC (DS 1500 Only)
Instrument Cluster / MOD CSG (HD Only)
F50 –20 Amp Yellow Air Suspension Control Module – If Equipped
F51 –10 Amp RedIgnition Node Module / Keyless Ignition Node Module,
Radio Frequency Hub Module / Electric Steering Column
Lock - If Equipped
F52 –5 Amp Tan Battery Sensor
F53 –20 Amp Yellow Trailer Tow – Left Turn/Stop Lights - If Equipped
F54 –20 Amp Yellow Non Memory Adjustable Pedals - If Equipped
CavityCartridge Fuse Micro Fuse Description
6
2020_RAM_CHASSIS_CAB_OM_USA=GUID-6C67832B-7839-4CCF-BEFC-CDF988F949EA=1=en=.book Page 309
Page 312 of 516
310IN CASE OF EMERGENCY
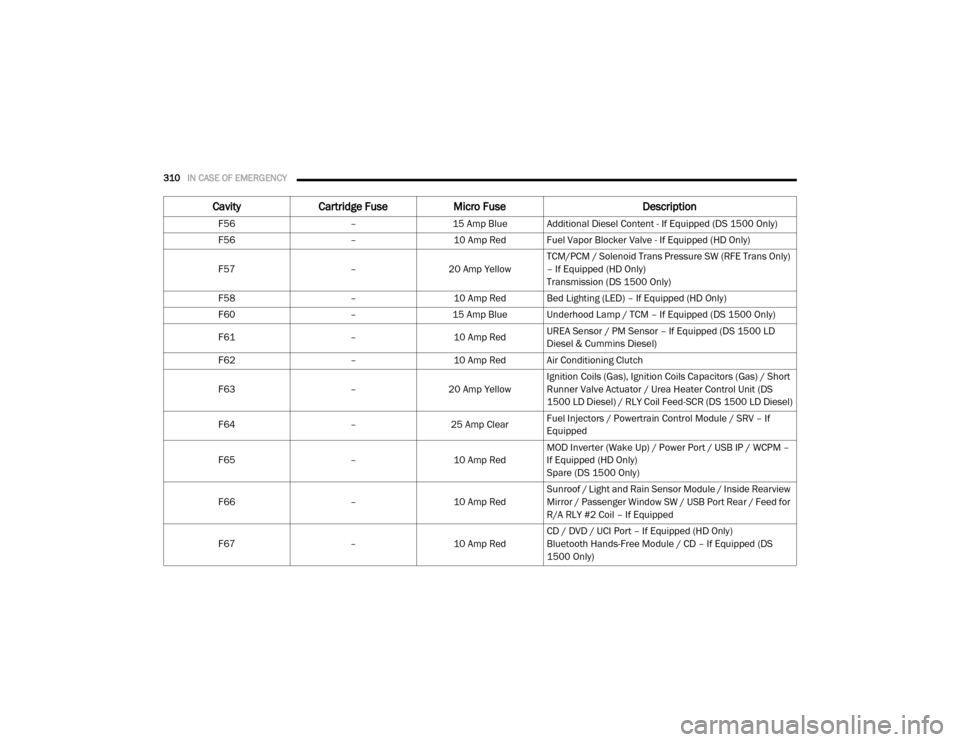
F56 –15 Amp Blue Additional Diesel Content - If Equipped (DS 1500 Only)
F56 –10 Amp Red Fuel Vapor Blocker Valve - If Equipped (HD Only)
F57 –20 Amp Yellow TCM/PCM / Solenoid Trans Pressure SW (RFE Trans Only)
– If Equipped (HD Only)
Transmission (DS 1500 Only)
F58 –10 Amp Red Bed Lighting (LED) – If Equipped (HD Only)
F60 –15 Amp Blue Underhood Lamp / TCM – If Equipped (DS 1500 Only)
F61 –10 Amp RedUREA Sensor / PM Sensor – If Equipped (DS 1500 LD
Diesel & Cummins Diesel)
F62 –10 Amp Red Air Conditioning Clutch
F63 –20 Amp Yellow Ignition Coils (Gas), Ignition Coils Capacitors (Gas) / Short
Runner Valve Actuator / Urea Heater Control Unit (DS
1500 LD Diesel) / RLY Coil Feed-SCR (DS 1500 LD Diesel)
F64 –25 Amp ClearFuel Injectors / Powertrain Control Module / SRV – If
Equipped
F65 –10 Amp RedMOD Inverter (Wake Up) / Power Port / USB IP / WCPM –
If Equipped (HD Only)
Spare (DS 1500 Only)
F66 –10 Amp RedSunroof / Light and Rain Sensor Module / Inside Rearview
Mirror / Passenger Window SW / USB Port Rear / Feed for
R/A RLY #2 Coil – If Equipped
F67 –10 Amp RedCD / DVD / UCI Port – If Equipped (HD Only)
Bluetooth Hands-Free Module / CD – If Equipped (DS
1500 Only)
Cavity
Cartridge Fuse Micro Fuse Description
2020_RAM_CHASSIS_CAB_OM_USA=GUID-6C67832B-7839-4CCF-BEFC-CDF988F949EA=1=en=.book Page 310
Page 314 of 516

312IN CASE OF EMERGENCY
F78 –10 Amp RedEngine Control Module / Powertrain Control Module /
Electric Power Steering (DS 1500 Only)
F78 –15 Amp BlueEngine Control Module / Powertrain Control Module / AEB
RACM MOD / Feed To AUX PDC Relay Coils/ HRLS (HD
Only)
F79 –15 Amp Blue ID / Clearance Lights
F80 –10 Amp RedUniversal Garage Door Opener / Compass / Anti-Intrusion
Module (DS 1500 Only)
ASSY Overhead Console / SW Assist / SW 911 – If
Equipped (HD Only)
F81 –20 Amp Yellow Trailer Tow Right Turn / Stop Lights - If Equipped
F82 –10 Amp Red Steering Column Control Module / Cruise Control
F83 ––No Connection
F84 –15 Amp Blue ASBM / HVAC / ICS / Rear Heated Seat Switches
F85 –10 Amp Red Airbag Module
F86 –10 Amp Red Airbag Module
F87 –10 Amp RedAir Suspension / ITBM / Steering Column Control Module
/ MOD Gateway CAN-C Trailer TPM (HD Only)
Air Suspension / Trailer Tow / DC/DC Converter (Voltage
Stabilizer) / Steering Column Control Module / Occupant
Classification Sensor (DS 1500 Only)
F88 –15 Amp Blue Instrument Panel Cluster
CavityCartridge Fuse Micro Fuse Description
2020_RAM_CHASSIS_CAB_OM_USA=GUID-6C67832B-7839-4CCF-BEFC-CDF988F949EA=1=en=.book Page 312
Page 315 of 516

IN CASE OF EMERGENCY313
F90/F91 –20 Amp Yellow IGN or BATT Customer Selectable – If Equipped (HD Only)
Power Outlet (Rear Seats) Customer Selectable (DS 1500
Only)
F93 –20 Amp Yellow Cigar Lighter - If Equipped
F94 –10 Amp RedShift-By-Wire / Transfer Case Switch (DS 1500 Only)
Shift-By-Wire / Transfer Case Switch / Module TPM Trailer
(HD Only) / Module Gateway Can-C Trailer TPM (HD Only)
F95 –10 Amp RedRearview Camera / Park Assist / CHMSL Camera / Blind
Spot Sensor / Surround View Camera (HD Only)
Rear Camera / Park Assist / Blind Spot Sensor / Compass
(DS 1500 Only)
F96 –10 Amp RedRear Seat Heater Switch / Trunk Lamp With Flashlamp
Charger / Truck Lamp - If Equipped (DS 1500 Only)
Trailer Camera – If Equipped (HD Only)
F97 –25 Amp ClearRear Heated Seats And Heated Steering Wheel – If
Equipped (DS 1500 Only)
F97 –20 Amp Yellow Front Heated Seat Passenger – If Equipped (HD Only)
F98 –25 Amp Clear Front Heated Seats – If Equipped (DS 1500 Only)
F98 –20 Amp Yellow Front Heated Seat Driver – If Equipped (HD Only)
F99 –10 Amp RedHVAC / DASM (DS 1500 Only)
HVAC / In-Car Temperature Sensor / CSG MOD (HD Only)
F100 –10 Amp Red Upfitters – If Equipped (HD Only)
F101 –15 Amp Blue SSV Only
CavityCartridge Fuse Micro Fuse Description
6
2020_RAM_CHASSIS_CAB_OM_USA=GUID-6C67832B-7839-4CCF-BEFC-CDF988F949EA=1=en=.book Page 313
Page 319 of 516

IN CASE OF EMERGENCY317
5. Remove the lug nuts and pull the wheel off.
Install the spare wheel and lug nuts with the
cone shaped end of the nuts toward the
wheel on Single Rear-Wheel (SRW) models.
On Dual Rear-Wheel models (DRW) the lug
nuts are a two-piece assembly with a flat
face. Lightly tighten the nuts. To avoid risk
of forcing the vehicle off the jack, do not
fully tighten the nuts until the vehicle has
been lowered.
6. Using the lug wrench, finish tightening the nuts using a crisscross pattern. For the
proper lug nut torque specifications refer to
“Wheel And Tire Torque Specifications” in
“Technical Specifications.” If in doubt about
the correct tightness, have them checked
with a torque wrench by an authorized
dealer or at a service station. 7. Install wheel center cap (if equipped) and
remove wheel blocks. Do not install chrome
or aluminum wheel center caps on the
spare wheel. This may result in cap damage.
8. Lower the jack to its fully closed position. If the jack will not lower by turning the dial
(thumbwheel) by hand, it may be necessary
to use the jack driver in order to lower the
jack. Stow the replaced tire, jack, and tools
as previously described.
9. Adjust the tire pressure when possible.
10. After 25 miles (40 km), check the lug nut torque with a torque wrench to ensure that
all lug nuts are properly seated against the
wheel.
Dual Rear Wheels
Slots in the wheels will assist in properly
orienting the inner and outer wheels. Align
these slots when assembling the wheels for
best access to the tire valve on the inner wheel.
The tires of both dual wheels must be
completely off the ground when tightening to
insure wheel centering and maximum wheel
clamping.
Dual wheel models require a special heavy-duty
lug nut tightening adapter (included with the
vehicle) to correctly tighten the lug nuts. Also,
when it is necessary to remove and install dual
rear wheels, use a proper vehicle lifting device.
NOTE:
When installing a spare tire (if equipped) as part
of a dual rear wheel end combination, the tire
diameter of the two individual tires must be
compared. If there is a significant difference,
the larger tire should be installed in a front loca-
tion. The correct direction of rotation for dual
tire installations must also be observed.WARNING!
Raising the vehicle higher than necessary can
make the vehicle less stable. It could slip off
the jack and hurt someone near it. Raise the
vehicle only enough to remove the tire.
WARNING!
A loose tire or jack thrown forward in a
collision or hard stop, could endanger the
occupants of the vehicle. Always stow the jack
parts and the spare tire in the places
provided.
6
2020_RAM_CHASSIS_CAB_OM_USA=GUID-6C67832B-7839-4CCF-BEFC-CDF988F949EA=1=en=.book Page 317
Page 322 of 516
320IN CASE OF EMERGENCY
Preparations For Jump Start
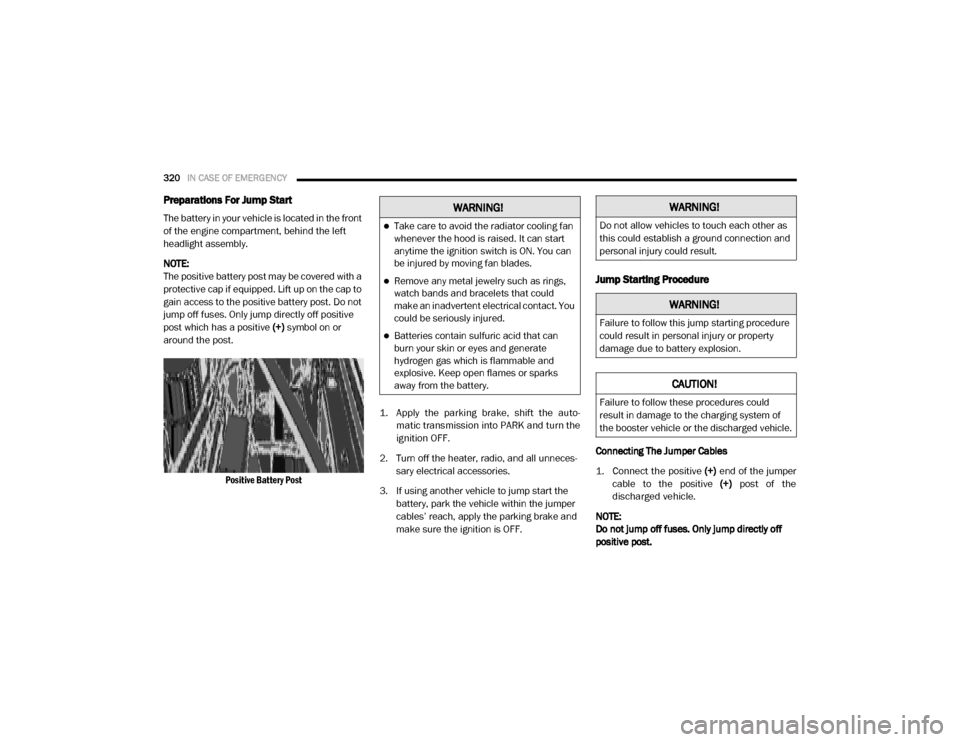
The battery in your vehicle is located in the front
of the engine compartment, behind the left
headlight assembly.
NOTE:
The positive battery post may be covered with a
protective cap if equipped. Lift up on the cap to
gain access to the positive battery post. Do not
jump off fuses. Only jump directly off positive
post which has a positive (+) symbol on or
around the post.
Positive Battery Post
1. Apply the parking brake, shift the auto
-
matic transmission into PARK and turn the
ignition OFF.
2. Turn off the heater, radio, and all unneces -
sary electrical accessories.
3. If using another vehicle to jump start the battery, park the vehicle within the jumper
cables’ reach, apply the parking brake and
make sure the ignition is OFF.
Jump Starting Procedure
Connecting The Jumper Cables
1. Connect the positive
(+) end of the jumper
cable to the positive (+)
post of the
discharged vehicle.
NOTE:
Do not jump off fuses. Only jump directly off
positive post.
WARNING!
Take care to avoid the radiator cooling fan
whenever the hood is raised. It can start
anytime the ignition switch is ON. You can
be injured by moving fan blades.
Remove any metal jewelry such as rings,
watch bands and bracelets that could
make an inadvertent electrical contact. You
could be seriously injured.
Batteries contain sulfuric acid that can
burn your skin or eyes and generate
hydrogen gas which is flammable and
explosive. Keep open flames or sparks
away from the battery.
WARNING!
Do not allow vehicles to touch each other as
this could establish a ground connection and
personal injury could result.
WARNING!
Failure to follow this jump starting procedure
could result in personal injury or property
damage due to battery explosion.
CAUTION!
Failure to follow these procedures could
result in damage to the charging system of
the booster vehicle or the discharged vehicle.
2020_RAM_CHASSIS_CAB_OM_USA=GUID-6C67832B-7839-4CCF-BEFC-CDF988F949EA=1=en=.book Page 320
Page 331 of 516
329
SERVICING AND MAINTENANCE
SCHEDULED SERVICING — GAS ENGINE
Your vehicle is equipped with an automatic oil
change indicator system. The oil change indi-
cator system will remind you that it is time to
take your vehicle in for scheduled maintenance.
Based on engine operation conditions, the oil
change indicator message will illuminate. This
means that service is required for your vehicle.
Operating conditions such as frequent
short-trips, trailer tow, extremely hot or cold
ambient temperatures, and E85 fuel usage will
influence when the “Oil Change Required”
message is displayed. Severe Operating Condi-
tions can cause the change oil message to illu -
minate as early as 3,500 miles (5,600 km)
since last reset. Have your vehicle serviced as
soon as possible, within the next 500 miles
(805 km). An authorized dealer will reset the oil change
indicator message after completing the sched
-
uled oil change. If a scheduled oil change is
performed by someone other than an autho -
rized dealer, the message can be reset by refer -
ring to the steps described under “Instrument
Cluster Display” in “Getting To Know Your
Instrument Panel” for further information.
Gas Engines:
Under no circumstances should oil change
intervals exceed 8,000 miles (13,000 km),
12 months or 350 hours of engine run time,
whichever comes first. The 350 hours of engine
run or idle time is generally only a concern for
fleet customers.
Severe Duty:
Change Engine Oil at 4,000 miles (6,500 km) or
350 hours of engine run time if the vehicle is
operated in a dusty and off road environment or
is operated predominately at idle or very low
engine RPM. This type of vehicle use is consid -
ered Severe Duty. Once A Month Or Before A Long Trip:Check engine oil level.
Check windshield washer fluid level.
Check the tire inflation pressures and look
for unusual wear or damage. Rotate at the
first sign of irregular wear.
Check the fluid levels of the coolant reservoir,
brake master cylinder, power steering and
automatic transmission (six-speed only), and
fill as needed.
Check function of all interior and exterior
lights.
7
2020_RAM_CHASSIS_CAB_OM_USA=GUID-6C67832B-7839-4CCF-BEFC-CDF988F949EA=1=en=.book Page 329