AUX Ram 4500 Chassis Cab 2018 Owner's Manual
[x] Cancel search | Manufacturer: RAM, Model Year: 2018, Model line: 4500 Chassis Cab, Model: Ram 4500 Chassis Cab 2018Pages: 298, PDF Size: 5.88 MB
Page 231 of 298
USB/Audio Jack (AUX) Manual
Operation
To select a specific audio source, push the
MEDIA button on the faceplate and select
from the following modes:
USB/iPod
• USB/iPod Mode is entered by either insert-ing a USB Jump Drive or iPod cable into the
USB port or by pushing the MEDIA button
located left of the display.
Audio Jack (AUX)
• The AUX allows a device such as an MP3 player or an iPod to be plugged into
the radio and utilize the vehicle’s audio
system, using a 3.5 mm audio cable, to
amplify the source and play through the
vehicle’s speakers.
• The functions of the device are controlled using the device buttons, not the buttons
on the radio. The volume may be controlled
using the radio or the device.
229
Page 235 of 298
Seek Previous/Next Buttons
Seek Up
Press and release the “Seek Up”button
on the touchscreen to tune the radio to the
next listenable station or channel.
During a Seek Up function, if the radio
reaches the starting station after passing
through the entire band two times, the radio
will stop at the station where it began.
Fast Seek Up
Press and hold the “Seek Up”button on
the touchscreen to advance the radio through
the available stations or channels at a faster
rate, the radio stops at the next available
station or channel when the button on the
touchscreen is released.
Seek Down
Press and release the “Seek Down”but-
ton on the touchscreen to tune the radio to
the next listenable station or channel.
During a Seek Down function, if the radio
reaches the starting station after passing
through the entire band two times, the radio
will stop at the station where it began. Fast Seek Down
Press and hold the “Seek Down”button
on the touchscreen to advance the radio
through the available stations or channel at a
faster rate, the radio stops at the next avail-
able station or channel when the button on
the touchscreen is released.
Store Radio Presets
The Radio stores up to 12 presets in each of
the Radio modes. There are four visible pre-
sets at the top of the radio screen. Pressing
the “All” button on the touchscreen on the
radio home screen will display all of the
preset stations for that mode.
To store a radio preset manually, follow the
steps below:
1. Tune to the desired station.
2. Press and hold the desired numbered but- ton on the touchscreen for more than two
seconds or until you hear a confirmation
beep.
Media Mode
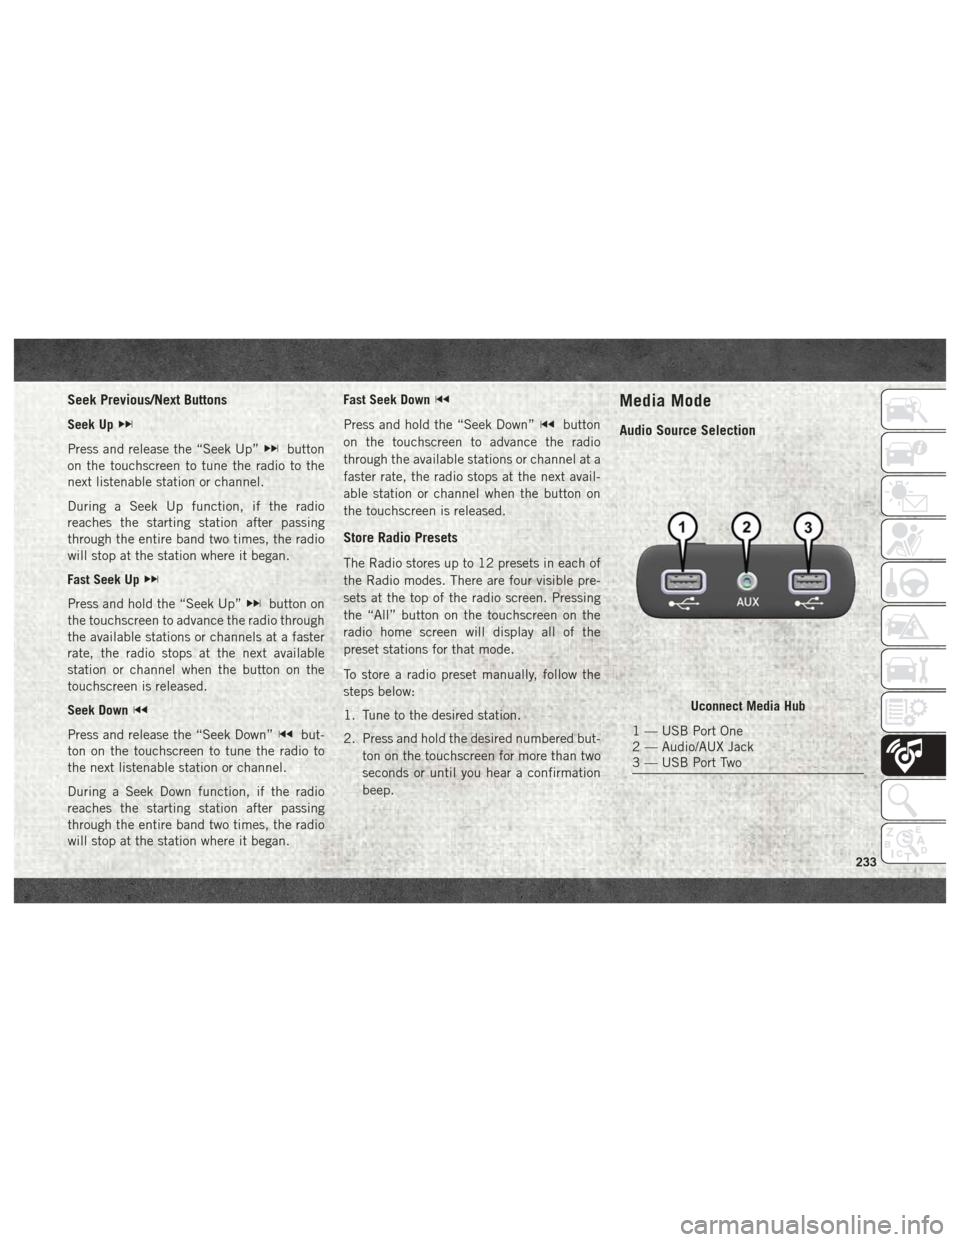
Audio Source Selection
Uconnect Media Hub
1 — USB Port One
2 — Audio/AUX Jack
3 — USB Port Two
233
Page 236 of 298
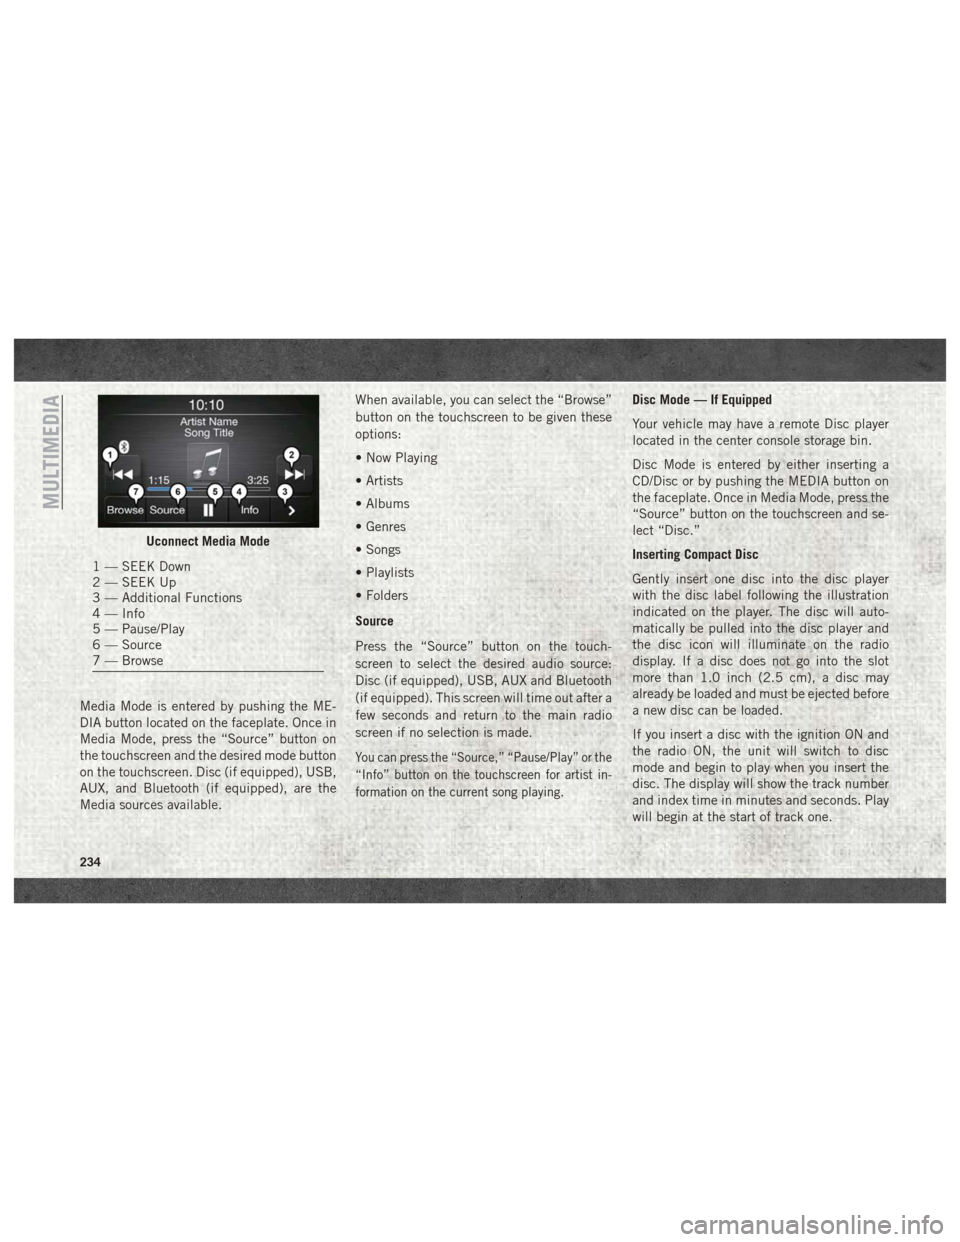
Media Mode is entered by pushing the ME-
DIA button located on the faceplate. Once in
Media Mode, press the “Source” button on
the touchscreen and the desired mode button
on the touchscreen. Disc (if equipped), USB,
AUX, and Bluetooth (if equipped), are the
Media sources available.When available, you can select the “Browse”
button on the touchscreen to be given these
options:
• Now Playing
• Artists
• Albums
• Genres
• Songs
• Playlists
• Folders
Source
Press the “Source” button on the touch-
screen to select the desired audio source:
Disc (if equipped), USB, AUX and Bluetooth
(if equipped). This screen will time out after a
few seconds and return to the main radio
screen if no selection is made.
You can press the “Source,” “Pause/Play” or the
“Info” button on the touchscreen for artist in-
formation on the current song playing.
Disc Mode — If Equipped
Your vehicle may have a remote Disc player
located in the center console storage bin.
Disc Mode is entered by either inserting a
CD/Disc or by pushing the MEDIA button on
the faceplate. Once in Media Mode, press the
“Source” button on the touchscreen and se-
lect “Disc.”
Inserting Compact Disc
Gently insert one disc into the disc player
with the disc label following the illustration
indicated on the player. The disc will auto-
matically be pulled into the disc player and
the disc icon will illuminate on the radio
display. If a disc does not go into the slot
more than 1.0 inch (2.5 cm), a disc may
already be loaded and must be ejected before
a new disc can be loaded.
If you insert a disc with the ignition ON and
the radio ON, the unit will switch to disc
mode and begin to play when you insert the
disc. The display will show the track number
and index time in minutes and seconds. Play
will begin at the start of track one.
Uconnect Media Mode
1 — SEEK Down
2 — SEEK Up
3 — Additional Functions
4 — Info
5 — Pause/Play
6 — Source
7 — Browse
MULTIMEDIA
234
Page 237 of 298
Browse
Press the “Browse” button on the touch-
screen to scroll through and select a desired
track on the Disc. Press the “Exit” button on
the touchscreen if you wish to cancel the
browse function.
Eject Button — Ejecting a Disc
Push the eject button to eject the disc. If you
have ejected a disc and have not removed it
within ten seconds, it will be reloaded. If the
Disc is not removed, the radio will reinsert the
disc but will not play it.
A disc can be ejected with the radio and
ignition OFF.
USB/iPod Mode
USB/iPod Mode is entered by either inserting
a USB Jump Drive or iPod cable into the USB
port, or by pushing the MEDIA button located
on the faceplate. Once in Media Mode, press
the “Source” button on the touchscreen and
select “USB/iPod.”Inserting USB/iPod Device
Gently insert the USB/iPod device into the
USB Port. If you insert a USB/iPod device
with the ignition ON, the unit will switch to
USB/iPod mode and begin to play when you
insert the device. The display will show the
track number and index time in minutes and
seconds. Play will begin at the start of track
one.
Browse
Press the “Browse” button on the touch-
screen to select Artist, Albums, Genres,
Songs, Playlists or Folders from the USB/
iPod device. Once the desired selection is
made you can chose from the available media
by pressing the button on the touchscreen.
Press the “Exit” button on the touchscreen if
you wish to cancel the browse function.
AUX Mode
AUX Mode is entered by inserting a AUX
device using a stereo cable with a 3.5 mm
audio jack into the AUX port, or by pushing
the MEDIA button located on the faceplate.
Once in Media Mode, press the “Source”
button on the touchscreen and select “AUX.”Inserting Auxiliary Device
Gently insert the Auxiliary device cable into
the AUX Port. If you insert a Auxiliary device
with the ignition ON, the unit will switch to
AUX mode and begin to play when you insert
the device cable.
Controlling The Auxiliary Device
The control of the Auxiliary device (e.g., se-
lecting playlists, play, fast forward, etc.) can-
not be provided by the radio; use the device
controls instead. Adjust the volume with the
VOLUME/MUTE rotary knob, or with the vol-
ume of the attached device.
The vehicle radio unit is acting as the ampli-
fier for audio output from the Auxiliary de-
vice. Therefore if the volume control on the
Auxiliary device is set too low, there will be
insufficient audio signal for the radio unit to
play the music on the device.
235
Page 259 of 298
TIPS CONTROLS AND GENERAL
INFORMATION
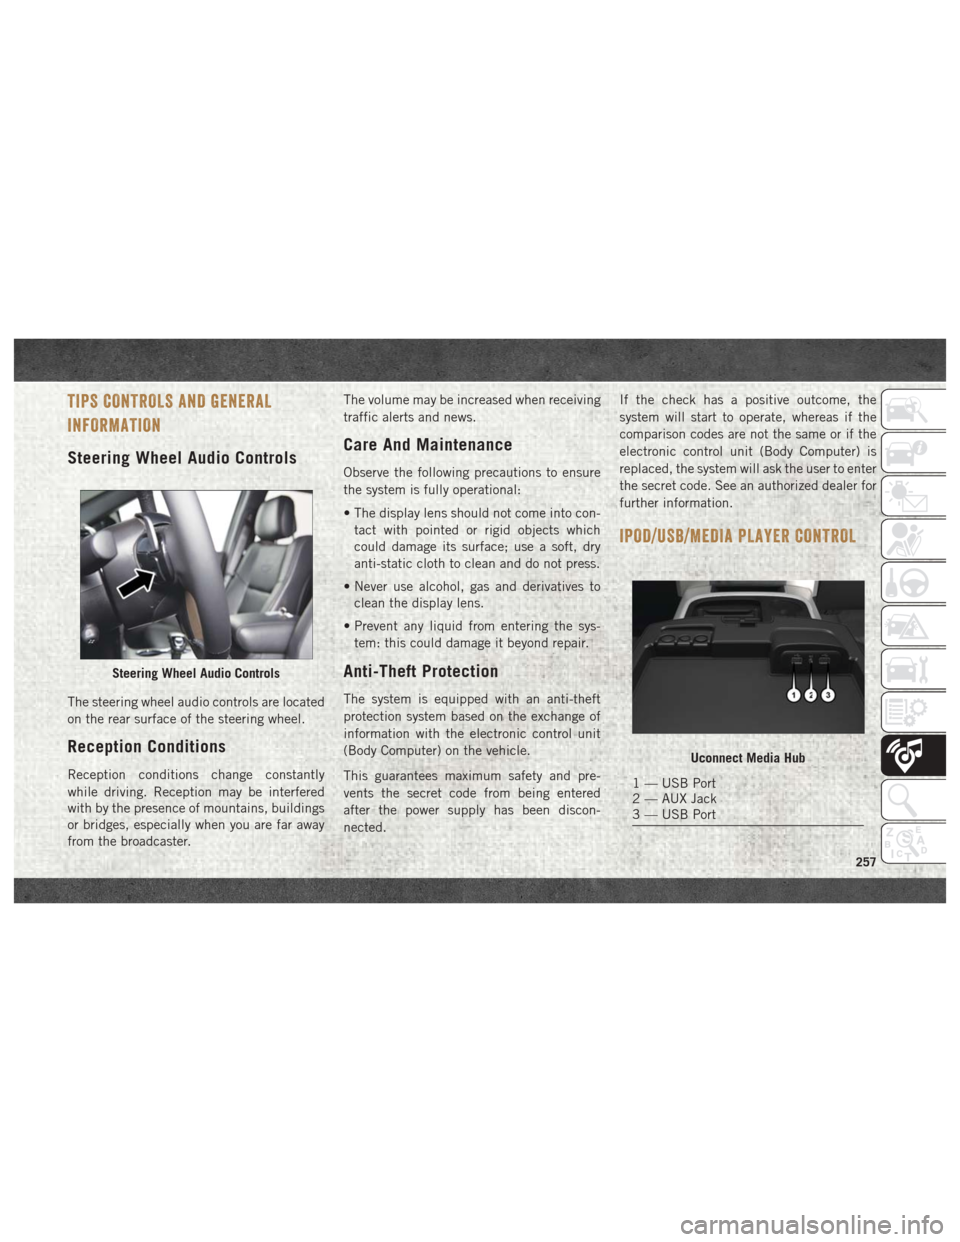
Steering Wheel Audio Controls
The steering wheel audio controls are located
on the rear surface of the steering wheel.
Reception Conditions
Reception conditions change constantly
while driving. Reception may be interfered
with by the presence of mountains, buildings
or bridges, especially when you are far away
from the broadcaster.The volume may be increased when receiving
traffic alerts and news.
Care And Maintenance
Observe the following precautions to ensure
the system is fully operational:
• The display lens should not come into con-
tact with pointed or rigid objects which
could damage its surface; use a soft, dry
anti-static cloth to clean and do not press.
• Never use alcohol, gas and derivatives to clean the display lens.
• Prevent any liquid from entering the sys- tem: this could damage it beyond repair.
Anti-Theft Protection
The system is equipped with an anti-theft
protection system based on the exchange of
information with the electronic control unit
(Body Computer) on the vehicle.
This guarantees maximum safety and pre-
vents the secret code from being entered
after the power supply has been discon-
nected. If the check has a positive outcome, the
system will start to operate, whereas if the
comparison codes are not the same or if the
electronic control unit (Body Computer) is
replaced, the system will ask the user to enter
the secret code. See an authorized dealer for
further information.
IPOD/USB/MEDIA PLAYER CONTROL
Steering Wheel Audio Controls
Uconnect Media Hub
1 — USB Port
2 — AUX Jack
3 — USB Port
257
Page 260 of 298
There are many ways to play music from
MP3 players, or USB devices through your
vehicle's sound system. Press your Media
button on the touchscreen to begin.
Audio Jack (AUX)
• The AUX allows a device to be plugged intothe radio and utilize the vehicle’s sound
system, using a 3.5 mm audio cable, to
amplify the source and play through the
vehicle speakers.
• Pressing the “AUX” button on the touch- screen will change the mode to auxiliary
device if the audio jack is connected, allow-
ing the music from your device to be heard
through the vehicle's speakers. To activate
the AUX, plug in the audio jack.
• The functions of the device are controlled using the device buttons. The volume may
be controlled using the radio or device.
USB Port
• Connect your compatible device using a
USB cable into the USB Port. USB Memory
sticks with audio files can also be used.
Audio from the device can be played on the
vehicles sound system while providing
metadata (artist, track title, album, etc.)
information on the radio display.
• When connected, the compatible USB de- vice can be controlled using the radio or
Steering Wheel Audio Controls to play, skip
to the next or previous track, browse, and
list the contents.
• The battery charges when plugged into the USB port (if supported by the specific de-
vice).
• To route the USB cable out of the center console, use the access cut out. NOTE:
When connecting your device for the first
time, the system may take several minutes to
read your music, depending on the number of
files. For example, the system will take ap-
proximately five minutes for every
1,000 songs loaded on the device. Also dur-
ing the reading process, the Shuffle and
Browse functions will be disabled. This pro-
cess is needed to ensure the full use of your
features and only happens the first time it is
connected. After the first time, the reading
process of your device will take considerably
less time unless changes are made or new
songs are added to the playlist.
MULTIMEDIA
258
Page 274 of 298
Helpful Tips And Common
Questions To Improve Bluetooth
Performance With Your Uconnect
System
Mobile Phone won’t reconnect to system after
pairing:
• Set mobile phone to auto-connect ortrusted device in mobile phone Bluetooth
settings (Blackberry devices).
• Perform a factory reset on your mobile phone. Refer to your mobile phone manu-
facturer or cellular provider for instruc-
tions.
• Many mobile phones do not automatically reconnect after being restarted (hard re-
boot). Your mobile phone can still be con-
nected manually. Close all applications that
may be operating (refer to mobile phone
manufacturer’s instructions), and follow
“Pairing (Wirelessly Connecting) Your Mobile
Phone To The Uconnect System”.
Mobile Phone won’t pair to system:
• Perform a hard reset in the mobile phone byremoving the battery (if removable — see
your mobile phone’s owner manual).
• Delete pairing history in mobile phone and Uconnect system; usually found in phone’s
Bluetooth connection settings.
• Verify you are selecting “Uconnect” in the discovered Bluetooth devices on your mo-
bile phone.
• If your vehicle system generates a pin code the default is 0000.
Mobile Phonebook didn’t download:
• Check “Do not ask again,” then accept the “phonebook download” request on your
mobile phone.
• Up to 5,000 contact names with four num- bers per contact will transfer to the
Uconnect 4C/4C NAV system phonebook. Can’t make a conference call:
• CDMA (Code-Division Multiple Access) car-
riers do not support conference calling.
Refer to your mobile phone user’s manual
for further information.
Making calls while connected to AUX:
• Plugging in your mobile phone to AUX while connected to Bluetooth will disable Hands-
Free Calling. Do not make calls while your
mobile phone is plugged into the AUX jack.
UCONNECT VOICE RECOGNITION
QUICK TIPS
Introducing Uconnect
Start using Uconnect Voice Recognition with
these helpful quick tips. It provides the key
Voice Commands and tips you need to know
to control your Uconnect system.
If you see the NAV icon on the bottom bar, or
in the Apps menus, of your touchscreen, you
have the Uconnect 4C NAV system. If not,
you have a Uconnect 4C system.
MULTIMEDIA
272
Page 277 of 298
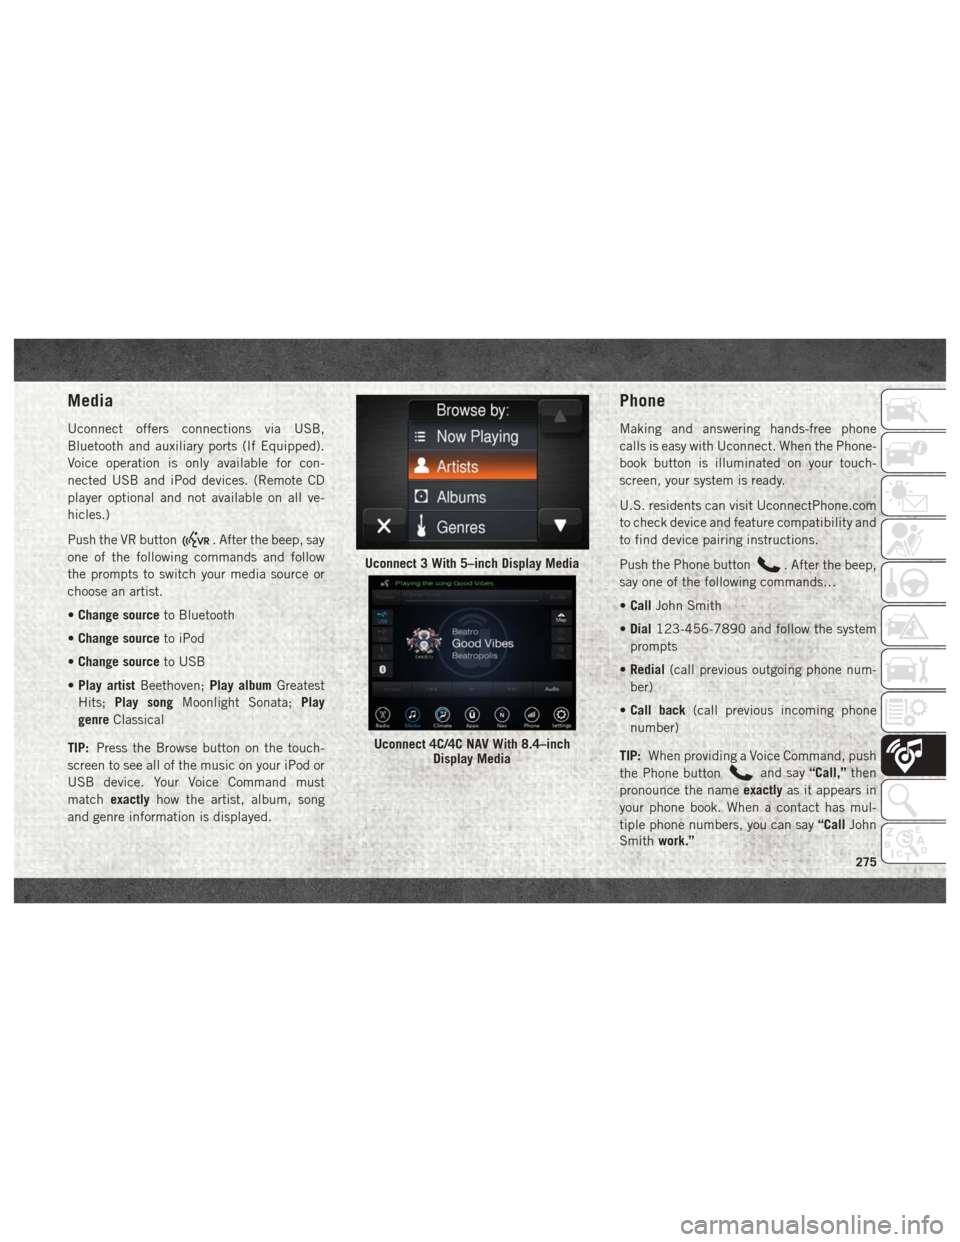
Media
Uconnect offers connections via USB,
Bluetooth and auxiliary ports (If Equipped).
Voice operation is only available for con-
nected USB and iPod devices. (Remote CD
player optional and not available on all ve-
hicles.)
Push the VR button
. After the beep, say
one of the following commands and follow
the prompts to switch your media source or
choose an artist.
• Change source to Bluetooth
• Change source to iPod
• Change source to USB
• Play artist Beethoven; Play albumGreatest
Hits; Play song Moonlight Sonata; Play
genre Classical
TIP: Press the Browse button on the touch-
screen to see all of the music on your iPod or
USB device. Your Voice Command must
match exactly how the artist, album, song
and genre information is displayed.
Phone
Making and answering hands-free phone
calls is easy with Uconnect. When the Phone-
book button is illuminated on your touch-
screen, your system is ready.
U.S. residents can visit UconnectPhone.com
to check device and feature compatibility and
to find device pairing instructions.
Push the Phone button
. After the beep,
say one of the following commands…
• Call John Smith
• Dial 123-456-7890 and follow the system
prompts
• Redial (call previous outgoing phone num-
ber)
• Call back (call previous incoming phone
number)
TIP: When providing a Voice Command, push
the Phone button
and say “Call,”then
pronounce the name exactlyas it appears in
your phone book. When a contact has mul-
tiple phone numbers, you can say “CallJohn
Smith work.”
Uconnect 3 With 5–inch Display Media
Uconnect 4C/4C NAV With 8.4–inch
Display Media
275
Page 294 of 298
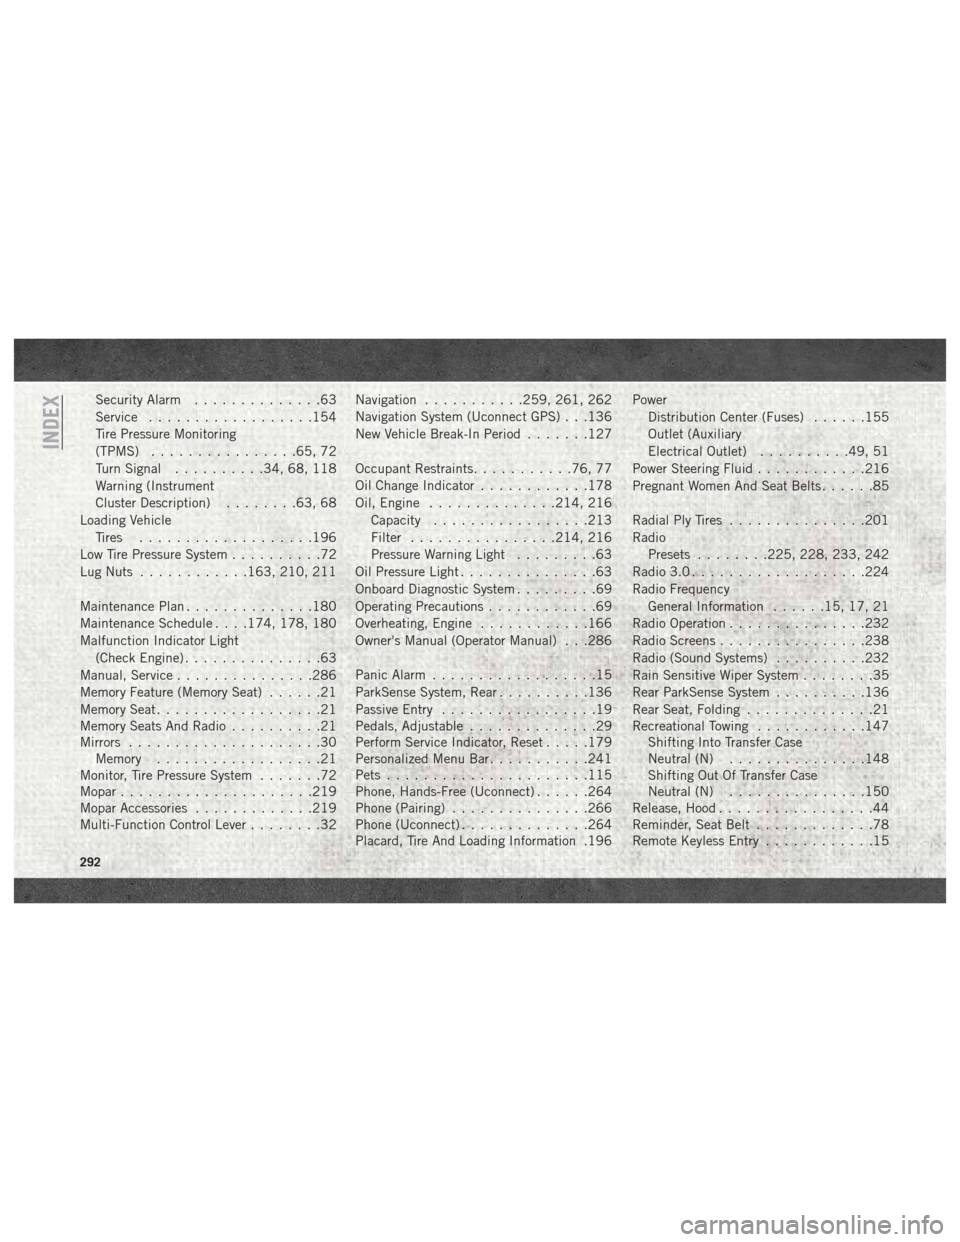
Security Alarm..............63
Service ..................154
Tire Pressure Monitoring
(TPMS) ................65, 72
Turn Signal ..........34, 68, 118
Warning (Instrument
Cluster Description) ........63, 68
Loading Vehicle Tires ...................196
Low Tire Pressure System ..........72
Lug Nuts ............163, 210, 211
Maintenance Plan ..............180
Maintenance Schedule . . . .174, 178, 180
Malfunction Indicator Light (Check Engine) ...............63
Manual, Service ...............286
Memory Feature (Memory Seat) ......21
Memory Seat ..................21
Memory Seats And Radio ..........21
Mirrors .....................30
Memory ..................21
Monitor, Tire Pressure System .......72
Mopar .....................219
Mopar Accessories .............219
Multi-Function Control Lever ........32Navigation
...........259, 261, 262
Navigation System (Uconnect GPS) . . .136
New Vehicle Break-In Period .......127
Occupant Restraints ...........76, 77
Oil Change Indicator ............178
Oil, Engine ..............214, 216
Capacity .................213
Filter ................214, 216
Pressure Warning Light .........63
Oil Pressure Light ...............63
Onboard Diagnostic System .........69
Operating Precautions ............69
Overheating, Engine ............166
Owner's Manual (Operator Manual) . . .286
Panic Alarm ..................15
ParkSense System, Rear ..........136
Passive Entry .................19
Pedals, Adjustable ..............29
Perform Service Indicator, Reset .....179
Personalized Menu Bar ...........241
Pets ......................115
Phone,
Hands-Free (Uconnect) ......264
Phone (Pairing) ...............266
Phone (Uconnect) ..............264
Placard, Tire And Loading Information .196 Power
Distribution Center (Fuses) ......155
Outlet (Auxiliary
Electrical Outlet) ..........49, 51
Power Steering Fluid ............216
Pregnant Women And Seat Belts ......85
Radial Ply Tires ...............201
Radio Presets ........225, 228, 233, 242
Radio 3.0 ...................224
Radio Frequency General Information ......15, 17, 21
Radio Operation ...............232
Radio Screens ................238
Radio (Sound Systems) ..........232
Rain Sensitive Wiper System ........35
Rear ParkSense System ..........136
Rear Seat, Folding ..............21
Recreational Towing ............147
Shifting Into Transfer Case
Neutral (N) ...............148
Shifting Out Of Transfer Case
Neutral (N) ...............150
Release, Hood .................44
Reminder, Seat Belt .............78
Remote Keyless Entry ............15
INDEX
292