audio Ram 4500 Chassis Cab 2018 Owner's Manual
[x] Cancel search | Manufacturer: RAM, Model Year: 2018, Model line: 4500 Chassis Cab, Model: Ram 4500 Chassis Cab 2018Pages: 298, PDF Size: 5.88 MB
Page 260 of 298
There are many ways to play music from
MP3 players, or USB devices through your
vehicle's sound system. Press your Media
button on the touchscreen to begin.
Audio Jack (AUX)
• The AUX allows a device to be plugged intothe radio and utilize the vehicle’s sound
system, using a 3.5 mm audio cable, to
amplify the source and play through the
vehicle speakers.
• Pressing the “AUX” button on the touch- screen will change the mode to auxiliary
device if the audio jack is connected, allow-
ing the music from your device to be heard
through the vehicle's speakers. To activate
the AUX, plug in the audio jack.
• The functions of the device are controlled using the device buttons. The volume may
be controlled using the radio or device.
USB Port
• Connect your compatible device using a
USB cable into the USB Port. USB Memory
sticks with audio files can also be used.
Audio from the device can be played on the
vehicles sound system while providing
metadata (artist, track title, album, etc.)
information on the radio display.
• When connected, the compatible USB de- vice can be controlled using the radio or
Steering Wheel Audio Controls to play, skip
to the next or previous track, browse, and
list the contents.
• The battery charges when plugged into the USB port (if supported by the specific de-
vice).
• To route the USB cable out of the center console, use the access cut out. NOTE:
When connecting your device for the first
time, the system may take several minutes to
read your music, depending on the number of
files. For example, the system will take ap-
proximately five minutes for every
1,000 songs loaded on the device. Also dur-
ing the reading process, the Shuffle and
Browse functions will be disabled. This pro-
cess is needed to ensure the full use of your
features and only happens the first time it is
connected. After the first time, the reading
process of your device will take considerably
less time unless changes are made or new
songs are added to the playlist.
MULTIMEDIA
258
Page 261 of 298
Bluetooth Streaming Audio
If using a Bluetooth equipped device you may
also be able to stream music to your vehicle's
sound system. Your connected device must
be Bluetooth compatible and paired with your
system (see Uconnect Phone for pairing in-
structions). You can access the music from
your connected Bluetooth device by pressing
the Bluetooth button on the touchscreen
while in Media mode.
NAVIGATION
• The information in the section below is onlyapplicable if you have the Uconnect 4C
NAV system or the Navigation has been
activated on your Uconnect 4C with 8.4–
inch display system.
Press the “Nav” button on the touchscreen in
the menu bar to access the Navigation sys-
tem.
Changing The Navigation Voice
Prompt Volume
Changing The Navigation Voice Prompt Volume
1. Press the “Settings” button on the touch- screen in the lower right area of the
screen.
2. In the Settings menu, press the “Guid- ance” button on the touchscreen.
3. In the Guidance menu, adjust the Nav Volume by pressing the “+” or “–” buttons
on the touchscreen.
259
Page 270 of 298
Select The iPhone's Priority Level
When the pairing process has successfully
completed, the system will prompt you to
choose whether or not this is your favorite
mobile phone. Selecting “Yes” will make this
mobile phone the highest priority. This mo-
bile phone will take precedence over other
paired mobile phones within range and will
connect to the Uconnect system automati-
cally when entering the vehicle. Only one
mobile phone and/or one Bluetooth audio
device can be connected to the Uconnect
system at a time. If “No” is selected, simply
select “Uconnect” from the mobile phone/
audio device Bluetooth screen, and the
Uconnect system will reconnect to the
Bluetooth device.Pair Your Android Device:
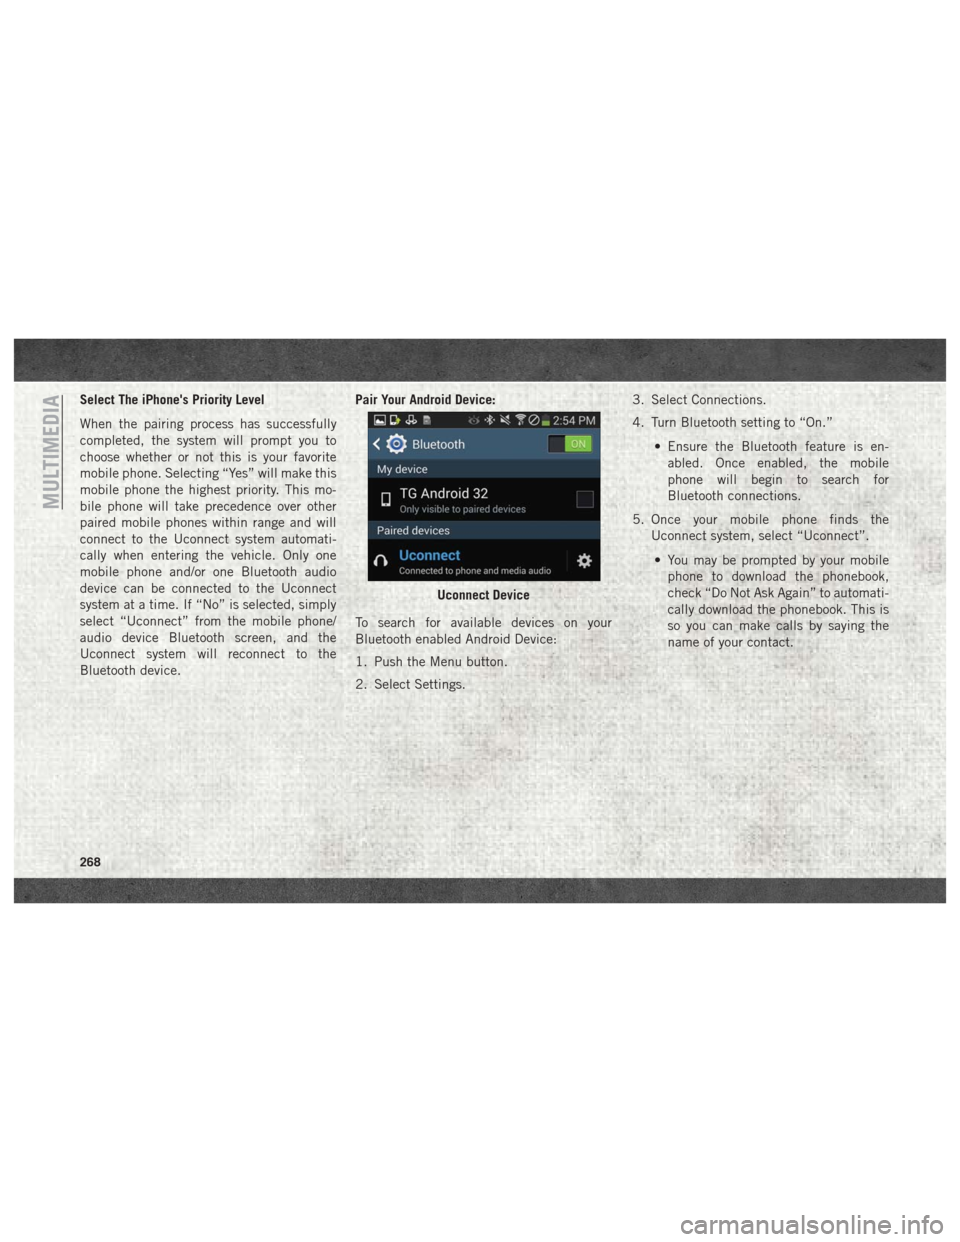
To search for available devices on your
Bluetooth enabled Android Device:
1. Push the Menu button.
2. Select Settings. 3. Select Connections.
4. Turn Bluetooth setting to “On.”
• Ensure the Bluetooth feature is en-abled. Once enabled, the mobile
phone will begin to search for
Bluetooth connections.
5. Once your mobile phone finds the Uconnect system, select “Uconnect”.
• You may be prompted by your mobile phone to download the phonebook,
check “Do Not Ask Again” to automati-
cally download the phonebook. This is
so you can make calls by saying the
name of your contact.
Uconnect Device
MULTIMEDIA
268
Page 271 of 298
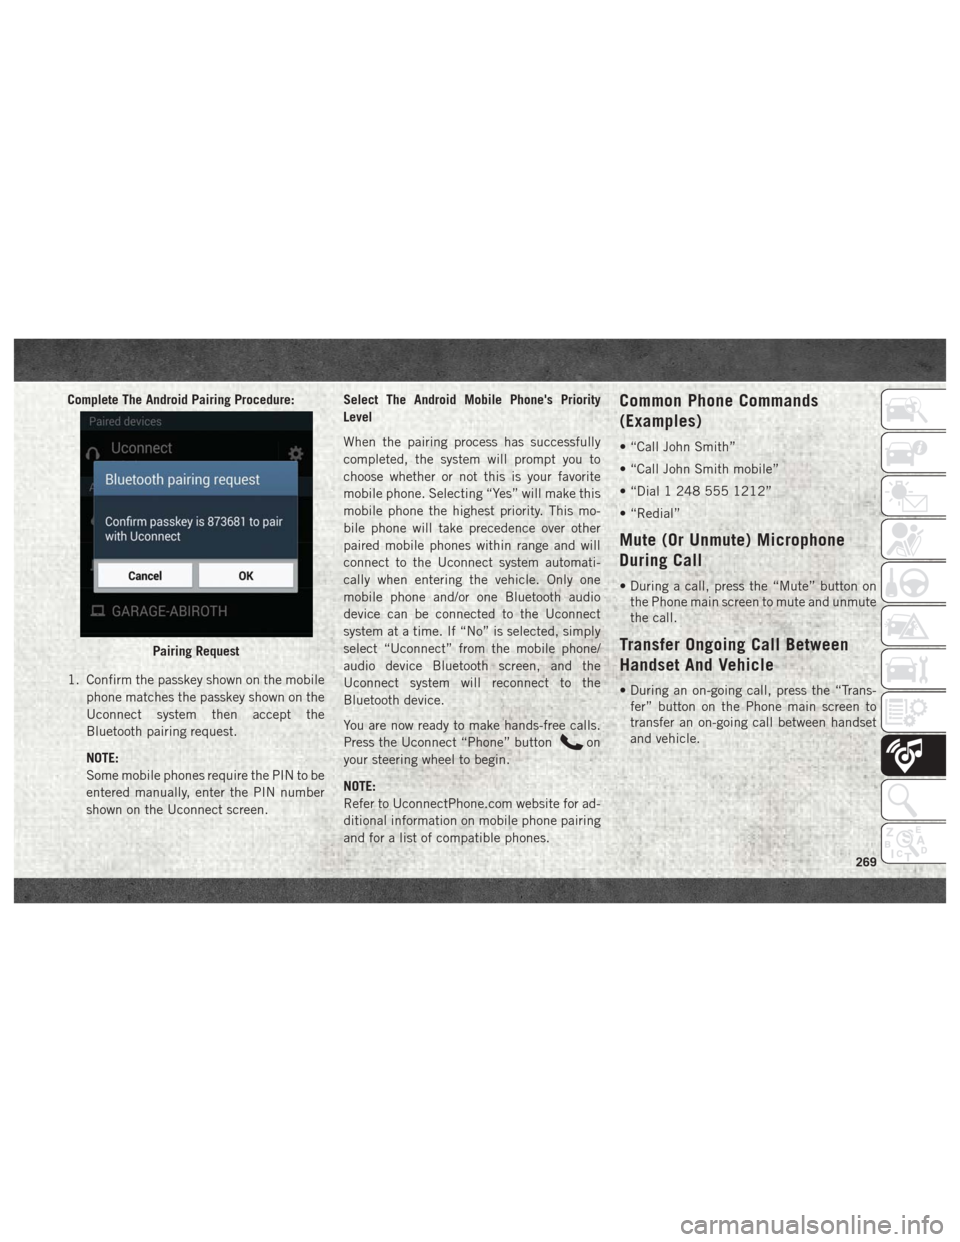
Complete The Android Pairing Procedure:
1. Confirm the passkey shown on the mobilephone matches the passkey shown on the
Uconnect system then accept the
Bluetooth pairing request.
NOTE:
Some mobile phones require the PIN to be
entered manually, enter the PIN number
shown on the Uconnect screen. Select The Android Mobile Phone's Priority
Level
When the pairing process has successfully
completed, the system will prompt you to
choose whether or not this is your favorite
mobile phone. Selecting “Yes” will make this
mobile phone the highest priority. This mo-
bile phone will take precedence over other
paired mobile phones within range and will
connect to the Uconnect system automati-
cally when entering the vehicle. Only one
mobile phone and/or one Bluetooth audio
device can be connected to the Uconnect
system at a time. If “No” is selected, simply
select “Uconnect” from the mobile phone/
audio device Bluetooth screen, and the
Uconnect system will reconnect to the
Bluetooth device.
You are now ready to make hands-free calls.
Press the Uconnect “Phone” button
on
your steering wheel to begin.
NOTE:
Refer to UconnectPhone.com website for ad-
ditional information on mobile phone pairing
and for a list of compatible phones.
Common Phone Commands
(Examples)
• “Call John Smith”
• “Call John Smith mobile”
• “Dial 1 248 555 1212”
• “Redial”
Mute (Or Unmute) Microphone
During Call
• During a call, press the “Mute” button on the Phone main screen to mute and unmute
the call.
Transfer Ongoing Call Between
Handset And Vehicle
• During an on-going call, press the “Trans-fer” button on the Phone main screen to
transfer an on-going call between handset
and vehicle.
Pairing Request
269
Page 272 of 298
Phonebook
The Uconnect system will automatically sync
your phonebook from your paired phone, if
this feature is supported by your phone.
Phonebook contacts are updated each time
that the phone is connected. If your phone
book entries do not appear, check the set-
tings on your phone. Some phones require
you to enable this feature manually.
• Your phonebook can be browsed on theUconnect system touchscreen, but editing
can only be done on your phone. To browse,
press the “Phone” button on the touch-
screen, then the “Phonebook” button on
the touchscreen.
Favorite phonebook entries can be saved as
Favorites for quicker access. Favorites are
shown at the top of the main phone screen.
Voice Command Tips
• Speaking complete names (i.e; Call John Doe vs. Call John) will result in greater
system accuracy.
• You can “link” commands together for faster results. Say “Call John Doe, mobile,”
for example. • If you are listening to available voice com-
mand options, you do not have to listen to
the entire list. When you hear the command
that you need, push the
button on the
steering wheel, wait for the beep and say
your command.
Changing The Volume
• Start a dialogue by pushing the VR button
, then say a command. For example,
"Help".
• Use the radio VOLUME/MUTE rotary knob to adjust the volume to a comfortable level
while the Uconnect system is speaking.
NOTE:
The volume setting for Uconnect is different
than the audio system.
NOTE:
To access help, push the Uconnect VR button
(if active) on the steering wheel and say
"help." Push the Uconnect VR Pickup button
(if active) or the VR button(if
active) and say "cancel" to cancel the help
session.
Using Do Not Disturb
With Do Not Disturb, you can disable notifi-
cations from incoming calls and texts, allow-
ing you to keep your eyes on the road and
hands on the wheel. For your convenience,
there is a counter display to keep track of
your missed calls and text messages while
you were using Do Not Disturb.
Do Not Disturb can automatically reply with a
text message, a call or both, when declining
an incoming call and send it to voicemail.
Automatic reply messages can be:
• “I am driving right now, I will get back to
you shortly.”
• Create a custom auto reply message up to 160 characters.
While in Do Not Disturb, Conference Call can
be selected so you can still place a second
call without being interrupted by incoming
calls.
NOTE:
• Only the beginning of your custom message will be seen on the touchscreen.
MULTIMEDIA
270
Page 273 of 298
• Reply with text message is not compatiblewith iPhones.
• Auto reply with text message is only avail- able on phones that supporting Bluetooth
MAP.
Incoming Text Messages
After pairing your Uconnect system with a
Bluetooth enabled mobile device with the
Message Access Profile (MAP), the Uconnect
system can announce a new incoming text
message and read it to you over the vehicle’s
audio system.
NOTE:
Only incoming text messages received during
the current ignition cycle can be viewed/read.
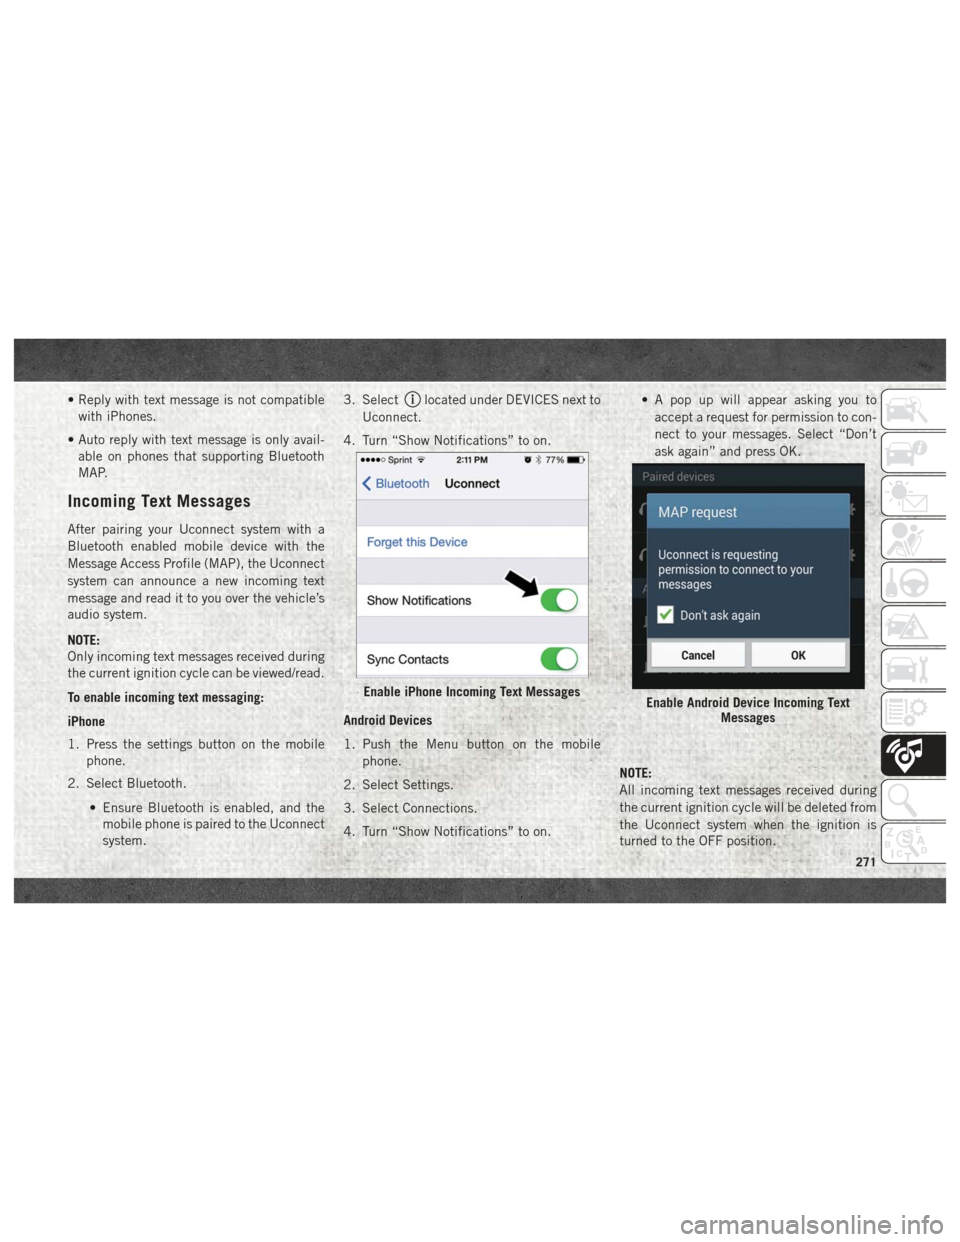
To enable incoming text messaging:
iPhone
1. Press the settings button on the mobile phone.
2. Select Bluetooth.
• Ensure Bluetooth is enabled, and themobile phone is paired to the Uconnect
system. 3. Select
located under DEVICES next to
Uconnect.
4. Turn “Show Notifications” to on.
Android Devices
1. Push the Menu button on the mobile phone.
2. Select Settings.
3. Select Connections.
4. Turn “Show Notifications” to on. • A pop up will appear asking you to
accept a request for permission to con-
nect to your messages. Select “Don’t
ask again” and press OK.
NOTE:
All incoming text messages received during
the current ignition cycle will be deleted from
the Uconnect system when the ignition is
turned to the OFF position.
Enable iPhone Incoming Text MessagesEnable Android Device Incoming Text Messages
271
Page 291 of 298
Accessories..................219
Mopar ...................219
Adding Fuel ..............138, 139
Additives, Fuel ................139
Adjustable Pedals ...............29
Air Bag Air Bag Operation .............90
Air Bag Warning Light ..........87
Enhanced Accident Response . .94, 171
Event Data Recorder (EDR) ......171
If A Deployment Occurs .........94
Knee Impact Bolsters ..........90
Maintaining Your Air Bag System . . .95
Transporting Pets ............115
Air Bag Light ............61, 87, 116
Air Bag Maintenance .............95
Air Cleaner, Engine (Engine Air Cleaner Filter) .......186
Air Conditioning Filter ............44
Air Conditioning, Operating Tips ......44
Air Conditioning System ...........43
Air Filter ...................186
Air Pressure, Tires ..............200
Alarm, Panic ..................15
Alarm (Security Alarm) .........17, 63 Alarm System (Security Alarm)
.......17
Antifreeze (Engine Coolant) Capacities ................213
Anti-Lock Warning Light ...........66
Audio Jack ..................257
Automatic Headlights ............33
Automatic High Beams ...........32
Automatic Temperature Control (ATC) . . .43
Automatic Transmission Fluid Type ............216, 218
Shifting .................129
Axle Fluid ...............216, 218
Back-Up ...................136
Back-Up Camera ..............136
Battery .....................62
Charging System Light .........62
Belts, Seat ..................116
Body Builders Guide ..............2
B-Pillar Location ..............196
Brake Fluid ................. .216
Brake
System
Warning Light ...............61
Brake/Transmission Interlock .......129
Bulb Replacement .............154 Bulbs, Light
..............118, 154
Camera ....................136
Camera, Rear ................136
Capacities, Antifreeze (Engine Coolant) .............213
Capacities, Fluid ..............213
Caps, Filler Oil (Engine) ...............184
Carbon Monoxide Warning .........115
Cargo Light ...................34
Changing A Flat Tire ............160
Chart, Tire Sizing ..............192
Checking Your Vehicle For Safety . . . .115
Checks, Safety ................115
Child Restraint ................96
Child Restraints Booster Seats ...............99
Child Restraints ..............96
Child Seat Installation .....107, 109
How To Stow An Unused
ALR Seat Belt ..............106
Infants And Child Restraints ......97
Locating The LATCH Anchorages . .104
INDEX
289
Page 293 of 298
Four Wheel Drive..............131
Freeing A Stuck Vehicle ..........168
Fuel ......................139
Adding ...............138, 139
Additives .................139
Diesel ...............139, 216
Filter ................187, 214
Light ....................66
Materials Added ............139
Tank Capacity ..............213
Fuses .....................155
Garage Door Opener (HomeLink) ......45
Gauges Voltmeter ................125
Gear Select Lever Override ........167
General Information .............76
Guide, Body Builders .............2
Hands-Free Phone (Uconnect) ......264
Hazard Warning Flasher ..........154
Headlights Automatic .................33
High Beam ................32
High Beam/Low Beam
Select Switch ...............32
Switch ...................31 Head Restraints
................26
High Beam/Low Beam Select (Dimmer) Switch ..............32
Hoisting ....................191
HomeLink (Garage Door Opener) ......45
Hood Prop ...................44
Hood Release .................44
Hub Caps ...................163
Idle Up Feature ...............126
Instrument Cluster ..............68
Integrated Trailer Brake Controls .....144
Intermittent Wipers (Delay Wipers) ....35
Intervention Regeneration Strategy ....55
Introduction ...................1
Inverter Outlet (115V) ............51
iPod/USB/MP3 Control Bluetooth Streaming Audio ......264
Jack Operation ................160
Jump Starting ................164
Key
Fob
Panic Alarm ................15
Keyless Enter-N-Go ..........19, 122
Passive Entry ...............19
Passive Entry Programming .......19Keys
.......................13
Lane Change And Turn Signals .......34
Lane Change Assist ..............34
Latches ....................118
Hood ....................44
Leaks, Fluid .................118
Life Of Tires .................202
Light Bulbs ..................118
Lights .....................118
AirBag .............61, 87, 116
Automatic Headlights ..........33
Brake Warning ..............61
Bulb Replacement ...........154
Cargo ....................34
Cruise ...................68
Engine Temperature Warning .....63
Exterior ..................118
Fog .....................67
Hazard Warning Flasher ........154
Headlights .................31
High Beam ................32
High Beam/Low Beam Select .....32
Low Fuel ..................66
Malfunction Indicator (Check Engine) .63
Park ....................68
Seat Belt Reminder ...........61
291