headlights Ram 4500 Chassis Cab 2018 User Guide
[x] Cancel search | Manufacturer: RAM, Model Year: 2018, Model line: 4500 Chassis Cab, Model: Ram 4500 Chassis Cab 2018Pages: 298, PDF Size: 5.88 MB
Page 11 of 298
GETTING TO KNOW YOUR VEHICLE
VEHICLE USER GUIDE — IF EQUIPPED .11
KEYS......................13
Key Fobs ....................13
IGNITION SWITCH ..............16
Wireless Ignition Node (WIN) —
If Equipped...................16
Keyless Push Button Ignition —
If Equipped ...................16
REMOTE START — IF EQUIPPED .....16
To Enter Remote Start Mode........16
To Exit Remote Start Mode Without
Driving The Vehicle .............17
To Exit Remote Start Mode And Drive
The Vehicle ...................17
General Information .............17
VEHICLE SECURITY ALARM ........17
To Arm The System..............18
To Disarm The System ............18
DOORS.....................19
Keyless Enter-N-Go — Passive Entry . . .19
SEATS .....................21
Driver Memory Seat — If Equipped ....21
Heated Seats ..................24
HEAD RESTRAINTS ..............26
Front Head Restraint Adjustment .....26
Rear Head Restraint Adjustment ......26
Front Head Restraint Removal .......27
Rear Head Restraint Removal ........27
STEERING WHEEL..............28
Tilt Steering Column .............28
Heated Steering Wheel — If Equipped . .28
DRIVER ADJUSTABLE PEDALS —
IF EQUIPPED .................29
MIRRORS ...................30
Power Folding Outside Mirrors For Standard
And Trailer Tow — If Equipped .......30
EXTERIOR LIGHTS..............31
Headlight Switch...............31
Headlights ...................32
Multifunction Lever .............32
High/Low Beam Switch ...........32Automatic High Beam Headlamp Control —
If Equipped
..................32
Automatic Headlights — If Equipped . .33
Parking Lights And Panel Lights ......34
Headlights On With Wipers (Available
With Automatic Headlights Only) ......34
Turn Signals ..................34
Lane Change Assist — If Equipped ....34
Cargo Light ..................34
WINDSHIELD WIPERS AND WASHERS .34
Windshield Wipers ..............34
Rain Sensing Wipers — If Equipped . . .35
CLIMATE CONTROLS .............37
Automatic Climate Controls With A
Touchscreen..................37
Climate Control Functions ..........42
Automatic Temperature Control (ATC) —
If Equipped ...................43
Operating Tips .................44
HOOD......................44
To Open The Hood ..............44
To Close The Hood ..............45
GETTING TO KNOW YOUR VEHICLE
9
Page 19 of 298
• If an engine fault is present or fuel level islow, the vehicle will start and then shut
down in 10 seconds.
• The park lamps will turn on and remain on during Remote Start mode.
• For security, power window and power sun- roof operation (if equipped) are disabled
when the vehicle is in the Remote Start
mode.
• The engine can be started two consecutive times (two 15-minute cycles) with the key
fob. However, the ignition must be placed
in the ON/RUN position before you can
repeat the start sequence for a third cycle.
To Exit Remote Start Mode
Without Driving The Vehicle
Push and release the remote start button one
time or allow the engine to run for the entire
15-minute cycle.
NOTE:
To avoid unintentional shutdowns, the system
will disable with a one time push of the
remote start button for two seconds after
receiving a valid remote start request.
To Exit Remote Start Mode And
Drive The Vehicle
Before the end of the 15-minute cycle, push
and release the unlock button on the key fob
to unlock the doors and disarm the vehicle
security alarm system (if equipped). Then,
prior to the end of the 15-minute cycle, cycle
the ignition to the ON/RUN position.
General Information
The following regulatory statement applies to
all radio frequency (RF) devices equipped in
this vehicle:
This device complies with Part 15 of the FCC
Rules and with Industry Canada license-
exempt RSS standard(s). Operation is sub-
ject to the following two conditions:
1. This device may not cause harmful inter-
ference, and
2. This device must accept any interference received, including interference that may
cause undesired operation. NOTE:
Changes or modifications not expressly ap-
proved by the party responsible for compli-
ance could void the user’s authority to oper-
ate the equipment.
VEHICLE SECURITY ALARM
The vehicle security alarm monitors the ve-
hicle doors and ignition for unauthorized op-
eration. When the vehicle security alarm is
activated, interior switches for door locks are
disabled. The system provides both audible
and visible signals for the first three minutes.
The horn will sound, the headlights will turn
on, the park lamps and/or turn signals will
flash and vehicle security light will flash
repeatedly. For an additional 15 minutes
only, the headlights will turn on, the park
lamps and/or turn signals, and vehicle secu-
rity light will flash.
17
Page 33 of 298
• The mirrors shake and vibrate at normaldriving speeds.
To Reset The Power Folding Mirrors:
1. Using the power folding mirror switch, move the mirror to its full forward
position.
2. Using the power folding mirror switch, move the mirror to the full retract position
(this may require multiple button
pushes). This resets them to their normal
position.
NOTE:
• The power fold mirrors are designed to operate while the vehicle is stationary or
traveling at moderate speeds. If you at-
tempt to power fold the mirrors at high
speeds they may not fully open or close. You
should slow down to a moderate speed and
complete the operation.
• When pushing the power fold button 10 or more times in one minute the system shuts
down for one minute to protect the motors
from over heating.EXTERIOR LIGHTS
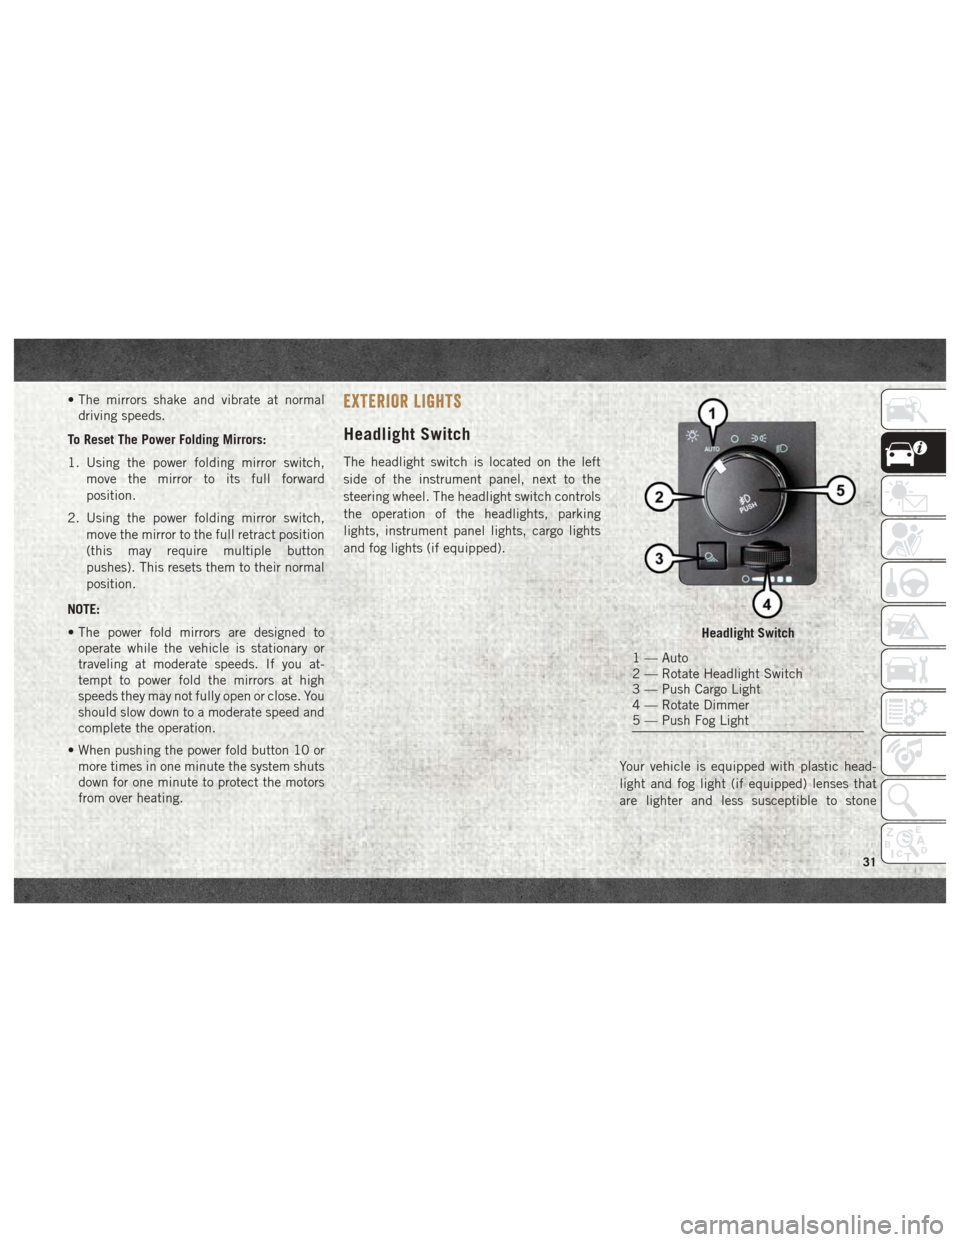
Headlight Switch
The headlight switch is located on the left
side of the instrument panel, next to the
steering wheel. The headlight switch controls
the operation of the headlights, parking
lights, instrument panel lights, cargo lights
and fog lights (if equipped).
Your vehicle is equipped with plastic head-
light and fog light (if equipped) lenses that
are lighter and less susceptible to stone
Headlight Switch
1 — Auto
2 — Rotate Headlight Switch
3 — Push Cargo Light
4 — Rotate Dimmer
5 — Push Fog Light
31
Page 34 of 298
breakage than glass lights. Plastic is not as
scratch resistant as glass and therefore dif-
ferent lens cleaning procedures must be fol-
lowed.
To minimize the possibility of scratching the
lenses and reducing light output, avoid wip-
ing with a dry cloth. To remove road dirt, wash
with a mild soap solution followed by rinsing.
NOTE:
If your vehicle is equipped with illuminated
approach lights under the outside mirrors,
they can be turned off through the instrument
cluster or the Uconnect radio. For further
information, refer to the Owner’s Manual at
www.mopar.com/en-us/care/owners-manual.html
(U.S. Residents) or www.owners.mopar.ca
(Canadian Residents) for further information.
CAUTION!
Do not use abrasive cleaning components,
solvents, steel wool or other abrasive ma-
terials to clean the lenses.
Headlights
To turn on the headlights, rotate the head-
light switch clockwise to the headlight posi-
tion. When the headlight switch is on, the
parking lights, taillights, license plate light
and instrument panel lights are also turned
on. To turn off the headlights, rotate the
headlight switch back to the O (off) position.
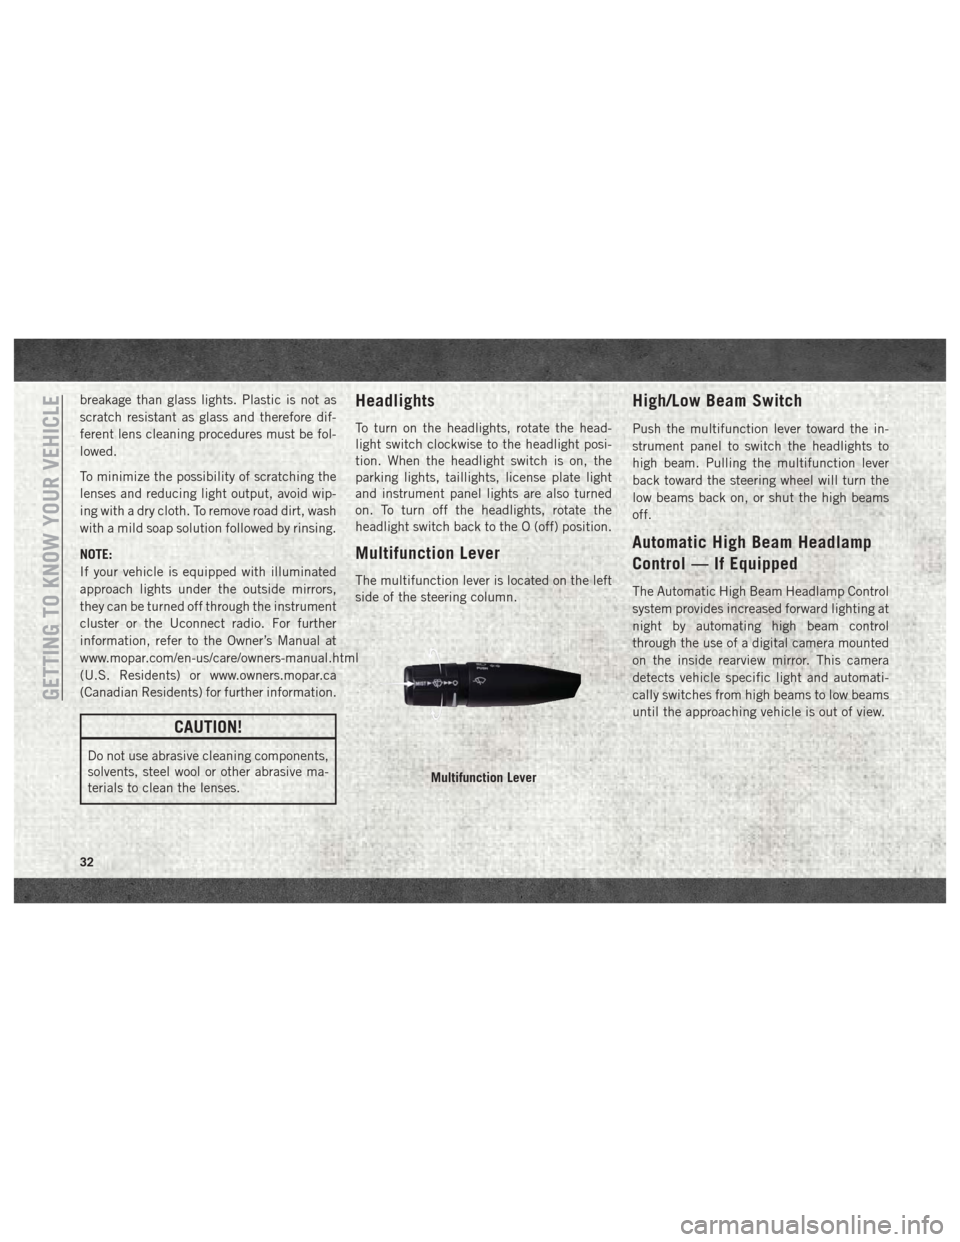
Multifunction Lever
The multifunction lever is located on the left
side of the steering column.
High/Low Beam Switch
Push the multifunction lever toward the in-
strument panel to switch the headlights to
high beam. Pulling the multifunction lever
back toward the steering wheel will turn the
low beams back on, or shut the high beams
off.
Automatic High Beam Headlamp
Control — If Equipped
The Automatic High Beam Headlamp Control
system provides increased forward lighting at
night by automating high beam control
through the use of a digital camera mounted
on the inside rearview mirror. This camera
detects vehicle specific light and automati-
cally switches from high beams to low beams
until the approaching vehicle is out of view.
Multifunction Lever
GETTING TO KNOW YOUR VEHICLE
32
Page 35 of 298
NOTE:
• The Automatic High Beam Headlamp Con-trol can be turned on or off by selecting
“ON” under “Auto High Beam” within your
Uconnect settings, as well as turning the
headlight switch to the AUTO position. Re-
fer to “Uconnect Settings” in “Multimedia”
in the Owner’s Manual at
www.mopar.com/en-us/care/owners-manual.html
(U.S. Residents) or www.owners.mopar.ca
(Canadian Residents) for further informa-
tion.
• Broken, muddy, or obstructed headlights and taillights of vehicles in the field of view
will cause headlights to remain on longer
(closer to the vehicle). Also, dirt, film, and
other obstructions on the windshield or
camera lens will cause the system to func-
tion improperly.
If the windshield or Automatic High Beam
Headlamp Control mirror is replaced, the
mirror must be re-aimed to ensure proper
performance. See a local authorized dealer.To Activate
1. The Automatic High Beams are enabled through the Uconnect system. Refer to
“Uconnect Settings” in “Multimedia” in
the Owner’s Manual at
www.mopar.com/en-us/care/owners-manual.html
(U.S. Residents) or www.owners.mopar.ca
(Canadian Residents) for further
information.
2. Turn the headlight switch to the AUTO headlight position.
3. Push the multifunction lever away from you (toward front of vehicle) to engage the
high beam mode.
NOTE:
This system will not activate until the vehicle
is at or above 20 mph (32 km/h).
To Deactivate
1. Pull the multifunction lever toward you (or rearward in vehicle) to manually deacti-
vate the system (normal operation of low
beams).
2. Push back on the multifunction lever to reactivate the system.
Automatic Headlights —
If Equipped
This system automatically turns the head-
lights on or off according to ambient light
levels. To turn the system on, rotate the
headlight switch counterclockwise to the
AUTO position. When the system is on, the
headlight time delay feature is also on. This
means the headlights will stay on for up to
90 seconds after you place the ignition into
the OFF position. The headlight time delay
can be programmed 0/30/60/90 seconds.
Refer to “Uconnect Settings” in “Multime-
dia” in the Owner’s Manual at
www.mopar.com/en-us/care/owners-manual.html
(U.S. Residents) or www.owners.mopar.ca
(Canadian Residents) for further information.
To turn the automatic system off, move the
headlight switch out of the AUTO position.
NOTE:
The engine must be running before the head-
lights will turn on in the Automatic Mode.
33
Page 36 of 298
Parking Lights And Panel Lights
To turn on the parking lights and instrument
panel lights, rotate the headlight switch
clockwise. To turn off the parking lights,
rotate the headlight switch back to the O (off)
position.
Headlights On With Wipers
(Available With Automatic
Headlights Only)
When this feature is active, the headlights
will turn on approximately 10 seconds after
the wipers are turned on if the headlight
switch is placed in the AUTO position. In
addition, the headlights will turn off when the
wipers are turned off, if they were turned on
by this feature.NOTE:
This feature can be programmed through the
Uconnect system. Refer to “Uconnect Set-
tings” in “Multimedia” in the Owner’s
Manual at www.mopar.com/en-us/care/
owners-manual.html (U.S. Residents) or
www.owners.mopar.ca (Canadian Residents)
for further information.
Turn Signals
Move the multifunction lever up or down and
the arrows on each side of the instrument
cluster display will flash to show proper op-
eration of the front and rear turn signal lights.
NOTE:
If either light remains on and does not flash,
or there is a very fast flash rate, check for a
defective outside light bulb. If an indicator
fails to light when the lever is moved, it would
suggest that the indicator bulb is defective.
Lane Change Assist —
If Equipped
Tap the lever up or down once, without mov-
ing beyond the detent, and the turn signal
(right or left) will flash three times then
automatically turn off.
Cargo Light
The cargo light is turned on by pushing on the
cargo light button.
The cargo light will also turn on for approxi-
mately 60 seconds when the unlock button
on a key fob is pushed, as part of the Illumi-
nated Entry feature.
WINDSHIELD WIPERS AND WASHERS
Windshield Wipers
The wipers and washers are operated by a
switch in the multifunction lever. Turn the
end of the lever to select the desired wiper
speed.
GETTING TO KNOW YOUR VEHICLE
34
Page 62 of 298
Instrument Cluster Display Programmable Features
The instrument cluster display can be used to view or change the following settings. Push theupordown arrow button until System Setup
displays, then push the rightarrow button. Scroll through the settings using the upordown arrow button. Push the rightarrow button to change
the setting. Push the leftarrow button to scroll back to a previous menu or sub menu.
• Language Select • Remote Start Comfort System
• Units • Easy Exit Seat
• ParkSense • Key Off Power Delay
• Tilt Mirror In Reverse • Commercial Settings
• Rain Sensing Wipers • Air Suspension Display Alerts
• Hill Start Assist • Aero Ride Height Mode
• Headlights Off Delay • Tire/Jack Mode
• Illuminated Approach • Transport Mode
• Headlights On With Wipers • Wheel Alignment Mode
• Automatic Highbeams • Horn With Remote Lower
• Flash Lights With Lock • Lights With Remote Lower
• Auto Lock Doors • Trailer Select
• Auto Unlock Doors • Brake Type
• Sound Horn With Remote Start • Trailer Name
• Sound Horn With Remote Lock • Compass Variance
• Remote Unlock Sequence • Calibrate Compass
• Key Fob Linked To Memory • Fuel Saver Display
• Passive Entry • Park Assist Front Chime Volume
• Park Assist Rear Chime Volume
GETTING TO KNOW YOUR INSTRUMENT PANEL
60
Page 70 of 298
age. Refer to the “Draining Fuel/Water Sepa-
rator Filter” section in “Dealer Service” in
“Servicing And Maintenance” for further in-
formation.
— Low Diesel Exhaust Fluid (DEF)
Indicator Light — If Equipped
The Low Diesel Exhaust Fluid (DEF) Indicator
will illuminate if the vehicle is low on Diesel
Exhaust Fluid (DEF). Refer to “Starting And
Operating” for further information.
Green Indicator Lights
— Park/Headlight On Indicator Light
This indicator will illuminate when the park
lights or headlights are turned on.
— Front Fog Indicator Light —
If Equipped
This indicator will illuminate when the front
fog lights are on.
— Turn Signal Indicator Lights
When the left or right turn signal is activated,
the turn signal indicator will flash indepen-
dently and the corresponding exterior turn
signal lamps will flash. Turn signals can be
activated when the multifunction lever is
moved down (left) or up (right).
NOTE:
• A continuous chime will sound if the ve- hicle is driven more than 1 mile (1.6 km)
with either turn signal on.
• Check for an inoperative outside light bulb if either indicator flashes at a rapid rate.
— Cruise Control SET Indicator Light
This light will turn on when the speed control
is set to the desired speed. Refer to “Speed
Control” in “Starting And Operating” for fur-
ther information.
White Indicator Lights
— Cruise Control ON Indicator
This light will turn on when the speed control
is on, but not set.
— Speed Control SET Indicator Light
This light will turn on when the speed control
is set. Refer to “Speed Control — If
Equipped” in “Starting And Operating” for
further information.
Blue Indicator Lights
— High Beam Indicator Light
This indicator shows that the high beam
headlights are on. With the low beams acti-
vated, push the multifunction lever forward
(toward the front of the vehicle) to turn on the
high beams. Pull the multifunction lever rear-
ward (toward the rear of the vehicle) to turn
off the high beams. If the high beams are off,
pull the lever toward you for a temporary high
beam on, "flash to pass" scenario.
GETTING TO KNOW YOUR INSTRUMENT PANEL
68
Page 291 of 298
Accessories..................219
Mopar ...................219
Adding Fuel ..............138, 139
Additives, Fuel ................139
Adjustable Pedals ...............29
Air Bag Air Bag Operation .............90
Air Bag Warning Light ..........87
Enhanced Accident Response . .94, 171
Event Data Recorder (EDR) ......171
If A Deployment Occurs .........94
Knee Impact Bolsters ..........90
Maintaining Your Air Bag System . . .95
Transporting Pets ............115
Air Bag Light ............61, 87, 116
Air Bag Maintenance .............95
Air Cleaner, Engine (Engine Air Cleaner Filter) .......186
Air Conditioning Filter ............44
Air Conditioning, Operating Tips ......44
Air Conditioning System ...........43
Air Filter ...................186
Air Pressure, Tires ..............200
Alarm, Panic ..................15
Alarm (Security Alarm) .........17, 63 Alarm System (Security Alarm)
.......17
Antifreeze (Engine Coolant) Capacities ................213
Anti-Lock Warning Light ...........66
Audio Jack ..................257
Automatic Headlights ............33
Automatic High Beams ...........32
Automatic Temperature Control (ATC) . . .43
Automatic Transmission Fluid Type ............216, 218
Shifting .................129
Axle Fluid ...............216, 218
Back-Up ...................136
Back-Up Camera ..............136
Battery .....................62
Charging System Light .........62
Belts, Seat ..................116
Body Builders Guide ..............2
B-Pillar Location ..............196
Brake Fluid ................. .216
Brake
System
Warning Light ...............61
Brake/Transmission Interlock .......129
Bulb Replacement .............154 Bulbs, Light
..............118, 154
Camera ....................136
Camera, Rear ................136
Capacities, Antifreeze (Engine Coolant) .............213
Capacities, Fluid ..............213
Caps, Filler Oil (Engine) ...............184
Carbon Monoxide Warning .........115
Cargo Light ...................34
Changing A Flat Tire ............160
Chart, Tire Sizing ..............192
Checking Your Vehicle For Safety . . . .115
Checks, Safety ................115
Child Restraint ................96
Child Restraints Booster Seats ...............99
Child Restraints ..............96
Child Seat Installation .....107, 109
How To Stow An Unused
ALR Seat Belt ..............106
Infants And Child Restraints ......97
Locating The LATCH Anchorages . .104
INDEX
289
Page 293 of 298
Four Wheel Drive..............131
Freeing A Stuck Vehicle ..........168
Fuel ......................139
Adding ...............138, 139
Additives .................139
Diesel ...............139, 216
Filter ................187, 214
Light ....................66
Materials Added ............139
Tank Capacity ..............213
Fuses .....................155
Garage Door Opener (HomeLink) ......45
Gauges Voltmeter ................125
Gear Select Lever Override ........167
General Information .............76
Guide, Body Builders .............2
Hands-Free Phone (Uconnect) ......264
Hazard Warning Flasher ..........154
Headlights Automatic .................33
High Beam ................32
High Beam/Low Beam
Select Switch ...............32
Switch ...................31 Head Restraints
................26
High Beam/Low Beam Select (Dimmer) Switch ..............32
Hoisting ....................191
HomeLink (Garage Door Opener) ......45
Hood Prop ...................44
Hood Release .................44
Hub Caps ...................163
Idle Up Feature ...............126
Instrument Cluster ..............68
Integrated Trailer Brake Controls .....144
Intermittent Wipers (Delay Wipers) ....35
Intervention Regeneration Strategy ....55
Introduction ...................1
Inverter Outlet (115V) ............51
iPod/USB/MP3 Control Bluetooth Streaming Audio ......264
Jack Operation ................160
Jump Starting ................164
Key
Fob
Panic Alarm ................15
Keyless Enter-N-Go ..........19, 122
Passive Entry ...............19
Passive Entry Programming .......19Keys
.......................13
Lane Change And Turn Signals .......34
Lane Change Assist ..............34
Latches ....................118
Hood ....................44
Leaks, Fluid .................118
Life Of Tires .................202
Light Bulbs ..................118
Lights .....................118
AirBag .............61, 87, 116
Automatic Headlights ..........33
Brake Warning ..............61
Bulb Replacement ...........154
Cargo ....................34
Cruise ...................68
Engine Temperature Warning .....63
Exterior ..................118
Fog .....................67
Hazard Warning Flasher ........154
Headlights .................31
High Beam ................32
High Beam/Low Beam Select .....32
Low Fuel ..................66
Malfunction Indicator (Check Engine) .63
Park ....................68
Seat Belt Reminder ...........61
291