Ram 5500 Chassis Cab 2011 Owner's Manual
5500 Chassis Cab 2011
Ram
Ram
https://www.carmanualsonline.info/img/34/12630/w960_12630-0.png
Ram 5500 Chassis Cab 2011 Owner's Manual
Trending: fuel consumption, hood open, key fob battery, keyless, steering wheel, navigation system, coolant level
Page 421 of 476

REPLACEMENT BULBS
LIGHT BULBS – InteriorBulb No.
Overhead Console Lamps ............... TS212-2
Dome Lamp ........................... 7679
NOTE: For lighted switches, see your authorized dealer
for replacement instructions.
All of the inside bulbs are brass or glass-wedge base.
Aluminum base bulbs are not approved.
LIGHT BULBS – Exterior Bulb No.
Center High Mounted Stop Lamp (CHMSL) ..... 921
Fog Lamp ............................. 9145
Dual Headlamp ......................... H13
Quad Headlamp – Low Beam ............... H11
Quad Headlamp – High Beam ..............9005
Side Marker (Dual Headlamp) .............3157K
Side Marker (Quad Headlamp) ............3157NA
Rear Cargo Lamp ........................ 921
Cab Roof Marker Lamps .................194NA
BULB REPLACEMENT
Dual or Quad Headlamp/Front Park and Turn
Signal – If Equipped
1. Open the hood.
2. Disconnect and isolate the negative battery cable.
3. Remove the four plastic push-in fasteners that secure
the upper radiator seal to the grille support and both
fender ledges.
4. Remove the two plastic push-in rivets that secure the
upper radiator seal to the radiator.
5. Remove the upper radiator seal from the vehicle.
6. Remove the two headlamp assembly attachment
screws.
420 MAINTAINING YOUR VEHICLE
Page 422 of 476
7. Reach into the front wheel house ahead of the front
wheel, remove the fastener, and lift the cover over the
access hole in the front of the wheel house splash shield.
Access to the rear of the lamp can be gained through this
access hole.8. Reach through the access hole of the wheel house
splash shield and lift the slide lock upward far enough to
disengage it from the lock post on the back of the front
lamp unit housing.
9. Remove the headlamp assembly. Grasp the outboard
edge of the lamp and pull it straight forward to disen-
gage the ball stud from the plastic grommet.
7
MAINTAINING YOUR VEHICLE 421
Page 423 of 476
 as necessary.
CAUTION!
•Do not contaminate the bulb glass by touching it
with your fingers or by allowing it to contact other
oily surfaces.")
10. Disconnect electrical connectors.
11. Replace bulb(s) as necessary.
CAUTION!
•Do not contaminate the bulb glass by touching it
with your fingers or by allowing it to contact other
oily surfaces. Shortened bulb life will result.
•Always use the correct bulb size and type for
replacement. An incorrect bulb size or type may
overheat and cause damage to the lamp, the bulb
socket, or the lamp wiring.
NOTE: There are access covers over both headlamp
bulb access holes in the quad front lamp unit housing (if
equipped). These covers MUST be reinstalled after the
bulb has been replaced.
Fog Lamps – If Equipped
1. Reach under and behind the front bumper to access
the back of the front fog lamp housing.
2. Disconnect the fog lamp wiring harness connector
from the fog lamp bulb.
3. Rotate the bulb counterclockwise
1�4turn to unlock the
bulb from the housing.
4. Pull the bulb straight out from the housing.
CAUTION!
Do not contaminate the bulb glass by touching it
with your fingers or by allowing it to contact other
oily surfaces. Shortened bulb life will result.
422 MAINTAINING YOUR VEHICLE
Page 424 of 476
Center High-Mounted Stoplamp (CHMSL) With
Cargo Lamp
1. Remove the two screws holding the housing/lens to
the body as shown.2. Separate the connector holding the housing and wir-
ing harness to the body.
3. Turn the desired bulb socket
1�4turn and remove the
socket and bulb from housing.
7
MAINTAINING YOUR VEHICLE 423
Page 425 of 476
4. Pull the desired bulb straight from the socket.
CAUTION!
Do not contaminate the bulb glass by touching it
with your fingers or by allowing it to contact other
oily surfaces. Shortened bulb life will result.
•Outside Bulbs: Cargo Lamps
•Inside Bulb: Center High-Mounted Stop Lamp
5. Reverse the procedure for installation of bulbs and
housing.
Cab Top Clearance Lamps – If Equipped
1. Remove the two screws from the top of the lamp.
424 MAINTAINING YOUR VEHICLE
Page 426 of 476
2. Rotate the socket1�4turn and pull it from the lamp
assembly. 3. Pull the bulb straight from it’s socket and replace.
7
MAINTAINING YOUR VEHICLE 425
Page 427 of 476
FLUID CAPACITIES
U.S.Metric
Fuel (Approximate)
Standard Rear Tank 52 Gallons197 Liters
Optional Midship Tank 22 Gallons83 Liters
Engine Oil with Filter
5.7L Engine (SAE 5W-20, API Certified) 7 Quarts6.6 Liters
Cooling System
5.7L Engine (MOPAR� Antifreeze/Coolant 5
Year/100,000 Mile Formula) or equivalent. 18.7 Quarts
17.7 Liters
426 MAINTAINING YOUR VEHICLE
Page 428 of 476
FLUIDS, LUBRICANTS AND GENUINE PARTS
Engine
ComponentFluid, Lubricant, or Genuine Part
Engine Coolant Antifreeze/Coolant 5–Year/100,000 Mile Formula HOAT (Hybrid Organic
Additive Technology) or equivalent.
Engine Oil – 5.7L Engine Use API Certified SAE 5W-20 Engine Oil, meeting the requirements of
Chrysler Material Standard MS-6395. Refer to your engine oil filler cap for
correct SAE grade.
Engine Oil Filter – 5.7L Engine MOPAR� Engine Oil Filter or equivalent.
Spark Plugs – 5.7L Engine LZFR5C–11 (Gap 0.043 in [1.09 mm])
Fuel Selection – 5.7L Engine 87 Octane Acceptable - 89 Octane Recommended
7
MAINTAINING YOUR VEHICLE 427
Page 429 of 476
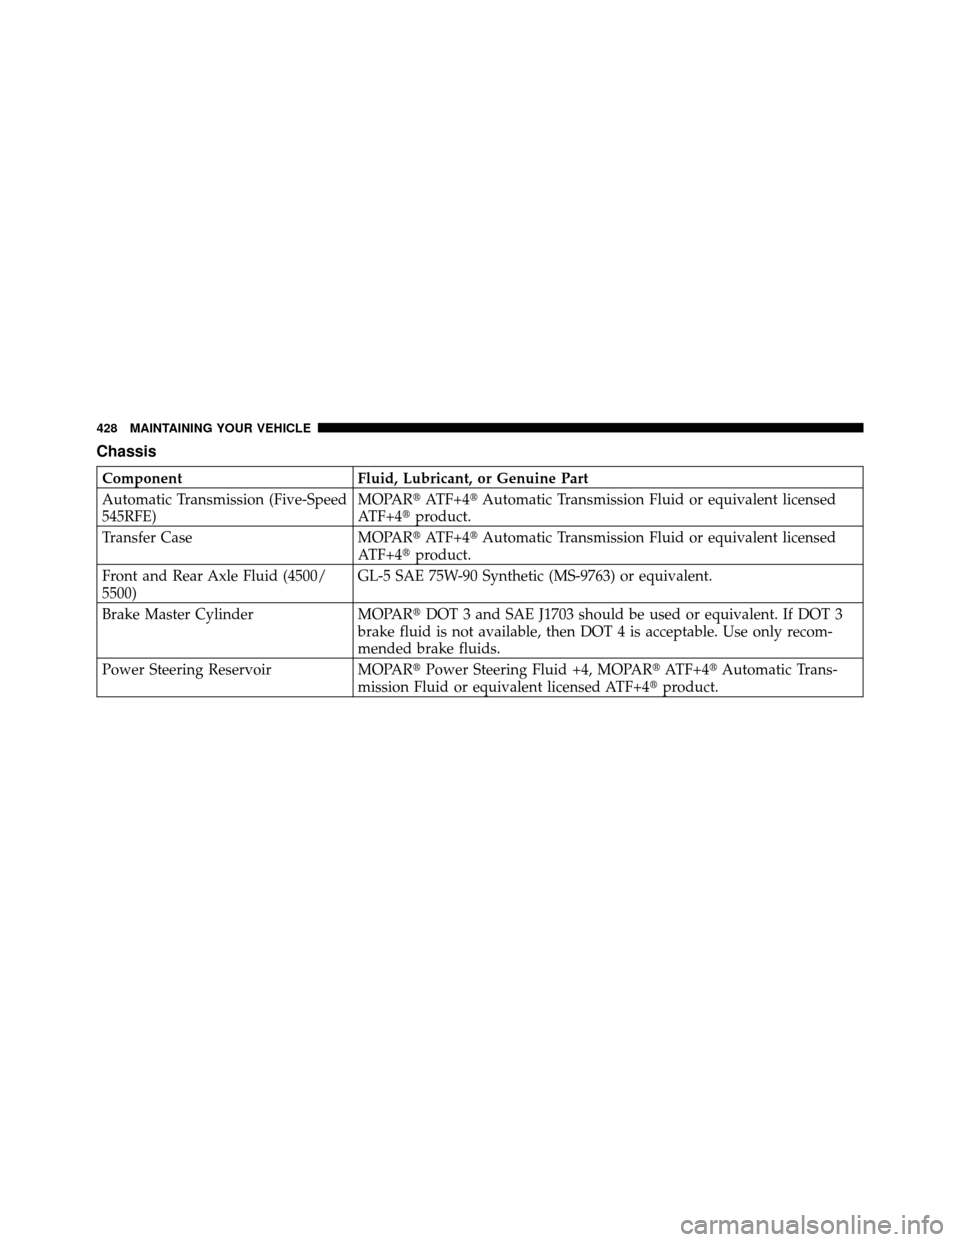
Chassis
ComponentFluid, Lubricant, or Genuine Part
Automatic Transmission (Five-Speed
545RFE) MOPAR�
ATF+4�Automatic Transmission Fluid or equivalent licensed
ATF+4� product.
Transfer Case MOPAR�ATF+4�Automatic Transmission Fluid or equivalent licensed
ATF+4� product.
Front and Rear Axle Fluid (4500/
5500) GL-5 SAE 75W-90 Synthetic (MS-9763) or equivalent.
Brake Master Cylinder MOPAR�DOT 3 and SAE J1703 should be used or equivalent. If DOT 3
brake fluid is not available, then DOT 4 is acceptable. Use only recom-
mended brake fluids.
Power Steering Reservoir MOPAR�Power Steering Fluid +4, MOPAR� ATF+4�Automatic Trans-
mission Fluid or equivalent licensed ATF+4� product.
428 MAINTAINING YOUR VEHICLE
Page 430 of 476
MAINTENANCE SCHEDULES
CONTENTS
�Emissions Control System Maintenance ...... 430
� Maintenance Schedule .................. 430 ▫
5.7L Gas Engine ..................... 430
8
M
A I
N T
E
N A
N CE
S
C
H E
D
U L
E
S
Trending: radio, alternator, differential, weight, sensor, snow chains, spare tire location

 With
Cargo Lamp
1. Remove the two screws holding the housing/lens to
the body as shown.2. Separate the connector holding the housing and wir-
ing harness to the bo")


Standard Rear Tank 52 Gallons197 Liters
Optional Midship Tank 22 Gallons83 Liters
Engine Oil with Filter
5.7L Engine (SAE 5W-20, API Certified) 7 Quarts6")
 or equi")