light RAM CHASSIS CAB 2009 Workshop Manual
[x] Cancel search | Manufacturer: RAM, Model Year: 2009, Model line: CHASSIS CAB, Model: RAM CHASSIS CAB 2009Pages: 429, PDF Size: 3.51 MB
Page 197 of 429

menus and instructions for selecting a variety of destina-
tions and routes, AM/FM stereo radio and six-disc CD
changer with MP3 capability.
Mapping information for navigation is supplied on a
DVD that is loaded into the unit. One map DVD covers
all of North America. Refer to your “Navigation User’s
Manual” for detailed operating instructions.
Operating Instructions — Satellite Radio — If
Equipped
Refer to your “Navigation User’s Manual” for detailed
operating instructions.
REC Setting the Clock
GPS Clock
The GPS receiver used in this system is synchronized to
the time data being transmitted by the GPS satellites. The
satellites’ clock is Greenwich Mean Time (GMT). This isthe worldwide standard for time. This makes the sys-
tem’s clock very accurate once the appropriate time zone
and daylight savings information is set.
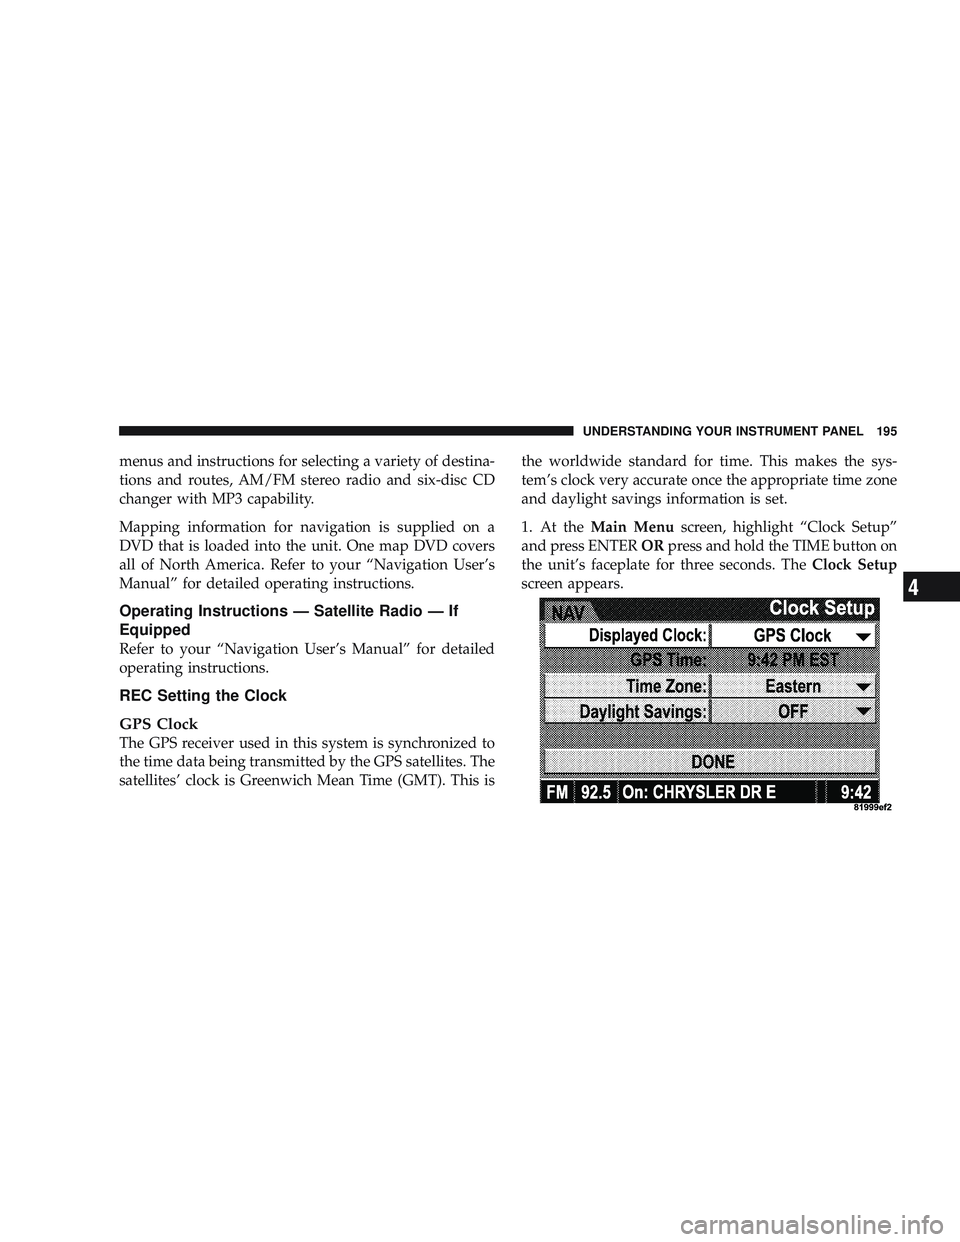
1. At the
Main Menu screen, highlight “Clock Setup”
and press ENTER ORpress and hold the TIME button on
the unit’s faceplate for three seconds. The Clock Setup
screen appears.
UNDERSTANDING YOUR INSTRUMENT PANEL 195
4
Page 198 of 429

2. To show the GPS clock, select “Displayed Clock: GPS
Clock” and press ENTER.
3. To adjust the time zone, Select “Time Zone” and press
ENTER. Select the appropriate time zone and press
ENTER.
4. To turn daylight savings on or off, select “Daylight
Savings” and press ENTER. Select “On” or “Off” and
press ENTER.
5. Select DONE to exit from the clock setting mode. Press
ENTER to save your changes. If you press CANCEL or
NAV then your changes will not be saved.
User Defined Clock
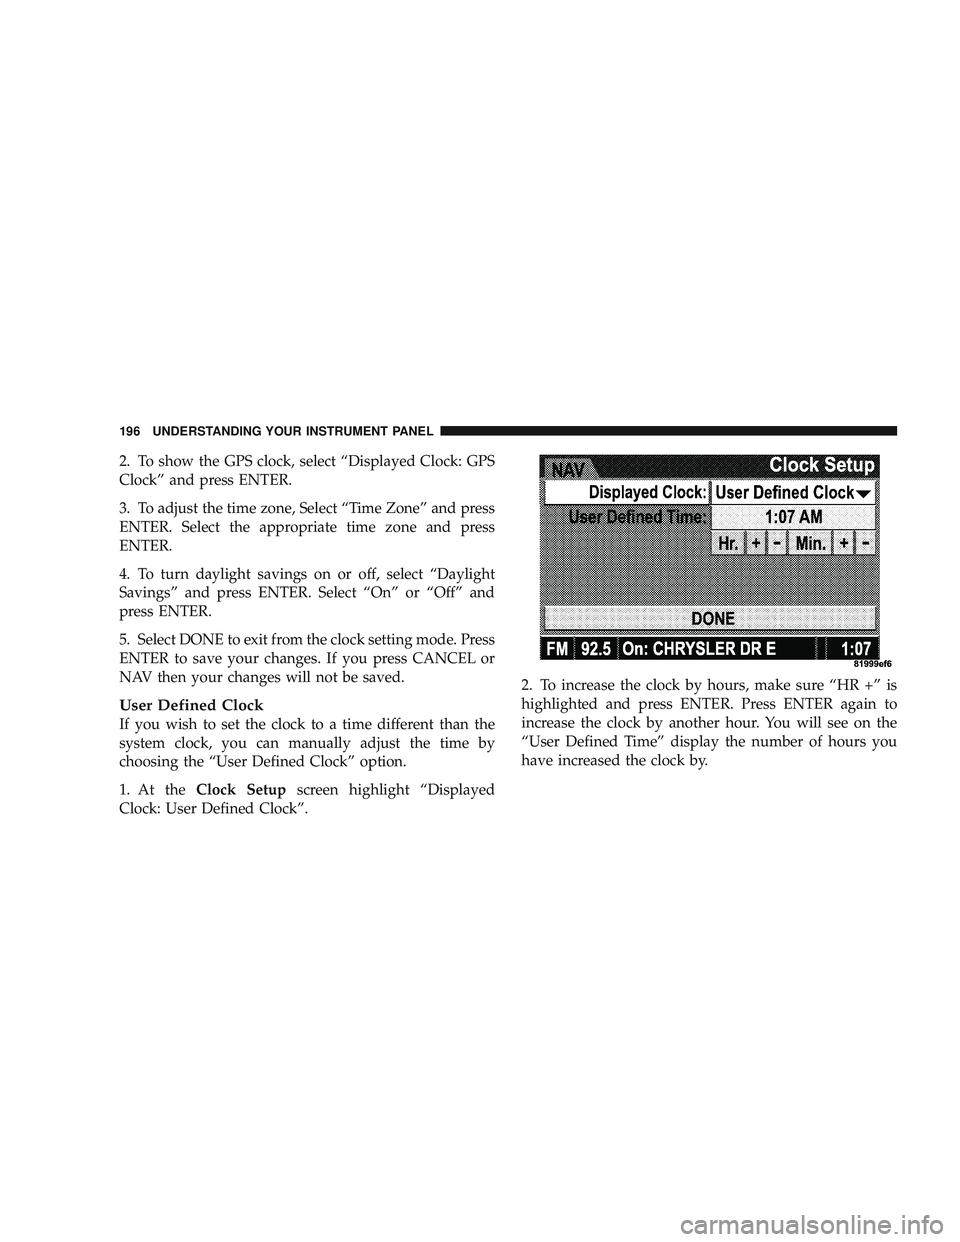
If you wish to set the clock to a time different than the
system clock, you can manually adjust the time by
choosing the “User Defined Clock” option.
1. At theClock Setup screen highlight “Displayed
Clock: User Defined Clock”. 2. To increase the clock by hours, make sure “HR +” is
highlighted and press ENTER. Press ENTER again to
increase the clock by another hour. You will see on the
“User Defined Time” display the number of hours you
have increased the clock by.
196 UNDERSTANDING YOUR INSTRUMENT PANEL
Page 199 of 429

3. To decrease the clock by one hour, use the Select
Encoder to highlight the “-” sign. Press ENTER. Press
ENTER again to decrease the clock by another hour.
4. To increase the clock by minutes, make sure “MIN +”
is highlighted and press ENTER. Press ENTER again to
increase the clock by another minute.
5. To decrease the clock by minutes, use the Select
Encoder to highlight the “-“ sign. Press ENTER. Press
ENTER again to decrease the clock by another minute.
6. Select “DONE” to exit from the clock setting mode.
Press ENTER to save your changes. If you press CAN-
CEL or NAV then your changes will not be saved.
SATELLITE RADIO — IF EQUIPPED
Satellite radio uses direct satellite to receiver broadcast-
ing technology to provide clear digital sound, coast to
coast. The subscription service provider is Sirius SatelliteRadio. This service offers over 130 channels of music,
sports, news, entertainment, and programming for chil-
dren, directly from its satellites and broadcasting studios.
NOTE:
Sirius service is not available in Hawaii and has
limited coverage in Alaska.
System Activation
Sirius Satellite Radio service is pre-activated, and you
may begin listening immediately to the one year of audio
service that is included with the factory-installed satellite
radio system in your vehicle. Sirius will supply a wel-
come kit that contains general information, including
how to setup your on-line listening account at no addi-
tional charge. For further information, call the toll-free
UNDERSTANDING YOUR INSTRUMENT PANEL 197
4
Page 205 of 429

If you press the switch up or down twice it plays the
second track, three times, it will play the third, etc.
The button in the center of the left-hand switch has no
function in this mode.
CD/DVD MAINTENANCE
To keep a CD/DVD in good condition, take the following
precautions:
1. Handle the disc by its edge; avoid touching the
surface.
2. If the disc is stained, clean the surface with a soft cloth,
wiping from center to edge.
3. Do not apply paper or tape to the disc; avoid scratch-
ing the disc.
4. Do not use solvents such as benzene, thinner, cleaners,
or antistatic sprays.5. Store the disc in its case after playing.
6. Do not expose the disc to direct sunlight.
7. Do not store the disc where temperatures may become
too high.
NOTE:
If you experience difficulty in playing a particu-
lar disc, it may be damaged (i.e. scratched, reflective
coating removed, a hair, moisture or dew on the disc)
oversized, or have theft protection encoding. Try a
known good disc before considering disc player service.
RADIO OPERATION AND CELLULAR PHONES
Under certain conditions, the operation of a cellular
phone in your vehicle can cause erratic or noisy perfor-
mance from your radio. This condition may be lessened
or eliminated by relocating the cellular phone antenna.
This condition is not harmful to the radio. If your radio
performance does not satisfactorily “clear” by the repo-
sitioning of the antenna, it is recommended that the radio
volume be turned down or off during cellular phone
operation.
UNDERSTANDING YOUR INSTRUMENT PANEL 203
4
Page 209 of 429

Air Conditioning and Heating — If Equipped
Air Conditioning Operation
To turn on the air conditioning, set the fan
control at any speed and press the snowflake
button located at the right of the control panel.
Conditioned air will be directed through theoutlets selected by the mode control. A light in the
snowflake button shows that the air conditioning is on.
Press the button a second time to turn the air condition-
ing off.
Slight changes in engine speed or power may be noticed
when the air conditioning compressor is on. This is a
normal occurrence, as the compressor will cycle on and
off to maintain comfort and increase fuel economy.
The mode control (at the right of the
control panel) can be set in any of the
following positions:
Air Conditioning And Heating
UNDERSTANDING YOUR INSTRUMENT PANEL 207
4
Page 212 of 429

Air Conditioning With Dual Zone Temperature
Control — If Equipped
With the Dual Zone Temperature Control System, each
front seat occupant can independently control the tem-
perature of air coming from the outlets on their side of
the vehicle.
Air Conditioning and Heating Operation
To turn on the air conditioning, set the fan control at any
speed and press the snowflake button located on the
control panel. Conditioned air will be directed through
the outlets selected by the mode control. A light in the
snowflake button shows that the air conditioning is on.
Press the button a second time to turn the air condition-
ing off.
A/C Push-button
With the fan control in the ON posi-
tion, pushing the A/C button turns on
the air conditioning compressor. An
indicator light on the button shows
that the air conditioning compressor is
on. Conditioned air is now directed
through the mode outlets selected.
Pushing the button a second time turns the compressor
OFF.
Dual Zone Control Head
210 UNDERSTANDING YOUR INSTRUMENT PANEL
Page 217 of 429

smoke, perfumes, etc.) from sticking to the windows.
Contaminates increase the rate of window fogging.
Summer Operation
Air conditioned vehicles must be protected with a high
quality antifreeze coolant during summer to provide
proper corrosion protection and to raise the boiling point
of the coolant for protection against overheating. A 50 %
concentration is recommended. Refer to ”Engine Cool-
ant” under “ Fluids, Lubricants and Genuine Parts” in
section 7.
When using the air conditioner in extremely heavy traffic
in hot weather, especially when towing a trailer, addi-
tional engine cooling may be required. If this situation is
encountered, operate the transmission in a lower gear to
increase engine RPM, coolant flow and fan speed. When
stopped in heavy traffic, it may be necessary to shift into
NEUTRAL and depress the accelerator slightly for fast
idle operation to increase coolant flow and fan speed.Your air conditioning system is also equipped with an
automatic recirculation system. When the system senses
a heavy load or high heat conditions, it may use partial
Recirculation A/C mode to provide additional comfort.
Winter Operation
When operating the system during the winter months,
make sure the air intake, located directly in front of the
windshield, is free of ice, slush, snow, or other
obstructions.
UNDERSTANDING YOUR INSTRUMENT PANEL 215
4
Page 219 of 429

STARTING AND OPERATING
CONTENTS
\2Starting Procedures .................... 221
\4 Normal Starting ..................... 221
\4 Automatic Transmission ............... 221
\4 If Engine Fails To Start ................ 222
\4 After Starting ....................... 223
\2 Engine Block Heater — If Equipped ........ 223
\2 Automatic Transmission ................. 224
\4 Automatic Transmission With Overdrive .... 224\2
Four-Wheel Drive Operation — If Equipped . . 230
\4 Manually Shifted Transfer Case Operating
Information/Precautions ............... 230
\4 Shifting Procedure - Manually Shifted
Transfer Case ....................... 233
\4 Transfer Case Reminder Light ........... 234
\4 Electronically Shifted Transfer Case
Operating Information/Precautions (5
Position Switch) — If Equipped .......... 234
\4 Shifting Procedure — Electronically Shifted
Transfer Case ....................... 239
5
Page 229 of 429

NOTE:Use caution when operating a heavily loaded
vehicle in SECOND or FIRST gear selections in high
ambients as torque converter slip can impose significant
additional heat load on the cooling system.
Overdrive Operation
The overdrive automatic transmission contains an elec-
tronically controlled fourth and fifth (if equipped) speed
(Overdrive). The transmission will automatically shift
from DRIVE to Overdrive if the following conditions are
present:
•the shift lever is in DRIVE;
•the engine coolant has reached normal operating tem-
perature;
•vehicle speed is above approximately 30 mph
(48 km/h);
•the “TOW HAUL O/D OFF” switch has not been
activated;
•transmission has reached normal operating
temperature.
NOTE: If the vehicle is started in extremely cold tem-
peratures, the transmission may not shift into Overdrive
and will automatically select the most desirable gear for
operation at this temperature. Normal operation will
resume when the transmission fluid temperature has
risen to a suitable level. Refer to the “Note” under
“Torque Converter Clutch” in this section.
If the transmission temperature gets extremely hot, the
transmission will automatically select the most desirable
gear for operation at this temperature. If the transmission
temperature becomes hot enough the TRANS TEMP light
may illuminate and the transmission may downshift out
of Overdrive until the transmission cools down. After
cooldown, the transmission will resume normal opera-
tion.
STARTING AND OPERATING 227
5
Page 231 of 429

economy) and automatic closed-throttle downshifts to
3rd gear are performed (for improved braking) when
driving conditions warrant. Pressing the “TOW HAUL
O/D OFF” button a second time to select O/D OFF will
disable 4th and 5th gear completely, which should elimi-
nate any excessive transmission shifting.
The “TOW HAUL” or “O/D OFF” light will illuminate in
the instrument cluster to indicate when the switch has
been activated. Pressing the switch a third time restores
normal operation. If the “TOW HAUL” or “O/D OFF”
modes are desired, the button must be pressed each time
the engine is started.
Torque Converter Clutch
A feature, designed to improve fuel economy, has been
included in the automatic transmission on your vehicle.
A clutch within the torque converter engages automati-
cally at calibrated speeds. This may result in a slightly
different feeling or response during normal operation inthe upper gears. When the vehicle speed drops or during
acceleration when the transmission downshifts to second
gear, the clutch automatically disengages.
NOTE:
•The torque converter clutch will not engage until the
transmission fluid and engine coolant are warm [usu-
ally after 1-3 miles (1.6 - 4.8 km) of driving]. Because
the engine speed is higher when the torque converter
clutch is not engaged, it may seem as if the transmis-
sion is not shifting into Overdrive when cold. This is
normal. Pressing the “TOW HAUL O/D OFF” button,
when the transmission is sufficiently warm, will dem-
onstrate that the transmission is able to shift into and
out of overdrive.
•If the vehicle has not been driven in several days, the
first few seconds of operation after shifting the trans-
mission into gear may seem sluggish. This is due to the
fluid partially draining from the torque converter into
STARTING AND OPERATING 229
5