tire type RAM CHASSIS CAB 2011 Owners Manual
[x] Cancel search | Manufacturer: RAM, Model Year: 2011, Model line: CHASSIS CAB, Model: RAM CHASSIS CAB 2011Pages: 472, PDF Size: 7.38 MB
Page 67 of 472
We urge you to carefully follow the directions of the
manufacturer when installing your child restraint. Many,
but not all, restraint systems will be equipped with
separate straps on each side, with each having a hook or
connector, and a means for adjusting the tension in the
strap. Forward-facing toddler restraints and some
rearward-facing infant restraints will also be equipped
with a tether strap, a hook and means for adjusting the
tension in the strap.
In general, you will first loosen the adjusters on the lower
straps and tether straps so that you can more easily attach
the hook or connector to the lower anchorages and tether
anchorages. Then tighten all three straps as you push the
child restraint rearward and downward into the seat.
Not all child restraint systems will be installed as we
have described here. Again, carefully follow the instruc-
tions that come with the child restraint system. WARNING!Improper installation of a child restraint to the
LATCH anchorages can lead to failure of an infant or
child restraint. The child could be badly injured or
killed. Follow the manufacturer’s directions exactly
when installing an infant or child restraint.
Installing Child Restraints Using the Vehicle Seat
Belt
The seat belts in the passenger seating positions are
equipped with either an Automatic Locking Retractor
(ALR) or a cinching latch plate or both. Both types of seat
belts are designed to keep the lap portion of the seat belt
tight around the child restraint so that it is not necessary
to use a locking clip. The ALR will make a ratcheting
noise if you extract the entire belt from the retractor and66 THINGS TO KNOW BEFORE STARTING YOUR VEHICLE
Page 276 of 472
• Four-wheel drive low range (4L)
This transfer case is intended to be driven in the 2H
position for normal street and highway conditions such
as dry, hard surfaced roads.
When additional traction is required, the 4H and 4L
positions can be used to lock the front and rear drive-
shafts together and force the front and rear wheels to
rotate at the same speed. This is accomplished by simply
moving the shift lever to the desired positions. The 4H
and 4L positions are intended for loose, slippery road
surfaces only. Driving in the 4H and 4L positions on dry,
hard surfaced roads may cause increased tire wear and
damage to the driveline components.
The “Transfer Case Position Indicator Light” in the
instrument cluster will alert the driver that the vehicle is
in four-wheel drive and that the front and rear drive-
shafts are locked together. This light will illuminate when the transfer case is shifted into either the 4H or 4L
position. There is no light for the 2H or NEUTRAL
positions.
When operating your vehicle in 4L, the engine speed is
approximately three times that of the 2H or 4H positions
at a given road speed. Take care not to overspeed the
engine and do not exceed 25 mph (40 km/h).
Proper operation of four-wheel drive vehicles depends
on tires of equal size, type and circumference on each
wheel. Any difference will adversely affect shifting and
can cause damage to the transfer case.
NOTE: Do not attempt to make a shift while only the
front or rear wheels are spinning. The transfer case is not
equipped with a synchronizer and therefore the front and
rear driveshaft speeds must be equal for the shift to take
place. Shifting while only the front or rear wheels are
spinning can cause damage to the transfer case.
5 STARTING AND OPERATING 275
Page 282 of 472
Proper operation of four-wheel drive vehicles depends
on tires of equal size, type and circumference on each
wheel. Any difference in tire size can cause damage to the
transfer case.
Because four-wheel drive provides improved traction,
there is a tendency to exceed safe turning and stopping
speeds. Do not go faster than road conditions permit.
WARNING!You or others could be injured if you leave the
vehicle unattended with the transfer case in the
NEUTRAL position without first fully engaging the
parking brake. The transfer case NEUTRAL position
disengages both the front and rear driveshafts from
the powertrain and will allow the vehicle to move
regardless of the transmission position. The parking
brake should always be applied when the driver is
not in the vehicle. For additional information on the appropriate use of each
transfer case mode position, see the information below:
2WD
Rear Wheel Drive High Range - This range is for normal
street and highway driving on dry, hard surfaced roads.
4WD LOCK
Four-Wheel Drive Lock Range - This range locks the front
and rear driveshafts together forcing the front and rear
wheels to rotate at the same speed. This range provides
additional traction for loose, slippery road surfaces only.
4WD LOW
Four-Wheel Drive Low Range - This range provides low
speed four-wheel drive. It locks the front and rear
driveshafts together forcing the front and rear wheels to
rotate at the same speed. This range provides additional
traction and maximum pulling power for loose, slippery
road surfaces only. Do not exceed 25 mph (40 km/h).
5 STARTING AND OPERATING 281
Page 306 of 472
WARNING! (Continued)• Always drive with each tire inflated to the recom-
mended cold tire inflation pressure.
Economy
Improper inflation pressures can cause uneven wear
patterns to develop across the tire tread. These abnormal
wear patterns will reduce tread life resulting in a need for
earlier tire replacement. Under-inflation also increases tire
rolling resistance and results in higher fuel consumption.
Ride Comfort and Vehicle Stability
Proper tire inflation contributes to a comfortable ride.
Over-inflation produces a jarring and uncomfortable
ride.
Tire Inflation Pressures
The proper cold tire inflation pressure is listed on the
driver’s side “B” Pillar. Some vehicles may have Supplemental Tire Pressure
Information for vehicle loads that are less than the
maximum loaded vehicle condition. These pressure con-
ditions will be found in the “Supplemental Tire Pressure
Information” section of this manual.
The pressure should be checked and adjusted as well as
inspecting for signs of tire wear or visible damage at least
once a month. Use a good quality pocket-type gauge to
check tire pressure. Do not make a visual judgement
when determining proper inflation. Radial tires may look
properly inflated even when they are under-inflated.
CAUTION!After inspecting or adjusting the tire pressure, al-
ways reinstall the valve stem cap. This will prevent
moisture and dirt from entering the valve stem,
which could damage the valve stem.
5 STARTING AND OPERATING 305
Page 307 of 472
Inflation pressures specified on the placard are always
“cold tire inflation pressure.” Cold tire inflation pressure
is defined as the tire pressure after the vehicle has not
been driven for at least three hours, or driven less than
1 mile (1.6 km) after a three hour period. The cold tire
inflation pressure must not exceed the maximum infla-
tion pressure molded into the tire sidewall.
Check tire pressures more often if subject to a wide range
of outdoor temperatures, as tire pressures vary with
temperature changes.
Tire pressures change by approximately 1 psi (7 kPa) per
12°F (7°C) of air temperature change. Keep this in mind
when checking tire pressure inside a garage, especially in
the winter.
Example: If garage temperature = 68°F (20°C) and the
outside temperature = 32°F (0°C) then the cold tire inflation pressure should be increased by 3 psi (21 kPa),
which equals 1 psi (7 kPa) for every 12°F (7°C) for this
outside temperature condition.
Tire pressure may increase from 2 to 6 psi (13 to 40 kPa)
during operation. DO NOT reduce this normal pressure
build up or your tire pressure will be too low.
Tire Inflation Pressure – 4500/5500 with Steel
Carcass Ply Tires
This type of tire utilizes steel cords in the sidewall. As
such, they cannot be treated like normal light truck tires.
Adjusting tire pressure must be performed by personnel
trained, supervised and equipped accordingly.
Inflation Pressure Adjustment When Mounted to
Vehicle
During procedures when adding tire inflation pressure,
the technician or individual must utilize a remote infla-
tion device, and ensure that all persons are clear of the
trajectory area.306 STARTING AND OPERATING
Page 310 of 472
Radial Ply Tires
WARNING!Combining radial ply tires with other types of tires
on your vehicle will cause your vehicle to handle
poorly. The instability could cause an accident result-
ing in serious injury or death. Always use radial ply
tires in sets of four (or six, in case of trucks with dual
rear wheels). Never combine them with other types
of tires.
Cuts and punctures in radial tires are repairable only in
the tread area because of sidewall flexing. Consult your
authorized tire dealer for radial tire repairs. Tire Spinning
When stuck in mud, sand, snow, or ice conditions, do not
spin your vehicle’s wheels faster than 30 mph (48 km/h)
or for longer than 30 seconds continuously without
stopping when you are stuck.
Refer to “Freeing A Stuck Vehicle” in “What To Do In
Emergencies” for further information.
WARNING!Fast spinning tires can be dangerous. Forces gener-
ated by excessive wheel speeds may cause tire dam-
age or failure. A tire could explode and injure some-
one. Do not spin your vehicle’s wheels faster than
30 mph (48 km/h) or for more than 30 seconds
continuously when you are stuck, and don’t let
anyone near a spinning wheel, no matter what the
speed.
5 STARTING AND OPERATING 309
Page 314 of 472
![RAM CHASSIS CAB 2011 Owners Manual SUPPLEMENTAL TIRE PRESSURE
INFORMATION — IF EQUIPPED
A light load vehicle condition is defined as two passen-
gers [150 lbs (68 kg) each] plus 200 lbs (91 kg) of cargo.
Cold tire inflation pressures RAM CHASSIS CAB 2011 Owners Manual SUPPLEMENTAL TIRE PRESSURE
INFORMATION — IF EQUIPPED
A light load vehicle condition is defined as two passen-
gers [150 lbs (68 kg) each] plus 200 lbs (91 kg) of cargo.
Cold tire inflation pressures](/img/34/59200/w960_59200-313.png)
SUPPLEMENTAL TIRE PRESSURE
INFORMATION — IF EQUIPPED
A light load vehicle condition is defined as two passen-
gers [150 lbs (68 kg) each] plus 200 lbs (91 kg) of cargo.
Cold tire inflation pressures for a lightly loaded vehicle
will be found on the face of the driver’s door.
TIRE CHAINS
Use “Class U” chains or other traction aids that meet SAE
Type “U” specifications.
NOTE: Chains must be the proper size for the vehicle,
as recommended by the chain manufacturer.
CAUTION!To avoid damage to your vehicle, tires or chains,
observe the following precautions:
(Continued) CAUTION! (Continued)• Because of limited chain clearance between tires
and other suspension components, it is important
that only chains in good condition are used. Bro-
ken chains can cause serious vehicle damage. Stop
the vehicle immediately if noise occurs that could
suggest chain breakage. Remove the damaged
parts of the chain before further use.
• Install chains as tightly as possible and then
retighten after driving about 1/2 mi (0.8 km).
• Do not exceed 45 mph (72 km/h).
• Drive cautiously and avoid severe turns and large
bumps, especially with a loaded vehicle.
• Do not install tire chains on front wheels of 4x2
vehicles.
• Do not drive for a prolonged period on dry pave-
ment.
(Continued)5 STARTING AND OPERATING 313
Page 316 of 472

SNOW TIRES
Snow tires should be of the same size and type construc-
tion as the front tires. Consult the manufacturer of the
snow tire to determine any maximum vehicle speed
requirement associated with the tire. These tires should
always be operated at the vehicle maximum capacity
inflation pressures under any load condition.
While studded tires improve performance on ice, skid
and traction capability on wet or dry surfaces may be
poorer than that of non-studded tires. Some states pro-
hibit studded tires; therefore, local laws should be
checked before using these tire types. TIRE ROTATION RECOMMENDATIONS
Tires on the front and rear axles of vehicles operate at
different loads and perform different steering, driving,
and braking functions. For these reasons, they wear at
unequal rates. These effects can be reduced by timely
rotation of tires. The benefits of rotation are especially
worthwhile with aggressive tread designs such as those
on On/Off Road type tires. Rotation will increase tread
life, help to maintain mud, snow, and wet traction levels,
and contribute to a smooth, quiet ride.
5 STARTING AND OPERATING 315
Page 317 of 472
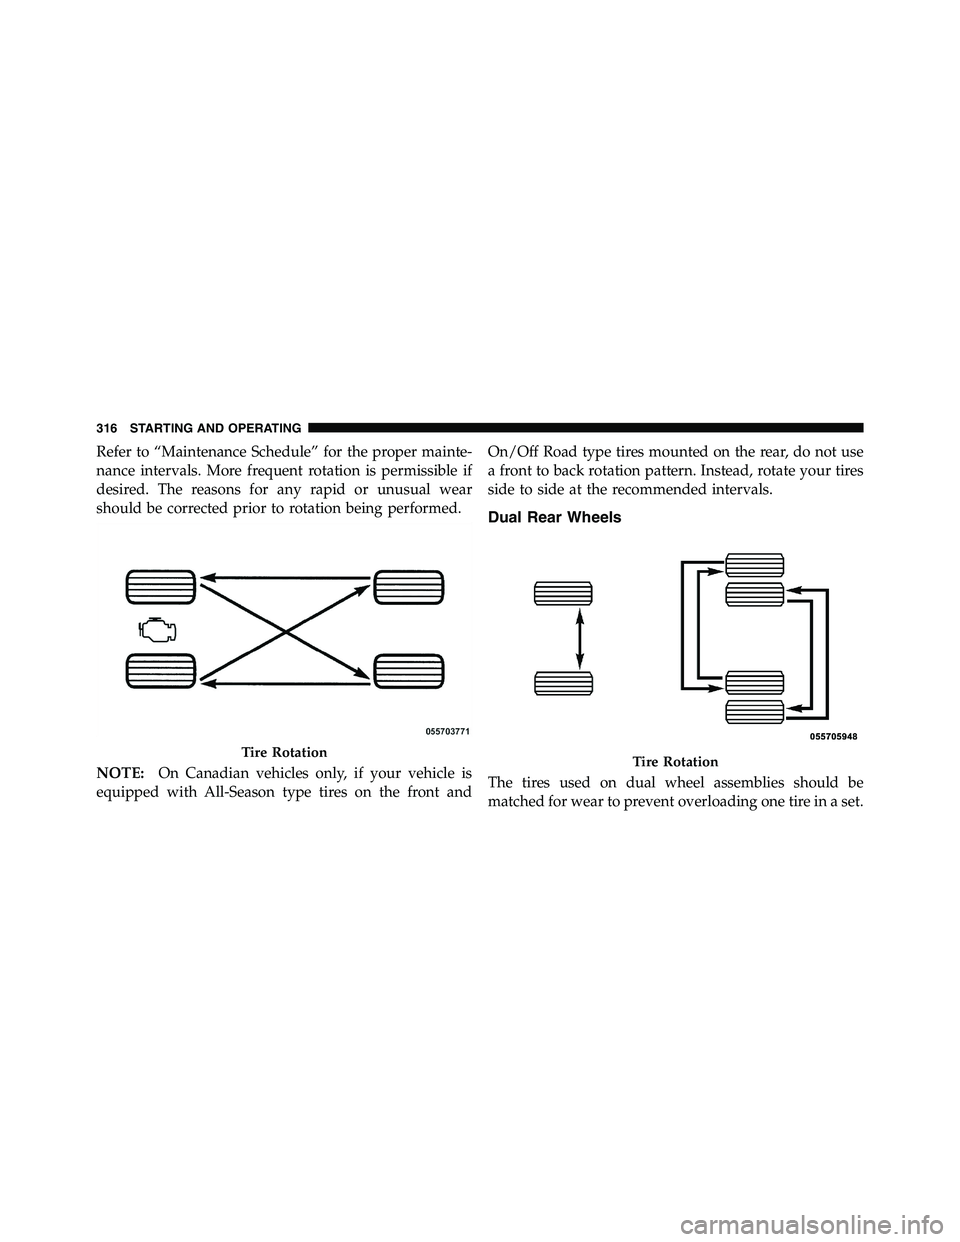
Refer to “Maintenance Schedule” for the proper mainte-
nance intervals. More frequent rotation is permissible if
desired. The reasons for any rapid or unusual wear
should be corrected prior to rotation being performed.
NOTE: On Canadian vehicles only, if your vehicle is
equipped with All-Season type tires on the front and On/Off Road type tires mounted on the rear, do not use
a front to back rotation pattern. Instead, rotate your tires
side to side at the recommended intervals.
Dual Rear Wheels
The tires used on dual wheel assemblies should be
matched for wear to prevent overloading one tire in a set.Tire Rotation
Tire Rotation316 STARTING AND OPERATING
Page 332 of 472
Consider the following items when computing the
weight on the rear axle of the vehicle:
• The tongue weight of the trailer
• The weight of any other type of cargo or equipment
put in or on your vehicle
• The weight of the driver and all passengers.
NOTE: Remember that everything put into or on the
trailer adds to the load on your vehicle. Also, additional
factory-installed options or dealer-installed options must
be considered as part of the total load on your vehicle.
Refer to “Tire Safety Information/Tire and Loading In-
formation Placard” in “Starting and Operating” for fur-
ther information. Towing Requirements
To promote proper break-in of your new vehicle drive-
train components the following guidelines are recom-
mended:
CAUTION!• Do not tow a trailer at all during the first 500 miles
(805 km) the new vehicle is driven. The engine,
axle or other parts could be damaged.
• Then, during the first 500 miles (805 km) that a
trailer is towed, do not drive over 50 mph
(80 km/h) and do not make starts at full throttle.
This helps the engine and other parts of the
vehicle wear in at the heavier loads.
5 STARTING AND OPERATING 331