steering RAM CHASSIS CAB 2017 Owner's Manual
[x] Cancel search | Manufacturer: RAM, Model Year: 2017, Model line: CHASSIS CAB, Model: RAM CHASSIS CAB 2017Pages: 536, PDF Size: 5.67 MB
Page 204 of 536

Electric Power Steering Fail Warning Light — If Equipped
Red Telltale
Light What It Means
Electric Power Steering Fail Warning — If Equipped
This light is used to manage the electrical warning of the EPS (Electric Power Steering). Refer to
“Power Steering” in “Starting And Operating” for further information.
Trailer Brake Disconnected Warning Light
Red Warning
Light What It Means
Trailer Brake Disconnected Warning Light
This telltale is on when the Trailer Brake has been disconnected.
Oil Temperature Warning Light
Red Telltale
Light What It Means
Oil Temperature Warning Light
This telltale indicates engine oil temperature is high. If the light turns on while driving, stop the
vehicle and shut off the engine as soon as possible.202 UNDERSTANDING YOUR INSTRUMENT PANEL
Page 210 of 536

Tire Pressure Monitoring Indicator Light
Yellow Telltale
Light What It Means
Tire Pressure Monitoring Indicator Light
The warning light switches on and a message is displayed to indicate that the tire pressure is
lower than the recommended value and/or that slow pressure loss is occurring. In these cases,
optimal tire duration and fuel consumption may not be guaranteed.
Should one or more tires be in the condition mentioned above, the display will show the indica-
tions corresponding to each tire in sequence.
CAUTION!Do not continue driving with one or more flat tires as
handling may be compromised. Stop the vehicle,
avoiding sharp braking and steering. Repair immedi-
ately using the dedicated tire repair kit and contact
your authorized dealership as soon as possible.
Each tire, including the spare (if provided), should be
checked monthly when cold and inflated to the inflation
pressure recommended by the vehicle manufacturer on the
vehicle placard or tire inflation pressure label. If your
vehicle has tires of a different size than the size indicated on the vehicle placard or tire inflation pressure label, you
should determine the proper tire inflation pressure for
those tires.
As an added safety feature, your vehicle has been
equipped with a Tire Pressure Monitoring System (TPMS)
that illuminates a low tire pressure telltale when one or
more of your tires is significantly under-inflated. Accord-
ingly, when the low tire pressure telltale illuminates, you
should stop and check your tires as soon as possible and
inflate them to the proper pressure. Driving on a signifi-
cantly under-inflated tire causes the tire to overheat and
can lead to tire failure. Under-inflation also reduces fuel
efficiency and tire tread life, and may affect the vehicle’s
handling and stopping ability.208 UNDERSTANDING YOUR INSTRUMENT PANEL
Page 220 of 536
Cruise Control SET Indicator Light — If Equipped
White Telltale
Light What It Means
Cruise Control SET Indicator Light
This light will turn on when the speed control is set. Refer to “Speed Control” in “Understanding
The Features Of Your Vehicle” for further information.
INSTRUMENT CLUSTER DISPLAY
Your vehicle may be equipped with an instrument cluster
display, which offers useful information to the driver. With
the ignition in the STOP/OFF position, opening/closing of
a door will activate the display for viewing, and display
the total miles (kilometers) in the odometer. Your instru-
ment cluster display is designed to display important
information about your vehicle’s systems and features.
Using a driver interactive display located on the instru-
ment panel, your instrument cluster display can show you
how systems are working and give you warnings when
they aren’t. The steering wheel mounted controls allow
you to scroll through and enter the main menus and
submenus. You can access the specific information you
want and make selections and adjustments. Instrument Cluster Display Controls
The instrument cluster display features a driver-interactive
display that is located in the instrument cluster.
Base Instrument Cluster Display218 UNDERSTANDING YOUR INSTRUMENT PANEL
Page 222 of 536
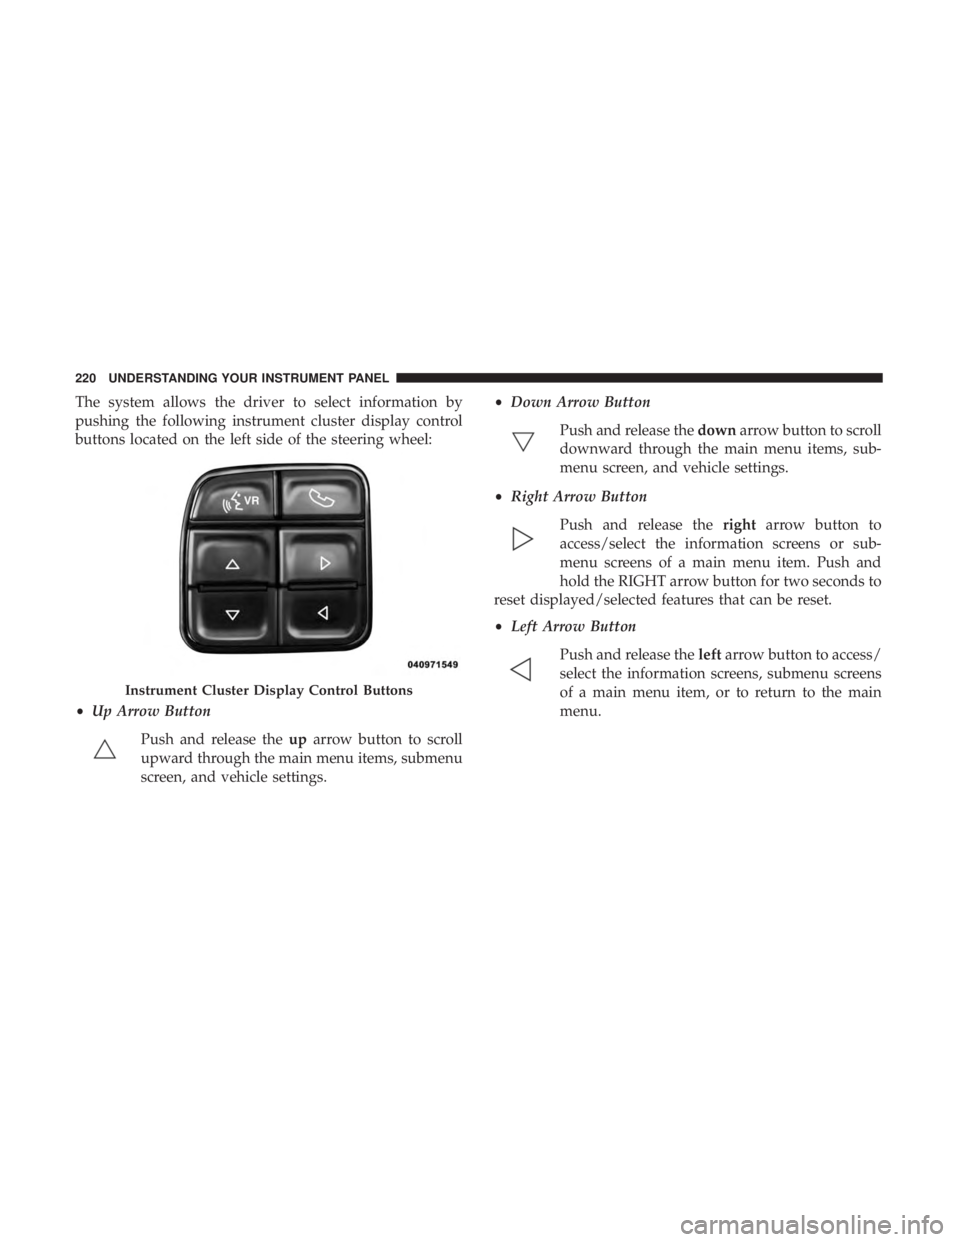
The system allows the driver to select information by
pushing the following instrument cluster display control
buttons located on the left side of the steering wheel:
• Up Arrow Button
Push and release the up arrow button to scroll
upward through the main menu items, submenu
screen, and vehicle settings. • Down Arrow Button
Push and release the down arrow button to scroll
downward through the main menu items, sub-
menu screen, and vehicle settings.
• Right Arrow Button
Push and release the right arrow button to
access/select the information screens or sub-
menu screens of a main menu item. Push and
hold the RIGHT arrow button for two seconds to
reset displayed/selected features that can be reset.
• Left Arrow Button
Push and release the left arrow button to access/
select the information screens, submenu screens
of a main menu item, or to return to the main
menu.Instrument Cluster Display Control Buttons220 UNDERSTANDING YOUR INSTRUMENT PANEL
Page 225 of 536
messages of this type are then stored (as long as the
condition that activated it remains active) and can be
reviewed from the “Messages” main menu item. As long as
there is a stored message, an “i” will be displayed in the
instrument cluster display’s compass/outside temp line.
Examples of this message type are “Right Front Turn Signal
Lamp Out” and “Low Tire Pressure.”
• Unstored Messages
This message type is displayed indefinitely or until the
condition that activated the message is cleared. Examples
of this message type are “Turn Signal On” (if a turn signal
is left on) and “Lights On” (if driver leaves the vehicle).
• Unstored Messages Until RUN
These messages deal primarily with the Remote Start
feature. This message type is displayed until the ignition is
in the RUN state. Examples of this message type are
“Remote Start Aborted - Door Ajar” and “Press Brake
Pedal and Push Button to Start.”
• Five Second Unstored Messages
When the appropriate conditions occur, this type of mes-
sage takes control of the main display area for five seconds
and then returns to the previous screen. An example of this
message type is “Automatic High Beams On.” Oil Life Reset
Your vehicle is equipped with an engine oil change indi-
cator system. The “Oil Change Required” message will
display in the instrument cluster display after a single
chime has sounded, to indicate the next scheduled oil
change interval. The engine oil change indicator system is
duty cycle based, which means the engine oil change
interval may fluctuate, dependent upon your personal
driving style.
NOTE: Use the steering wheel instrument cluster display
controls for the following procedure(s).
Vehicles Equipped With Passive Entry
1. Without pushing the brake pedal, push the ENGINE
START/STOP button and place the ignition to the
ON/RUN position (do not start the engine).
2. Push and release the down arrow button to scroll
downward through the main menu to “Vehicle Info.”
3. Push and release the right arrow button to access the
”Vehicle Info” screen, then scroll up or down to select
“Oil Life.”
4. Push and hold the right arrow button to select “Reset”. 4UNDERSTANDING YOUR INSTRUMENT PANEL 223
Page 232 of 536
Setting Names Setting Names Abbreviated
(Left Submenu Layer) Sub-Menus
(Right Submenu Layer)
33 Compass Variance Compass Var 1-15 increments of 1
34 Calibrate Compass Compass Cal Cancel; Calibrate
Turn Menu OFF — If Equipped
Push and release the right arrow button to exit the main
menu.
Push and release any instrument cluster display control
button to enter the instrument cluster display main menu
again.
Instrument Cluster Display Messages
• Front Seatbelts Unbuckled
• Driver Seatbelt Unbuckled
• Passenger Seatbelt Unbuckled
• Service Airbag System
• Traction Control Off
• Washer Fluid Low
• Oil Pressure Low
• Oil Change Due • Fuel Low
• Service Antilock Brake System
• Service Electronic Throttle Control
• Service Power Steering
• Cruise Off
• Cruise Ready
• Cruise Set To XXX MPH
• Tire Pressure Screen With Low Tire(s) “Inflate Tire To
XX”
• Tire Pressure Information System (TPIS)
• Service Tire Pressure System
• Parking Brake Engaged
• Brake Fluid Low
• Service Electronic Braking System230 UNDERSTANDING YOUR INSTRUMENT PANEL
Page 248 of 536

Auto Comfort Systems — If Equipped
After pressing the “Auto-On Comfort” button on the
touchscreen, the following settings will be available:
Setting Name Selectable Options
Auto-On Driver Heated/Ventilated
Seat & Steering Wheel With Vehicle
Start — If Equipped On Off
NOTE: When the “Auto-On Driver Heated/Ventilated Seat & Steering Wheel With Vehicle Start” feature is selected
the driver’s heated seat and heated steering wheel will automatically turn on when temperatures are below 40° F
(4.4° C). When temperatures are above 80° F (26.7° C) the driver vented seat will turn on. 246 UNDERSTANDING YOUR INSTRUMENT PANEL
Page 263 of 536

Setting Name Selectable Options
ParkView Backup Camera
Active Guidelines On Off
NOTE: Your vehicle may be equipped with the ParkView Rear Back Up Camera Active Guidelines that allows you to
see Active (Dynamic) Guidelines which deflect with steering wheel angle over the ParkView Back up Camera display
whenever the gear selector is put into REVERSE. The image will be displayed on the radio touchscreen display along
with a caution note to “check entire surroundings” across the top of the screen. After five seconds, this note will dis-
appear.
ParkView Backup Camera
Delay On Off
NOTE:
When the “ParkView Backup Camera Delay” feature is enabled, it will allow the ParkView Backup Camera display to
remain on while in drive for up to 10 seconds, or 8 mph (12 km/h).
Rain Sensing Auto Wipers
— If Equipped On Off
NOTE: When the “Rain Sensing Auto Wipers” feature is selected, the system will automatically activate the wind-
shield wipers if it senses moisture on the windshield.
Hill Start Assist —
If Equipped On Off 4UNDERSTANDING YOUR INSTRUMENT PANEL 261
Page 268 of 536

Auto Comfort Systems — If Equipped
After pressing the “Auto-On Comfort” button on the
touchscreen, the following settings will be available:
Setting Name Selectable Options
Auto-On Driver Heated/
Ventilated Seat & Steering
Wheel With Vehicle Start
— If Equipped Off Remote Start All Starts
NOTE: When the “Auto-On Driver Heated/Ventilated Seat & Steering Wheel With Vehicle Start” feature is selected
the driver’s heated seat and heated steering wheel will automatically turn on when temperatures are below 40° F
(4.4° C). When temperatures are above 80° F (26.7° C), the driver vented seat will turn on. 266 UNDERSTANDING YOUR INSTRUMENT PANEL
Page 276 of 536
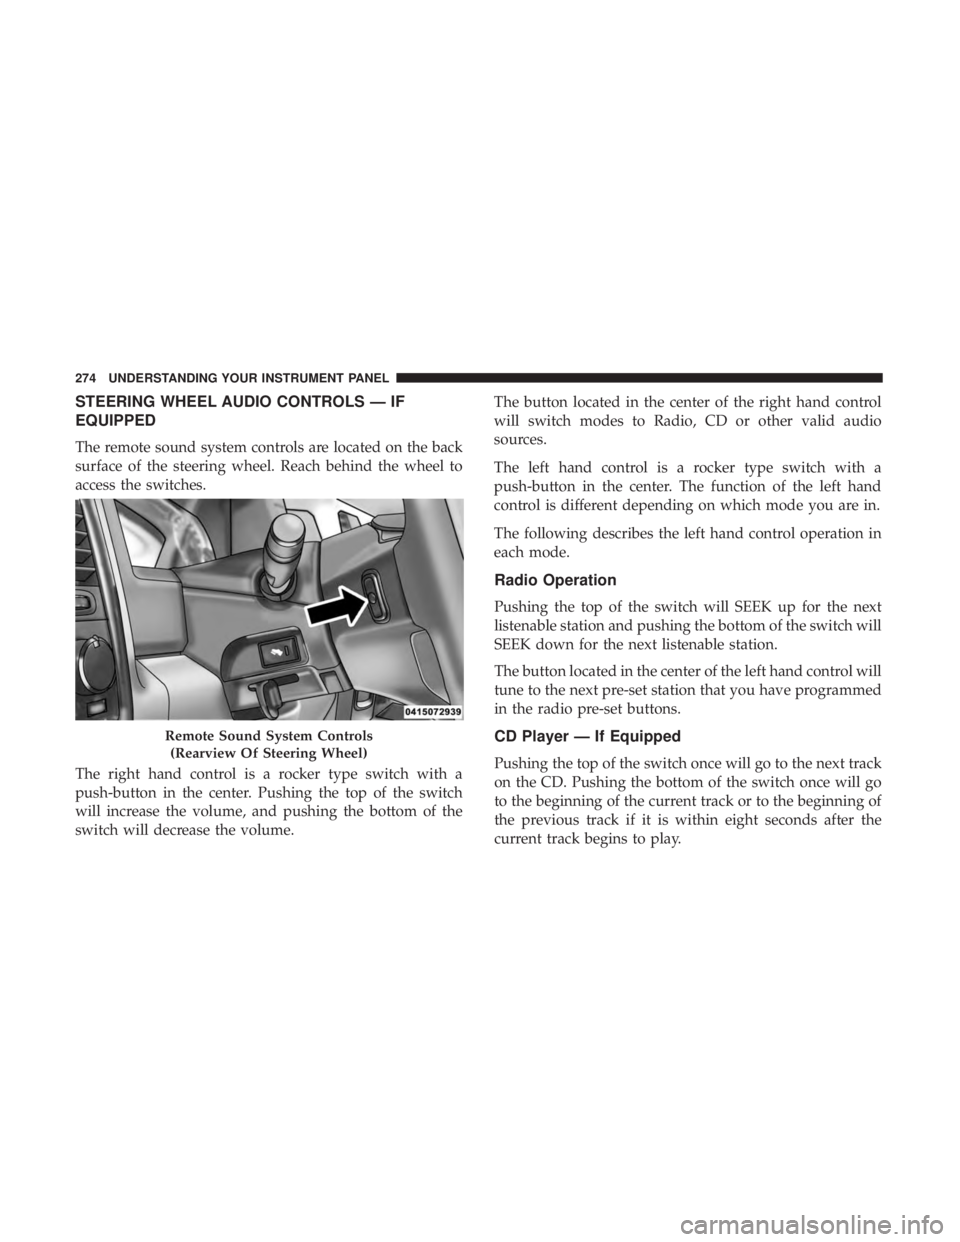
STEERING WHEEL AUDIO CONTROLS — IF
EQUIPPED
The remote sound system controls are located on the back
surface of the steering wheel. Reach behind the wheel to
access the switches.
The right hand control is a rocker type switch with a
push-button in the center. Pushing the top of the switch
will increase the volume, and pushing the bottom of the
switch will decrease the volume. The button located in the center of the right hand control
will switch modes to Radio, CD or other valid audio
sources.
The left hand control is a rocker type switch with a
push-button in the center. The function of the left hand
control is different depending on which mode you are in.
The following describes the left hand control operation in
each mode.
Radio Operation
Pushing the top of the switch will SEEK up for the next
listenable station and pushing the bottom of the switch will
SEEK down for the next listenable station.
The button located in the center of the left hand control will
tune to the next pre-set station that you have programmed
in the radio pre-set buttons.
CD Player — If Equipped
Pushing the top of the switch once will go to the next track
on the CD. Pushing the bottom of the switch once will go
to the beginning of the current track or to the beginning of
the previous track if it is within eight seconds after the
current track begins to play.Remote Sound System Controls
(Rearview Of Steering Wheel)274 UNDERSTANDING YOUR INSTRUMENT PANEL