ECO mode RAM CHASSIS CAB 2020 Manual Online
[x] Cancel search | Manufacturer: RAM, Model Year: 2020, Model line: CHASSIS CAB, Model: RAM CHASSIS CAB 2020Pages: 516, PDF Size: 16.57 MB
Page 405 of 516
TECHNICAL SPECIFICATIONS403
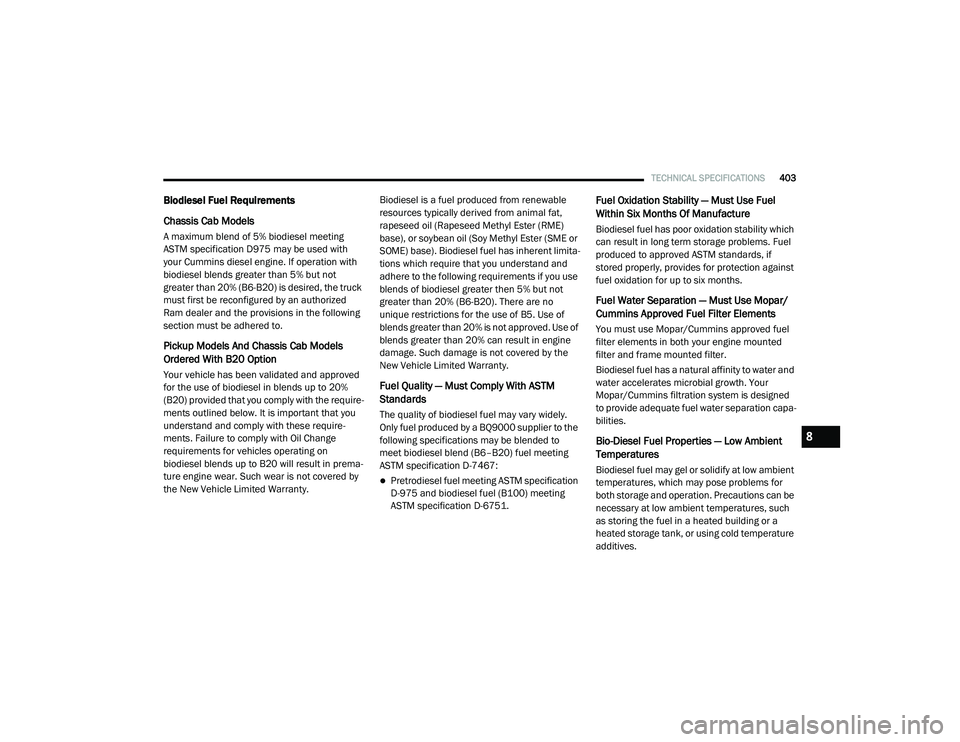
Biodiesel Fuel Requirements
Chassis Cab Models
A maximum blend of 5% biodiesel meeting
ASTM specification D975 may be used with
your Cummins diesel engine. If operation with
biodiesel blends greater than 5% but not
greater than 20% (B6-B20) is desired, the truck
must first be reconfigured by an authorized
Ram dealer and the provisions in the following
section must be adhered to.
Pickup Models And Chassis Cab Models
Ordered With B20 Option
Your vehicle has been validated and approved
for the use of biodiesel in blends up to 20%
(B20) provided that you comply with the require -
ments outlined below. It is important that you
understand and comply with these require -
ments. Failure to comply with Oil Change
requirements for vehicles operating on
biodiesel blends up to B20 will result in prema -
ture engine wear. Such wear is not covered by
the New Vehicle Limited Warranty. Biodiesel is a fuel produced from renewable
resources typically derived from animal fat,
rapeseed oil (Rapeseed Methyl Ester (RME)
base), or soybean oil (Soy Methyl Ester (SME or
SOME) base). Biodiesel fuel has inherent limita-
tions which require that you understand and
adhere to the following requirements if you use
blends of biodiesel greater then 5% but not
greater than 20% (B6-B20). There are no
unique restrictions for the use of B5. Use of
blends greater than 20% is not approved. Use of
blends greater than 20% can result in engine
damage. Such damage is not covered by the
New Vehicle Limited Warranty.Fuel Quality — Must Comply With ASTM
Standards
The quality of biodiesel fuel may vary widely.
Only fuel produced by a BQ9000 supplier to the
following specifications may be blended to
meet biodiesel blend (B6–B20) fuel meeting
ASTM specification D-7467:
Pretrodiesel fuel meeting ASTM specification
D-975 and biodiesel fuel (B100) meeting
ASTM specification D-6751.
Fuel Oxidation Stability — Must Use Fuel
Within Six Months Of Manufacture
Biodiesel fuel has poor oxidation stability which
can result in long term storage problems. Fuel
produced to approved ASTM standards, if
stored properly, provides for protection against
fuel oxidation for up to six months.
Fuel Water Separation — Must Use Mopar/
Cummins Approved Fuel Filter Elements
You must use Mopar/Cummins approved fuel
filter elements in both your engine mounted
filter and frame mounted filter.
Biodiesel fuel has a natural affinity to water and
water accelerates microbial growth. Your
Mopar/Cummins filtration system is designed
to provide adequate fuel water separation capa-
bilities.
Bio-Diesel Fuel Properties — Low Ambient
Temperatures
Biodiesel fuel may gel or solidify at low ambient
temperatures, which may pose problems for
both storage and operation. Precautions can be
necessary at low ambient temperatures, such
as storing the fuel in a heated building or a
heated storage tank, or using cold temperature
additives.
8
2020_RAM_CHASSIS_CAB_OM_USA=GUID-6C67832B-7839-4CCF-BEFC-CDF988F949EA=1=en=.book Page 403
Page 413 of 516
TECHNICAL SPECIFICATIONS411
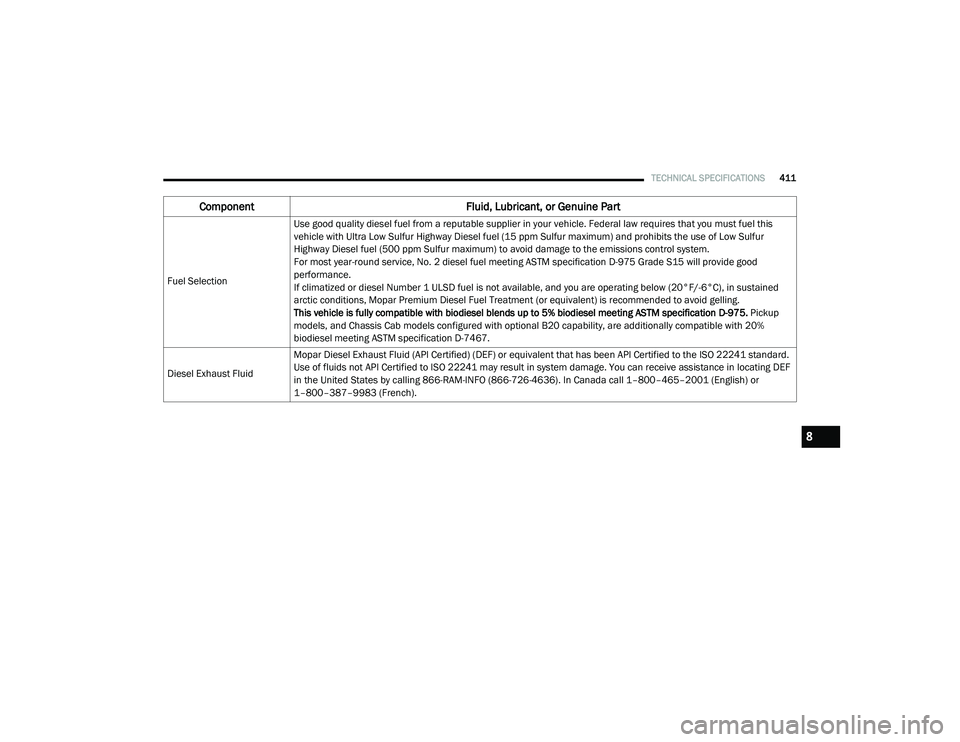
Fuel SelectionUse good quality diesel fuel from a reputable supplier in your vehicle. Federal law requires that you must fuel this
vehicle with Ultra Low Sulfur Highway Diesel fuel (15 ppm Sulfur maximum) and prohibits the use of Low Sulfur
Highway Diesel fuel (500 ppm Sulfur maximum) to avoid damage to the emissions control system.
For most year-round service, No. 2 diesel fuel meeting ASTM specification D-975 Grade S15 will provide good
performance.
If climatized or diesel Number 1 ULSD fuel is not available, and you are operating below (20°F/-6°C), in sustained
arctic conditions, Mopar Premium Diesel Fuel Treatment (or equivalent) is recommended to avoid gelling.
This vehicle is fully compatible with biodiesel blends up to 5% biodiesel meeting ASTM specification D-975.
Pickup
models, and Chassis Cab models configured with optional B20 capability, are additionally compatible with 20%
biodiesel meeting ASTM specification D-7467.
Diesel Exhaust Fluid Mopar Diesel Exhaust Fluid (API Certified) (DEF) or equivalent that has been API Certified to the ISO 22241 standard.
Use of fluids not API Certified to ISO 22241 may result in system damage. You can receive assistance in locating DEF
in the United States by calling 866-RAM-INFO (866-726-4636). In Canada call 1–800–465–2001 (English) or
1–800–387–9983 (French).
Component
Fluid, Lubricant, or Genuine Part
8
2020_RAM_CHASSIS_CAB_OM_USA=GUID-6C67832B-7839-4CCF-BEFC-CDF988F949EA=1=en=.book Page 411
Page 421 of 516
MULTIMEDIA419
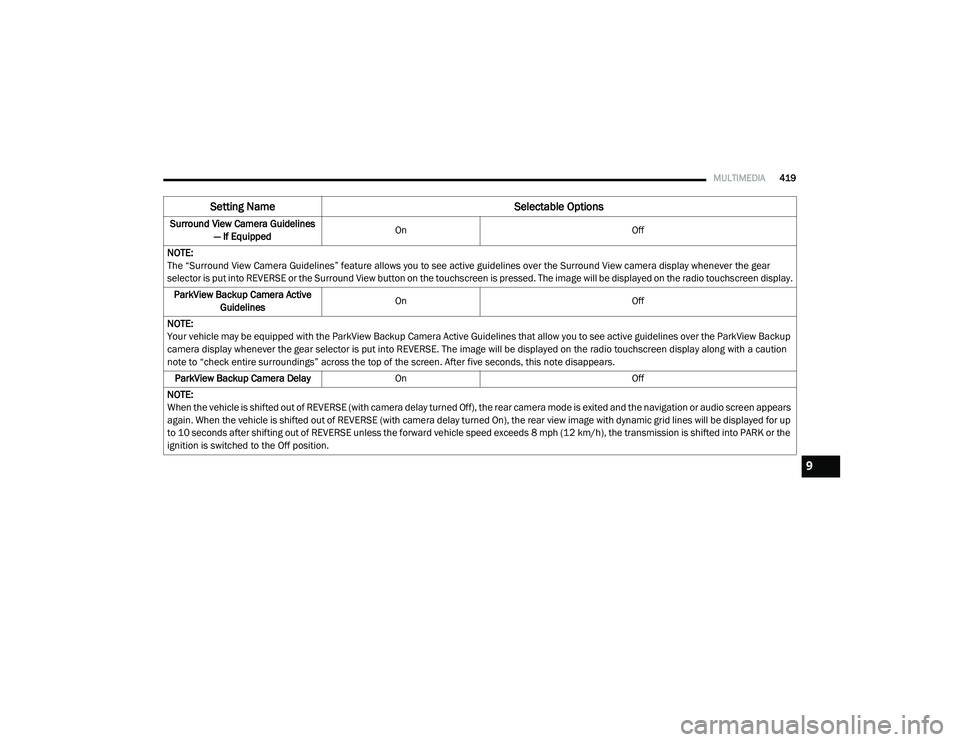
Surround View Camera Guidelines
— If Equipped On
Off
NOTE:
The “Surround View Camera Guidelines” feature allows you to see active guidelines over the Surround View camera display whenever the gear
selector is put into REVERSE or the Surround View button on the touchscreen is pressed. The image will be displayed on the radio touchscreen display. ParkView Backup Camera Active Guidelines On
Off
NOTE:
Your vehicle may be equipped with the ParkView Backup Camera Active Guidelines that allow you to see active guidelines over the ParkView Backup
camera display whenever the gear selector is put into REVERSE. The image will be displayed on the radio touchscreen display along with a caution
note to “check entire surroundings” across the top of the screen. After five seconds, this note disappears. ParkView Backup Camera Delay On Off
NOTE:
When the vehicle is shifted out of REVERSE (with camera delay turned Off), the rear camera mode is exited and the navigation or audio screen appears
again. When the vehicle is shifted out of REVERSE (with camera delay turned On), the rear view image with dynamic grid lines will be displayed for up
to 10 seconds after shifting out of REVERSE unless the forward vehicle speed exceeds 8 mph (12 km/h), the transmission is shifted into PARK or the
ignition is switched to the Off position.
Setting Name Selectable Options
9
2020_RAM_CHASSIS_CAB_OM_USA=GUID-6C67832B-7839-4CCF-BEFC-CDF988F949EA=1=en=.book Page 419
Page 462 of 516
460MULTIMEDIA
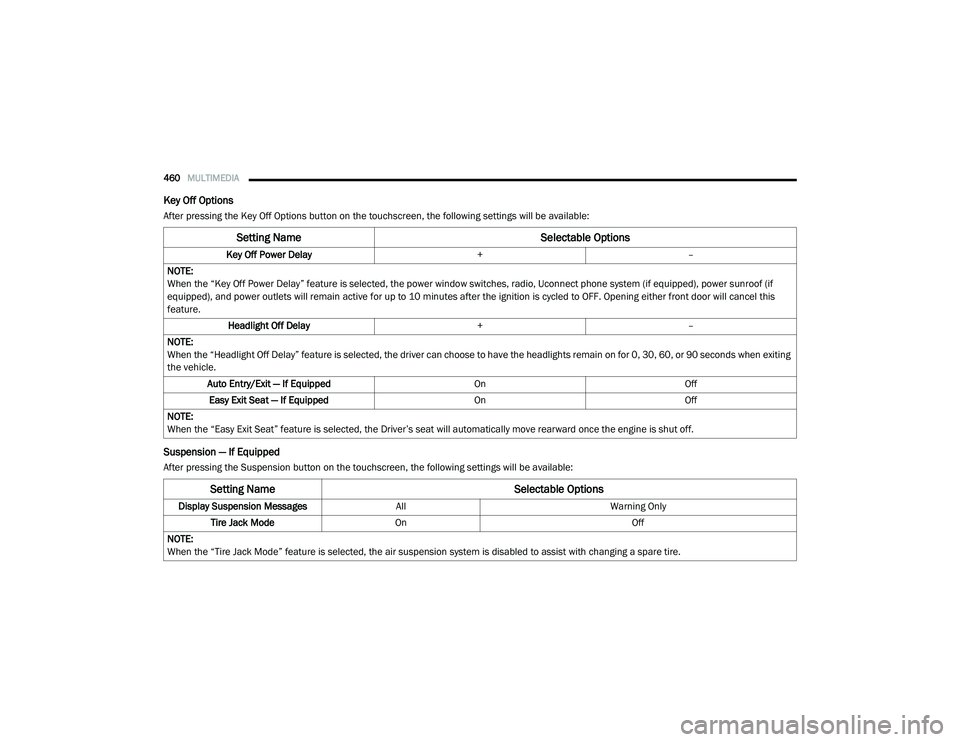
Key Off Options
After pressing the Key Off Options button on the touchscreen, the following settings will be available:
Suspension — If Equipped
After pressing the Suspension button on the touchscreen, the following settings will be available:
Setting Name Selectable Options
Key Off Power Delay+–
NOTE:
When the “Key Off Power Delay” feature is selected, the power window switches, radio, Uconnect phone system (if equipped), power sunroof (if
equipped), and power outlets will remain active for up to 10 minutes after the ignition is cycled to OFF. Opening either front door will cancel this
feature. Headlight Off Delay +–
NOTE:
When the “Headlight Off Delay” feature is selected, the driver can choose to have the headlights remain on for 0, 30, 60, or 90 seconds when exiting
the vehicle. Auto Entry/Exit — If Equipped OnOff
Easy Exit Seat — If Equipped OnOff
NOTE:
When the “Easy Exit Seat” feature is selected, the Driver’s seat will automatically move rearward once the engine is shut off.
Setting Name Selectable Options
Display Suspension MessagesAllWarning Only
Tire Jack Mode On Off
NOTE:
When the “Tire Jack Mode” feature is selected, the air suspension system is disabled to assist with changing a spare tire.
2020_RAM_CHASSIS_CAB_OM_USA=GUID-6C67832B-7839-4CCF-BEFC-CDF988F949EA=1=en=.book Page 460
Page 463 of 516
MULTIMEDIA461
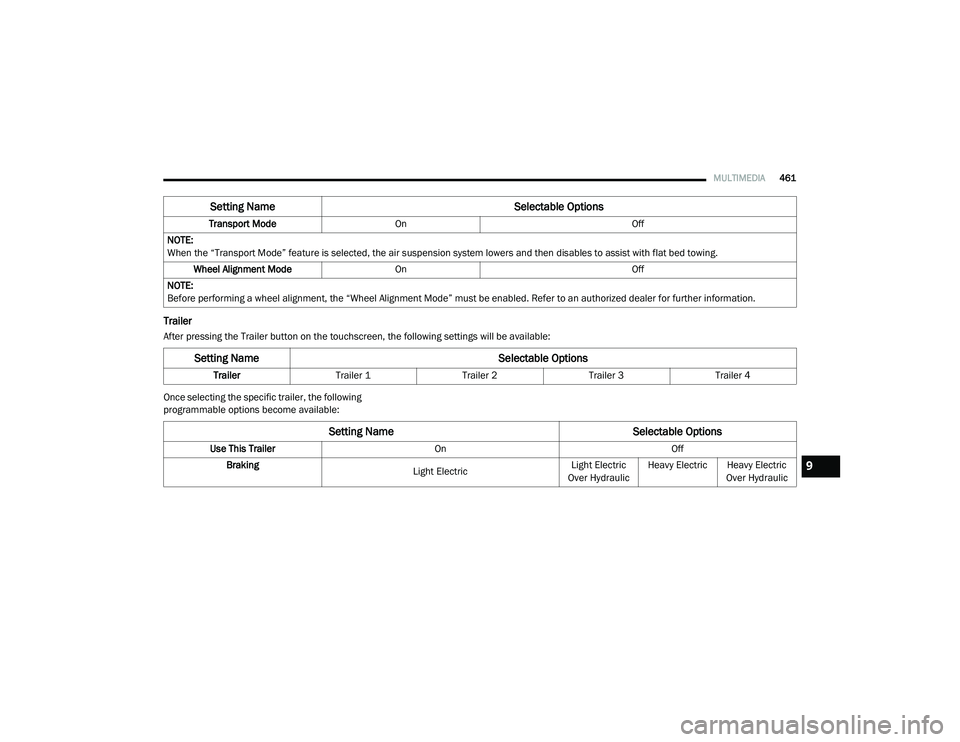
Trailer
After pressing the Trailer button on the touchscreen, the following settings will be available:
Once selecting the specific trailer, the following
programmable options become available:Transport Mode
On Off
NOTE:
When the “Transport Mode” feature is selected, the air suspension system lowers and then disables to assist with flat bed towing. Wheel Alignment Mode On Off
NOTE:
Before performing a wheel alignment, the “Wheel Alignment Mode” must be enabled. Refer to an authorized dealer for further information.
Setting Name Selectable Options
Setting NameSelectable Options
TrailerTrailer 1 Trailer 2Trailer 3Trailer 4
Setting Name Selectable Options
Use This TrailerOn Off
Braking Light ElectricLight Electric
Over Hydraulic Heavy Electric
Heavy Electric
Over Hydraulic
9
2020_RAM_CHASSIS_CAB_OM_USA=GUID-6C67832B-7839-4CCF-BEFC-CDF988F949EA=1=en=.book Page 461
Page 473 of 516
MULTIMEDIA471
When you are receiving a station that you wish
to commit into memory, press and hold the
desired numbered button on the touchscreen
for more than two seconds or until you hear a
confirmation beep.
The Radio stores up to 12 presets in each of the
Radio modes. Four presets are visible at the top
of the radio screen.
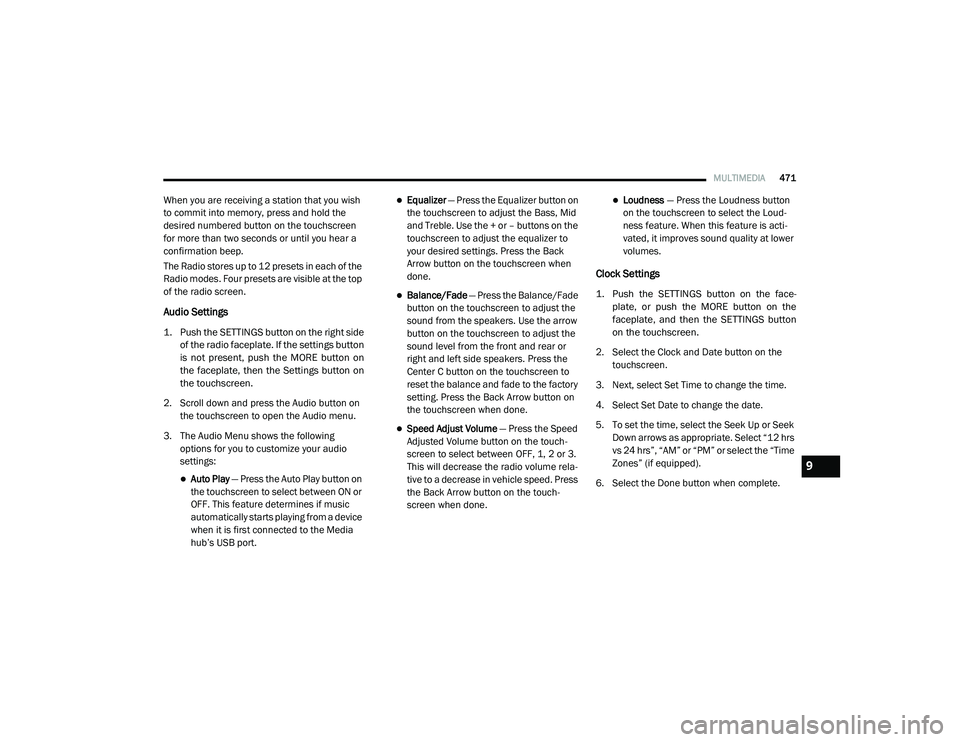
Audio Settings
1. Push the SETTINGS button on the right side
of the radio faceplate. If the settings button
is not present, push the MORE button on
the faceplate, then the Settings button on
the touchscreen.
2. Scroll down and press the Audio button on the touchscreen to open the Audio menu.
3. The Audio Menu shows the following options for you to customize your audio
settings:
Auto Play — Press the Auto Play button on
the touchscreen to select between ON or
OFF. This feature determines if music
automatically starts playing from a device
when it is first connected to the Media
hub’s USB port.
Equalizer — Press the Equalizer button on
the touchscreen to adjust the Bass, Mid
and Treble. Use the + or – buttons on the
touchscreen to adjust the equalizer to
your desired settings. Press the Back
Arrow button on the touchscreen when
done.
Balance/Fade — Press the Balance/Fade
button on the touchscreen to adjust the
sound from the speakers. Use the arrow
button on the touchscreen to adjust the
sound level from the front and rear or
right and left side speakers. Press the
Center C button on the touchscreen to
reset the balance and fade to the factory
setting. Press the Back Arrow button on
the touchscreen when done.
Speed Adjust Volume — Press the Speed
Adjusted Volume button on the touch -
screen to select between OFF, 1, 2 or 3.
This will decrease the radio volume rela -
tive to a decrease in vehicle speed. Press
the Back Arrow button on the touch-
screen when done.
Loudness — Press the Loudness button
on the touchscreen to select the Loud -
ness feature. When this feature is acti -
vated, it improves sound quality at lower
volumes.
Clock Settings
1. Push the SETTINGS button on the face -
plate, or push the MORE button on the
faceplate, and then the SETTINGS button
on the touchscreen.
2. Select the Clock and Date button on the touchscreen.
3. Next, select Set Time to change the time.
4. Select Set Date to change the date.
5. To set the time, select the Seek Up or Seek Down arrows as appropriate. Select “12 hrs
vs 24 hrs”, “AM” or “PM” or select the “Time
Zones” (if equipped).
6. Select the Done button when complete.
9
2020_RAM_CHASSIS_CAB_OM_USA=GUID-6C67832B-7839-4CCF-BEFC-CDF988F949EA=1=en=.book Page 471
Page 474 of 516
472MULTIMEDIA
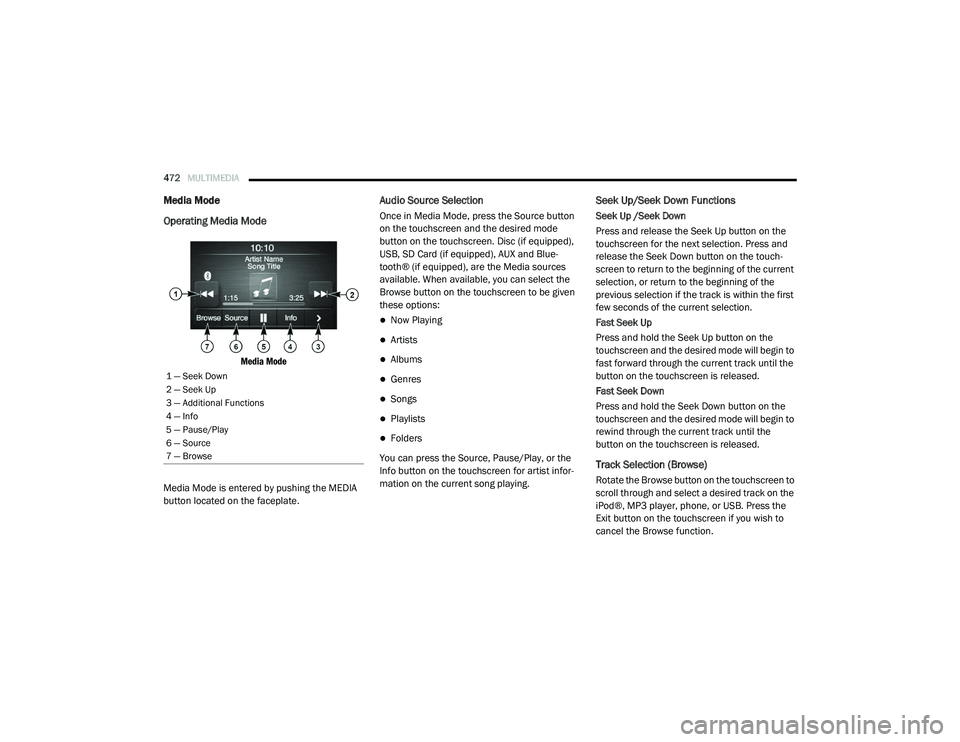
Media Mode
Operating Media Mode
Media Mode
Media Mode is entered by pushing the MEDIA
button located on the faceplate.
Audio Source Selection
Once in Media Mode, press the Source button
on the touchscreen and the desired mode
button on the touchscreen. Disc (if equipped),
USB, SD Card (if equipped), AUX and Blue-
tooth® (if equipped), are the Media sources
available. When available, you can select the
Browse button on the touchscreen to be given
these options:
Now Playing
Artists
Albums
Genres
Songs
Playlists
Folders
You can press the Source, Pause/Play, or the
Info button on the touchscreen for artist infor -
mation on the current song playing.
Seek Up/Seek Down Functions
Seek Up /Seek Down
Press and release the Seek Up button on the
touchscreen for the next selection. Press and
release the Seek Down button on the touch -
screen to return to the beginning of the current
selection, or return to the beginning of the
previous selection if the track is within the first
few seconds of the current selection.
Fast Seek Up
Press and hold the Seek Up button on the
touchscreen and the desired mode will begin to
fast forward through the current track until the
button on the touchscreen is released.
Fast Seek Down
Press and hold the Seek Down button on the
touchscreen and the desired mode will begin to
rewind through the current track until the
button on the touchscreen is released.
Track Selection (Browse)
Rotate the Browse button on the touchscreen to
scroll through and select a desired track on the
iPod®, MP3 player, phone, or USB. Press the
Exit button on the touchscreen if you wish to
cancel the Browse function.
1 — Seek Down
2 — Seek Up
3 — Additional Functions
4 — Info
5 — Pause/Play
6 — Source
7 — Browse
2020_RAM_CHASSIS_CAB_OM_USA=GUID-6C67832B-7839-4CCF-BEFC-CDF988F949EA=1=en=.book Page 472
Page 475 of 516
MULTIMEDIA473
Repeat
Press the Repeat button on the touchscreen to
repeat the song selection. To cancel Repeat,
press the Repeat button on the touchscreen a
second time.
Shuffle
Press the Shuffle button on the touchscreen to
play the selections on the USB/iPod® or Blue -
tooth® device in random order to provide an
interesting change of pace. Press the Shuffle
button on the touchscreen a second time to
turn this feature off.
Track Info
Press the Info button on the touchscreen to
display the current track information. Press the
X button on the touchscreen to cancel this
feature.
Audio
Refer to “Audio Settings” for the adjustable
audio settings.
USB/IPOD® MODE
USB/iPod® Mode is entered by either inserting
a USB Jump Drive or iPod® cable into the USB
port, or by pushing the MEDIA button located on
the faceplate. Once in Media Mode, press the
Source button on the touchscreen, and select
the USB/iPod® button.
Inserting USB/iPod® Device
Gently insert the USB/iPod® device into the
USB Port. If you insert a USB/iPod® device with
the ignition ON, the unit will switch to USB/
iPod® mode and begin to play when you insert
the device. The display will show the track
number and index time in minutes and
seconds. Play will begin at the start of track 1.
Browse
Press the Browse button on the touchscreen to
select Artist, Albums, Genres, Songs, Playlists or
Folders from the USB/iPod® device. Once the
desired selection is made you can chose from
the available media by pressing the button on
the touchscreen. Press the Exit button on the
touchscreen if you wish to cancel the Browse
function.
BLUETOOTH® MODE
Bluetooth® Streaming Audio (BTSA) or
Bluetooth® Mode is entered by pairing a
Bluetooth® device containing music to the
Uconnect system.
Before proceeding, the Bluetooth® device must
be paired with the Uconnect Phone to communi -
cate with the Uconnect system.
Refer to Phone Mode chapter in this manual for
pairing procedure.
Once the Bluetooth® device is paired to the
Uconnect system, push the MEDIA button
located on the faceplate. Once in Media Mode,
press the Source button on the touchscreen
and select the Bluetooth® button.
NOTE:
For mobile phone compatibility and pairing
instructions, please visit UconnectPhone.com.
AUX MODE
AUX Mode is entered by inserting a AUX device
using a stereo cable with a 3.5 mm audio jack
into the AUX port or by pushing the MEDIA
button located on the faceplate. Once in Media
Mode, press the Source button on the touch -
screen, and select the AUX button.9
2020_RAM_CHASSIS_CAB_OM_USA=GUID-6C67832B-7839-4CCF-BEFC-CDF988F949EA=1=en=.book Page 473
Page 476 of 516
474MULTIMEDIA
Inserting Auxiliary Device
Gently insert the Auxiliary device cable into the
AUX Port. If you insert an Auxiliary device with
the ignition on, the unit will switch to AUX mode
and begin to play when you insert the device
cable.
Controlling The Auxiliary Device
The control of the Auxiliary device (e.g.,
selecting playlists, play, fast forward, etc.)
cannot be provided by the radio; use the device
controls instead. Adjust the volume with the
VOLUME rotary knob or with the volume of the
attached device.
The radio unit is acting as the amplifier for audio
output from the Auxiliary device. Therefore, if
the volume control on the Auxiliary device is set
too low, there will be insufficient audio signal for
the radio unit to play the music on the device.Phone Mode
Operating Phone Mode
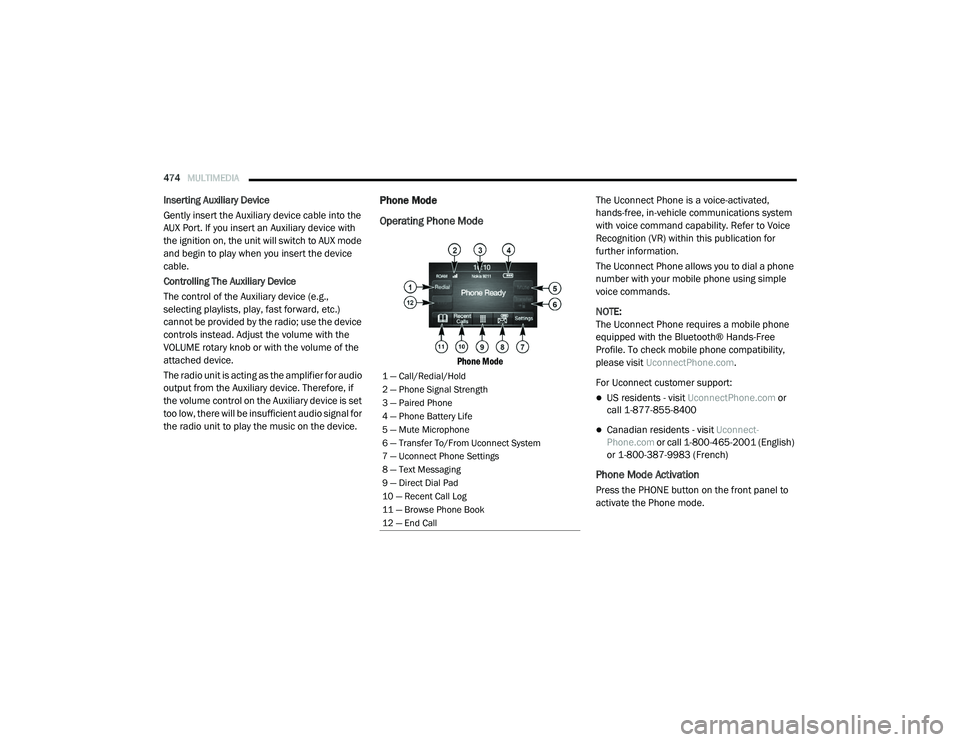
Phone Mode
The Uconnect Phone is a voice-activated,
hands-free, in-vehicle communications system
with voice command capability. Refer to Voice
Recognition (VR) within this publication for
further information.
The Uconnect Phone allows you to dial a phone
number with your mobile phone using simple
voice commands.
NOTE:
The Uconnect Phone requires a mobile phone
equipped with the Bluetooth® Hands-Free
Profile. To check mobile phone compatibility,
please visit
UconnectPhone.com .
For Uconnect customer support:
US residents - visit UconnectPhone.com or
call 1-877-855-8400
Canadian residents - visit Uconnect-
Phone.com or call 1-800-465-2001 (English)
or 1-800-387-9983 (French)
Phone Mode Activation
Press the PHONE button on the front panel to
activate the Phone mode.
1 — Call/Redial/Hold
2 — Phone Signal Strength
3 — Paired Phone
4 — Phone Battery Life
5 — Mute Microphone
6 — Transfer To/From Uconnect System
7 — Uconnect Phone Settings
8 — Text Messaging
9 — Direct Dial Pad
10 — Recent Call Log
11 — Browse Phone Book
12 — End Call
2020_RAM_CHASSIS_CAB_OM_USA=GUID-6C67832B-7839-4CCF-BEFC-CDF988F949EA=1=en=.book Page 474
Page 482 of 516
480MULTIMEDIA
Managing Two Phone Calls
If two calls are in progress (one active and one
on hold), it is possible to switch between them
pressing the Call On Hold button or to merge the
two calls in a conference pressing the Merge
Calls button.
NOTE:
Check whether the mobile phone in use
supports the management of a second call and
the "Conference" mode.
Transferring/Call Continuation
Transferring
The ongoing calls can be transferred from the
mobile phone to the system and vice versa
without ending the call.
To transfer the call, press the Transfer button.
Call Continuation
After the engine is switched off, it is still possible
to continue a phone call.
The call continues until it is ended manually or
for a maximum period of about 20 minutes.
When the system is switched off, the call is
transferred to the mobile phone.
Ending A Call
Press the End button on the touchscreen or the
PHONE button on the steering wheel controls to
end a call in progress.
Only the ongoing call is ended and any call on
hold becomes the new active call.
Depending on the type of mobile phone, if the
ongoing call is ended by the caller, the call on
hold may not be activated automatically.
Uconnect Phone Features
Mute/Unmute
1. During a call, push the VOICE COMMAND
button on the steering wheel.
2. After the beep, say “mute” or “mute off”.
Reading Messages
The system can read the messages received by
the mobile phone.
To use this function, the mobile phone must
support the SMS exchange function via Blue -
tooth®.
If this function is not supported by the phone,
the corresponding message button is deacti -
vated (greyed out) or may only accept incoming
messages. When a text message is received, the display
will show a screen where the options "Listen",
"Call" or "Ignore" can be selected.
Press the Message button to access the list of
SMS messages received by the mobile phone.
The list displays a maximum of 60 messages
received.
Browsing SMS
Using the steering wheel commands, you can
view and manage the last 10 SMS messages
received on the instrument panel. To use this
function, the mobile phone must support the
SMS exchange function through Bluetooth®.
Select the PHONE button on the instrument
panel menu, and then select “SMS Reader”
using the arrow keys on the steering wheel
controls.
The “SMS Reader” submenu allows the last 10
SMS messages to be displayed.
2020_RAM_CHASSIS_CAB_OM_USA=GUID-6C67832B-7839-4CCF-BEFC-CDF988F949EA=1=en=.book Page 480