USB RAM CHASSIS CAB 2021 User Guide
[x] Cancel search | Manufacturer: RAM, Model Year: 2021, Model line: CHASSIS CAB, Model: RAM CHASSIS CAB 2021Pages: 463, PDF Size: 21.5 MB
Page 248 of 463
246MULTIMEDIA
SAFETY AND GENERAL INFORMATION
Safety Guidelines
Please read this manual carefully before using
the system. It contains instructions on how to
use the system in a safe and effective manner.
Do NOT attach any object to the touchscreen.
Doing so can result in damage to the
touchscreen.
Please read and follow these safety precautions.
Failure to do so may result in injury or property
damage.
Glance at the screen only when safe to do so.
If prolonged viewing of the screen is required,
park in a safe location and set the parking
brake.
Stop use immediately if a problem occurs.
Failure to do so may cause injury or damage
to the product. See an authorized dealer for
repair.
Ensure the volume level of the system is set
to a level that still allows you to hear outside
traffic and emergency vehicles.
Safe Usage Of The Uconnect System
The Uconnect system is a sophisticated elec -
tronic device. Do not let young children use
the system.
Permanent hearing loss may occur if you play
your music or sound system at loud volumes.
Exercise caution when setting the volume on
the system.
Keep drinks, rain and other sources of mois -
ture away from the system. Besides damage
to the system, moisture can cause electric
shocks as with any electronic device. NOTE:
Many features of this system are speed depen
-
dent. For your own safety, it is not possible to
use some of the touchscreen features while the
vehicle is in motion.
Care And Maintenance
Do not press the touchscreen with any hard
or sharp objects (pen, USB stick, jewelry,
etc.), which could scratch the surface.
Do not spray any liquid or chemicals directly
on the screen! Use a clean and dry microfiber
lens cleaning cloth in order to clean the
touchscreen.
If necessary, use a lint-free cloth dampened
with a cleaning solution, such as isopropyl
alcohol or an isopropyl alcohol and water
solution ratio of 50:50. Be sure to follow
the solvent manufacturer's precautions and
directions Ú page 449.
WARNING!
ALWAYS drive safely with your hands on the
steering wheel. You have full responsibility
and assume all risks related to the use of the
Uconnect features and applications in this
vehicle. Only use Uconnect when it is safe
to do so. Failure to do so may result in an
accident involving serious injury or death.
21_DPF_OM_EN_USC_t.book Page 246
Page 249 of 463
MULTIMEDIA247
UCONNECT MODES
STEERING WHEEL AUDIO CONTROLS
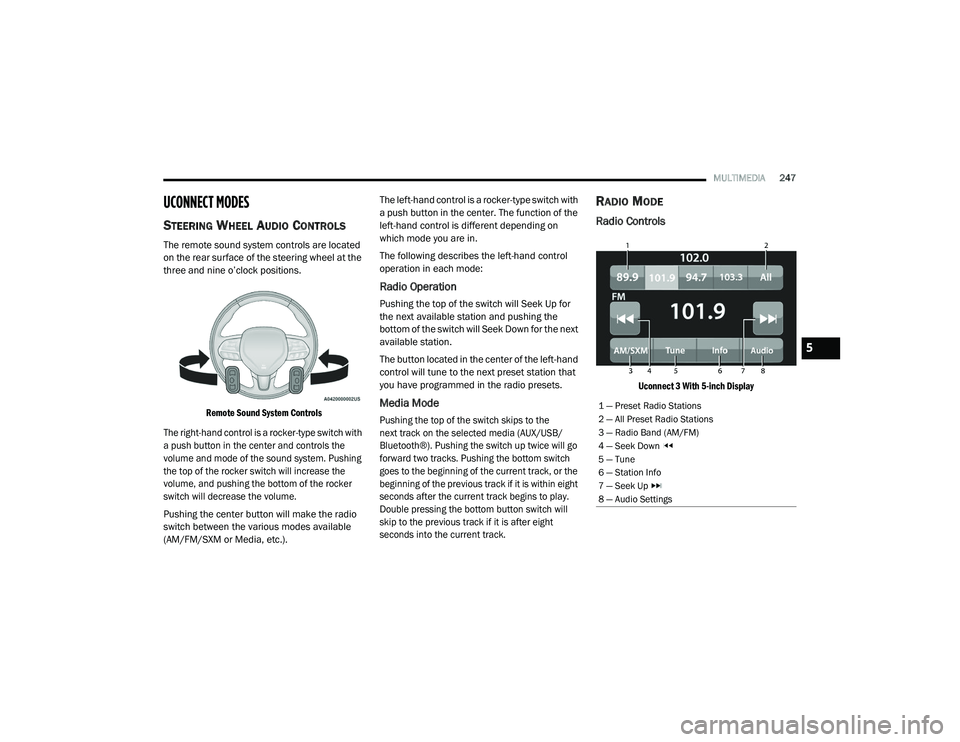
The remote sound system controls are located
on the rear surface of the steering wheel at the
three and nine o’clock positions.
Remote Sound System Controls
The right-hand control is a rocker-type switch with
a push button in the center and controls the
volume and mode of the sound system. Pushing
the top of the rocker switch will increase the
volume, and pushing the bottom of the rocker
switch will decrease the volume.
Pushing the center button will make the radio
switch between the various modes available
(AM/FM/SXM or Media, etc.). The left-hand control is a rocker-type switch with
a push button in the center. The function of the
left-hand control is different depending on
which mode you are in.
The following describes the left-hand control
operation in each mode:
Radio Operation
Pushing the top of the switch will Seek Up for
the next available station and pushing the
bottom of the switch will Seek Down for the next
available station.
The button located in the center of the left-hand
control will tune to the next preset station that
you have programmed in the radio presets.
Media Mode
Pushing the top of the switch skips to the
next track on the selected media (AUX/USB/
Bluetooth®). Pushing the switch up twice will go
forward two tracks. Pushing the bottom switch
goes to the beginning of the current track, or the
beginning of the previous track if it is within eight
seconds after the current track begins to play.
Double pressing the bottom button switch will
skip to the previous track if it is after eight
seconds into the current track.
RADIO MODE
Radio Controls
Uconnect 3 With 5-inch Display
1 — Preset Radio Stations
2 — All Preset Radio Stations
3 — Radio Band (AM/FM)
4 — Seek Down
5 — Tune
6 — Station Info
7 — Seek Up
8 — Audio Settings
5
21_DPF_OM_EN_USC_t.book Page 247
Page 256 of 463
254MULTIMEDIA
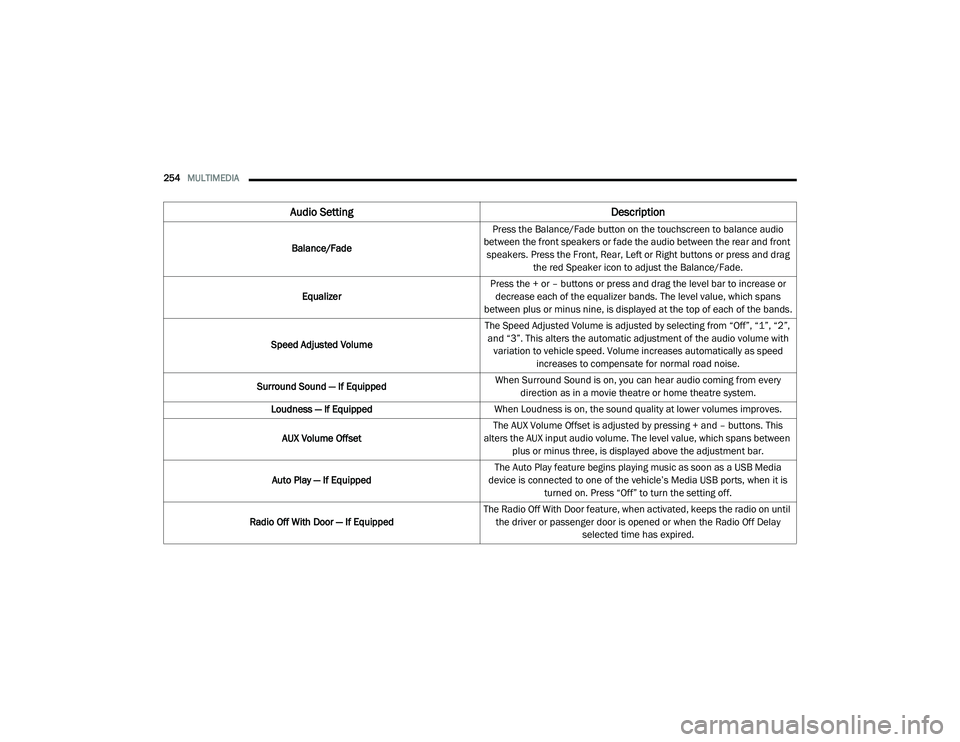
Audio Setting Description
Balance/FadePress the Balance/Fade button on the touchscreen to balance audio
between the front speakers or fade the audio between the rear and front speakers. Press the Front, Rear, Left or Right buttons or press and drag the red Speaker icon to adjust the Balance/Fade.
Equalizer Press the + or – buttons or press and drag the level bar to increase or
decrease each of the equalizer bands. The level value, which spans
between plus or minus nine, is displayed at the top of each of the bands.
Speed Adjusted Volume The Speed Adjusted Volume is adjusted by selecting from “Off”, “1”, “2”,
and “3”. This alters the automatic adjustment of the audio volume with variation to vehicle speed. Volume increases automatically as speed increases to compensate for normal road noise.
Surround Sound — If Equipped When Surround Sound is on, you can hear audio coming from every
direction as in a movie theatre or home theatre system.
Loudness — If Equipped When Loudness is on, the sound quality at lower volumes improves.
AUX Volume Offset The AUX Volume Offset is adjusted by pressing + and – buttons. This
alters the AUX input audio volume. The level value, which spans between plus or minus three, is displayed above the adjustment bar.
Auto Play — If Equipped The Auto Play feature begins playing music as soon as a USB Media
device is connected to one of the vehicle’s Media USB ports, when it is turned on. Press “Off” to turn the setting off.
Radio Off With Door — If Equipped The Radio Off With Door feature, when activated, keeps the radio on until
the driver or passenger door is opened or when the Radio Off Delay selected time has expired.
21_DPF_OM_EN_USC_t.book Page 254
Page 257 of 463
MULTIMEDIA255
MEDIA MODE
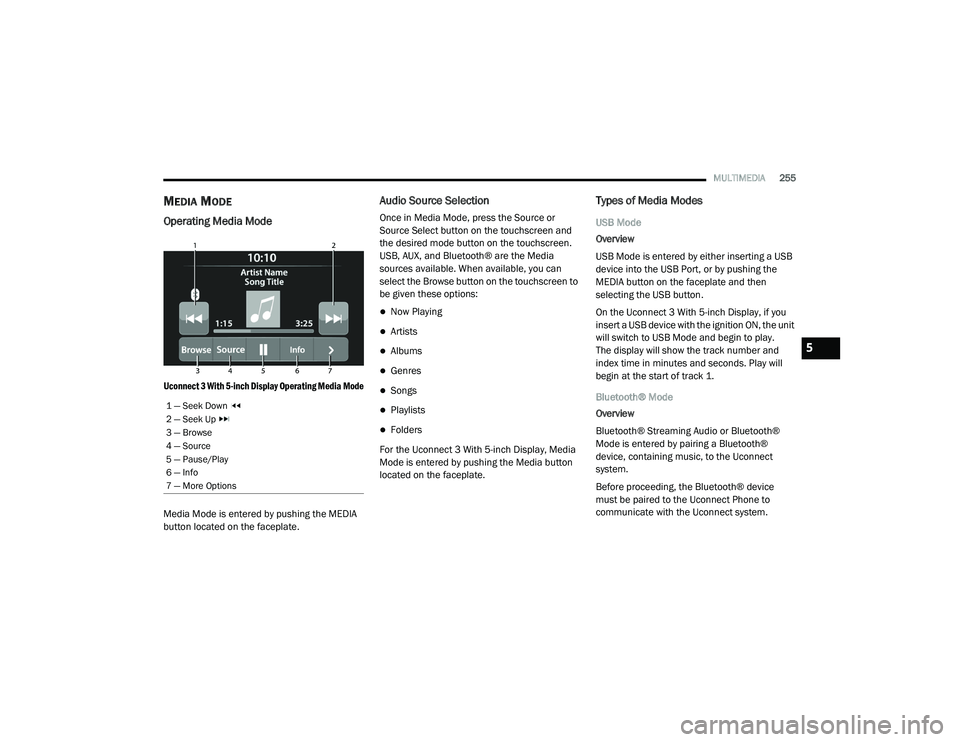
Operating Media Mode
Uconnect 3 With 5-inch Display Operating Media Mode
Media Mode is entered by pushing the MEDIA
button located on the faceplate.
Audio Source Selection
Once in Media Mode, press the Source or
Source Select button on the touchscreen and
the desired mode button on the touchscreen.
USB, AUX, and Bluetooth® are the Media
sources available. When available, you can
select the Browse button on the touchscreen to
be given these options:
Now Playing
Artists
Albums
Genres
Songs
Playlists
Folders
For the Uconnect 3 With 5-inch Display, Media
Mode is entered by pushing the Media button
located on the faceplate.
Types of Media Modes
USB Mode
Overview
USB Mode is entered by either inserting a USB
device into the USB Port, or by pushing the
MEDIA button on the faceplate and then
selecting the USB button.
On the Uconnect 3 With 5-inch Display, if you
insert a USB device with the ignition ON, the unit
will switch to USB Mode and begin to play.
The display will show the track number and
index time in minutes and seconds. Play will
begin at the start of track 1.
Bluetooth® Mode
Overview
Bluetooth® Streaming Audio or Bluetooth®
Mode is entered by pairing a Bluetooth®
device, containing music, to the Uconnect
system.
Before proceeding, the Bluetooth® device
must be paired to the Uconnect Phone to
communicate with the Uconnect system.
1 — Seek Down
2 — Seek Up
3 — Browse
4 — Source
5 — Pause/Play
6 — Info
7 — More Options
5
21_DPF_OM_EN_USC_t.book Page 255
Page 258 of 463
256MULTIMEDIA
On the Uconnect 3 With 5-inch Display, push the
MEDIA button located on the faceplate. Once in
Media Mode, press the Source button on the
touchscreen and select the Bluetooth® button
Úpage 258.
To access Bluetooth® Mode, press the
Bluetooth® button on the left side of the
touchscreen or under the Source Select/Select
Source button (if equipped).
AUX Mode
Overview
Auxiliary Mode (AUX) is entered by inserting an
AUX device using a cable with a 3.5 mm audio
jack into the AUX port or pushing the MEDIA
button on the faceplate and then selecting the
Source button and then the AUX button.
To insert an Auxiliary device, gently insert the
Auxiliary device cable into the AUX Port. If you
insert an Auxiliary device with the ignition and
the radio on, the unit will switch to AUX Mode
and begin to play. Controlling The Auxiliary Device
The control of the Auxiliary device (e.g.,
selecting playlists, play, fast forward, etc.)
cannot be provided by the radio; use the device
controls instead. Adjust the volume with the
Volume button, Volume/Mute rotary knob, or
the On/Off rotary knob, or with the volume of
the attached device.
NOTE:
The radio unit is acting as the amplifier for audio
output from the Auxiliary device. Therefore, if
the volume control on the Auxiliary device is set
too low, there will be insufficient audio signal for
the radio unit to play the music on the device.
Seek Up /Seek Down
In USB Mode, press the Seek Up button on the
touchscreen for the next selection on the USB
device. Press and release the Seek Down
button on the touchscreen to return to the
beginning of the current selection, or to return
to the beginning of the previous selection if the
USB device is within the first three seconds of
the current selection.
In Bluetooth® Mode, press and release the
Seek Up button on the touchscreen for the next
selection on the Bluetooth® device. Press and release the Seek Down button on the
touchscreen to return to the beginning of the
current selection, or return to the beginning of
the previous selection if the Bluetooth® device
is within the first second of the current
selection.
Browse
In USB Mode, press the Browse button on the
touchscreen to display the browse window.
In USB Mode, the left side of the browse window
displays a list of ways you can browse through
the contents of the USB device. If supported by
the device, you can browse by Folder, Artist,
Playlist, Album, Song, etc. Press the desired
button on the touchscreen on the left side of the
screen. The center of the browse window shows
items and its sub-functions, which can be
scrolled through by pressing the Up and Down
buttons to the right. The Tune/Scroll knob can
also be used to scroll.
On the Uconnect 3 With 5-inch Display, rotate the
Browse button on the touchscreen to scroll
through and select a desired track on the device.
Press the Exit button on the touchscreen if you
wish to cancel the Browse function.
21_DPF_OM_EN_USC_t.book Page 256
Page 259 of 463
MULTIMEDIA257
Media Mode
In USB Mode, press the Media button on the
touchscreen to select the desired audio
source: USB.
In Bluetooth® Mode, press the Media button on
the touchscreen to select the desired audio
source: Bluetooth®.
In AUX Mode, press the Media button on
the touchscreen to select the desired audio
source: AUX.
Repeat
In USB Mode, press the Repeat button on the
touchscreen to toggle the repeat functionality.
The Repeat button on the touchscreen is
highlighted when active. The Radio will continue
to play the current track, repeatedly, as long as
the repeat is active. Press the Repeat button
again to enter Repeat All. The radio will continue
to play all the current tracks, repeatedly, as long
as the repeat function is active. To cancel
Repeat, press the Repeat button a third time. Shuffle
In USB Mode, press the Shuffle button on the
touchscreen to play the selections on the USB
device in random order to provide an interesting
change of pace. Press the Shuffle button on the
touchscreen a second time to turn this feature off.
Audio
Audio settings can be accessed by pressing the
Audio button Ú
page 247.
Info
In both Disc and USB Modes, press the Info
button on the touchscreen to display the
current track information. Press the Info or X
button on the touchscreen a second time to
cancel this feature.
Tracks
In both Disc and USB Modes, press the Tracks
button on the touchscreen to display a pop-up
with the Song List. The song currently playing is
indicated by an arrow and lines above and
below the song title. When in the Tracks List
screen you can rotate the Tune/Scroll knob to
highlight a track (indicated by the line above
and below the track name) and then push the
Enter/Browse knob to start playing that track. In Bluetooth® Mode, if the Bluetooth® device
supports this feature, press the Tracks button
on the touchscreen to display a pop-up with
the Song List. The currently playing song is
indicated by a red arrow and lines above and
below the song title.
Pressing the Tracks button on the touchscreen
while the pop-up is displayed will close the pop-up.
Media Voice Commands
Uconnect offers connections via USB,
Bluetooth®, and auxiliary (AUX) ports. Voice
operation is only available for connected USB
and AUX devices.
Push the VR button located on the steering
wheel. After the beep, say one of the following
commands and follow the prompts to switch
your media source or choose an artist.
“
Change source to Bluetooth®”
“Change source to AUX”
“Change source to USB”
“Play artist Beethoven”; “ Play album
Greatest Hits”; “ Play song Moonlight
Sonata”; “ Play genre Classical”
5
21_DPF_OM_EN_USC_t.book Page 257
Page 260 of 463
258MULTIMEDIA
Did You Know: Press the Browse button on the
touchscreen to see all of the music on your USB
device. Your Voice Command must match
exactly how the artist, album, song, and genre
information is displayed.
PHONE MODE
Overview
Uconnect Phone is a voice-activated,
hands-free, in-vehicle communications system.
It allows you to dial a phone number with your
mobile phone.
The feature supports the following:
Voice Activated Features
Hands-Free dialing via Voice (“Call John
Smith Mobile” or “Dial 248-555-1212”).
Hands-Free text-to-speech listening of your
incoming SMS messages.
Hands-Free Text Message Replying: Forward
one of 18 predefined SMS messages to
incoming calls/text messages.
Redialing last dialed numbers (“Redial”).
Calling Back the last incoming call number
(“Call Back”).
Viewing call logs on screen (“Show Incoming
Calls,” “Show Outgoing Calls,” “Show Missed
Calls,” or “Show Recent Calls”).
Searching Contacts phone number (“Search
for John Smith Mobile”).
Screen Activated Features
Dialing via Keypad using touchscreen.
Viewing and Calling contacts from Phone -
books displayed on the touchscreen.
Setting Favorite Contact phone numbers so
they are easily accessible on the Main Phone
screen.
Viewing and Calling contacts from Recent
Call logs.
Reviewing your recent Incoming SMS
Messages.
Pairing up to 10 phones/audio devices for
easy access to connect to them quickly.
NOTE:
Your phone must be capable of SMS messaging
via Bluetooth® for messaging features to work
properly. Your mobile phone’s audio is transmitted
through your vehicle’s audio system; the system
will automatically mute your radio when using
the Uconnect Phone.
For Uconnect customer support:
US visit UconnectPhone.com or call
877-855-8400
Canada visit UconnectPhone.com or call
800-465-2001 (English) or (French) call
800-387-9983
Uconnect Phone allows you to transfer calls
between the system and your mobile phone as
you enter or exit your vehicle and enables you to
mute the system's microphone for private
conversation.
WARNING!
ALWAYS drive safely with your hands on the
steering wheel. You have full responsibility
and assume all risks related to the use of the
Uconnect features and applications in this
vehicle. Only use Uconnect when it is safe
to do so. Failure to do so may result in an
accident involving serious injury or death.
21_DPF_OM_EN_USC_t.book Page 258
Page 400 of 463
398SERVICING AND MAINTENANCE
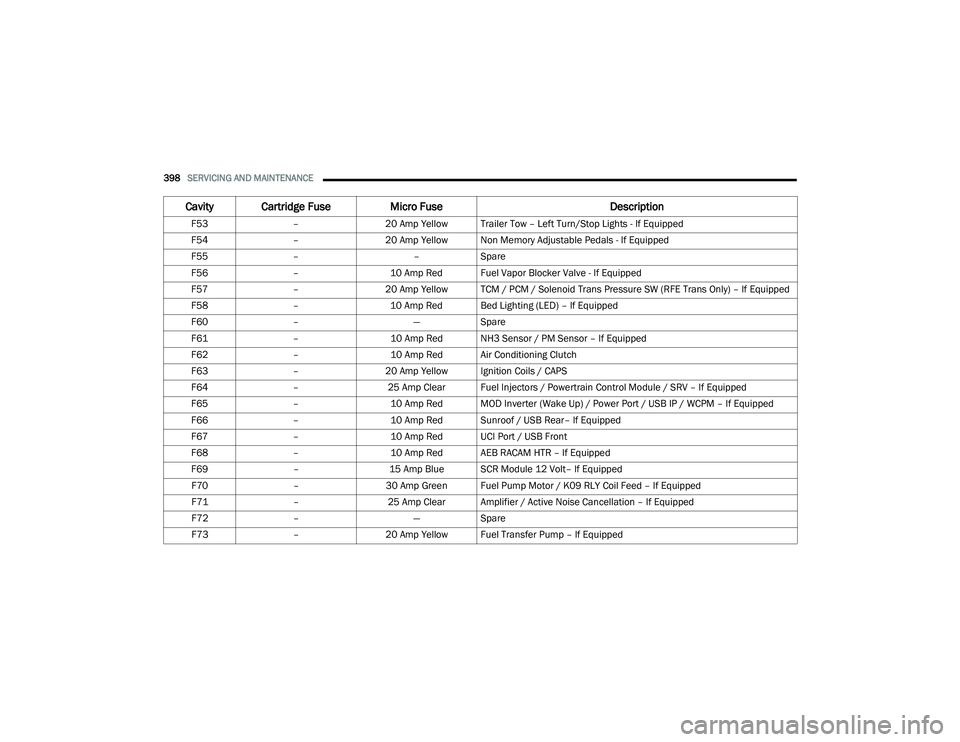
F53–20 Amp Yellow Trailer Tow – Left Turn/Stop Lights - If Equipped
F54 –20 Amp Yellow Non Memory Adjustable Pedals - If Equipped
F55 – –Spare
F56 –10 Amp Red Fuel Vapor Blocker Valve - If Equipped
F57 –20 Amp Yellow TCM / PCM / Solenoid Trans Pressure SW (RFE Trans Only) – If Equipped
F58 –10 Amp Red Bed Lighting (LED) – If Equipped
F60 – —Spare
F61 –10 Amp Red NH3 Sensor / PM Sensor – If Equipped
F62 –10 Amp Red Air Conditioning Clutch
F63 –20 Amp Yellow Ignition Coils / CAPS
F64 –25 Amp Clear Fuel Injectors / Powertrain Control Module / SRV – If Equipped
F65 –10 Amp Red MOD Inverter (Wake Up) / Power Port / USB IP / WCPM – If Equipped
F66 –10 Amp Red Sunroof / USB Rear– If Equipped
F67 –10 Amp Red UCI Port / USB Front
F68 –10 Amp Red AEB RACAM HTR – If Equipped
F69 –15 Amp Blue SCR Module 12 Volt– If Equipped
F70 –30 Amp Green Fuel Pump Motor / K09 RLY Coil Feed – If Equipped
F71 –25 Amp Clear Amplifier / Active Noise Cancellation – If Equipped
F72 – —Spare
F73 –20 Amp Yellow Fuel Transfer Pump – If Equipped
Cavity Cartridge Fuse Micro Fuse Description
21_DPF_OM_EN_USC_t.book Page 398
Page 402 of 463
400SERVICING AND MAINTENANCE
(Continued)
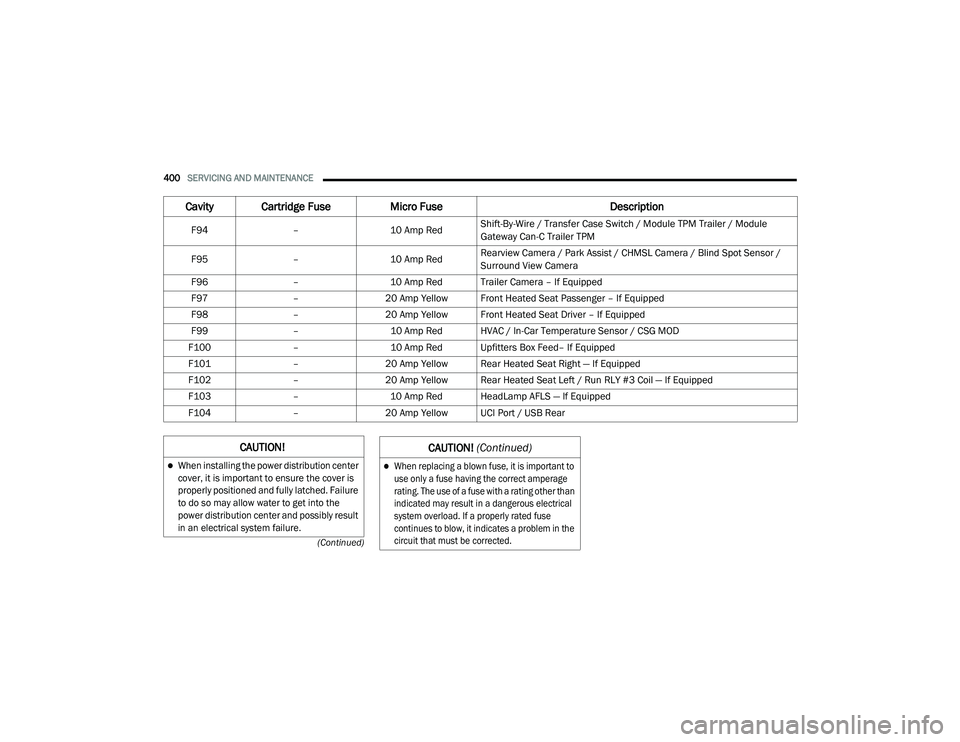
F94 –10 Amp RedShift-By-Wire / Transfer Case Switch / Module TPM Trailer / Module
Gateway Can-C Trailer TPM
F95 –10 Amp RedRearview Camera / Park Assist / CHMSL Camera / Blind Spot Sensor /
Surround View Camera
F96 –10 Amp Red Trailer Camera – If Equipped
F97 –20 Amp Yellow Front Heated Seat Passenger – If Equipped
F98 –20 Amp Yellow Front Heated Seat Driver – If Equipped
F99 –10 Amp Red HVAC / In-Car Temperature Sensor / CSG MOD
F100 –10 Amp Red Upfitters Box Feed– If Equipped
F101 –20 Amp Yellow Rear Heated Seat Right — If Equipped
F102 –20 Amp Yellow Rear Heated Seat Left / Run RLY #3 Coil — If Equipped
F103 –10 Amp Red HeadLamp AFLS — If Equipped
F104 –20 Amp Yellow UCI Port / USB Rear
Cavity Cartridge Fuse Micro Fuse Description
CAUTION!
When installing the power distribution center
cover, it is important to ensure the cover is
properly positioned and fully latched. Failure
to do so may allow water to get into the
power distribution center and possibly result
in an electrical system failure.
When replacing a blown fuse, it is important to
use only a fuse having the correct amperage
rating. The use of a fuse with a rating other than
indicated may result in a dangerous electrical
system overload. If a properly rated fuse
continues to blow, it indicates a problem in the
circuit that must be corrected.
CAUTION! (Continued)
21_DPF_OM_EN_USC_t.book Page 400
Page 460 of 463
458 Rotation
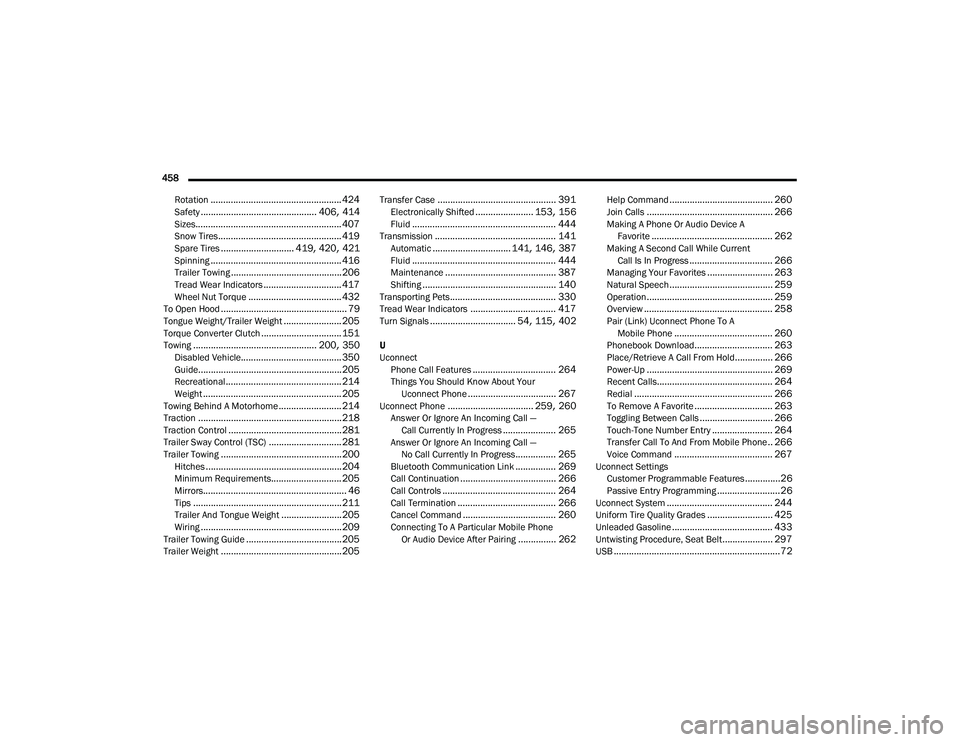
.................................................... 424Safety.............................................. 406, 414Sizes.......................................................... 407Snow Tires................................................. 419Spare Tires............................. 419, 420, 421Spinning.................................................... 416Trailer Towing............................................ 206Tread Wear Indicators............................... 417Wheel Nut Torque..................................... 432To Open Hood.................................................. 79Tongue Weight/Trailer Weight....................... 205Torque Converter Clutch................................ 151Towing................................................. 200, 350Disabled Vehicle........................................ 350Guide......................................................... 205Recreational.............................................. 214Weight....................................................... 205Towing Behind A Motorhome......................... 214Traction......................................................... 218Traction Control............................................. 281Trailer Sway Control (TSC)............................. 281Trailer Towing................................................ 200Hitches...................................................... 204Minimum Requirements............................ 205Mirrors......................................................... 46Tips........................................................... 211Trailer And Tongue Weight........................ 205Wiring........................................................ 209Trailer Towing Guide...................................... 205Trailer Weight................................................ 205
Transfer Case............................................... 391Electronically Shifted....................... 153, 156Fluid......................................................... 444Transmission................................................ 141Automatic............................... 141, 146, 387Fluid......................................................... 444Maintenance............................................ 387Shifting..................................................... 140Transporting Pets.......................................... 330Tread Wear Indicators.................................. 417Turn Signals.................................. 54, 115, 402
U
UconnectPhone Call Features
................................. 264Things You Should Know About Your Uconnect Phone................................... 267Uconnect Phone.................................. 259, 260Answer Or Ignore An Incoming Call — Call Currently In Progress..................... 265Answer Or Ignore An Incoming Call — No Call Currently In Progress................ 265Bluetooth Communication Link................ 269Call Continuation...................................... 266Call Controls............................................. 264Call Termination....................................... 266Cancel Command..................................... 260Connecting To A Particular Mobile Phone Or Audio Device After Pairing............... 262
Help Command......................................... 260Join Calls.................................................. 266Making A Phone Or Audio Device A Favorite................................................ 262Making A Second Call While Current Call Is In Progress................................. 266Managing Your Favorites.......................... 263Natural Speech......................................... 259Operation.................................................. 259Overview................................................... 258Pair (Link) Uconnect Phone To A Mobile Phone....................................... 260Phonebook Download............................... 263Place/Retrieve A Call From Hold............... 266Power-Up.................................................. 269Recent Calls.............................................. 264Redial....................................................... 266To Remove A Favorite............................... 263Toggling Between Calls............................. 266Touch-Tone Number Entry........................ 264Transfer Call To And From Mobile Phone.. 266Voice Command....................................... 267Uconnect SettingsCustomer Programmable Features..............26Passive Entry Programming.........................26Uconnect System.......................................... 244Uniform Tire Quality Grades.......................... 425Unleaded Gasoline........................................ 433Untwisting Procedure, Seat Belt.................... 297USB..................................................................72
21_DPF_OM_EN_USC_t.book Page 458