reset RAM CHASSIS CAB 2022 Owner's Manual
[x] Cancel search | Manufacturer: RAM, Model Year: 2022, Model line: CHASSIS CAB, Model: RAM CHASSIS CAB 2022Pages: 428, PDF Size: 20.18 MB
Page 149 of 428

STARTING AND OPERATING147
When ACC Is Active
When you use the SET (-) button to decelerate, if
the engine’s braking power does not slow the
vehicle sufficiently to reach the set speed, the
brake system will automatically slow the
vehicle.
The ACC system applies the brake down to a full
stop when following the vehicle in front. If your
vehicle follows the vehicle in front to a standstill,
your vehicle will release the brakes two seconds
after coming to a full stop.
The ACC system maintains set speed when
driving uphill and downhill. However, a slight
speed change on moderate hills is normal. In
addition, downshifting may occur while climbing
uphill or descending downhill. This is normal
operation and necessary to maintain set speed.
When driving uphill and downhill, the ACC
system will cancel if the braking temperature
exceeds normal range (overheated).
Setting The Following Distance In ACC
The specified following distance for Adaptive
Cruise Control (ACC) can be set by varying the
distance setting between four bars (longest), three
bars (long), two bars (medium) and one bar (short).
Using this distance setting and the vehicle speed,
ACC calculates and sets the distance to the vehicle
ahead. This distance setting displays in the
instrument cluster display.
Distance Settings
To adjust the distance setting, push the Distance
Button and release. Each time the button is
pushed, the distance setting increases by one bar
(longer). When the farthest distance is set, pushing
the distance button again will reset to the shortest
distance.
If there is no vehicle ahead, the vehicle will
maintain the set speed. If a slower moving vehicle
is detected in the same lane, the instrument
cluster displays the ACC Set With Target Detected
Indicator Light, and the system adjusts vehicle
speed automatically to maintain the distance
setting, regardless of the set speed. The vehicle will then maintain the set distance
until:
The vehicle ahead accelerates to a speed above
the set speed.
The vehicle ahead moves out of your lane or
view of the sensor.
The distance setting is changed.
The system disengages.
The maximum braking applied by ACC is limited;
however, the driver can always apply the brakes
manually, if necessary.
NOTE:The brake lights will illuminate whenever the ACC
system applies the brakes.
A Proximity Warning will alert the driver if ACC
predicts that its maximum braking level is not
sufficient to maintain the set distance. If this
occurs, a visual alert “BRAKE!” will flash in the
instrument cluster display and a chime will sound
while ACC continues to apply its maximum braking
force.
NOTE:The “BRAKE!” screen in the instrument cluster
display is a warning for the driver to take action
and does not necessarily mean that the Forward
Collision Warning system is applying the brakes
autonomously.
1 — Longest Distance Setting (Four Bars)
2 — Medium Distance Setting (Two Bars)
3 — Long Distance Setting (Three Bars)
4 — Short Distance Setting (One Bar)
4
22_DPF_OM_EN_USC_t.book Page 147
Page 186 of 428

184STARTING AND OPERATING
The loaded vehicle weight, including the snowplow
system, all aftermarket accessories, driver,
passengers, options, and cargo, must not exceed
either the Gross Vehicle Weight Rating (GVWR) or
Gross Axle Weight Rating (GAWR). These weights
are specified on the Safety Compliance
Certification Label on the driver's side door
opening.
NOTE:Detach the snowplow when transporting
passengers.
Vehicle front end wheel alignment was set to
specifications at the factory without consideration
for the weight of the plow. Front end toe-in should
be checked and reset if necessary at the beginning
and end of the snowplow season. This will help
prevent uneven tire wear.
The blade should be lowered whenever the vehicle
is parked.
Maintain and operate your vehicle and snowplow
equipment following the recommendations
provided by the specific snowplow manufacturer.
OVER THE ROAD OPERATION WITH
S
NOWPLOW ATTACHED
The blade restricts air flow to the radiator and
causes the engine to operate at higher than
normal temperatures. Therefore, when
transporting the plow, angle the blade completely
and position it as low as road or surface conditions
permit. Do not exceed 40 mph (64 km/h). The
operator should always maintain a safe stopping
distance and allow adequate passing clearance.
OPERATING TIPS
Under ideal snow plowing conditions, 20 mph
(32 km/h) should be maximum operating speed.
The operator should be familiar with the area and
surface to be cleaned. Reduce speed and use
extreme caution when plowing unfamiliar areas or
under poor visibility.
GENERAL MAINTENANCE
Snowplows should be maintained in accordance
with the plow manufacturer's instructions.
Keep all snowplow electrical connections and
battery terminals clean and free of corrosion.
When plowing snow, to avoid transmission and
drivetrain damage, the following precautions
should be observed.
Operate with transfer case in 4WD LOW when
plowing small or congested areas where speeds
are not likely to exceed 15 mph (24 km/h). At
higher speeds operate in 4WD HIGH.
Vehicles with automatic transmissions should
use 4WD LOW when plowing deep or heavy
snow for extended periods of time to avoid
transmission overheating.
Do not shift the transmission unless the engine
has returned to idle and wheels have stopped.
Make a practice of stepping on the brake pedal
while shifting the transmission.
22_DPF_OM_EN_USC_t.book Page 184
Page 193 of 428
MULTIMEDIA191
UCONNECT SETTINGS
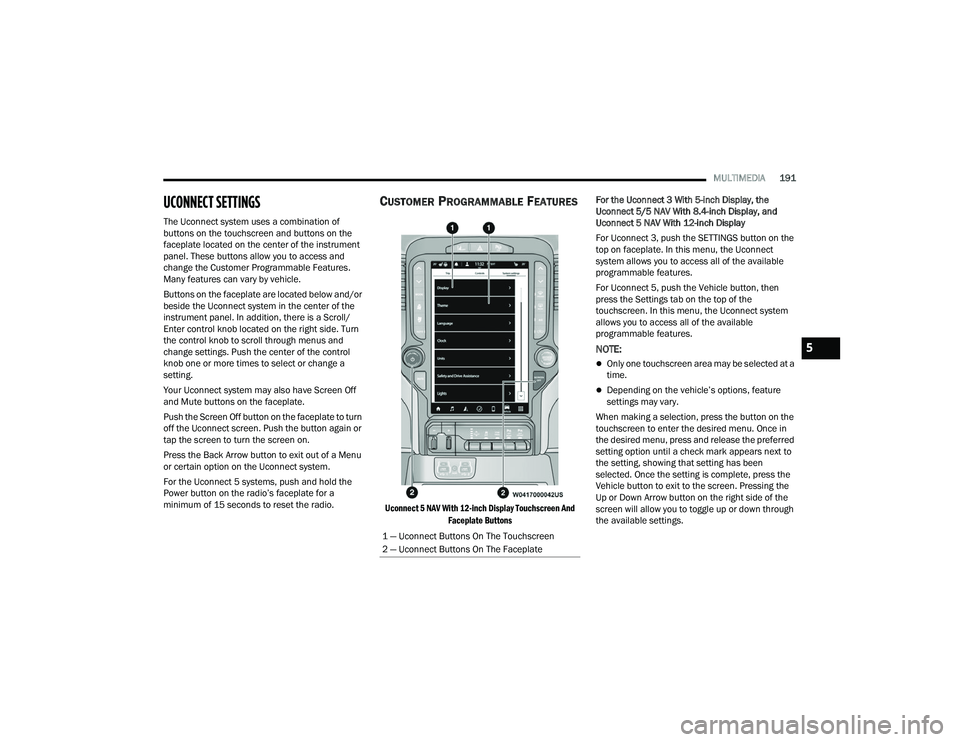
The Uconnect system uses a combination of
buttons on the touchscreen and buttons on the
faceplate located on the center of the instrument
panel. These buttons allow you to access and
change the Customer Programmable Features.
Many features can vary by vehicle.
Buttons on the faceplate are located below and/or
beside the Uconnect system in the center of the
instrument panel. In addition, there is a Scroll/
Enter control knob located on the right side. Turn
the control knob to scroll through menus and
change settings. Push the center of the control
knob one or more times to select or change a
setting.
Your Uconnect system may also have Screen Off
and Mute buttons on the faceplate.
Push the Screen Off button on the faceplate to turn
off the Uconnect screen. Push the button again or
tap the screen to turn the screen on.
Press the Back Arrow button to exit out of a Menu
or certain option on the Uconnect system.
For the Uconnect 5 systems, push and hold the
Power button on the radio’s faceplate for a
minimum of 15 seconds to reset the radio.
CUSTOMER PROGRAMMABLE FEATURES
Uconnect 5 NAV With 12-inch Display Touchscreen And
Faceplate Buttons
For the Uconnect 3 With 5-inch Display, the
Uconnect 5/5 NAV With 8.4-inch Display, and
Uconnect 5 NAV With 12-inch Display
For Uconnect 3, push the SETTINGS button on the
top on faceplate. In this menu, the Uconnect
system allows you to access all of the available
programmable features.
For Uconnect 5, push the Vehicle button, then
press the Settings tab on the top of the
touchscreen. In this menu, the Uconnect system
allows you to access all of the available
programmable features.
NOTE:
Only one touchscreen area may be selected at a
time.
Depending on the vehicle’s options, feature
settings may vary.
When making a selection, press the button on the
touchscreen to enter the desired menu. Once in
the desired menu, press and release the preferred
setting option until a check mark appears next to
the setting, showing that setting has been
selected. Once the setting is complete, press the
Vehicle button to exit to the screen. Pressing the
Up or Down Arrow button on the right side of the
screen will allow you to toggle up or down through
the available settings.
1 — Uconnect Buttons On The Touchscreen
2 — Uconnect Buttons On The Faceplate
5
22_DPF_OM_EN_USC_t.book Page 191
Page 196 of 428
194MULTIMEDIA
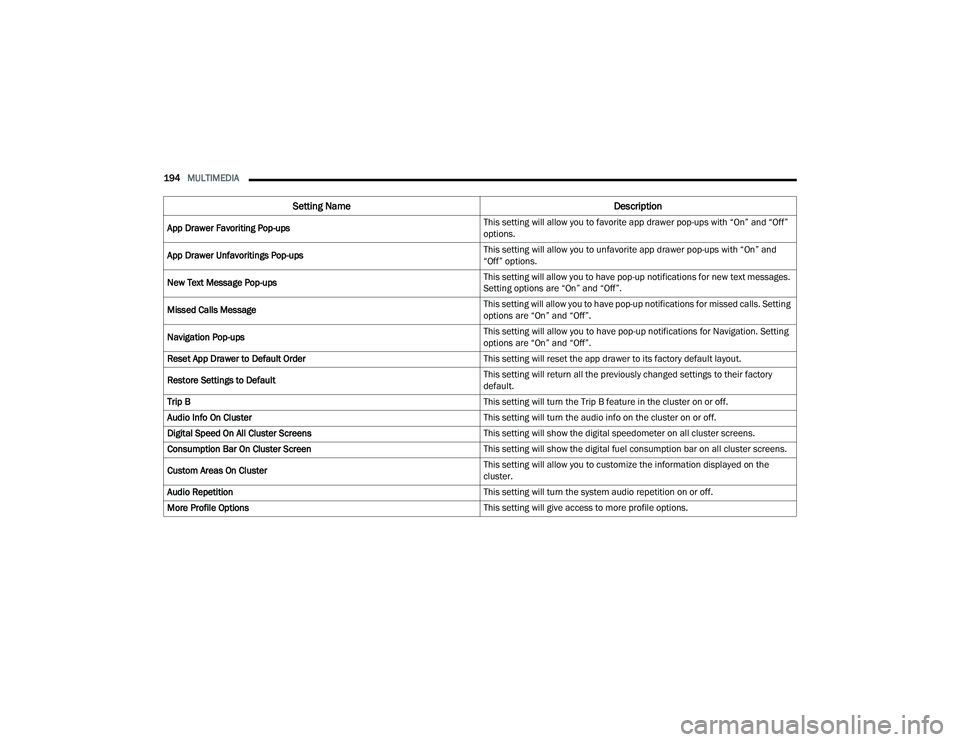
App Drawer Favoriting Pop-ups This setting will allow you to favorite app drawer pop-ups with “On” and “Off”
options.
App Drawer Unfavoritings Pop-ups This setting will allow you to unfavorite app drawer pop-ups with “On” and
“Off” options.
New Text Message Pop-ups This setting will allow you to have pop-up notifications for new text messages.
Setting options are “On” and “Off”.
Missed Calls Message This setting will allow you to have pop-up notifications for missed calls. Setting
options are “On” and “Off”.
Navigation Pop-ups This setting will allow you to have pop-up notifications for Navigation. Setting
options are “On” and “Off”.
Reset App Drawer to Default Order This setting will reset the app drawer to its factory default layout.
Restore Settings to Default This setting will return all the previously changed settings to their factory
default.
Trip B This setting will turn the Trip B feature in the cluster on or off.
Audio Info On Cluster This setting will turn the audio info on the cluster on or off.
Digital Speed On All Cluster Screens This setting will show the digital speedometer on all cluster screens.
Consumption Bar On Cluster Screen This setting will show the digital fuel consumption bar on all cluster screens.
Custom Areas On Cluster This setting will allow you to customize the information displayed on the
cluster.
Audio Repetition This setting will turn the system audio repetition on or off.
More Profile Options This setting will give access to more profile options.
Setting NameDescription
22_DPF_OM_EN_USC_t.book Page 194
Page 207 of 428
MULTIMEDIA205
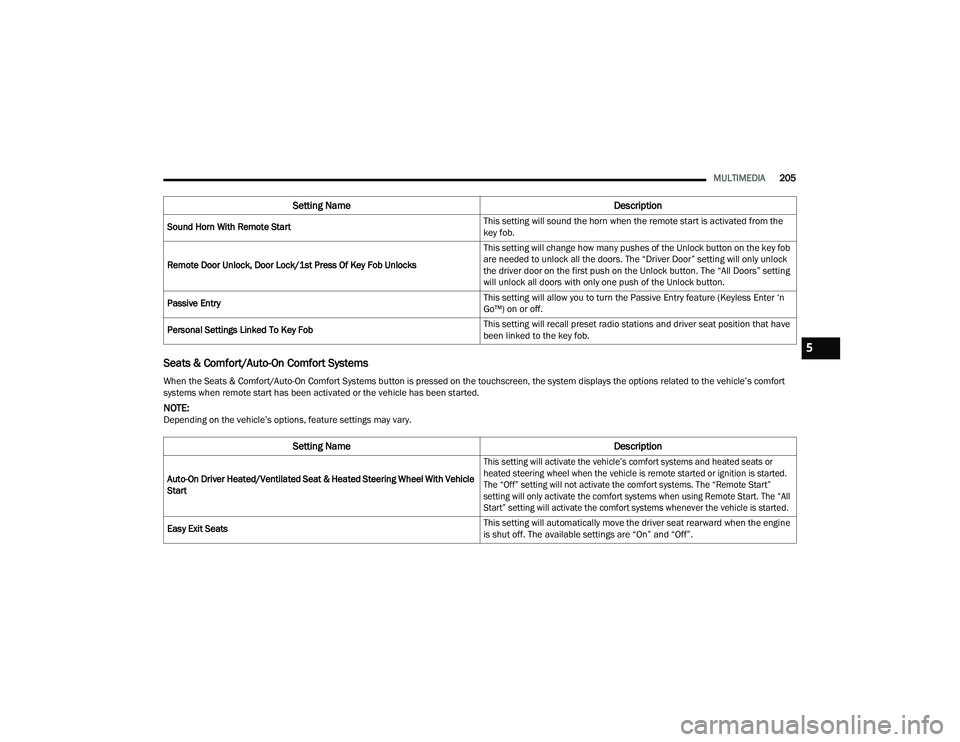
Seats & Comfort/Auto-On Comfort Systems
Sound Horn With Remote Start This setting will sound the horn when the remote start is activated from the
key fob.
Remote Door Unlock, Door Lock/1st Press Of Key Fob Unlocks This setting will change how many pushes of the Unlock button on the key fob
are needed to unlock all the doors. The “Driver Door” setting will only unlock
the driver door on the first push on the Unlock button. The “All Doors” setting
will unlock all doors with only one push of the Unlock button.
Passive Entry This setting will allow you to turn the Passive Entry feature (Keyless Enter ‘n
Go™) on or off.
Personal Settings Linked To Key Fob This setting will recall preset radio stations and driver seat position that have
been linked to the key fob.
When the Seats & Comfort/Auto-On Comfort Systems button is pressed on the touchscreen, the system displays the options related to the vehicle’s comfort
systems when remote start has been activated or the vehicle has been started.
NOTE:Depending on the vehicle’s options, feature settings may vary.
Setting Name Description
Auto-On Driver Heated/Ventilated Seat & Heated Steering Wheel With Vehicle
Start
This setting will activate the vehicle’s comfort systems and heated seats or
heated steering wheel when the vehicle is remote started or ignition is started.
The “Off” setting will not activate the comfort systems. The “Remote Start”
setting will only activate the comfort systems when using Remote Start. The “All
Start” setting will activate the comfort systems whenever the vehicle is started.
Easy Exit Seats This setting will automatically move the driver seat rearward when the engine
is shut off. The available settings are “On” and “Off”.
Setting Name
Description
5
22_DPF_OM_EN_USC_t.book Page 205
Page 211 of 428
MULTIMEDIA209
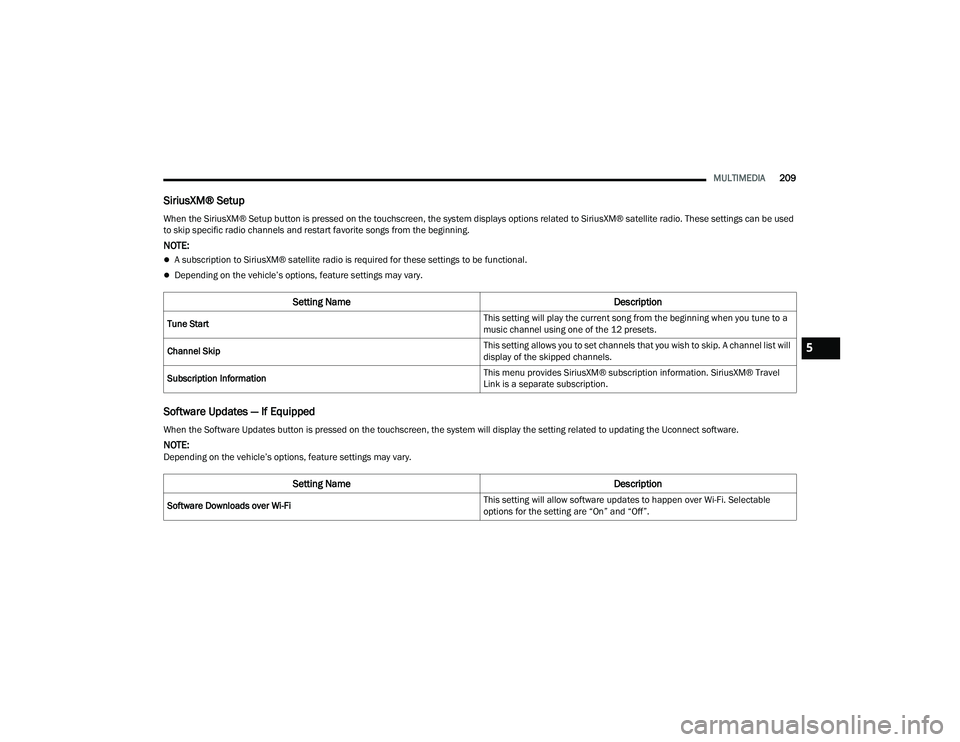
SiriusXM® Setup
Software Updates — If Equipped
When the SiriusXM® Setup button is pressed on the touchscreen, the system displays options related to SiriusXM® satellite radio. These settings can be used
to skip specific radio channels and restart favorite songs from the beginning.
NOTE:
A subscription to SiriusXM® satellite radio is required for these settings to be functional.
Depending on the vehicle’s options, feature settings may vary.
Setting Name Description
Tune Start This setting will play the current song from the beginning when you tune to a
music channel using one of the 12 presets.
Channel Skip This setting allows you to set channels that you wish to skip. A channel list will
display of the skipped channels.
Subscription Information This menu provides SiriusXM® subscription information. SiriusXM® Travel
Link is a separate subscription.
When the Software Updates button is pressed on the touchscreen, the system will display the setting related to updating the Uconnect software.
NOTE:Depending on the vehicle’s options, feature settings may vary.
Setting Name
Description
Software Downloads over Wi-Fi This setting will allow software updates to happen over Wi-Fi. Selectable
options for the setting are “On” and “Off”.
5
22_DPF_OM_EN_USC_t.book Page 209
Page 212 of 428
210MULTIMEDIA
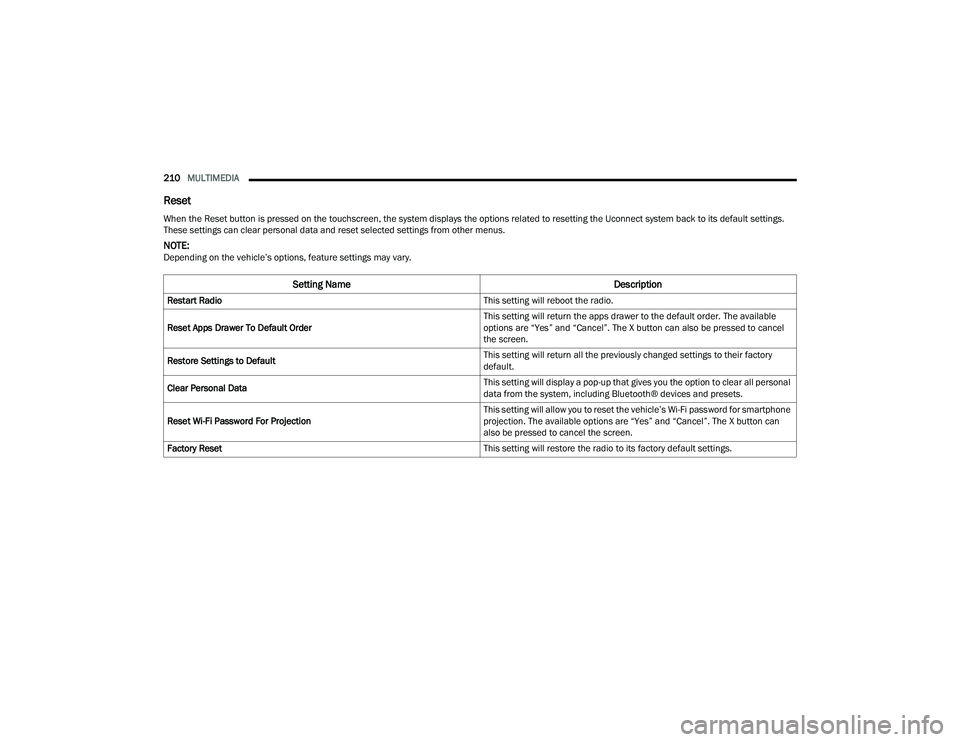
Reset
When the Reset button is pressed on the touchscreen, the system displays the options related to resetting the Uconnect system back to its default settings.
These settings can clear personal data and reset selected settings from other menus.
NOTE:Depending on the vehicle’s options, feature settings may vary.
Setting Name Description
Restart Radio This setting will reboot the radio.
Reset Apps Drawer To Default Order This setting will return the apps drawer to the default order. The available
options are “Yes” and “Cancel”. The X button can also be pressed to cancel
the screen.
Restore Settings to Default This setting will return all the previously changed settings to their factory
default.
Clear Personal Data This setting will display a pop-up that gives you the option to clear all personal
data from the system, including Bluetooth® devices and presets.
Reset Wi-Fi Password For Projection This setting will allow you to reset the vehicle’s Wi-Fi password for smartphone
projection. The available options are “Yes” and “Cancel”. The X button can
also be pressed to cancel the screen.
Factory Reset This setting will restore the radio to its factory default settings.
22_DPF_OM_EN_USC_t.book Page 210
Page 214 of 428

212MULTIMEDIA
NOTE:Uconnect screen images are for illustration purposes only and may not reflect exact software for your vehicle.
Feature Description
Radio/Media
Press/Push the Radio button or Media button to enter Radio Mode/Media
Mode and access the radio functions and external audio sources
Ú
page 213.
Phone Press/Push the Phone button to enter Phone Mode and access the
hands-free phone system Ú
page 223.
Settings Press/Push the Settings button to access the Uconnect Settings Ú page 191.
Push the ENTER/BROWSE button on the faceplate to accept a highlighted
selection on the screen. Rotate the TUNE/SCROLL rotary knob to scroll
through a list or tune a radio station.
Push the SCREEN OFF button on the faceplate to turn the screen on or off.
Push the MUTE button on the faceplate to turn the audio of the radio system
off. Push it again to turn the audio back on.
Rotate the rotary knob to adjust the volume. Push the VOLUME & On/Off
button on the faceplate to turn the system on or off.
NOTE:Push and hold the VOLUME & On/Off button for approximately 10 seconds to
reset the radio manually. Doing this can also recover the radio screen from
freezing or being stuck.
Compass Push the COMPASS button to access the vehicle’s compass.
More Push the MORE button to access additional options.
22_DPF_OM_EN_USC_t.book Page 212
Page 216 of 428
214MULTIMEDIA
The right-hand control is a rocker-type switch with
a push button in the center and controls the
volume and mode of the sound system. Pushing
the top of the rocker switch will increase the
volume, and pushing the bottom of the rocker
switch will decrease the volume.
Pushing the center button will make the radio
switch between the various modes available
(AM/FM/SXM or Media, etc.).
The left-hand control is a rocker-type switch with a
push button in the center. The function of the
left-hand control is different depending on which
mode you are in.
The following describes the left-hand control
operation in each mode:
Radio Operation
Pushing the top of the switch will Seek Up for the
next available station and pushing the bottom of
the switch will Seek Down for the next available
station.
The button located in the center of the left-hand
control will tune to the next preset station that you
have programmed in the radio presets.
Media Mode
Pushing the top of the switch skips to the next
track on the selected media (AUX/USB/
Bluetooth®). Pushing the switch up twice will go
forward two tracks. Pushing the bottom switch goes to the beginning of the current track, or the
beginning of the previous track if it is within eight
seconds after the current track begins to play.
Double pressing the bottom button switch will skip
to the previous track if it is after eight seconds into
the current track.
RADIO MODE
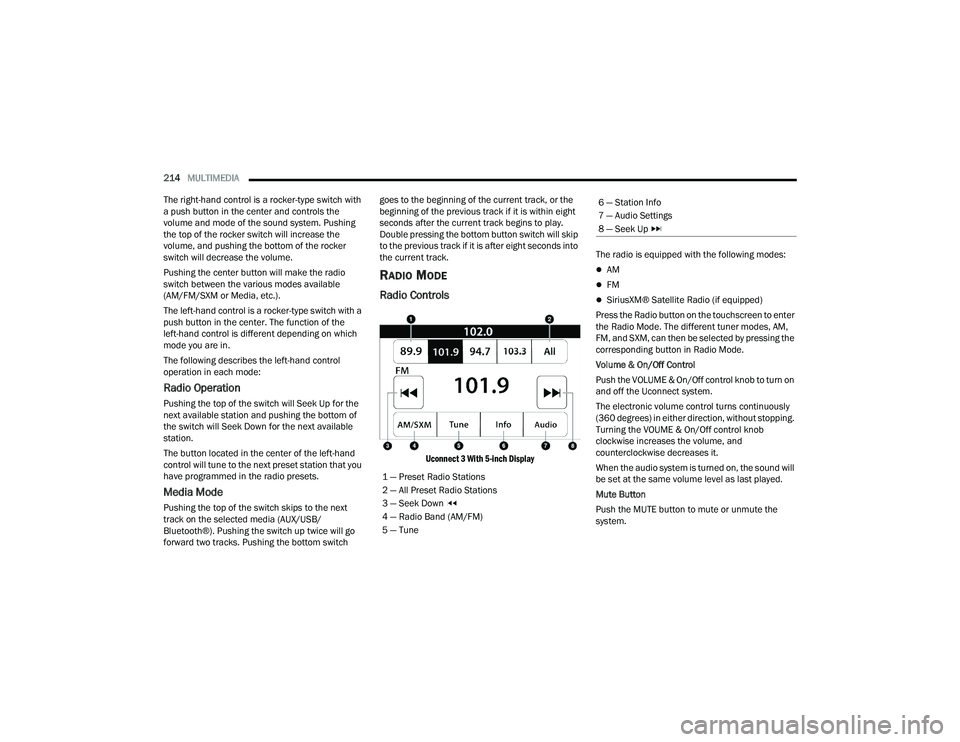
Radio Controls
Uconnect 3 With 5-inch Display
The radio is equipped with the following modes:
AM
FM
SiriusXM® Satellite Radio (if equipped)
Press the Radio button on the touchscreen to enter
the Radio Mode. The different tuner modes, AM,
FM, and SXM, can then be selected by pressing the
corresponding button in Radio Mode.
Volume & On/Off Control
Push the VOLUME & On/Off control knob to turn on
and off the Uconnect system.
The electronic volume control turns continuously
(360 degrees) in either direction, without stopping.
Turning the VOUME & On/Off control knob
clockwise increases the volume, and
counterclockwise decreases it.
When the audio system is turned on, the sound will
be set at the same volume level as last played.
Mute Button
Push the MUTE button to mute or unmute the
system.
1 — Preset Radio Stations
2 — All Preset Radio Stations
3 — Seek Down
4 — Radio Band (AM/FM)
5 — Tune
6 — Station Info
7 — Audio Settings
8 — Seek Up
22_DPF_OM_EN_USC_t.book Page 214
Page 218 of 428
216MULTIMEDIA
SiriusXM® Satellite Radio uses direct
satellite-to-receiver broadcasting technology to
provide clear, coast-to-coast radio content.
SiriusXM® is a subscription-based service.
Visit siriusxm.com/getallaccess or review your
SiriusXM® Radio pamphlet in your Owner’s
Manual kit for more information.
SiriusXM® services require subscriptions, sold
separately after the trial included with the new
vehicle purchase. If you decide to continue your
service at the end of your trial subscription, the
plan you choose will automatically renew and bill at
then-current rates until you call SiriusXM® at
866-635-2349 to cancel. See SiriusXM®
Customer Agreement for complete terms at
www.siriusxm.com (US) or www.siriusxm.ca
(Canada).
All fees and programming subject to change.
SiriusXM® satellite service is available only to
those at least 18 and older in the 48 contiguous
US and D.C. Our SiriusXM® satellite service is also
available in Canada and Puerto Rico (with
coverage limitations). SiriusXM® Internet radio
service is available throughout their satellite
service area and in AK. © 2021 SiriusXM® Radio
Inc. SiriusXM® and all related marks and logos are
trademarks of SiriusXM® Radio Inc. This functionality is only available for radios
equipped with a Satellite receiver. In order to
receive satellite radio, the vehicle needs to be
outside with a clear view to the sky.
If the screen shows “Acquiring Signal”, you might
have to change the vehicle’s position in order to
receive a signal. In most cases, the satellite radio
does not receive a signal in underground parking
garages or tunnels.
No Subscription
Radios equipped with a Satellite receiver require a
subscription to the SiriusXM® Service. When the
radio does not have the necessary subscription,
the radio is able to receive the Preview channel
only.
Acquiring SiriusXM® Subscription
To activate the SiriusXM® Satellite Radio
subscription, US residents visit http://
www.siriusxm.com/getallaccess or call:
1-800-643-2112
Canadian residents visit https://www.siriusxm.ca/
or call: 1-888-539-7474.
NOTE:You will need to provide the SiriusXM® ID (RID)
located at the bottom of the Channel 0 screen.
The Satellite Mode is activated by a press of the
SXM button on the touchscreen.
When in Satellite Mode:
The SXM button on the touchscreen is high -
lighted.
The SiriusXM® Presets are displayed at the top
of the screen.
The SiriusXM® Channel Number is displayed in
the center.
The Program Information is displayed at the
bottom of the Channel Number.
The SiriusXM® function buttons are displayed
below the Program Information.
Tuning is done by operating the Tune Knob or by
Direct Tune, similar to other Radio Bands.
In addition to the tuning operation functions
common to all radio modes, the Replay, Traffic/
Weather button, and Favorite button functions are
available in SiriusXM® Mode.
22_DPF_OM_EN_USC_t.book Page 216